Relax-and-Recover (ReaR in short) is a simple yet powerful, easy-to-setup, full-featured and leading open-source bare metal disaster recovery and system migration solution, written in Bash. It is a modular and configurable framework with numerous ready-to-use workflows for common situations.
ReaR creates a bootable rescue system and/or system backup in various formats. You can boot your bare metal server using the rescue system image and initiate a system restore from the backup. It can restore to different hardware where necessary, hence it can also be employed as a system migration tool.
Relax-and-Recover Key Features:
- It has a modular design written in Bash and can be extended using custom functionality.
- Supports various boot media including ISO, PXE, OBDR tape, USB or eSATA storage.
- Supports a variety of network protocols including FTP, SFTP, HTTP, NFS, and CIFS for storage and backup.
- Supports disk layout implementation such as LVM, DRBD, iSCSI, HWRAID (HP SmartArray), SWRAID, multipathing, and LUKS (encrypted partitions and filesystems).
- Supports both third-party and internal backup tools including IBM TSM, HP DataProtector, Symantec NetBackup, Bacula; tar and rsync.
- Supports booting via PXE, DVD/CD, bootable tape or virtual provisioning.
- Supports a simulation model that shows what scripts are run without executing them.
- Supports consistent logging and advanced debugging options for troubleshooting purposes.
- It can be integrated with monitoring tools such as Nagios and Opsview.
- It can also be integrated with job schedulers such as cron.
- It also supports various virtualization technologies supported (KVM, Xen, VMware).
In this article, you will learn how to install and configure ReaR to create a rescue system and/or system backup using a USB stick and rescue or restore a bare-metal Linux system after a disaster.
Step 1: Installing ReaR in Linux Bare Metal Server
1. To install the rear package on Debian and Ubuntu Linux distributions, use the following command.
$ sudo apt-get install rear extlinux
On RHEL and CentOS, you need to enable the EPEL 8 repository, then install the rear package as shown.
# yum install rear syslinux-extlinux grub2-efi-x64-modules
# dnf install rear syslinux-extlinux	#Fedora 22+
2. Once the installation is complete, rear’s main configuration directory is /etc/rear/ and the key configuration files are:
- /etc/rear/local.conf – used to set system-specific configuration; it’s intended for manual configuration.
- /etc/rear/site.conf – used to set site-specific configuration, should be created by the user.
- /usr/share/rear/conf/default.conf – contains possible/default configuration values.
- /var/log/rear/ – this directory stores the log files.
3. First, prepare the rescue media, a USB stick in this case by formatting using the rear command-line utility as follows. Once the formatting is complete, the media will be labeled as REAR-000.
# rear format /dev/sdb

4. To configure the output format, use the OUTPUT and OUTPUT_URL variables, enter it in the /etc/rear/local.conf configuration file.
OUTPUT=USB
4. Also, ReaR comes with a built-in backup method (called NETFS) which allows you to create both a rescue system and a full-system backup. It creates a simple backup as a tar archive by default.
To enable a full-system backup, add the BACKUP=NETFS and BACKUP_URL variables in the /etc/rear/local.conf configuration file. To create a bootable USB device, combine OUTPUT=USB and BACKUP_URL=”usb:///dev/disk/by-label/REAR-000” as shown.
OUTPUT=USB
BACKUP=NETFS
BACKUP_URL=”usb:///dev/disk/by-label/REAR-000”
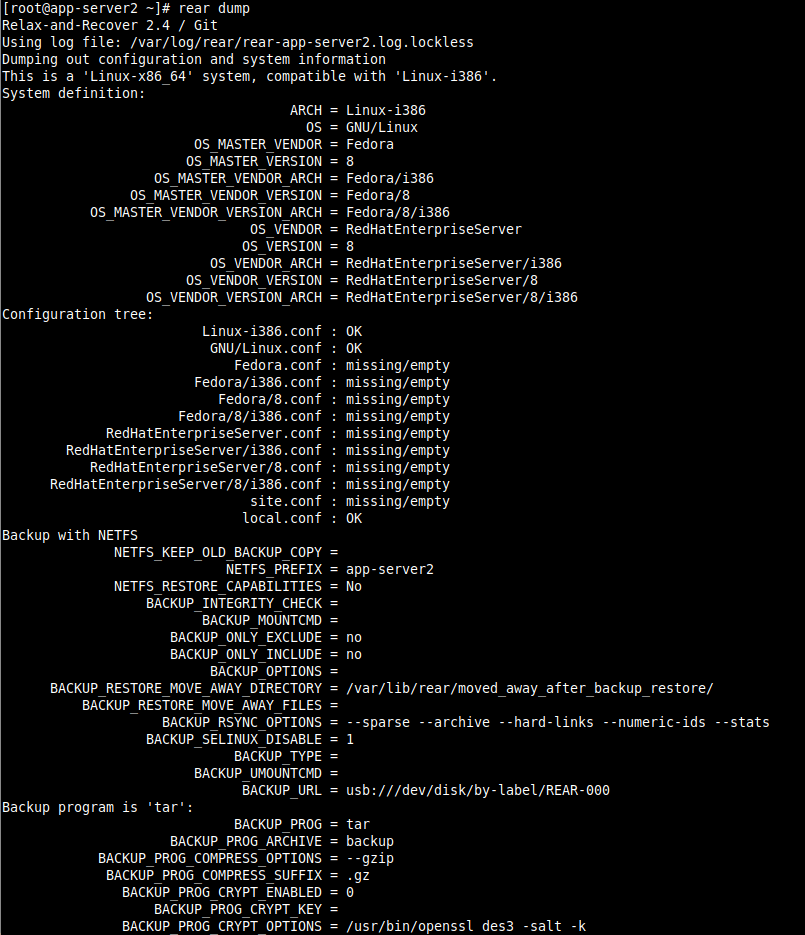
5. After configuring the rear, run the following command to print out its current configuration for BACKUP and OUTPUT methods and some system information.
# rear dump
Step 2: Creating a Rescue System and a Full-System Backup
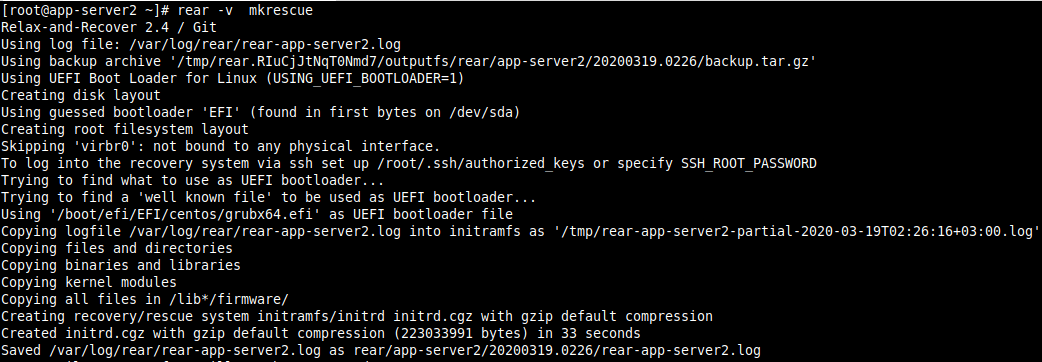
6. If all the settings are fine, you can create a rescue system using the mkrecue command as follows, where the -v option enables verbose mode.
# rear -v mkrescue
Note: If you encounter the following error after running a rescue or backup operation, as shown in this screenshot.
UEFI systems: “ERROR: /dev/disk/by-label/REAR-EFI is not block device. Use `rear format -- --efi ' for correct format”

Format the USB stick using this command and redo the operation.
# rear format -- --efi /dev/sdb

7. To create a rescue system and backup the system as well, use the mkbackup command as shown.
# rear -v mkbackup
8. To create a full-system backup only, use the mkbackuponly command as follows.
# rear -v mkbackuponly
Optional: Scheduling Rear Operations Using Cron
8. You can schedule ReaR to regularly create a rescue system using the cron job scheduler by adding the appropriate entry in the /etc/crontab file.
minute hour day_of_month month day_of_week root /usr/sbin/rear mkrescue
The following configurations will create a rescue system or take a full-system backup every midnight. Ensure that your USB stick is attached to it.
0 		0   		*  		* 		root /usr/sbin/rear mkrescue
OR
0 		0   		*  		* 		root /usr/sbin/rear mkbackup
Step 3: Performing a System Rescue/Restoration
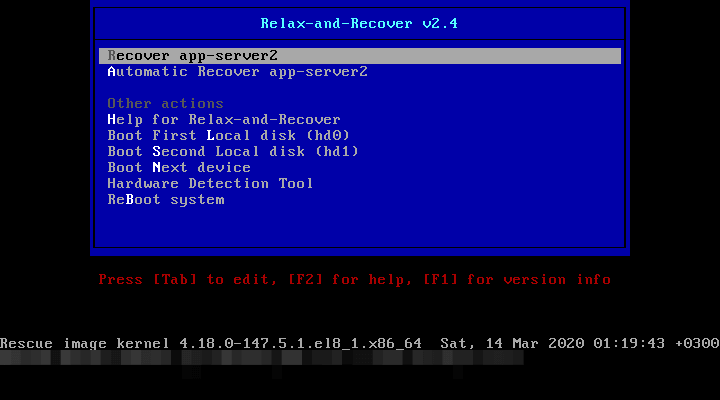
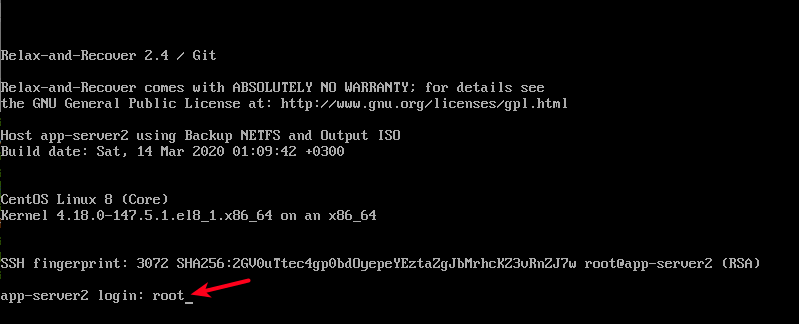
9. To restore/recover your system after a disaster, connect the bootable USB stick to your bare metal system and boot from it. In the console interface, select option one (Recover hostname) and click Enter.
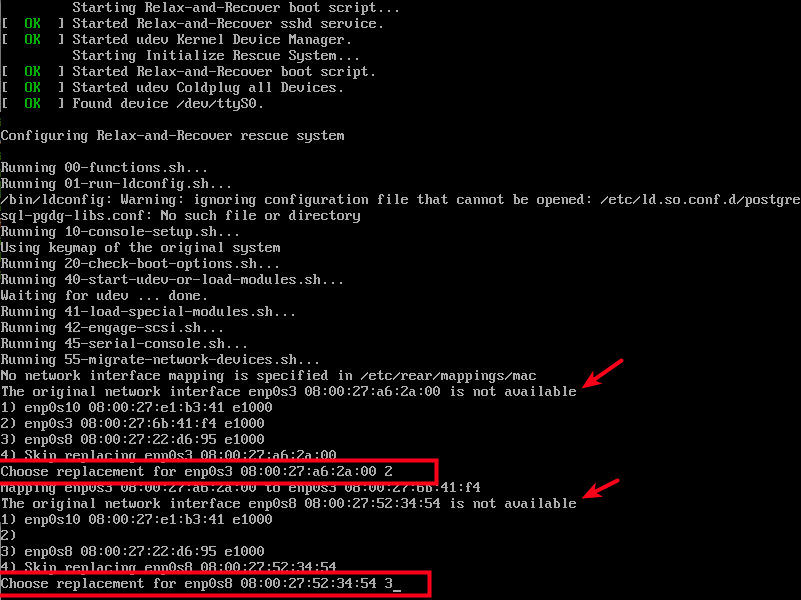
10. Next, the ReaR rescue system will be configured, you may be prompted to provide replacements for the original network interfaces as shown in the screenshot. Once you are done, click Enter.
11. Then login as root (just type username root and click Enter) to run the actual recovery.
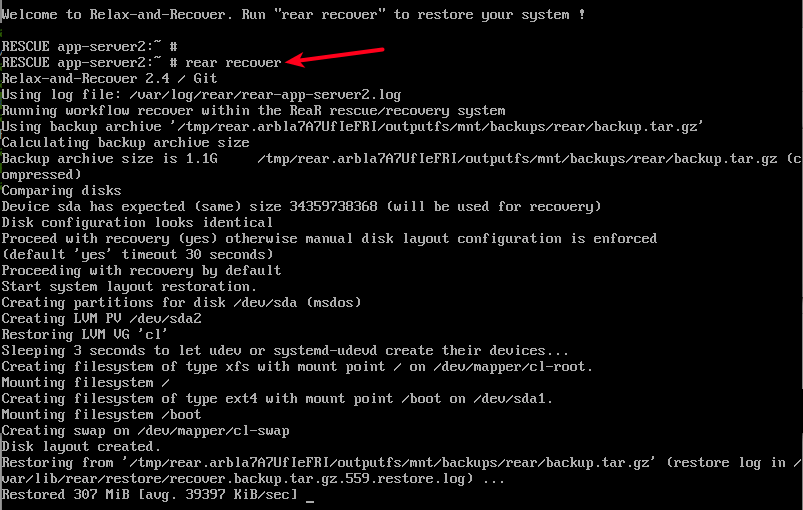
11. Next, run the following command to launch the recovery process. The rescue system will compare the disks, examine their configurations and prompt you to choose disk layout configuration. Press Enter to proceed with auto disk configuration.
Then it will start the system layout restoration, once the disk layout is created, it will restore the backup as shown in the following screenshot.
# rear recover
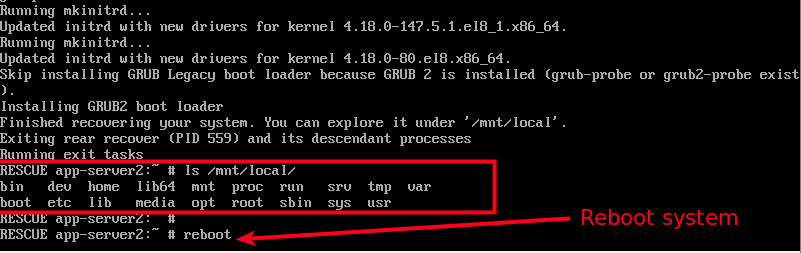
12. When the backup restoration is complete, the rescue system will run mkinitrd to create initial ramdisk images for preloading modules, then install the boot loader and exits. One the system recovery is done, the restored system will be mounted under /mnt/local/, move into this directory to examine it.
Finally, reboot the system:
# cd /mnt/local
# rebooot
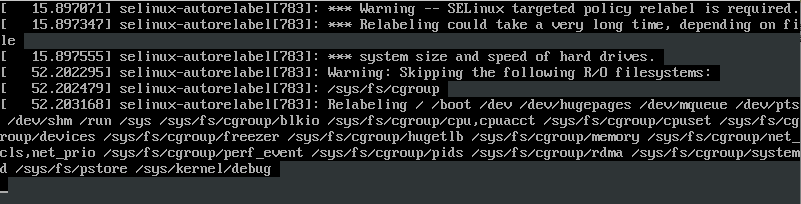
13. After a reboot, the SELinux will try to relabel files and file systems on the recovered system based on /mnt/local/.autorelabel file, as shown in the following screenshot.
For more usage options, read the ReaR manual page.
# man rear
ReaR Homepage: http://relax-and-recover.org/.
The ReaR is the leading, easy-to-use (setup-and-forget) and open source bare metal disaster recovery and system migration framework. In this article, we explained how to use ReaR to create a Linux bare metal rescue system and backup and how to restore a system after a disaster. Use the comment form below share your thoughts with us.
Dear Group:
The instructions for making a rescue system, rescue disk, on a USB Thumb Drive are clear. Can you make a combined rescue system and backup on a single USB External Hard Drive?
The instructions suggest you can but seem oriented towards using a Thumb Drive. If this is possible with a USB External Hard Drive, please advise me on the correction configuration. Also, if this is possible, you should be able to boot from USB External Hard Drive. Is this true?
Best Regards,
Paul Romero
[root@localhost ~]# rear -v mkbackupRelax-and-Recover 2.4 / GitUsing log file: /var/log/rear/rear-localhost.log
ERROR: Invalid scheme '”usb' in BACKUP_URL '”usb:///dev/disk/by-label/REAR-000”' valid schemes: nfs cifs usb tape file iso sshfs ftpfs
Aborting due to an error, check /var/log/rear/rear-localhost.log for details
Exiting rear mkbackup (PID 11969) and its descendant processes
Running exit tasks
Terminated
I have followed your steps and configuration but getting the above error
Remove the inverted quotes around usb:///dev/disk/by-label/REAR-000. Instead, it should read:
I have tried on two computers to download Rear, but the given command here throwing an error:
Says cannot find rear. help
@William,
May I know what Linux version you are trying on?
You can try this command:
Hi all,
I know it’s been a year or so but looking for a link to ask a question points to this method. I run a Linux Mint 20.1 system and I am struggling to be rear working to make a bootable recovery USB drive to be used for recovery including bare metal.
I’ve followed the above suggestions seeming to the letter and my mkbackup or even mkrescue seems to run without error. But the resulting USB is not bootable.
The readme file contained on it reads “Copy iso file to a CD/DVD to boot“. Well, that’s not what I want to do. I’d like to have it contained on the USB. Does anyone have any suggestions or recommendations as to what I might look for in the logs, etc to get this to work?
Any help greatly appreciated – Thanks
Hi Guys,
I’m hoping that one of you guys may have a solution for me. I used ReaR to create a backup of my CentOS7 system. Tested regularly… no probs. My system, a laptop, was stolen now, and I just have this backup. When I use it on any other computer, I either don’t see it or when I do and select it as my boot option in BIOS, it says no bootable disk found.
I have tried this in both UEFI and legacy BIOS. I have used other recovery tools like Testdisk and Photorec to recover files from this disk, but, unrecognizable formats. My backup was made with the USB option. Any help and advice will be appreciated. Am running into dead ends on the internet. I have tried the recovery on assorted computers, that have Windows on, Mint, Arch, etc..no luck.
I know, it doesn’t matter the OS, as it should boot from recovery USB. But, I have tried to see if any different, in a GRUB setup, or BCDStore. In BIOS / UEFI, I have tested various options, incl secure boot, and fast boot.
Is there any way a person can use the files recovered with Testdisk?
Any other options. I was reading about putting
GRUB_RESCUE = 1, but, do not have ReaR on the current two Linux machines that I have. Even still, I would need to put it in local.conf file, in ReaR, if I did install it. But, considering that USB drive keeps saying “no bootable disk found”?TIA