A LFCE (short for Linux Foundation Certified Engineer) is a trained professional who has the expertise to install, manage, and troubleshoot network services in Linux systems, and is in charge of the design, implementation and ongoing maintenance of the system architecture.
In this article we will show you how to configure Apache to serve web content, and how to set up name-based virtual hosts and SSL, including a self-signed certificate.

Introducing The Linux Foundation Certification Program (LFCE).
Note: That this article is not supposed to be a comprehensive guide on Apache, but rather a starting point for self-study about this topic for the LFCE exam. For that reason we are not covering load balancing with Apache in this tutorial either.
You may already know other ways to perform the same tasks, which is OK considering that the Linux Foundation Certification are strictly performance-based. Thus, as long as you ‘get the job done’, you stand good chances of passing the exam.
Requirements
Please refer to Part 1 of the current series (“Installing Network Services and Configuring Automatic Startup at Boot”) for instructions on installing and starting Apache.
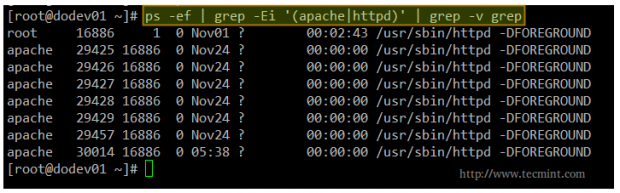
By now, you should have the Apache web server installed and running. You can verify this with the following command.
# ps -ef | grep -Ei '(apache|httpd)' | grep -v grep
Note: That the above command checks for the presence of either apache or httpd (the most common names for the web daemon) among the list of running processes. If Apache is running, you will get output similar to the following.
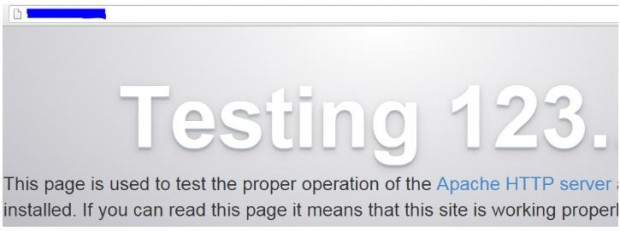
The ultimate method of testing the Apache installation and checking whether it’s running is launching a web browser and point to the IP of the server. We should be presented with the following screen or at least a message confirming that Apache is working.
Configuring Apache
The main configuration file for Apache can be located in different directories depending on your distribution.
/etc/apache2/apache2.conf 		[For Ubuntu]
/etc/httpd/conf/httpd.conf		[For CentOS]
/etc/apache2/httpd.conf 		[For openSUSE]
Fortunately for us, the configuration directives are extremely well documented in the Apache project web site. We will refer to some of them throughout this article.
Serving Pages in a Standalone Server with Apache
The most basic usage of Apache is to serve web pages in a standalone server where no virtual hosts have been configured yet. The DocumentRoot directive specifies the directory out of which Apache will serve web pages documents.
Note that by default, all requests are taken from this directory, but you can also use symbolic links and / or aliases may be used to point to other locations as well.
Unless matched by the Alias directive (which allows documents to be stored in the local filesystem instead of under the directory specified by DocumentRoot), the server appends the path from the requested URL to the document root to make the path to the document.
For example, given the following DocumentRoot:

When the web browser points to [Server IP or hostname]/lfce/tecmint.html, the server will open /var/www/html/lfce/tecmint.html (assuming that such file exists) and save the event to its access log with a 200 (OK) response.
The access log is typically found inside /var/log under a representative name, such as access.log or access_log. You may even find this log (and the error log as well) inside a subdirectory (for example, /var/log/httpd in CentOS). Otherwise, the failed event will still be logged to the access log but with a 404 (Not Found) response.

In addition, the failed events will be recorded in the error log:

The format of the access log can be customized according to your needs using the LogFormat directive in the main configuration file, whereas you cannot do the same with the error log.
The default format of the access log is as follows:
LogFormat "%h %l %u %t \"%r\" %>s %b" [nickname]
Where each of the letters preceded by a percent sign indicates the server to log a certain piece of information:
| String | Description |
| %h | Remote hostname or IP address |
| %l | Remote log name |
| %u | Remote user if the request is authenticated |
| %t | Date and time when the request was received |
| %r | First line of request to the server |
| %>s | Final status of the request |
| %b | Size of the response [bytes] |
and nickname is an optional alias that can be used to customize other logs without having to enter the whole configuration string again.
You may refer to the LogFormat directive [Custom log formats section] in the Apache docs for further options.
Both log files (access and error) represent a great resource to quickly analyze at a glance what’s happening on the Apache server. Needless to say, they are the first tool a system administrator uses to troubleshoot issues.
Finally, another important directive is Listen, which tells the server to accept incoming requests on the specified port or address/port combination:
If only a port number is defined, the apache will listens to the given port on all network interfaces (the wildcard sign * is used to indicate ‘all network interfaces’).
If both IP address and port is specified, then the apache will listen on the combination of given port and network interface.
Please note (as you will see in the examples below) that multiple Listen directives can be used at the same time to specify multiple addresses and ports to listen to. This option instructs the server to respond to requests from any of the listed addresses and ports.
Setting Up Name-Based Virtual Hosts
The concept of virtual host defines an individual site (or domain) that is served by the same physical machine. Actually, multiple sites / domains can be served off a single “real” server as virtual host. This process is transparent to the end user, to whom it appears that the different sites are being served by distinct web servers.
Name-based virtual hosting allows the server to rely on the client to report the hostname as part of the HTTP headers. Thus, using this technique, many different hosts can share the same IP address.
Each virtual host is configured in a directory within DocumentRoot. For our case, we will use the following dummy domains for the testing setup, each located in the corresponding directory:
- ilovelinux.com – /var/www/html/ilovelinux.com/public_html
- linuxrocks.org – /var/www/html/linuxrocks.org/public_html
In order for pages to be displayed correctly, we will chmod each VirtualHost’s directory to 755:
# chmod -R 755 /var/www/html/ilovelinux.com/public_html
# chmod -R 755 /var/www/html/linuxrocks.org/public_html
Next, create a sample index.html file inside each public_html directory:
<html>
  <head>
    <title>www.ilovelinux.com</title>
  </head>
  <body>
    <h1>This is the main page of www.ilovelinux.com</h1>
  </body>
</html>
Finally, in CentOS and openSUSE add the following section at the bottom of /etc/httpd/conf/httpd.conf or /etc/apache2/httpd.conf, respectively, or just modify it if it’s already there.
<VirtualHost *:80>
     ServerAdmin [email protected]
     DocumentRoot /var/www/html/ilovelinux.com/public_html
     ServerName www.ilovelinux.com
     ServerAlias www.ilovelinux.com ilovelinux.com
     ErrorLog /var/www/html/ilovelinux.com/error.log
     LogFormat "%v %l %u %t \"%r\" %>s %b" myvhost
     CustomLog /var/www/html/ilovelinux.com/access.log	myvhost
</VirtualHost>
<VirtualHost *:80>
     ServerAdmin [email protected]
     DocumentRoot /var/www/html/linuxrocks.org/public_html
     ServerName www.linuxrocks.org
     ServerAlias www.linuxrocks.org linuxrocks.org
     ErrorLog /var/www/html/linuxrocks.org/error.log
     LogFormat "%v %l %u %t \"%r\" %>s %b" myvhost
     CustomLog /var/www/html/linuxrocks.org/access.log	myvhost
</VirtualHost>
Please note that you can also add each virtual host definition in separate files inside the /etc/httpd/conf.d directory. If you choose to do so, each configuration file must be named as follows:
/etc/httpd/conf.d/ilovelinux.com.conf
/etc/httpd/conf.d/linuxrocks.org.conf
In other words, you need to add .conf to the site or domain name.
In Ubuntu, each individual configuration file is named /etc/apache2/sites-available/[site name].conf. Each site is then enabled or disabled with the a2ensite or a2dissite commands, respectively, as follows.
# a2ensite /etc/apache2/sites-available/ilovelinux.com.conf
# a2dissite /etc/apache2/sites-available/ilovelinux.com.conf
# a2ensite /etc/apache2/sites-available/linuxrocks.org.conf
# a2dissite /etc/apache2/sites-available/linuxrocks.org.conf
The a2ensite and a2dissite commands create links to the virtual host configuration file and place (or remove) them in the /etc/apache2/sites-enabled directory.
To be able to browse to both sites from another Linux box, you will need to add the following lines in the /etc/hosts file in that machine in order to redirect requests to those domains to a specific IP address.
[IP address of your web server]	www.ilovelinux.com
[IP address of your web server]	www.linuxrocks.org
As a security measure, SELinux will not allow Apache to write logs to a directory other than the default /var/log/httpd.
You can either disable SELinux, or set the right security context:
# chcon system_u:object_r:httpd_log_t:s0 /var/www/html/xxxxxx/error.log
where xxxxxx is the directory inside /var/www/html where you have defined your Virtual Hosts.
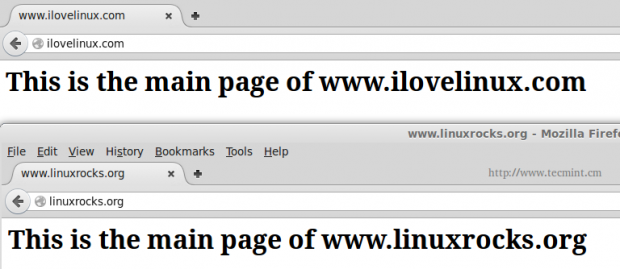
After restarting Apache, you should see the following page at the above addresses:
Installing and Configuring SSL with Apache
Finally, we will create and install a self-signed certificate to use with Apache. This kind of setup is acceptable in small environments, such as a private LAN.
However, if your server will expose content to the outside world over the Internet, you will want to install a certificate signed by a 3rd party to corroborate its authenticity. Either way, a certificate will allow you to encrypt the information that is transmitted to, from, or within your site.
In CentOS and openSUSE, you need to install the mod_ssl package.
# yum update && yum install mod_ssl 		[On CentOS]
# zypper refresh && zypper install mod_ssl	[On openSUSE]
Whereas in Ubuntu you’ll have to enable the ssl module for Apache.
# a2enmod ssl
The following steps are explained using a CentOS test server, but your setup should be almost identical in the other distributions (if you run into any kind of issues, don’t hesitate to leave your questions using the comments form).
Step 1 [Optional]: Create a directory to store your certificates.
# mkdir /etc/httpd/ssl-certs
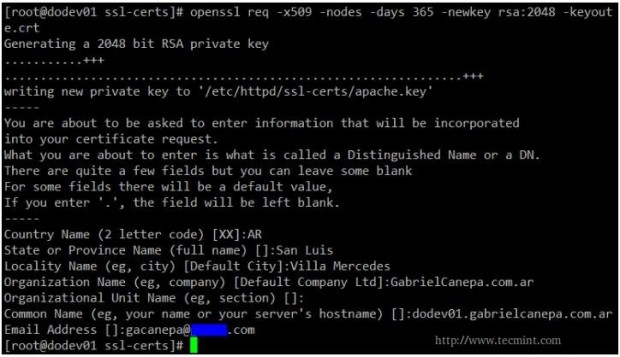
Step 2: Generate your self signed certificate and the key that will protect it.
# openssl req -x509 -nodes -days 365 -newkey rsa:2048 -keyout /etc/httpd/ssl-certs/apache.key -out /etc/httpd/ssl-certs/apache.crt
A brief explanation of the options listed above:
- req -X509 indicates we are creating a x509 certificate.
- -nodes (NO DES) means “don’t encrypt the key”.
- -days 365 is the number of days the certificate will be valid for.
- -newkey rsa:2048 creates a 2048-bit RSA key.
- -keyout /etc/httpd/ssl-certs/apache.key is the absolute path of the RSA key.
- -out /etc/httpd/ssl-certs/apache.crt is the absolute path of the certificate.
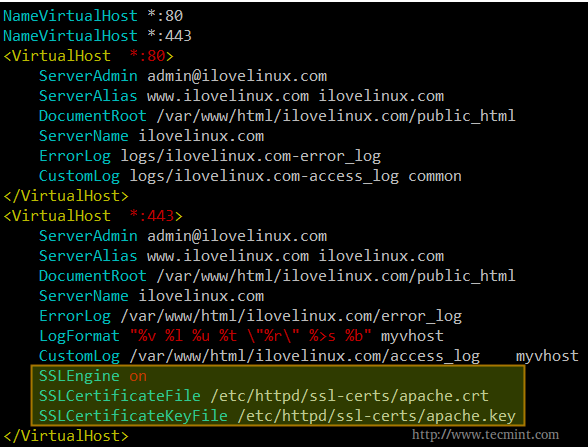
Step 3: Open your chosen virtual host configuration file (or its corresponding section in /etc/httpd/conf/httpd.conf as explained earlier) and add the following lines to a virtual host declaration listening on port 443.
SSLEngine on
SSLCertificateFile /etc/httpd/ssl-certs/apache.crt
SSLCertificateKeyFile /etc/httpd/ssl-certs/apache.key
Please note that you need to add.
NameVirtualHost *:443
at the top, right below
NameVirtualHost *:80
Both directives instruct apache to listen on ports 443 and 80 of all network interfaces.
The following example is taken from /etc/httpd/conf/httpd.conf:
Then restart Apache,
# service apache2 restart 			[sysvinit and upstart based systems]
# systemctl restart httpd.service 		[systemd-based systems]
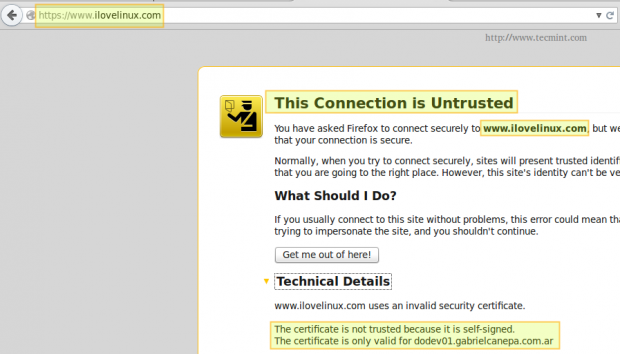
And point your browser to https://www.ilovelinux.com. You will be presented with the following screen.
Go ahead and click on “I understand the risks” and “Add exception”.
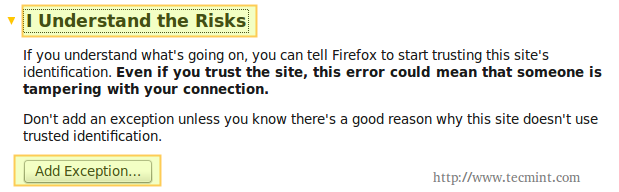
Finally, check “Permanently store this exception” and click “Confirm Security Exception”.

And you will be redirected to your home page using https.

Summary
In this post we have shown how to configure Apache and name-based virtual hosting with SSL to secure data transmission. If for some reason you ran into any issues, feel free to let us know using the comment form below. We will be more than glad to help you perform a successful set up.
Read Also
- Apache IP Based and Name Based Virtual Hosting
- Creating Apache Virtual Hosts with Enable/Disable Vhosts Options
- Monitor “Apache Web Server” Using “Apache GUI” Tool


Hi All,
I have question here, can we use the name based Virtual hosts for two different sites with two different SSL certificate in the same Apache server ?
@Santhosh,
Yes, you can setup name based virtual hosting on two different websites with different SSL for each…
Hi Gabriel and Tecmint team,
First of all, thank you very much for all your work, I am really grateful for all your effort.
I’ve been using Apache for years and I have always chown’ed the entire DocumentRoot to the web server user and group. I did some more reading before asking why you don’t do it and for anybody else interested:
Your web server user should only have the minimum needed authority to function. Allowing it to modify the DocumentRoot will allow any ‘hacker’ to wreak havoc on the compromised system.
I am practicing the tutorials on CentOS7 virtual machines and I ran into a confusing snag… Apache service would not (re)start with the log files specified for virtual hosts. error_log showed “could not open log file. Unable to open logs”. Turns out SELinux prevents Apache writing logs so I had to do the following:
# ls -lZ /var/log/httpd/error_log
This shows the security context required. I then applied it to the individual log files with:
# chcon system_u:object_r:httpd_log_t:s0 /var/www/html/xxxxxx/error.log
Is this appropriate? It’s very tedious and there must be a better way.
@Michael,
I know this answer comes pretty late but I am now revising the series and noticing several comments I had not seen before. By default, Apache will not be allowed to write logs outside the default /var/log/httpd directory, as you have observed. Personally, I like keeping logs for virtual hosts separated from the main server, and located in the DocumentRoot for accessibility. In that case, you’re right in that the security context of the log file needs to be updated or SELinux needs to be disabled. You have the choice to do either thing on the exam.
For the LFCE do you know if they specifically specify an Apache server needs to be setup or do they just say webserver? I mostly use NGINX and would rather stick to this than re-learn all the Apache mess.
@Daniel,
Unfortunately, you will have to use Apache in the exams. Nginx is not being considered as a alternative at the time.
by the way, the NameVirtualHost directive is not required any more since 2.4 , see http://httpd.apache.org/docs/2.4/new_features_2_4.html
NameVirtualHost directive
No longer needed and is now deprecated
@birdman,
This is being corrected as we speak. Thanks for pointing it out, though.
Hi,
Hey thanks, It really helped me.Can you please tell me about the apache modules and error log
@ankurkeelu,
Please refer to the following link: http://httpd.apache.org/docs/
Its not working for me. i have two folders containing .php pages on centos6 . i want to access it by name means i want to configured httpd as name-based vhosting in my workplace.I tried to do everything which is explained here but didnt succeeds.I am able to access site through ip .its only shows the content of index.php page.please guide me
@mayur,
Where have you placed those two folders? Please provide absolute path.
Have you set up domain name resolution using either a DNS server or the /etc/hosts file in the client machine (meaning the computer you’re using to access the site)?
I want to setup it for internal use (workplace)only.i dont have dns . path of two folder is /var/www/html/foldername/ & exactly gave d same path in httpd.conf.i want to acces it from windows system. And how to setup DNS for local sites.?
what should be inside this file /etc/httpd/conf.d/filename.com.conf. can i use other extension instead .com like .local?
@mayur,
Yes, you can. Inside that file you will include specific configuration for that virtual host. I wrote this article using a CentOS 7 box but it should not be all that different.
If you want to access from a Windows system you should point your browser to the IP of the CentOS server. If it doesn’t work try disabling the firewall for a minute (iptables -F) and see if it works. I’m inclined to think that it’s a firewall issue.
Hi Gabriel,
There is a missing link between the first part that contains the list of all 12 tutorials and this one.
This article would be easier to find if there was a link from the first one.
Thanks,
Vlad
@vlad,
Thanks for updating about that missing link, I’ve included the link in the first part of this series.