How to Setup MySQL Replication in RHEL, Rocky and AlmaLinux

Data replication is the process of copying your data across multiple servers to improve data availability and enhance the reliability and performance of an application. In MySQL replication, data is copied from a database from the master server to other nodes in real-time to ensure consistency of data and also to provide backup and redundancy.

In this guide, we demonstrate how you can set up MySQL (Master-Slave) replication in RHEL-based distributions such as CentOS, Fedora, Rocky Linux, and AlmaLinux.

MySQL Replication Setup

So, here is our MySQL replication lab setup.

MySQL Master - 10.128.0.14
MySQL Slave - 10.128.15.211

Let’s get started…

Step 1: Install MySQL on Master and Slave Server

We will start off by installing the MySQL database on both the master and slave servers.

$ sudo dnf install @mysql
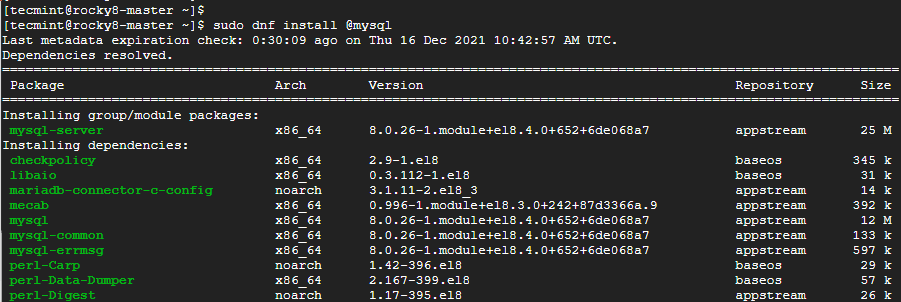
Install MySQL in Rocky Linux

Once the installation is complete, make a point to start the database server.

$ sudo systemctl start mysqld

Then enable it to start to system startup or upon reboot.

$ sudo systemctl enable mysqld

Thereafter, confirm that the MySQL database server is running as shown:

$ sudo systemctl status mysqld
Check MySQL Running Status

Step 2: Secure MySQL on Master and Slave Server

The next step is to secure the MySQL database on both the master and slave servers. This is because the default settings are insecure and present some loopholes which can easily be exploited by hackers.

So, to harden MySQL, run the command:

$ sudo mysql_secure_installation

First, you will be required to set the MySQL root password. Be sure to provide a strong root password, preferably with more than 8 characters which are a mix of uppercase, lowercase, special and numeric characters.
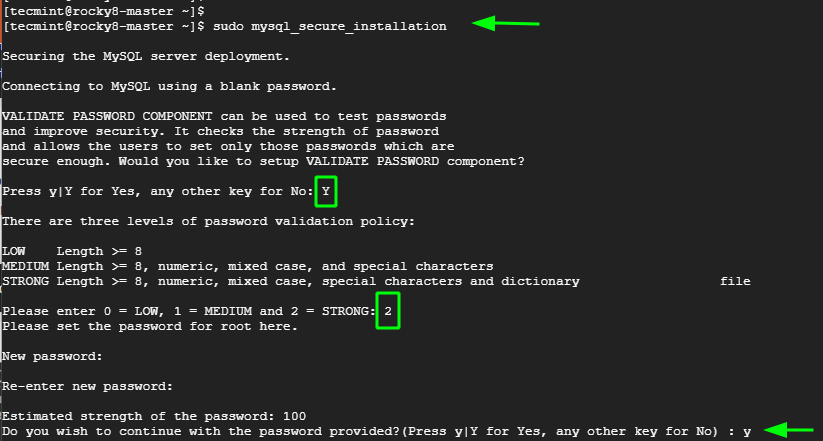
Secure MySQL in Rocky Linux

For the remaining prompts, type in 'Y' to tweak the database server to the recommended settings.
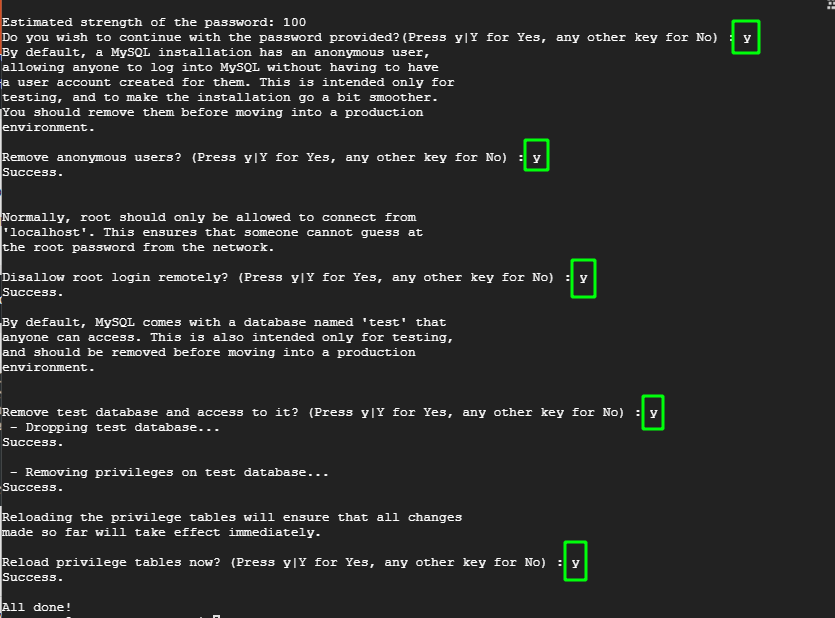
Confirm MySQL Settings

Once you have finished installing and hardening MySQL on the master and slave node, the next is to configure the master node.

Step 3: Configure the Master Node (Server)

The next step is to configure the Master node and grant the slave node access to it. First, we need to edit the mysql-server.cnf configuration file.

$ sudo vim /etc/my.cnf.d/mysql-server.cnf

Add the following lines under the [mysqld] section.

bind-address	 = 10.128.0.14
server-id 	 = 1
log_bin		 = mysql-bin

Once done, save the changes and exit. Then restart the MySQL server.

$ sudo sysemctl restart mysqld

Next, log into MySQL shell.

$ sudo mysql -u root -p

Execute the following commands to create a database user that will be used to bind the master and slave for replication.

mysql> CREATE USER 'replica'@'10.128.15.211' IDENTIFIED BY 'P@ssword321';
mysql> GRANT REPLICATION SLAVE ON *.*TO 'replica'@'10.128.15.211';
Create Database Replication User

Apply the changes and exit the MySQL server.

mysql> FLUSH PRIVILEGES;
mysql> EXIT;

Verify the status of the master.

mysql> SHOW MASTER STATUS\G
Verify MySQL Status
Verify MySQL Status

Take note of the Filename and Position. You will need this later on when setting up the slave for replication. In our case, we have the filename as mysql-bin.000001 and Position 1232.

Step 4: Configure the Slave Node (Server)

Now, head back to the Slave node. Once again, edit the mysql-server.cnf configuration file.

$ sudo vim /etc/my.cnf.d/mysql-server.cnf

As before, paste these lines under the [mysqld] section. Change the IP address to correspond to the slave’s IP. Also, assign a different server-id. Here we have assigned it the value of 2.

bind-address	 = 10.128.15.211
server-id	 = 2
log_bin 	 = mysql-bin

Save the changes and exit the file. Then restart the database server.

$ sudo systemctl restart mysqld

To configure the Slave node to replicate from the Master node, log in to the Slave’s MySQL server.

$ sudo mysql -u root -p

First and foremost, stop the replication threads:

mysql> STOP SLAVE;
Stop MySQL Slave
Stop MySQL Slave

Then execute the following command to configure the slave node to replicate databases from the master.

mysql> CHANGE MASTER TO
     MASTER_HOST='10.128.0.14' ,
     MASTER_USER='replica' ,
     MASTER_PASSWORD='P@ssword321' ,
     MASTER_LOG_FILE='mysql-bin.000001' ,
     MASTER_LOG_POS=1232;

Note that the MASTER_LOG_FILE and MASTER_LOG_POS flags correspond to the file and Position values from the Master node at the end of Step 1.

The MASTER_HOST, MASTER_USER, and MASTER_PASSWORD correspond to the Master IP address, the replication user, and the replication user’s password respectively.

Configure MySQL Slave Replication

Then start the slave replication threads:

mysql> START SLAVE;
Start MySQL Slave
Start MySQL Slave

Step 4: Testing MySQL Master-Slave Replication

Now, to test if replication between the master and slave node is working, log in to the MySQL database server on the master node:

$ sudo mysql -u root -p

Create a test database. Here, our test database is called replication_db.

mysql> CREATE DATABASE replication_db;
Verify the existence of the database.
mysql> SHOW DATABASES;
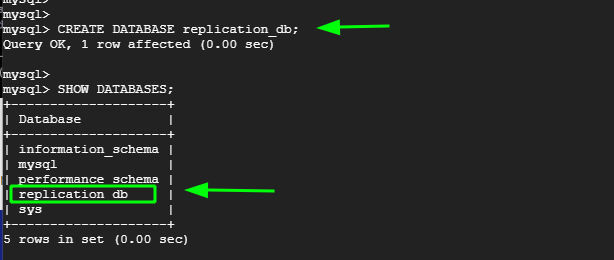
Create Database on MySQL Master

Now, head over to the slave node, log in to the MySQL server and confirm that the replication_db database is present. From the output below, we can see that the database is present. This is confirmation that replication has taken place from the Master to the slave node.

mysql> SHOW DATABASES;
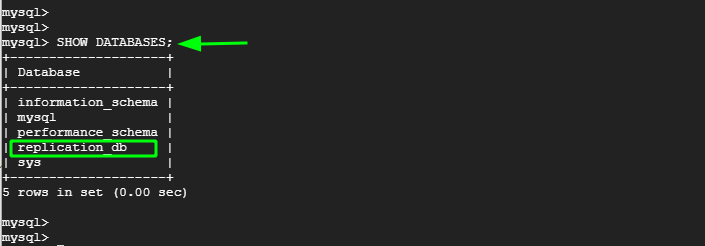
Check MySQL Master Slave Replication
Check MySQL Master-Slave Replication

And that’s it, we have successfully demonstrated how you can set up a MySQL master-slave replication model that can replicate databases from the master node to the slave node.

If you read this far, tweet to the author to show them you care. Tweet a thanks
James Kiarie
This is James, a certified Linux administrator and a tech enthusiast who loves keeping in touch with emerging trends in the tech world. When I'm not running commands on the terminal, I'm taking listening to some cool music. taking a casual stroll or watching a nice movie.

Each tutorial at TecMint is created by a team of experienced Linux system administrators so that it meets our high-quality standards.

Join the TecMint Weekly Newsletter (More Than 156,129 Linux Enthusiasts Have Subscribed)
Was this article helpful? Please add a comment or buy me a coffee to show your appreciation.

163 thoughts on “How to Setup MySQL Replication in RHEL, Rocky and AlmaLinux”

  1. Hello, Thank for this Tutorial, but it doesn’t work for me, I followed all steps, but sadly i can’t find the database that I create on Master in the other one. Please Contact me

    Reply
  2. I get following error, how can resolve this issue?

    [root@client ~]# mysql -u root -p < /root/dbdump.db
    error: Found option without preceding group in config file: /etc/my.cnf at line: 11
    Fatal error in defaults handling. Program aborted
    
    Reply
  3. Hi,

    MySQL service failed on Slave node when trying to configure CentOS 6.3 with MYSQL Server version: 5.7.22-log MySQL Community Server (GPL).

    Reply
  4. Hi, I am getting error, status show connecting and last i/o shows error connecting to master ip address.

    Please help me..

    Reply
  5. So like the simplicity of the setup. However it did not work and was frustrating as everything seemed to be set up correctly. Took some time to find the problem is due to the “binlog-do-db“.

    Problem for me was there was a “test” DB and even though I was creating a “test” table in different DB it wasn’t being replicated. Read this post about why it’s dangerous: https://www.percona.com/blog/2009/05/14/why-mysqls-binlog-do-db-option-is-dangerous/ . Other than that thanks for your contributions

    Reply
  6. my master slave was running perfectly but once master got shutdown due to power failure (breakdown ) and it stop replication how to overcome this situation ? or restart replication with minimum downtime

    Reply
    • @Prashant,

      Never faced such power failure issues, but I think there nothing to worry, once you master started its automatically starts replicating to slave..

      Reply
  7. To put master host and so on slave in /etc/my.cnf is officially deprecated.

    Instead run in mysql

    Extract from official website
    “2.2.5.2 Setting the Master Configuration on the Slave

    To set up the slave to communicate with the master for replication, configure the slave with the necessary connection information. To do this, execute the following statement on the slave, replacing the option values with the actual values relevant to your system:

    mysql> CHANGE MASTER TO
        ->     MASTER_HOST='master_host_name',
        ->     MASTER_USER='replication_user_name',
        ->     MASTER_PASSWORD='replication_password',
        ->     MASTER_LOG_FILE='recorded_log_file_name',
        ->     MASTER_LOG_POS=recorded_log_position;
    
    Reply
  8. I got the same error..

    ERROR 1794 (HY000) at line 22: Slave is not configured or failed to initialize properly. You must at least set –server-id to enable either a master or a slave. Additional error messages can be found in the MySQL error log

    Reply
  9. mysql -u root -p < /root/dbdump.db
    Enter password:
    ERROR 1794 (HY000) at line 22: Slave is not configured or failed to initialize properly. You must at least set –server-id to enable either a master or a slave. Additional error messages can be found in the MySQL error log.

    I got this when I tried to do the restore on the slave.

    Reply
    • @James,

      Have you properly configured Slave server? added correct server-id in slave my.cnf file? please check and confirm..

      Reply
      • Hi Ravi,

        I have followed your article its good, I have done the configuration in Master no issue but getting an error on slave while importing DB

        ERROR 1794 (HY000) at line 22: Slave is not configured or failed to initialize properly. You must at least set –server-id to enable either a master or a slave. Additional error messages can be found in the MySQL error log.

        Reply

Got something to say? Join the discussion.

Thank you for taking the time to share your thoughts with us. We appreciate your decision to leave a comment and value your contribution to the discussion. It's important to note that we moderate all comments in accordance with our comment policy to ensure a respectful and constructive conversation.

Rest assured that your email address will remain private and will not be published or shared with anyone. We prioritize the privacy and security of our users.