One of the most important tasks in Linux systems administration is process management, which involves several operations such as monitoring, signaling processes, and setting process priorities on the system.
There are numerous Linux tools/utilities designed for monitoring and handling processes, such as top, ps, pgrep, kill, killall, nice, and many others.
In this article, we shall uncover how to find processes using a powerful and resourceful Linux utility called fuser.
What is a fuser in Linux?
fuser is a simple yet powerful command-line utility intended to locate processes based on the files, directories, or sockets a particular process is accessing. In short, it helps a system user identify which processes are using specific files or sockets.
The basic syntax for using fuser is:
fuser [options] [file|socket]
fuser [options] -SIGNAL [file|socket]
fuser -l
Find Which Process is Accessing a Directory
Running fuser without any options displays the PIDs of processes currently accessing your current working directory.
fuser .
OR
fuser /home/tecmint

Find Running Processes of a Directory (Verbose Output)
For a more detailed and clear output, enable the -v or --verbose as follows. In the output, fuser prints out the name of the current directory, then columns of the process owner (USER), process ID (PID), the access type (ACCESS), and command (COMMAND) as in the image below.
fuser -v .
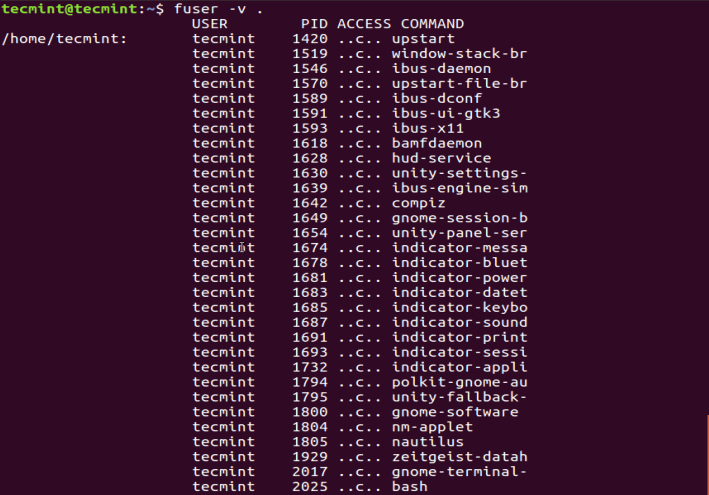
Under the ACCESS column, you will see access types signified by the following letters:
c– current directory.e– an executable file being run.f– open file, however,fis left out in the output.F– open file for writing,Fis as well excluded from the output.r– root directory.m– mmap’ed file or shared library.
Find Which Process is Accessing a File or Filesystem
To determine which processes are accessing your ~/.bashrc file, run:
fuser -v -m .bashrc
The -m NAME or --mount NAME option shows all processes accessing the given file or directory. If you pass a directory as NAME, it automatically appends a / to reference the file system mounted on that directory.

Find Which Process is Using a Specific Port
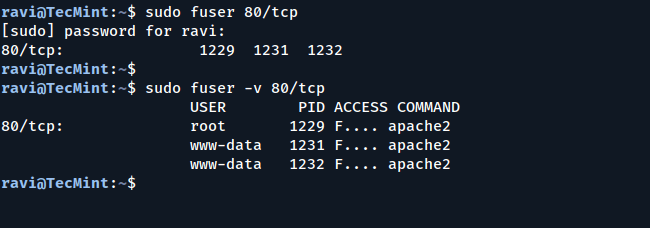
Another practical use case is identifying which process is using a specific network port, which is especially useful for debugging service conflicts.
sudo fuser 80/tcp
OR
sudo fuser -v 80/tcp
This shows the PID of the process using TCP port 80. Add -v for detailed output.
How to Kill and Signal Processes Using fuser
To kill all processes accessing a file or socket, use the -k or --kill option.
sudo fuser -k .
To interactively kill a process, where you are asked to confirm your intention to kill the processes accessing a file or socket, make use of -i or --interactive option.
sudo fuser -ki .

The two previous commands will kill all processes accessing your current directory; the default signal sent to the processes is SIGKILL, except when -SIGNAL is used.
List All Available Signals in Linux
You can list all the signals using the -l or –-list-signals options as below.
sudo fuser --list-signals

Send a Specific Signal to Processes
Therefore, you can send a signal to processes as in the next command, where SIGNAL is any of the signals listed in the output above.
sudo fuser -k -SIGNAL
For example, to send the HUP (hang up) signal to processes accessing /boot.
sudo fuser -k -HUP /boot
For advanced usage and more details, check the fuser manual page.
man fuser
Conclusion
The fuser command might not be the first tool that comes to mind when managing processes, but it’s a hidden gem for any Linux user or system admin. It’s perfect for finding out which processes are using specific files, directories, or ports – and gives you the power to deal with them directly.
If you’re working with files, directories, or network services on a Linux system, learning how to use fuser is 100% worth your time.


Ravi, thank you for the article. Do you have any use cases involving fuser -u?
Cheers,
— Dave
Great Article. I’ve seen it a lot of times but never knew what fuser was for. Thanks for the great article. I’d buy you a coffee, but I’m really poor. Keep up the good work.
@Dane,
Thanks for your coffee and support…:)