By default, SSH already uses secure data communication between remote machines, but if you want to add an extra security layer to your SSH connections, you can add a Google Authenticator (two-factor authentication) module that allows you to enter a random one-time password (TOTP) verification code while connecting to SSH servers. You’ll have to enter the verification code from your smartphone or PC when you connect.
The Google Authenticator is an open-source module that includes implementations of one-time passcodes (TOTP) verification tokens developed by Google.
It supports several mobile platforms, as well as PAM (Pluggable Authentication Module). These one-time passcodes are generated using open standards created by the OATH Initiative for Open Authentication).
In this article, I will show you how to set up and configure SSH for two-factor authentication under RedHat-based and Debian-based Linux distributions such as Fedora, CentOS Stream, Rocky Linux, and AlmaLinux, Ubuntu, Debian, and Mint.
Installing Google Authenticator in Linux
Open the machine that you want to set up two-factor authentication, and install the following PAM libraries along with the development libraries that are needed for the PAM module to work correctly with the Google Authenticator module.
On RedHat-based Systems (RHEL, CentOS Stream, Rocky Linux, AlmaLinux), you need to enable the EPEL repository and install the required packages:
sudo dnf install epel-release -y
sudo dnf install google-authenticator qrencode-libs -y
On Debian-based systems, install the Google Authenticator PAM module using the following apt command.
sudo apt install libpam-google-authenticator -y
Generate Google Authentication Tokens
Once installed, run the following command as the user you want to secure.
google-authenticator
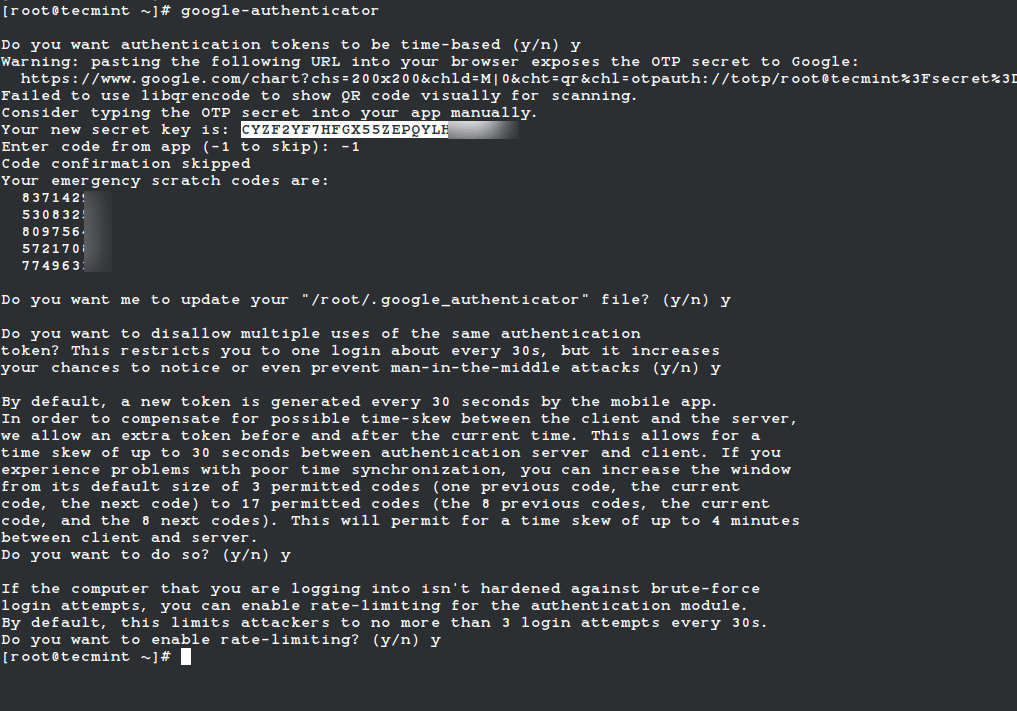
It will prompt you with a series of questions. Simply type "y" (yes) as the answer in most situations. If something goes wrong, you can run the command again to reset the settings.
After these questions, you will get your secret key and emergency codes. Write down these details somewhere, as we’ll need the secret key later to set up the Google Authenticator app.
You may see output like this:
Do you want authentication tokens to be time-based (y/n) y
Warning: pasting the following URL into your browser exposes the OTP secret to Google:
https://www.google.com/chart?chs=200x200&chld=M|0&cht=qr&chl=otpauth://totp/root@tecmint%3Fsecret%3DCYZF2YF7HFGX55ZEPQYLHOO5JM%26issuer%3Dtecmint

Failed to use libqrencode to show QR code visually for scanning.
Consider typing the OTP secret into your app manually.

Your new secret key is: CYZF2YF7HFGX55ZEPQYLHOM
Enter code from app (-1 to skip): -1
Code confirmation skipped

Your emergency scratch codes are:
83714291
53083200
80975623
57217008
77496339
Continue answering "y" to all configuration prompts:
Do you want me to update your "/root/.google_authenticator" file (y/n) y
Do you want to disallow multiple uses of the same authentication token? (y/n) y
Do you want to increase the window to about 4min? (y/n) y
Do you want to enable rate-limiting? (y/n) y
Configuring SSH to Use Google Authenticator in Linux
Open the PAM configuration file ‘/etc/pam.d/sshd‘ and add the following line at the top or before any pam_permit.so line:
auth required pam_google_authenticator.so nullok
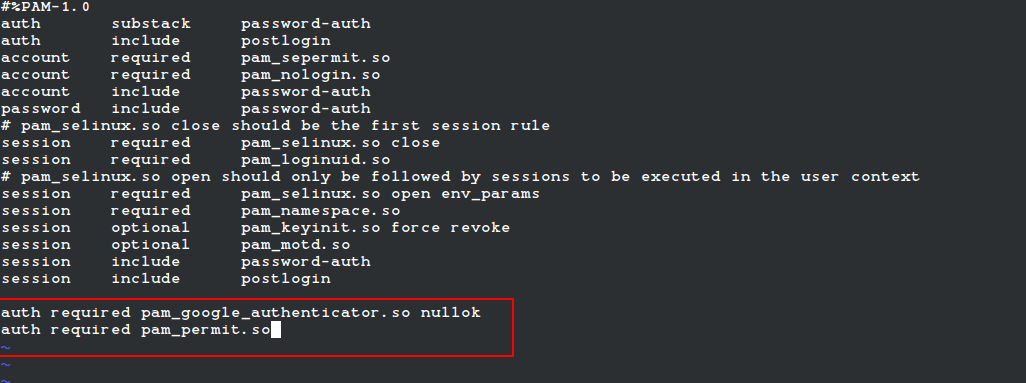
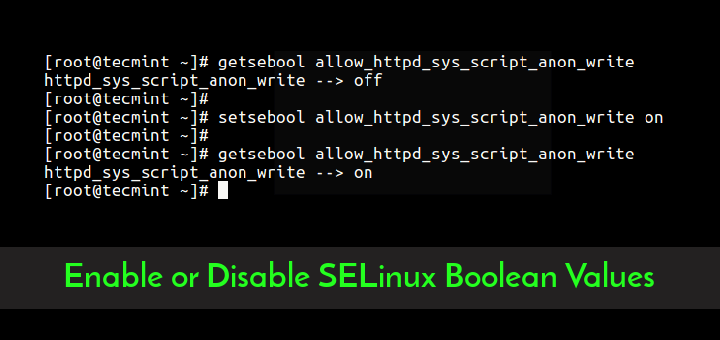
Note: If SELinux is enabled, move the .google_authenticator file to a location with proper SELinux context (like ~/.ssh/) and specify the full path:
auth required pam_google_authenticator.so secret=/home//.ssh/.google_authenticator nullok
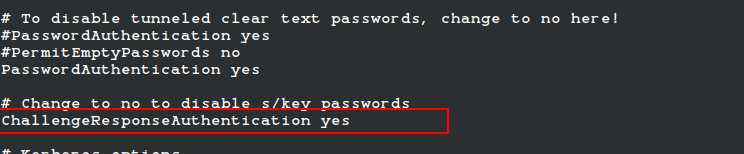
Next, open the SSH configuration file ‘/etc/ssh/sshd_config‘ and make sure these lines are set:
UsePAM yes
ChallengeResponseAuthentication yes
You may optionally enforce both 2FA and key/password authentication:
AuthenticationMethods publickey,keyboard-interactive
Finally, restart the SSH service to take new changes.
sudo systemctl restart sshd
Configuring the Google Authenticator App
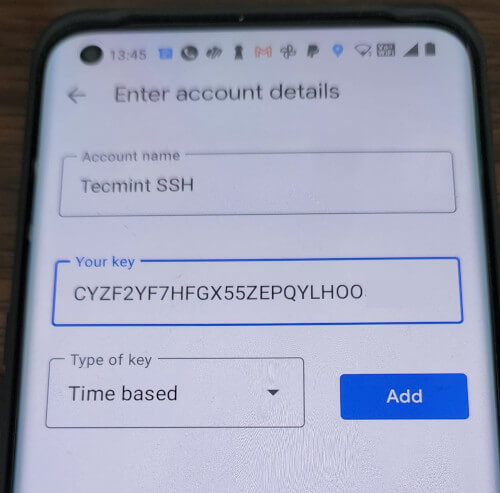
Launch the Google Authenticator app on your smartphone. Press + and choose “Enter a setup key“. If you don’t have this app, you can download and install the Google Authenticator app on your Android/iPhone/Blackberry devices.
Add your account ‘Name‘ and enter the ‘secret key‘ generated earlier.
It will generate a one-time password (verification code) that will constantly change every 30 seconds on your phone.
Now, try to log in via SSH, you will be prompted with a Google Authenticator code (Verification code) and Password whenever you attempt to log in via SSH. You have only 30 seconds to enter this verification code; if you miss it will regenerate a new verification code.
login as: tecmint
Access denied
Using keyboard-interactive authentication.
Verification code:
Using keyboard-interactive authentication.
Password:
Last login: Tue Apr 23 13:58:29 2022 from 172.16.25.125
[root@tecmint ~]#
If you don’t have a smartphone, you can also use the “Authenticator” Firefox add-on or a desktop TOTP app like KeePassXC or Authenticator App for Linux.
Important: The two-factor authentication works with password-based SSH login. If you are using any private/public key SSH session, it will ignore two-factor authentication and log you in directly.


2FA does not works for RHEL8/9 ,Dear Admin could you please update the article which work with rhel 8/9.
Thanks!
@Among,
Hi, thank you for your feedback!
I’ve just updated the article with the correct and verified steps for RHEL-based systems, including RHEL 8/9, Rocky Linux, and AlmaLinux.
Please check it out again and let me know if you face any issues.
Appreciate your support!
— AdminHi, thank you for your feedback!
You’re absolutely right — some parts needed updating for RHEL 8/9. I’ve just updated the article with the correct and verified steps for RHEL-based systems, including RHEL 8/9, Rocky Linux, and AlmaLinux.
Please check it out again and let me know if you face any issues.
Appreciate your support!
I can get qr-code from google-authenticator by install following:
# dnf install qrencode qrencode-libs -y
This makes it easy to use the app on a smartphone.
The code is then easy confirmed – anyway I do not get the two factor authenticationat login yet…
When a normal user runs google_authenticator the secret file .google_authenticator is owned by the root.
In /var/log/secure I see :
I have:
Rocky Linux 8.6
google-authenticator-1.07-1.el8.x86_64
I’ve tried the command lines for Google Authenticator recently (Linux Mint 19.1) and found they do not work. upon entering I receive ‘command not found‘ which stands to reason when the OP was in 2013. I can create a pam file but it does not ‘trigger’ a response on boot…. i.e. no requirement for a password other than the one I created on install.
It works for me. Thanks.
I request you to write a blog that how we can Integrate Apache with Google authentication
I have configured google-authenticator on MY RHEL7 box and it’s working fine. But I want to centralize the key generation method. What I want is only root or any other user should be able to generate keys for other users and then share the key with other user.
Can this be done?
Hey Ravi, good guide, however I am having an issue with root account…I set this up to run on root and normal user, it runs OK with normal user, but not with root…I get the ‘validation code’ response for regular user, but only PW prompt for root, which it will not accept, even though root is allowed for ssh….wondering if you have any ideas on how to get this to work as root?
Thanks
Ken C.
@Ken,
Do you have disabled root login via SSH in your SSH configuration file?
Hey, just checking in before I start implementing this in my environment – will this work in conjunction with SSH-key authentication, or do I have to be using password-based authentication to take advantage of 2FA?
Great guide, thanks!
Do you know how to get this working with Shell-In-A-Box? It currently just prompts for a password as normal. Or do you know of a alternative to shell-in-a-box that can be used and works well with GA?
Getting Google authenticator configured was easy enough, but is it possible to have a Verification request presented to every login attempt (valid user or not?). If i try to login with my own account, i get presented with verification code, works great. But if i try and login with a random account say ‘johndoe’ that isn’t on my server, it doesn’t prompt for Verification. By this its possible to identify valid accounts on a machine by which ones prompt for verification. Am i missing something?
If you put the:
auth required pam_google_authenticator.so nullok
line AFTER the:
@include common-auth
in the pam.d config file then it’ll first ask for a password and ONLY if the password is correct will it then prompt for a verification code. If the user doesn’t exist or the password is incorrect it’ll perform the standard behaviour of keeping asking for a password so no valid username details can be derived.
All this change does is tell it to ask after the password is authenticated rather than before.
That should solve the problem.
This doesn’t really live up to two-factor. Since the Google factor can be produced with something I know (the secret key and the Account or just the QR code) and a commodity something I have or using GAuth, this seems to be just a second something I know factor. Two-factor usually means two different kinds of factors.
Nope, doesn’t work for me either and I did follow all steps correctly. It just keeps asking for the password and then fails on it. Never asks for verification code……
Same is with me, I restarted ssh for 10 times still it dont ask for verification code
Have you entered correct Secret Key? Please check.
Nice one
I am trying to login with root user and I am getting access denied when I try to give the code that is given on my mobile and also it is not prompting for verification code
Followed all the steps mentioned above.
Dont understand where am I going wrong. plz help.
Do you correctly added your secret key on the phone? or try to run again “google-authenticator” command and follow the steps thereon. Make sure you add correct secret key to get this work.
Add another one here for “this NOT working.”
It keeps asking for verification code and password over and over.
I feel a new fail blog post coming on.
And this is why it is failing. In the sshd log there is:
“Auth sshd(pam_google_authenticator)[11838]Failed to read /root/.google_authenticator”
The file is there and I even made it readable globally with chmod 777
If SELinux enabled in your system, then you need to use proper configuration. The default SELinux rule doesn’t allow the SSH daemon to write or update the google_authenticator file. To do run the following command to fix it.
This looks very promising as it uses the authentication in addition instead of replacing the password. Would love to hear anybodys suggested security implications.