Linux Mint 22.2 (“Zara”) is the latest point release in the Linux Mint 22 series, which is a Long Term Support release (LTS), which means it will get updates (security, bug-fix) until 2029.
It’s not a completely new base, but it continues to build on Ubuntu’s 24.04 LTS and keeps many of the 22.x features, but introduces numerous refinements, new apps, visual polish, and improved hardware support.
If you’re using Linux Mint 22 or 22.1, “Zara” makes for a worthwhile upgrade, especially for hardware compatibility, security, and daily usability.
What is Linux Mint 22.2 “Zara”
Here are the main changes in “Zara”, with why they matter for everyday users.
- Fingerprint login and authentication support (new Fingwit app).
- Sticky Notes with rounded corners, Wayland support, and Android sync via StyncyNotes.
- Cleaner login screen with blur effects and user avatars.
- Hypnotix TV app with Theater and Borderless modes, faster startup/search, and saved volume settings.
- GTK4/libAdwaita apps now follow Mint themes and accent colors (including Flatpak apps).
- Improved dark theme colors and refreshed icons/artwork.
- Update Manager now shows a reboot button when needed.
- Software Manager explains Flatpak vs system package differences.
- File renaming tool with more control (like leading zeros).
- WebApp Manager lets you edit app descriptions.
- Added thumbnail preview for
.aiffaudio files. - Ships with Linux kernel 6.14 for better hardware support.
Known Issues and Caveats
It’s not all perfect; as with any release, there are things to watch out for:
- HWE Kernel Issues: The newer kernel (6.14) has problems with older NVIDIA cards using the 470 driver, and with VirtualBox. If you depend on those, you may prefer sticking with Mint 22.1 initially.
- Shutdown Timeout: The shutdown timeout has been reduced to 10 seconds. If you have long-running shutdown tasks, you may want to override that.
- VirtualBox Display Settings Glitch: For VirtualBox installs, users may see black screens unless the display controller is set to VMSVGA, video memory is increased, and 3D acceleration is disabled.
Upgrading to Linux Mint 22.2 from 22 / 22.1
If you’re already running Linux Mint 22 or 22.1, moving up to Linux Mint 22.2 “Zara” is a safe and beginner-friendly process as explained below.
Step 1: Back Up Your System (Very Important!)
Before you touch anything, make a backup of your important files, even though upgrades usually work fine, accidents can happen, and you don’t want to risk your files.
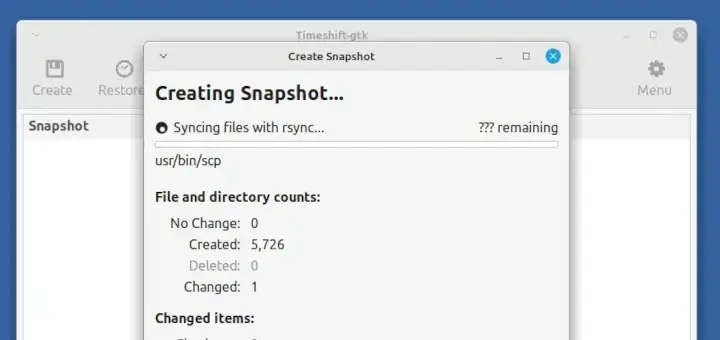
- Use Timeshift (preinstalled in Mint, or install it if missing) to take a full system snapshot, which is useful for rolling back if something breaks.
- Back up personal files (Documents, Pictures, etc.) to an external drive or cloud storage for extra safety.
Step 2: Update Your Current System
Now that your backup is safe and sound, the next step is to bring your current Mint installation fully up to date, which ensures that the upgrade path to Linux Mint 22.2 “Zara” becomes available.
Click the menu button in the bottom-left corner of your desktop and search for Update Manager and launch it. Inside it, click the Refresh button, which checks for the latest updates from the Linux Mint repositories.
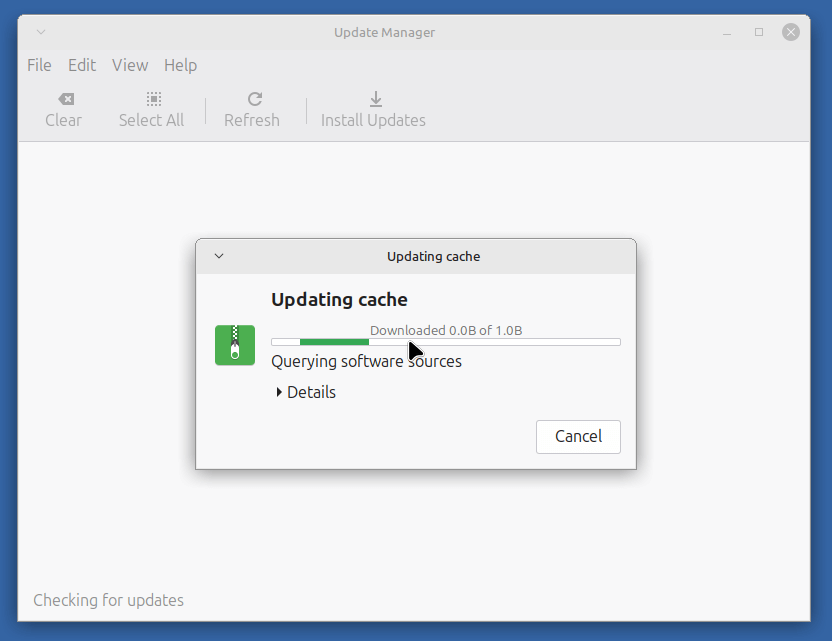
Next, install all updates, especially the ones for mintupdate and mint-upgrade-info, these packages enable the upgrade path. If the updater asks you to restart after installing updates, go ahead and reboot.
Step 3: Start the Upgrade
Once you system fully updated, open Update Manager again and click the Edit menu and select Upgrade to Linux Mint 22.2 Zara, which will open and show you the release notes, list new features and warn you about known issues.

When ready, continue, which will download and install all the new packages, which can take some time depending on your internet speed and hardware, so be patient. Once the upgrade completes, reboot your computer.
Step 4: Post-upgrade Checks
After your system reboots into Linux Mint 22.2 “Zara”, there are a few quick checks you should perform to make sure everything is running smoothly.
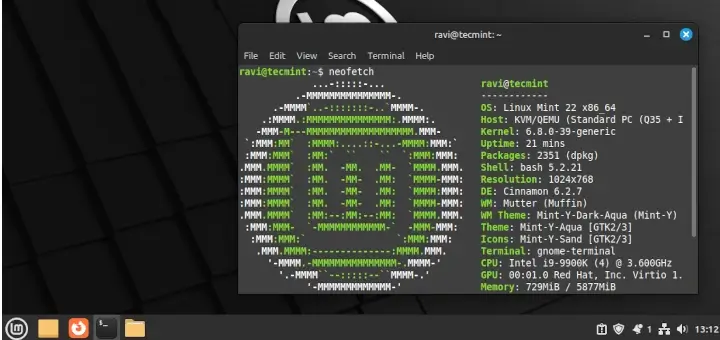
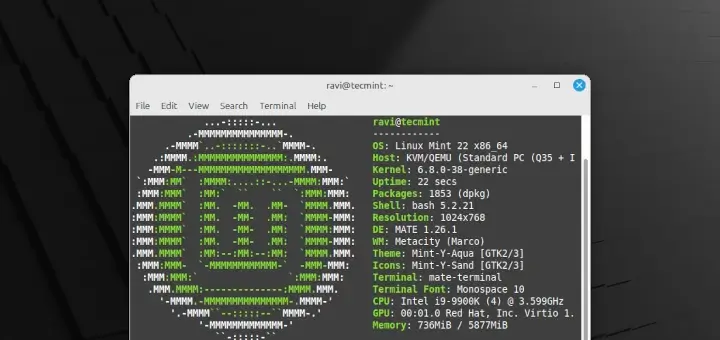
Open a terminal and run the following command to confirm your kernel version.
uname -r
By default, Mint 22.2 ships with kernel 6.14. If your hardware isn’t happy with this newer kernel, you can still boot into an older one using the GRUB menu at startup.
Next, explore your menus, panels, themes, applets, and desklets. If something feels off (especially with third-party themes or Cinnamon spices), update them or temporarily disable them until a compatible version is available.
Once you’re confident the upgrade went well, you can remove unused packages and old kernels to free up space.
sudo apt autoremove
That’s it! You’re officially running Linux Mint 22.2 “Zara” with a clean, stable setup. Enjoy the new features, improved visuals, and hardware support this release brings.
Hello friends,
I’ve got an old Dell Optiplex 755 and ran into some issues with Zara. Before the upgrade, I had to ignore Mesa driver updates, since they don’t work well with older Intel graphics. Because of that, using the new HWE kernel 6.14 isn’t possible on these older machines.
So, in this case, it’s better not to do a fresh install of Mint 22.2. Instead, upgrade from 22.1 while staying on kernel 6.18, which is LTS until 2029. Also, make sure to ignore or lock Mesa driver updates if the system prompts you.
@Otto,
Thanks for sharing your experience!
That’s really useful info for anyone running Mint on older hardware like the Optiplex 755.
Please what happens if after all files have been downloaded, the system goes off?
sir i am trying to upgrade linux mint 15 but i am getting like this
E: Could not get lock /var/lib/dpkg/lock – open (11: Resource temporarily unavailable)
E: Unable to lock the administration directory (/var/lib/dpkg/), is another process using it?
sreenatha@bhoomi ~ $ sudo apt-get upgrade
E: Could not get lock /var/lib/dpkg/lock – open (11: Resource temporarily unavailable)
E: Unable to lock the administration directory (/var/lib/dpkg/), is another process using it?
sreenatha@bhoomi ~ $
@Sreenatha,
Use the following command to remove that lock file and then give a try..its should work.
Hi ,
I have upgraded from mint 15 but get a black screen on boot up can’t bypass go to type in crpt key and goes black. Can see log panel barely. Any idea? Thanks
Hi,
Thanks for this post,
Im going to try upgrade from julia to 14.04 doing this same method.
Hi, I am running linux mint 15 cinnamon 64 bit installed with mint4win as a dual boot with Windows 7 64 bit Home Premium.
I tried to upgrade to Linux mint 17 with the following commands:
sudo sed -i ‘s/raring/trusty/’ /etc/apt/sources.list
sudo sed -i ‘s/olivia/qiana/’ /etc/apt/sources.list
sudo sed -i ‘s/raring/trusty/’ /etc/apt/sources.list.d/official-package-repositories.list
sudo sed -i ‘s/olivia/qiana/’ /etc/apt/sources.list.d/official-package-repositories.list
and
sudo apt-get update
sudo apt-get dist-upgrade
sudo apt-get upgrade
I kept Y (keeping the Package maintainers version) whenever prompted.
Then
sudo reboot
But after reboot, it doesn’t boot anymore, it drops to “initramfs” prompt and the file system became read-only. I couldn’t access any console as none of the tty worked.
What mistake did i do?
I did it 3 times, every time it was the same.
My laptop had a 25 GB recovery partition with no label, i thought this was causing the problem. I deleted that partition, and went through the same process again, but no luck.
Please help me here.
I’m confused by the first four instructions given at the top of this tutorial.
I wanted to find out what these four instructions did. Namely:
$ sudo sed -i ‘s/raring/saucy/’ /etc/apt/sources.list
$ sudo sed -i ‘s/olivia/petra/’ /etc/apt/sources.list
$ sudo sed -i ‘s/raring/saucy/’ /etc/apt/sources.list.d/official-package-repositories.list
$ sudo sed -i ‘s/olivia/petra/’ /etc/apt/sources.list.d/official-package-repositories.list
Let us examine the first command:
$ sudo sed -i ‘s/raring/saucy/’ /etc/apt/sources.list
“sudo” just gives the user “super-user” privileges temporarily.
The “sed” command is a text stream editor that opens a given file, looks in it for a string of text, and wherever that text occurs, replaces it with a different string of text.
So the first command open the file “sources.list” in the directory /etc/apt/, and wherever it finds the word “raring”, replaces it with the word “saucy”.
The switch “-i” tells the “sed” command to do the replacement “in-place”.
In essence, the first two instructions open the file “sources.list” and replace the word “raring” with “saucy”, and replace the word “olivia” with “petra”.
The third and fourth instructions open the file “official-package-repositories.list” and perform the same replacements.
That looks easy. I decided to go to the /etc/apt/ directory, find the “sources.list” file, and edit it myself. That would help me understand what is going on, and would avoid the problem of using the wrong quotes, and avoid typo-errors when typing these lo-o-o-ng instructions.
I opened a terminal window by clicking the terminal icon at the bottom of the screen.
I typed this command to get to the /etc/apt/ directory.
cd /etc/apt
I typed the “print working directory” command “pwd” to check that I was in the right folder.
pwd
I typed the “list files” command “ls”, to make sure the file “sources.list” was really there.
ls
It was on the list, so it was there.
I opened the file for editing using the text editor called gedit with this command.
sudo gedit sources.list
Much to my surprise I found the file contained only one line which was:
# deb http://archive.getdeb.net/ubuntu raring-getdeb apps games
I noted three things from looking at the line in this file:
1) There is only one occurrence of the word “raring”, so it was easy to change it to “saucy” by editing it manually.
2) There was no occurrence of the word “olivia”, so that made the second instruction (above) redundant.
3) The first character of the line is a hash ” # “, which makes the line a comment only, so it will never get executed anyway, even after changing “raring” to “saucy”.
Therefore the first two instructions given above only change a line that will never be executed anyway.
I then checked the file “official-package-repositories.list” in the directory
/etc/apt/sources.list.d
Much to my surprise I found a warning in the first line saying:
“# Do not edit this file manually, use Software Sources instead.”
This tells me not to use the third and fourth instructions above, which edit the file.
I’m puzzled. Can you please explain.
Thank you
Michael Walsh
While updating power went down and now when I log in a blank screen is shown..pls help
Upgrade went so easy with none personal byte lost IN my case … i`we just followed the given howto … and my system is now upgraded without any byte data lost, even i made backup/just in case … this is just an top example how things should work -lovely easy way. Tnx to all who made this work. Mint 15 x64 to 16 x64 Cinnamon. Charming for the way:-)
Now the backsides – Upgrade took me 2 GB of data.
And as guide said wait “couple of minutes” -> it was ment WAIT 10 mins on ssd… ;-)
Thanks broke my system
First comes up ugly – buggy – creepy unity
After unistall it nothing comes up and I have to reinstall new linux mint 16
Errors were encountered while processing:
/var/cache/apt/archives/unity-greeter_13.10.3-0ubuntu1_amd64.deb
E: Sub-process /usr/bin/dpkg returned an error code (1)
I have a problem at the end of the procesess it says it will add more mb more do I want to continue (Y/n) when I enter Y it says abort. what should I input
I have no problem using this way to get in 16, atm i dont have any other solution, 16 demands a live cd to continue the installation so i have to take the longer route, but i am very glad u did this thread, i am installing i installed dbus and was fixing the error when i turned on linux pam by mistake, took around 10 min then i was locked out from system.
oh well tested newest LMDE its to messy atm to deal with back to 16 and have some fun.
//Regards Johan
Ravi, thanks man. It all worked perfectly.
Hugs,
Navlig from Brazil.
I ran Ravi’s original set of commands. When I rebooted the system I also got the “Cinnamon crashing…” message. I let it run in Fallback mode.
I then ran the regular Update Manager, rebooted again, and everything was fine.
Hope this helps.
Glenn
Didn’t work and it kind of messed up my system… When I ran the two “/etc/apt/sources.list” commands, they worked fine, but the two “/etc/apt/sources.list.d/official-package-repositories.list” commands came with an error “sed: can’t read /etc/apt/sources.list.d/official-package-repositories.list: No such file or directory.” I ignored it and went ahead with the upgrade, everything seemed to go fine until I rebooted. It says I have Mint 16, but I cannot use Gnome (just a blank screen with a useless mouse pointer) and in Mate everything is a little screwy. I just have the desktop, no menus or anything (I have to open everything from terminal), and I can’t move windows around. I can click things, maximize and minimize windows (but once they’re minimized I can’t open them again). Any suggestions? I made a post at http://forums.linuxmint.com/viewtopic.php?f=90&t=163143 including an apt-get printout, thanks for any help.
I have upgraded to mint 15 but get a black screen on boot up can’t bypass go to type in crpt key and goes black. Can see log panel barely. I have tried everything listed on all pages i have found with no success.
Followed all the steps on this web page for my Linux Mint 15 (Olivia) virtual machine and also accepted “package maintener’s file” that is updated for all package files before rebooting the kernel. End result was a black screen with a hanging cursor on the top-left.
Thank goodness I made a snapshot of VM before following through with the steps.
In sum, this is not a reliable guide and I don’t think I will trust any guides written by this author again. :/
So I tried the commands, but fails. I don`t know how to get the tiny ““““ to point the other way. I have in on a a key with 4 text options (but I only know how to access two).
So; I downloaded the ISO. But cannot run the ISO withing Linux 15 (which will not let me run Japanese and English).
So; I thought I would wipe the SSD, but I put it in HDD case and connected it to my other haswell PC (to format it) but the USB does not recognize the HDD/SSD drive (its invisible).
Why are computers such cr@p to work with. I am really pleased my car is not such an irritating code-break to get started on a morning.
No doubt programmers would have been dragged out and shot in some countries at certain points in history (as were readers in Cambodia).
Is this secure and is the article updated to what it should be, I see people saying no do this, no do that in the comments…
You all know how long it is to have all the programs and desktop layouts you want before you are satisfied with your distro installation. Another issue is that i have 4.6gb of space left on my mint 15 partition, I so expect this to be an issue as it downloads all what’s needed…everything I download except programs, I place on another drive. After using the backup tool and saving all that needs saving to another drive, I might proceed…i’m just afraid this won’t be as good as if I used an usb key to boot and install over, but we all know this way of proceeding can’t be done without formatting.
I get two System Setting Menus after updating using the way you have shown.
One shows linux mint 16
Second shows Ubuntu 13.10.
What to do man…?
Upgraded Successfully…
I also noticed two Shortcuts to System Settings,
-one under Menu > Preferences > System Settings
(shows Appearance, Preferences, Hardware & Administration sections)
-one under Menu > Administration > System Settings
(shows Personal, Hardware & System sections)
Under Menu > Preferences, I also have two shortcuts for
-Bluetooth
-Network
-[one Language & Support shortcut with matching icon too] Regional & Language
-Startup Applications
-Universal Access
Any ideas on an easy way to sort them out?
Upgraded from 15 to 16, rebooted, logged in, and nothing! Whoops … changed the session to Xfce instead of the default, all is well… :)
Hi,
I have upgraded from Mint 15 Olivia to 16 Petra using the following:
$ sudo sed -i ‘s/raring/saucy/’ /etc/apt/sources.list
$ sudo sed -i ‘s/olivia/petra/’ /etc/apt/sources.list
$ sudo sed -i ‘s/raring/saucy/’ /etc/apt/sources.list.d/official-package-repositories.list
$ sudo sed -i ‘s/olivia/petra/’ /etc/apt/sources.list.d/official-package-repositories.list
$ sudo apt-get update && sudo apt-get dist-upgrade
$ sudo apt-get upgrade
there was some connectivity issue during the installation during the ‘sudo apt-get update && sudo apt-get dist-upgrade’ but installation was successful. Initially it gave me an error:
“Do you want to restart – running in fallback mode” which did not restart on clicking yes and owuld go on clicking no.
I once again updated via terminal using he following commands again
$ sudo apt-get update && sudo apt-get dist-upgrade
$ sudo apt-get upgrade
since then i am getting this BlackNBlue error – i don’t remember using this theme on Olivia but i believe it seems to be a problem irrespective.
I tried all the options availables in various forums viz:
1. pacman was not installed so i installed it using the ‘apt-get’ command but on running the
“pacman -s mdm-themes-extra” – i got an error saying ‘no display available’
2. ‘edit /etc/mdm/defaults.conf’ command gives an error saying it works only with applications.
by now you would have understood i am very new to this.
As suggested at another forum I also tried via the root shell by going to ‘html-themes’ using cd and tried to rename ‘cloud’ to ‘blacknblue’ using ‘mv’ but an error occurred saying ‘no file or directory present’.
Please help as i am unable to log into Mint 16.
I have a dual-boot laptop with Ubuntu 13.04 & Mint 16 (supposedly) on different partitions. They were both working fine till i upgraded Mint.
All help is appreciated.
thanks.
If possible can you post a screen grab of that error here, so I could get better idea.
Dear Ravi, I have successfully upgraded to mint16 from mint15, but I have a doubt my C drive is having both files now. That is that of mint15 and 16. how we can find out the old unwanted files of mint 15 and remove it.
regards
Kurian
I run
$ sudo sed -i ‘s/raring/saucy/’ /etc/apt/sources.list
$ sudo sed -i ‘s/olivia/petra/’ /etc/apt/sources.list
$ sudo sed -i ‘s/raring/saucy/’ /etc/apt/sources.list.d/official-package-repositories.list
$ sudo sed -i ‘s/olivia/petra/’ /etc/apt/sources.list.d/official-package-repositories.list
and run
$ sudo apt-get update && sudo apt-get dist-upgrade
but not update reconsider at the last moment. How I can undo commands?
I’ve exactly the same problem, please help us!
I’ve installed many software that i need, and i can not start on cero
Hi,
I also have the same problem, as in I can only enter Linux Mint 16 in fallback mode and Cinnamon keeps crashing. My model is Acer Aspire 5742Z, and Linux Mint 15 was working fine before.
Does anyone have any guidance as to what the fix may be? I am having this same issue since upgrading to Mint.
Hi,
I followed following comments
sudo sed -i ‘s/raring/saucy/’ /etc/apt/sources.list.d/official-package-repositories.list
sudo sed -i ‘s/olivia/petra/’ /etc/apt/sources.list.d/official-package-repositories.list
sudo apt-get update && sudo apt-get dist-upgrade
sudo apt-get upgrade
and everything went fine, but when I restart my computer it prompts warning message
“Do you want to restart Cinnamon?
Cinnamon just crashed. You are currently running in Fallback Mode.”
I have two options Yes or No. If I choose yes it prompts same warning message. If I choose No then I loose all desktop menu.
Thanks in advance,
All I get is command not found when I copy and paste this into terminal. I new to linux. Seriously dont understand this, it seems the only way to find out how to do stuff on it is through word of mouth on forums and unofficial tutorials.
I am currently dual booting Linux Mint 15 with windows 8.1. I have it set to load with the Windows boot window giving me the option of which OS to choose. I find this nicer looking and easier for the kids to us. My question is if I do this process as stated, will it mess up my dual boot set up?
No, it will not mess up your dual boot setup, it’s just upgrade from previous release to newer.
ok very good
Thanks
I tried to upgrade from 15 Oliva to 16. Everything went well and good updated successfully but while rebooting it was saying CInnamom just crashed. I understood that my OS crashed during the process of upgrading but no worries. Still I can work on this machine without much Problem and I am backing up my files.
“Operation Success..Patient died”
sorry make that linux mint “15” olivia (Not 14 as stated originally) sorry I seem to have lost count
I was given a link to this site when I asked if there was an “easy” way to upgrade from linux mint 14 olivia which had stopped installing new apps when using its Application Manager. So far I am left confused …it sounds like the initial instructions have all been dismissed as incorrect by other comments.. Would someone please simply update the instructions at the top of this site so that a relative newbee like myself has a chance at a successful upgrade…thanks.
Ok it seems because I did an upgrade from Mint 14 as opposed to a clean install my repositories are still listed in sources.list.
I instead have webupd8team-arista-olivia.list should I change the sources there?
I seem not to have the official-package-repositories.list file. What should I do?
Instructions worked perfectly. I did do update and upgrade before starting and I had a few glitches (dupes) in sources which I cleared before following the upgrade process. Thanks.
The updated instructions worked for me without any trouble. It might be beneficial to do “apt-get update” before following your instructions so you do not run into other anomalies. Great job!
when i try the other method i get this
maddoggin@maddoggin ~ $ sudo sed -i ‘s/raring/saucy/’ /etc/apt/sources.list
maddoggin@maddoggin ~ $ sudo sed -i ‘s/olivia/petra/’ /etc/apt/sources.list
maddoggin@maddoggin ~ $ sudo sed -i ‘s/raring/saucy/’ /etc/apt/sources.list.d/official-package-repositories.list
sed: can’t read /etc/apt/sources.list.d/official-package-repositories.list: No such file or directory
maddoggin@maddoggin ~ $ sudo sed -i ‘s/olivia/petra/’ /etc/apt/sources.list.d/official-package-repositories.list
sed: can’t read /etc/apt/sources.list.d/official-package-repositories.list: No such file or directory
maddoggin@maddoggin ~ $
1561 upgraded, 197 newly installed, 25 to remove and 3 not upgraded.
Need to get 1,055 MB of archives.
After this operation, 650 MB of additional disk space will be used.
Do you want to continue [Y/n]? Y
Abort.
this is what i got
well i followed commands above
sudo sed -i ‘s/raring/saucy/’ /etc/apt/sources.list.d/official-package-repositories.list
sudo sed -i ‘s/olivia/petra/’ /etc/apt/sources.list.d/official-package-repositories.list
sudo apt-get update && sudo apt-get dist-upgrade
sudo apt-get upgrade
after a bunch of stuff happend it asked if i want to continue (Y/N) i hit Y and the abort. whats the deal??
I did following commands
sudo sed -i ‘s/raring/saucy/’ /etc/apt/sources.list.d/official-package-repositories.list
sudo sed -i ‘s/olivia/petra/’ /etc/apt/sources.list.d/official-package-repositories.list
sudo apt-get update && sudo apt-get dist-upgrade
sudo apt-get upgrade
and after reboot its not leting me in with an error “Theme loading error “Clouds GL”
What to do?
Hello vovchyck,
I ran into the same problem – mine was “TimeMachine” theme though.
After you get this error, try the following key combinations:
CRTL+ALT+F1 (or F2, etc – up to F8)
You shall get a blank screen where you can login: enter your username and password. After that issue this command:
$ startx
You shall have your GUI. Now Menu -> Preferences -> System Settings
DO NOT DO: Menu -> Administration -> System Settings
In the dialog that opens, open “Login Screen” in “Administration” (last section). You need to enter your password again.
Most probably there will be two theme listed: Clouds and Mint-X. But none of them selected. Select one. Close.
Now: Menu -> Logout
$ sudo shutdown -r now
This will restart your computer. Enjoy !
Not working for me …
sudo sed -i ‘s/raring/saucy/’ /etc/apt/sources.list.d/official-package-repositories.list
results in:
sed: -e expression #1, char 1: unknown command: `�’
Please use the correct quotes.
Corrected the quotes but anyway not working
sudo sed -i ‘s/raring/saucy/’ /etc/apt/sources.list.d/official-package-repositories.list
and
sudo sed -i ‘s/olivia/petra/’ /etc/apt/sources.list.d/official-package-repositories.list
both fail with no such file ….
Again you’re using wrong quotes, the correct way is:
can i go from 64 bit 14 linux mint to 16 linux mint 64 bit? if at all possible please reply and i will try it i have looked on mint 16 page and it has no windows installer (i would normally use that) as i dont want to format my drive :D thanks in advance!
No, you can’t jump directly from Mint 14 to 16, you need to first upgrade to 15 and then 16. Please follow the below guides that might help you to upgrade to Mint 16.
Upgrade Linux Mint 14 (Nadia) to Linux Mint 15 (Olivia)
Upgrade Linux Mint 15 (Olivia) to Linux Mint 16 (Petra)
I upgraded from Nadia (14) to Petra (16) successfully.
Followed the instructions but replaced ‘quantal’ instead of ‘raring’ and ‘nadia’ instead of ‘olivia’ as well as updating all other apt sources to ‘saucy’.
Had one issue with mdm on reboot but found solution:
http://forums.linuxmint.com/viewtopic.php?f=46&t=150551&p=794200#p794200
Dear Donovan,
That’s great you jumped from Mint 14 to 16. It would be very helpful if you could post those commands, so others users will get benefited from this.
Did this with all four sed commands. I’m assuming that the OS upgraded, but, it didn’t do grub well (needed to rescue with rescatux) and it won’t let me log in on the login page (Steampunk)
Can’t start the PC now, as it remains black with mouse pointer and naught else.
48 upgraded, 0 newly installed, 0 to remove and 44 not upgraded.
E: Could not get lock /var/cache/apt/archives/lock – open (11: Resource temporarily unavailable)
E: Unable to lock directory /var/cache/apt/archives/
This is the error message I am getting, while upgrading from mint 15 Olivia. Any suggestions on how to rectify and upgrade to the latest version.
Delete these two lock file with the following commands:
# sudo rm /var/lib/apt/lists/lock
# sudo rm /var/cache/apt/archives/lock
After that, try running command again..
Hello, can we safely delete GNOME now that CINNAMON 2.0 is out?
Thanks!
Changed the wallpaper to Linux Mint 16…no problem, OK!
I’m just the happy user no expert, really need expert help, simply don’t know how to get rid of those duplicated icons buttons when the Preference Button, these duplicated icons are bluetooth, color (square and star), displays, networks, power, region & settings, startup applications, sound & universal access.
Appreciate any help please, TQ
Followed thro’ the upgrade cmds, however at reboot, it says Linux Mint 16…..ok. When system up, the wallpaper still displays Linux Mint 15! which is incorrect. The system upgraded to Linux Mint 16
What did i do wrong? Any help please!
I also had to replace raring and olivia in this file too:
/etc/apt/sources.list.d/official-package-repositories.list
Sorry, I missed to include in those two files. Thanks for update me.
Does not work for me .This is cat /etc/*-release output after upgrade
DISTRIB_ID=LinuxMint
DISTRIB_RELEASE=15
DISTRIB_CODENAME=olivia
DISTRIB_DESCRIPTION=”Linux Mint 15 Olivia”
NAME=”Ubuntu”
VERSION=”13.04, Raring Ringtail”
ID=ubuntu
ID_LIKE=debian
PRETTY_NAME=”Ubuntu 13.04″
VERSION_ID=”13.04″
HOME_URL=”http://www.ubuntu.com/”
SUPPORT_URL=”http://help.ubuntu.com/”
BUG_REPORT_URL=”http://bugs.launchpad.net/ubuntu/”
Sorry for trouble actually I missed two more commands to add in the article. Now I’ve updated the article, can you try again to upgrade.
Actually the commands for the upgrade are:
sudo sed -i ‘s/raring/saucy/’ /etc/apt/sources.list.d/official-package-repositories.list
sudo sed -i ‘s/olivia/petra/’ /etc/apt/sources.list.d/official-package-repositories.list
sudo apt-get update && sudo apt-get dist-upgrade
sudo apt-get upgrade
My upgrade is in progress right now.
Yeah thanks, i failed include in these files. Thanks updated in write-up..
In my machine, I had to update 2 more files to upgrade properly
Here are the commands
sudo sed -i ‘s/raring/saucy/’ /etc/apt/sources.list.d/official-package-repositories.list
sudo sed -i ‘s/olivia/petra/’ /etc/apt/sources.list.d/official-package-repositories.list
sed: -e expression #1, char 1: unknown command: `�’
$ sudo sed -i ‘s/raring/saucy/’ /etc/apt/sources.list
Don’t works with this command
Try this ->
$ sudo sed -i ‘s/raring/saucy/’ /etc/apt/sources.list.d/official-package-repositories.list
$ sudo sed -i ‘s/olivia/petra/’ /etc/apt/sources.list.d/official-package-repositories.list
I’ve followed the instructions above to upgrade from mint 14 to mint 17, and apparently everything is working; EXCEPT I no longer have sudo/administrator privileges (no else does either). This is sort of important, and worrying. Oh and my keyboard is US English only and I need it to be UK English
I am thinking about going from 15 to 17.
Did you get past the missing “sudo/administrator” privileges?
Also were there any additions to the sources.list