Linux Mint 19 code named “Tara”, is the latest release of the Mint project. It is a Long Term Support (LTS) release to be supported until 2023. Mint 19 ships in with updated software and enhancements and several new features as explained here.
In this article, we will show how to upgrade from Linux Mint 18, 18.1 or 18.2 to 18.3. Then we will show how to create a system snapshot using timeshift, switch system display manager to LightDM and upgrade to Linux Mint 19 from 18.x.
Requirements:
- You should have experience with APT package manager and the command line.
- You should be running Linux Mint 18.3 Cinnamon, MATE or XFCE edition, otherwise, first upgrade to Mint 18.3 using the Update Manager, then you can upgrade to Mint 19.
- Set your terminal to unlimited scrolling; from the terminal windows, go to Edit=>Profile Preferences=>Scrolling. Check the “Scroll on output” or “unlimited” option and click “OK”.
Upgrading to Linux Mint 18.3 From 18.x
As I said, first you need to upgrade to Linux Mint 18.3 from previous Linux Mint 18, 18.1 or 18.2 using upgrade tool as shown.
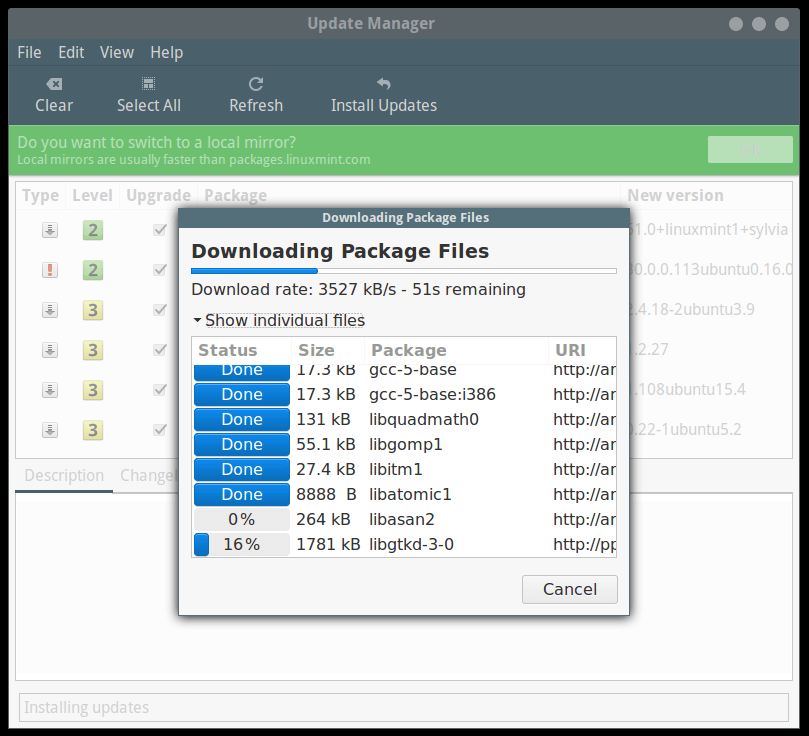
Go to Menu => Update Manager (if you are shown the update policy screen, select the policy you want and click OK), then click on the Refresh button to check for any new version of mintupdate and mint-upgrade-info.
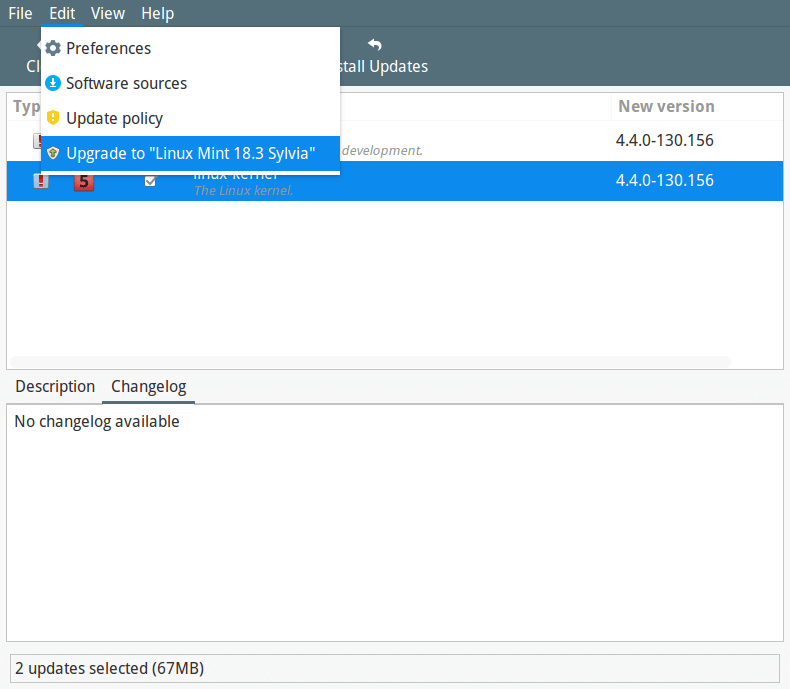
In case there are updates for any packages, apply them by clicking on Install Updates. Once you have installed all updates, go to Edit => Upgrade to Linux Mint 18.3 Sylvia (this menu item only appears when your system is up to date) as shown in the following screenshot.
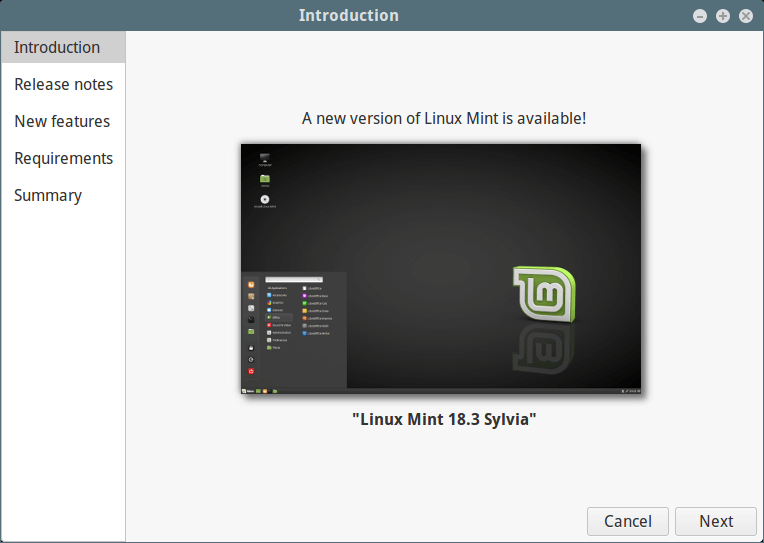
You will see the screen below telling you a new version of Linux Mint is available. Click Next and follows on screen instructions.
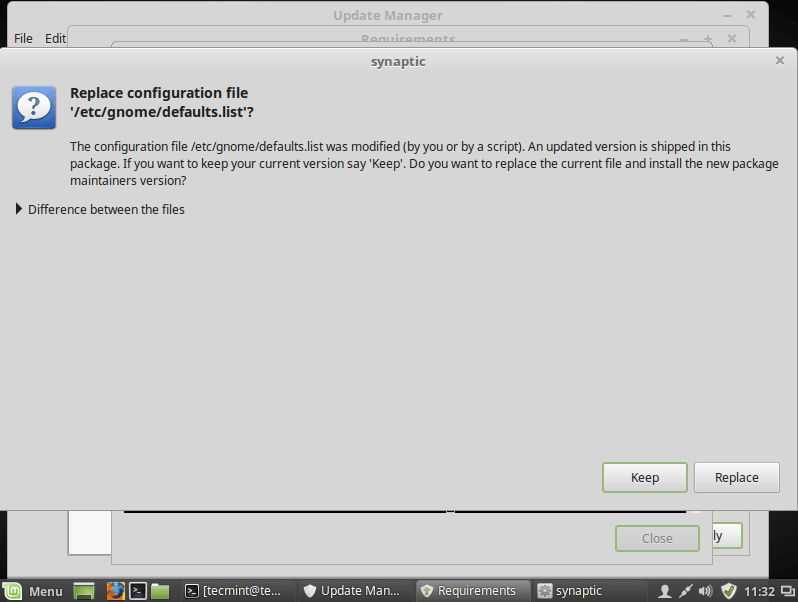
During the installation of upgrades, you will be asked whether to keep or replace configuration files, click on Replace as shown in the following screenshot.
After the upgrade is finished, reboot your computer.
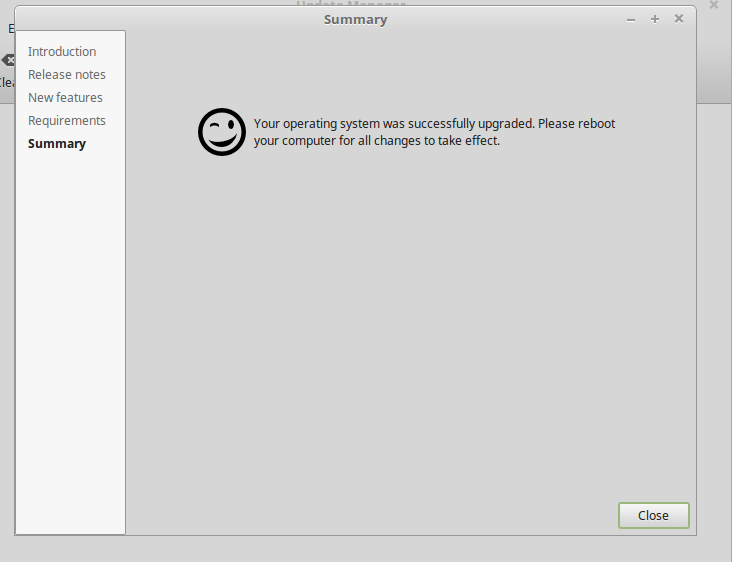
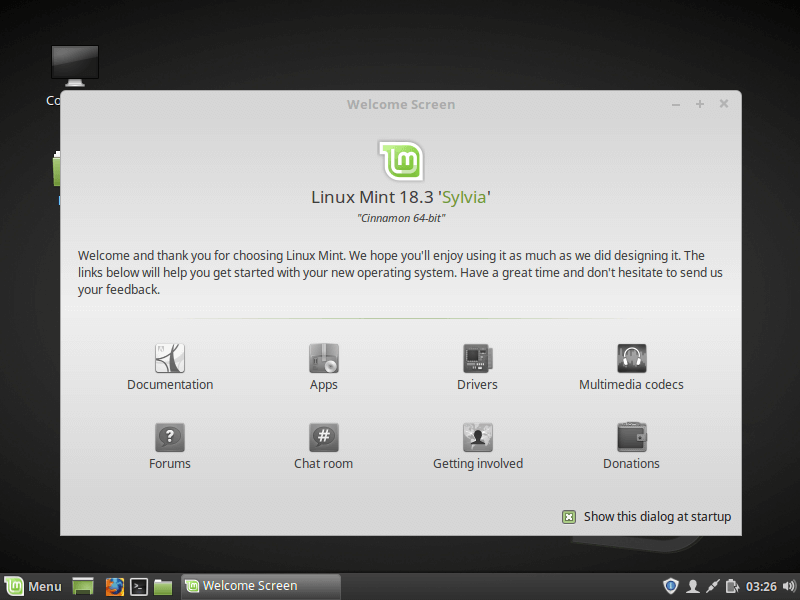
Once you have rebooted, you now have Linux Mint 18.3 running, and you are good to go.
Upgrade from Linux 18.3 to Linux Mint 19
1. This is an important and mandatory step, in case the upgrade process doesn’t go well and your system breaks, you can reclaim your system by restoring your latest system snapshot.
Create Linux Mint System Snapshot Using Timeshift
To install timeshift, open a terminal and run the following command.
$ sudo apt install timeshift
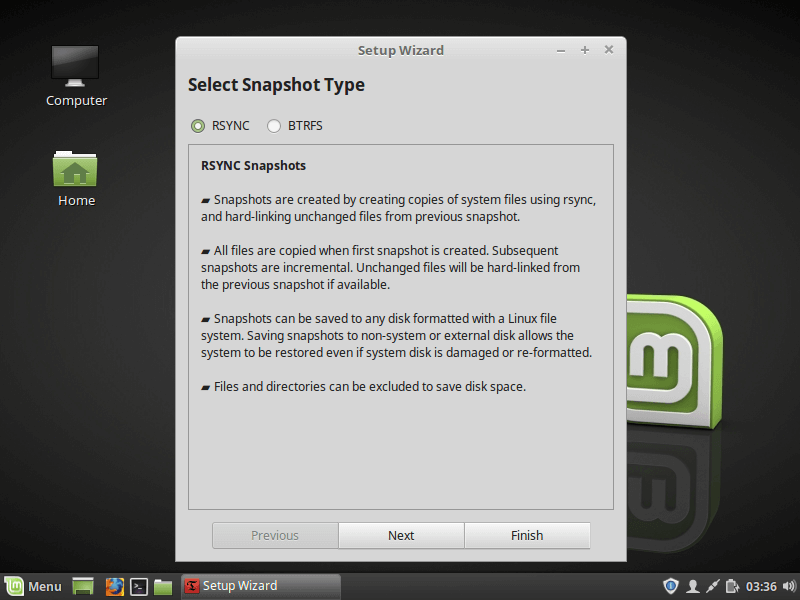
2. Then go to the system Menu and search for Timeshift, then click on it. Choose the snapshot type and click Next. The timeshift will try to estimate the system size and determine attached storages.
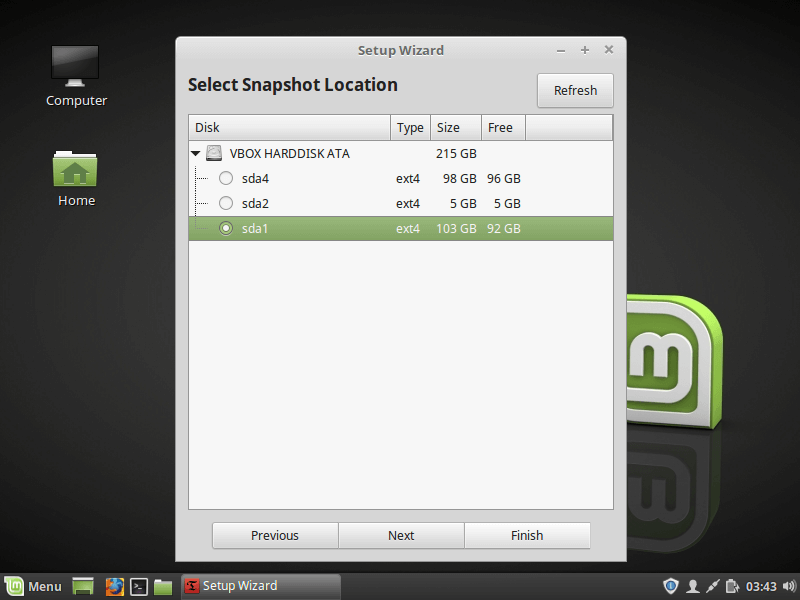
3. From the wizard, select a destination for your snapshots, then click Finish.
4. Afterwards, click on the Create button to make a manual snapshot of your operating system.
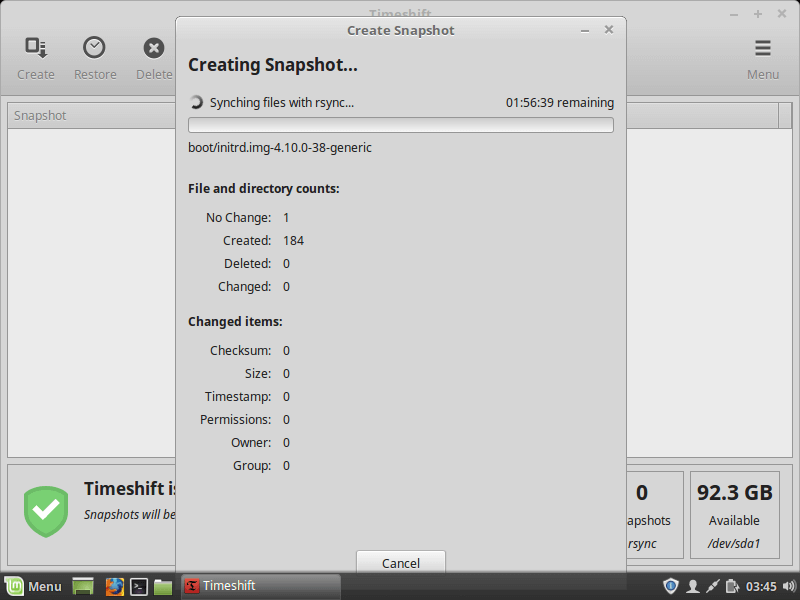
Once the creation of system snapshot is finished, move to the next step.
Step 2: Switch from MDM to LightDM Display Manager
5. The MDM display manager is not supported in Linux Mint 19, you need to install LightDM. To check your current display manager, run the following command.
$ cat /etc/X11/default-display-manager

/usr/sbin/mdm
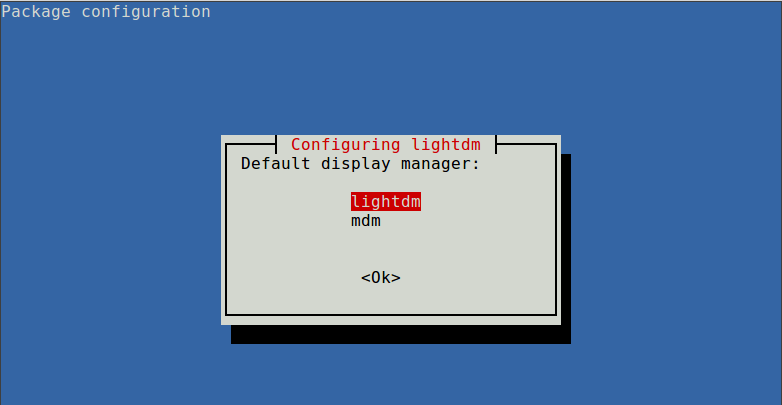
6. In case the output shows “/usr/sbin/lightdm”, head over to Step 3. But if the output is “/usr/sbin/mdm” as shown in the above output, you need to switch to LightDM and remove MDM as shown.
$ sudo apt install lightdm lightdm-settings slick-greeter
7. During the package installation process, you will be asked to choose a display manager between MDM and LightDM, choose LightDM, and click Enter.
8. Now remove MDM using the following command.
$ sudo apt remove --purge mdm mint-mdm-themes*
9. Next, reconfigure LightDM using dpkg-reconfigure command and reboot your system.
$ sudo dpkg-reconfigure lightdm
$ sudo reboot
Step 3: Upgrading to Linux Mint 19
10. To start, go to Menu => Update Manager (if you are shown the update policy screen, select the policy you want and click OK), then click on “Refresh” to update the APT package manager cache and click Install Updates to apply all updates.
If your system is up to date, proceed to install the upgrade tool by running the following command from a terminal.
$ sudo apt install mintupgrade
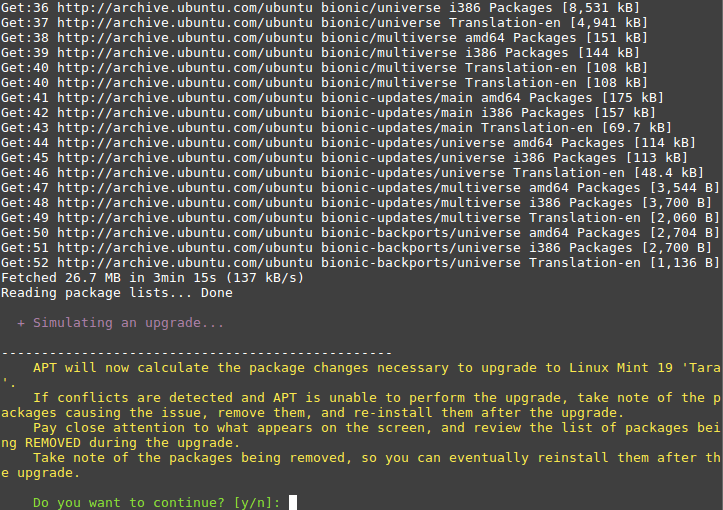
11. Next, run the following command to simulate an upgrade and follow the on screen instructions.
$ mintupgrade check
This command will:
- temporarily, point your system to the Linux Mint 19 repositories and assesses the impact of an upgrade. Once the simulation is complete, it restores your old repositories.
- let you know which packages will be upgraded, installed, kept back and removed (you can reinstall them after the upgrade).
- also help you point out any packages that are preventing the upgrade, if there are any, remove them to proceed.
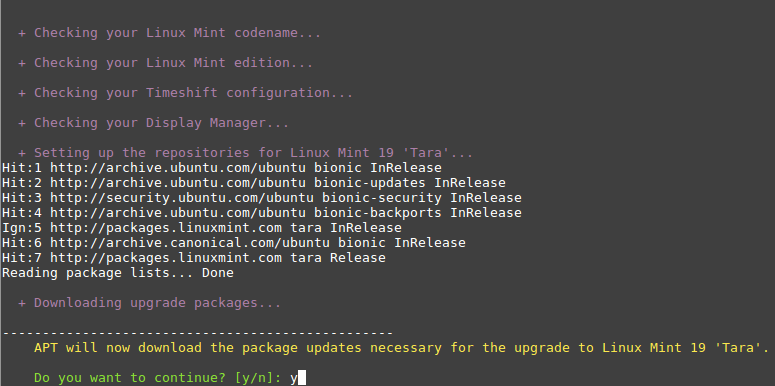
12. If you are satisfied with the results from the upgrade simulation process, proceed to download the package upgrades as shown.
$ mintupgrade download
13. Now its time to apply the upgrades. This is a critical step that you should be careful about, it can’t be reversed, you can only go back by restoring a system snapshot (that is if you properly created one as shown above). Run this command to apply the upgrades.
$ mintupgrade upgrade
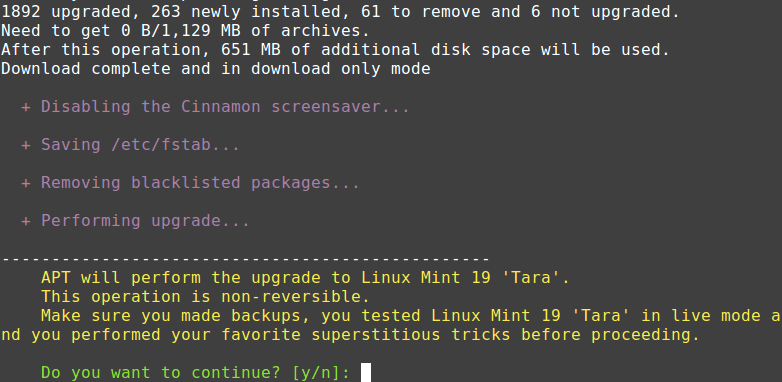
Sit back and wait for the upgrade to finish. Once it’s done, reboot your system, login and enjoy Linux Mint 19.
If the upgrade process didn’t go well as expected, for one reason or the other, restore your operating system to an earlier state, either from within Linux Mint, or by launching Timeshift from a live Mint session from a live USB or live DVD.


I get a red error “!! ERROR: Failed to configure APT sources”.
Now because it’s in red I am not proceeding, anyone else come across this?
Cheers
Matt Jones
@Matt,
Try this command to fix the error:
Thanks for the quick assistance Ravi. I gave up and went fresh install for V20.2
Hi, Thanks,
It took the whole night and stopped for 3 password requests. It finally finished and booted Ok. But gave me access denied on my second Hard Disk were all my Backups and Timeshift sits.
Rebooted again and now have access to the second drive. Permission Unknown.
I think next time I will do a clean install far better and cleaner. Left about 2 GB of rubbish that was not cleaned removed due to Permission errors.
There seem to be a few bugs due to permissions very frustrating.
How does one overcome this?
@Mac
Thanks for the feedback. Try to share your experience with the Linux Mint developers: https://www.linuxmint.com/contactus.php
I got stuck in a loop mode. After all the steps performed right when I ran “mintupgrade upgrade” I see the progress for over two hours and I don’t know what to do. Obviously, something is wrong. What do I do?
Does this work with Linux Mint 18.3 on a LUKS encrypted SDD?
Any special considerations?
Does Linux Mint 19 take that long to install from a fresh install off of a flash drive that this is even worth the hassle? You should have your Op system drive installed with 3 partitions anyway: Main Op System partition, swap partition, and then your /home partition so if your op system ever takes a dump and you have to re-install your op system you don’t really lose anything by re-installing since most settings are on your /home partition.
It only takes me about 25 minutes to wipe my op system and do a fresh install including full updates with XFCE 18.3. Unless 19 will not recognize the /home partition from 18.3 without going the upgrade path.
Please don’t run this command as root or with elevated privileges.
The line above shows up when I activate the commands:
What is going wrong as until the above command all went well?
go software sources, maintenance, downgrade foreign packages
Did that. The same thing happens. “Please don’t run this command as root or with elevated privileges.“.
Well, there you go; upgrade all done no issues that I immediately notice. Followed all your steps. It took 14 min 11 sec to complete.
Sadly update manager failed in the process in the early stages and on reboot, no system. Had to use live cd and restore Mint 18.3 through Timeshift :-(
I had no window manager after the first reboot.
ctrl-alt-f1login
the tutorial works great !
thanks, from BE
@Pieter[BE]
We are glad that this worked out well for you. Many thanks for the useful feedback.
Great Linux Mint upgrade technical article. I followed your steps from my old Linux Mint 18.3 and smoothly upgraded to Linux Mint 19 Tara 64-bit.
Linux Mint 19 on my PC now is much faster than Linux Mint 18 and keyboard shortcuts now works like in Ms-Windows.
Much appreciated and big thanks
Thanks a lot. I’m a complete novice and I followed the instructions to the letter and everything worked perfectly.
@Andy
That’s great. Many thanks for the useful feedback.
@Jacko thanks a million. upgrade ./success
@Maina
We are glad that this worked fine for you. Thanks for the feedback.
Isn’t this whole process eventually going to end up in the Upgrade Manager? Isn’t that what its for? If so, I’ll just wait for the easy way.
What if I have “/usr/bin/sddm” as my display manager? Is that going to work?
@Manuel
Please read the instructions carefully, “5. The MDM display manager is not supported in Linux Mint 19, you need to install LightDM.”
Thanks I did this on 3 machines. On each one I had this additional step after the update failed:
Then rerun update.
@bill
Thanks a lot for sharing this useful tip.
You’re welcome.
Tried three times without success. Each time I get all the way to the last action, 13 of Step 3. Instead of getting a prompt saying, “Do you want to continue? [y/n]: ” I get a prompt that is automatically answered in the negative, “”Do you want to continue? [y/n]: N ” and then another line that says “Abort“.
It also says that my original package info has been restored. Screen saver is off and no package manager is open so no conflicts there.
Can’t I just download the latest install and upgrade with that?
@Mint 18.3 User
You can download the latest install and upgrade with that. It’s okay!
You might get a failure during upgrade due to dependency problems with dbus-x11.
When it fails, it will try a lot of times before giving up. If you see this, might as well kill it, then run
apt install dbus-x11, then just restartmintupgrrade upgrade.Thank you so much! You rock, mate.
Thanks! No problems!
@Jako
Welcome, thanks for the feedback.
ERROR: Please set up system snapshots. If anything goes wrong with the upgrade, snapshots will allow you to restore your operating system. Install and configure Timeshift, and create a snapshot before proceeding with the upgrade.
@Sarah,
It suggesting you to backup your system using Timeshift, before upgrading to latest version of Linux Mint 19.
Problem upgrading from Mint 18.3 to Mint 19. locale: Cannot set LC_ALL: cannot change locale (en_US.UTF-8) and locale: Cannot set LC_ALL to default locale: No such file or directory.
@Kerry
Use the update-locale utility to update your system locale, for example:
To see all locales, use the command:
I use this command to install the package and choose the locale you said:
Thank you, this method worked fine. I lost no package functionality, not even in MySQL or Spyder with numerous Python packages. I got a message in the terminal that there were too many errors to complete install, but use the new updater to get correct packages.
I did that, without rebooting first, and, after a couple of hours, it was done. When I rebooted, Mint 19 appeared on my boot menu (I use dual boot with Windows 10), and worked perfectly. Not much different from Mint 18.3, but a little smoother, faster, and crisper appearance.
Got as far as Step 9, performed
$ sudo reboot, and the screen is now completely blank, with no display of any kind. I tried power off and restating, but there is still a completely blank screen.I seem to have lost my display entirely. What do I do now? (Note: I’m sending this from my wife’s Mac.)
I tried to upgrade from Mint 18.3 to 19, following your instructions. All went well, answered
Y, until all the downloaded packages were installed and the installation wanted some more packages.I noticed that my internet connection was disconnected part of the way through the install, and when the additional packages were requested, they were not available, because no internet. Installation failed :(
@Kerry
Oh, sorry, you should always have steady and good internet connection when performing an upgrade. Any internet disconnection can result into failure like the one you experienced.
After using Linux Mint since 2011 I have to conclude that their so-called upgrade method is a hit and miss mess. I simply can’t understand why Clem and his team haven’t put their heads together and come up with something as simple and seamless as Ubuntu’s upgrade method from one release to another. I may well go back to Ubuntu and install MATE, my desktop of choice.
@Rick
Many thanks for sharing your thoughts with us.
I think installing from live DVD or Memory stick goes no very much faster. After clean installation you need download all packages from depository because this on distro sources are not actualized.
Additionally you need re-install skype (if any) and Earth and so on.
Or am I wrong?
@Tomas
You are right! After a clean installation, you need to install utilities/tools and other packages for productivity.
The article is very nice!
But it seems that it is better (and easier!) to install the Linux Mint 19 directly from the distro. Isn’t?
Thanks.
@Bulat
Yeah, a fresh installation is actually much easier. But a number of users actually prefer an upgrade. Thanks for the feedback.
I’d confirm that for my part. Tried the upgrade yesterday. Seem to go smooth but took very long. Started at 4pm and this morning at 6pm still seem to work or was stuck. Since nothing seem to went further I aborted and restored the system to 18.3.
So I will proceed with my fresh iso installation on another partition. But anyway it is a great and easy to understand procedure. Thank you. :-)
@Waller
Okay, many thanks for the useful feedback.
I tried to upgrade from v18.3 to v19. After initial success through formation of snapshots etc, when the command to upgrade was in process and the list of packages to be upgraded came up and a final query on “Do you want to continue?” the system presumed “n” as the answer instead of “y”, and the upgrade process naturally aborted.
@aram
That is strange, have you tried once more? You can also contact the Mint developers about this: http://developer.linuxmint.com/reporting-an-issue.html Thanks for the feedback.
I also experienced that…
Nice article brother !!!
@Dhinesh
Thanks bro, many thanks for appreciating this little piece of work. W e are glad that you found it useful.