Whisper AI is an advanced automatic speech recognition (ASR) model developed by OpenAI that can transcribe audio into text with impressive accuracy and supports multiple languages. While Whisper AI is primarily designed for batch processing, it can be configured for real-time speech-to-text transcription on Linux.
In this guide, we will go through the step-by-step process of installing, configuring, and running Whisper AI for live transcription on a Linux system.
What is Whisper AI?
Whisper AI is an open-source speech recognition model trained on a vast dataset of audio recordings and it is based on a deep-learning architecture that enables it to:
- Transcribe speech in multiple languages.
- Handle accents and background noise efficiently.
- Perform translation of spoken language into English.
Since it is designed for high-accuracy transcription, it is widely used in:
- Live transcription services (e.g., for accessibility).
- Voice assistants and automation.
- Transcribing recorded audio files.
By default, Whisper AI is not optimized for real-time processing. However, with some additional tools, it can process live audio streams for immediate transcription.
Whisper AI System Requirements
Before running Whisper AI on Linux, ensure your system meets the following requirements:
Hardware Requirements:
- CPU: A multi-core processor (Intel/AMD).
- RAM: At least 8GB (16GB or more is recommended).
- GPU: NVIDIA GPU with CUDA (optional but speeds up processing significantly).
- Storage: Minimum 10GB of free disk space for models and dependencies.
Software Requirements:
- A Linux distribution such as Ubuntu, Debian, Arch, Fedora, etc.
- Python version 3.8 or later.
- Pip package manager for installing Python packages.
- FFmpeg for handling audio files and streams.
Step 1: Installing Required Dependencies
Before installing Whisper AI, update your package list and upgrade existing packages.
sudo apt update     [On Ubuntu]
sudo dnf update -y  [On Fedora]
sudo pacman -Syu    [On Arch]
Next, you need to install Python 3.8 or higher and Pip package manager as shown.
sudo apt install python3 python3-pip python3-venv -y             [On Ubuntu]
sudo dnf install python3 python3-pip python3-virtualenv -y       [On Fedora]
sudo pacman -S python python-pip python-virtualenv               [On Arch]
Lastly, you need to install FFmpeg, which is a multimedia framework used to process audio and video files.
sudo apt install ffmpeg     [On Ubuntu]
sudo dnf install ffmpeg     [On Fedora]
sudo pacman -S ffmpeg       [On Arch]
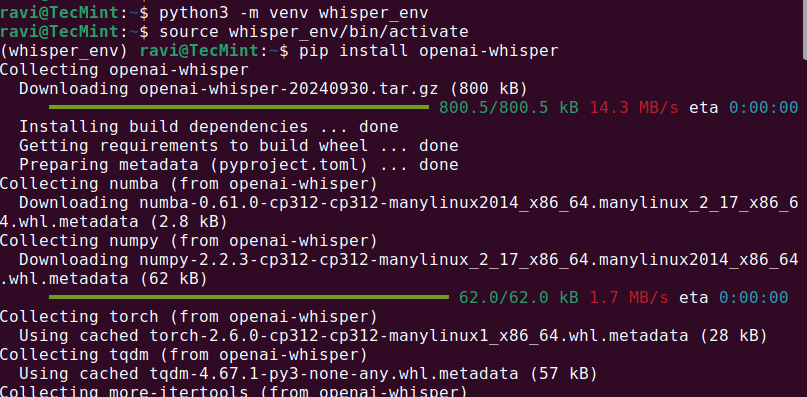
Step 2: Install Whisper AI in Linux
Once the required dependencies are installed, you can proceed to install Whisper AI in a virtual environment that allows you to install Python packages without affecting system packages.
python3 -m venv whisper_env
source whisper_env/bin/activate
pip install openai-whisper
Once the installation is complete, check if Whisper AI was installed correctly by running.
whisper --help
This should display a help menu with available commands and options, which means Whisper AI is installed and ready to use.

Step 3: Running Whisper AI in Linux
Once Whisper AI is installed, you can start transcribing audio files using different commands.
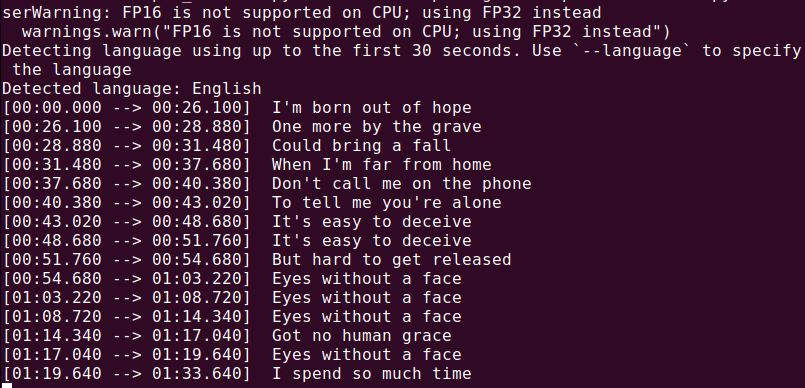
Transcribing an Audio File
To transcribe an audio file (audio.mp3), run:
whisper audio.mp3
Whisper will process the file and generate a transcript in text format.
Now that everything is installed, let’s create a Python script to capture audio from your microphone and transcribe it in real time.
nano real_time_transcription.py
Copy and paste the following code into the file.
import sounddevice as sd
import numpy as np
import whisper
import queue
import threading

# Load the Whisper model
model = whisper.load_model("base")

# Audio parameters
SAMPLE_RATE = 16000
BUFFER_SIZE = 1024
audio_queue = queue.Queue()

def audio_callback(indata, frames, time, status):
    """Callback function to capture audio data."""
    if status:
        print(status)
    audio_queue.put(indata.copy())

def transcribe_audio():
    """Thread to transcribe audio in real time."""
    while True:
        audio_data = audio_queue.get()
        audio_data = np.concatenate(list(audio_queue.queue))  # Combine buffered audio
        audio_queue.queue.clear()

        # Transcribe the audio
        result = model.transcribe(audio_data.flatten(), language="en")
        print(f"Transcription: {result['text']}")

# Start the transcription thread
transcription_thread = threading.Thread(target=transcribe_audio, daemon=True)
transcription_thread.start()

# Start capturing audio from the microphone
with sd.InputStream(callback=audio_callback, channels=1, samplerate=SAMPLE_RATE, blocksize=BUFFER_SIZE):
    print("Listening... Press Ctrl+C to stop.")
    try:
        while True:
            pass
    except KeyboardInterrupt:
        print("\nStopping...")
Execute the script using Python, which will start listening to your microphone input and display the transcribed text in real time. Speak clearly into your microphone, and you should see the results printed on the terminal.
python3 real_time_transcription.py
Conclusion
Whisper AI is a powerful speech-to-text tool that can be adapted for real-time transcription on Linux. For best results, use a GPU and optimize your system for real-time processing.


Dear Ravi,
First of all, thank you for this great work, and all the best to you in 2026.
My question: I am deaf and would like to use real-time transcription in German. After some initial trouble (specifically the ValueError: need at least one array to concatenate, which I fixed using your suggested check), everything works as expected:
whisper --helpworks, and I can also get a transcript from an audio file in German.However, when I try real-time transcription (using, of course,
result = model.transcribe(audio_data.flatten(), language="de")), I get no output at all—no text, nothing.I have tried waiting for some time, but still nothing happens.
Do you have any idea what might be going wrong?
Thank you very much in advance!
@irmhild,
Thank you for your kind words, and I’m glad to hear you were able to resolve the initial error and successfully transcribe audio files in German.
Regarding the real-time transcription issue: what you are seeing is a common limitation rather than a configuration mistake.
model.transcribe()is designed for complete audio segments, not for continuous real-time streams. If the incoming audio buffer is too short, contains mostly silence, or is not finalized, Whisper may simply return no text without raising an error.A few points to check:
Make sure
audio_dataactually contains speech and not just silence. Whisper will output nothing if the audio energy is too low.Real-time transcription typically requires buffering audio into longer chunks (e.g., several seconds) before calling
transcribe(). Calling it too frequently on small frames often results in empty output.Ensure the audio is sampled at 16 kHz (or properly resampled), mono, and normalized to the expected float range.
For real-time use, many implementations use a loop that accumulates audio, applies a voice-activity check, and only then calls
transcribe().Since file-based transcription works for you in German, language support is not the issue. The problem is almost certainly related to how the live audio is captured, buffered, or passed to the model.
I would recommend testing by saving a few seconds of your “real-time” audio to a file and transcribing that file. If that works, the issue is confirmed to be in the streaming logic rather than Whisper itself.
I hope this helps, and please feel free to share more details about your audio capture setup if you need further assistance.
Dear Ravi,
Thank you for your reply. After returning from holiday, I tried again today. As you suggested, I saved a file, but I’m not sure what to do next to transcribe in a quasi “live” mode.
Could you clarify what you meant? It works in transcription mode, but I’m not sure that’s what you were referring to.
I also have another question. You mention several possible limitations of real-time transcription — are these limitations related to Whisper itself, your script, Python, or Linux?
Where does the “streaming logic” come from? Do you know of any alternative solutions for real-time transcription that I could try?
@irmhild,
Thanks for the update, you’re actually very close.
By “quasi live,” I meant that Whisper can’t transcribe speech word by word in real time. Instead, you record audio continuously, collect a few seconds of speech, send that chunk to Whisper, show the text, and repeat.
Saving to a file was just to confirm your microphone audio is good and since that worked, Whisper itself is fine.
The limitations mainly come from Whisper, not Linux. It’s designed for full audio segments, so if the audio chunks are too short or mostly silence, it often returns no text.
The “streaming logic” is just the code that handles recording and chunking audio before sending it to the model.
If you want something more naturally real-time, you could also try tools like
whisper.cpp(streaming versions) or Vosk, which are built more for continuous speech recognition.So your setup isn’t broken, it’s just the audio buffering part that needs adjustment.
I wrote a small open-source wrapper around Whisper for typical Ubuntu desktops (GNOME/KDE).
It records your microphone, sends the audio to the whisper-gael snap (so you don’t have to run the Whisper command manually), and then pastes the transcription into whatever window currently has focus (using xdotool / Wayland equivalents).
So the workflow is: lettera start → speak → lettera stop → text appears.
Repo (install script + README):
https://gitlab.com/gd-pub/lettera-ink
Overview page:
https://www.lettera.ink
Hope it’s useful!
@Paolo,
Thanks for sharing this!
Super handy that it auto-types into the active window, that’s a nice workflow boost. I’ll check out the repo and give it a try.
Hello @Ravi,
I’ve just added some additional implementations, and the tool now supports:
– `snap whisper-gael` [default]
– `whisper.cpp`
– `faster-whisper (via ctranslate2)`
with
whisper.cppit seems to me way faster than the other implementations, give it a try and let me know! (and feel free to commit PR or issues) (or star it if you like it)@Paolo,
Thanks for the update!
Really appreciate you adding all these options. I’ll give them a spin and let you know my thoughts.
Great work!
Hey! I’m getting an error at this line:
The error says:
Looks like the queue might be empty or not recognized as an array.
Any idea what’s going on?
@Jun,
Sounds like your
audio_queuemight be empty when you’re trying to concatenate.np.concatenate()needs at least one array to work with, so if the queue is empty, it’ll throw that error.You can fix it by checking if the queue has any data before trying to concatenate:
if not audio_queue.empty():
    audio_data = np.concatenate(list(audio_queue.queue))
else:
    audio_data = np.array([])  # or handle it some other way
This way, you avoid the error when the queue is empty.
Let me know if that works!
Thank you very much for your article and answering questions.
I got the same ValueError on audio_data = np.concatenate(list(audio_queue.queue)) as Jun.
I put in your fix but now it gets another error:
 File "........................./venv/lib/python3.12/site-packages/whisper/audio.py", line 152, in log_mel_spectrogram
    mel_spec = filters @ magnitudes
               ~~~~~~~~^~~~~~~~~~~~
RuntimeError: expected m1 and m2 to have the same dtype, but got: float != double
How do you fix that?
@Nathan,
It looks like that new error is caused by a data type mismatch between the audio data (
float64) and the mel filter bank (float32). You can fix it by converting the audio data to float32 before passing it into Whisper.Try adding this line right before calling
log_mel_spectrogram:That should make both matrices use the same dtype and get rid of the
RuntimeError: expected m1 and m2 to have the same dtypeissue.If you’re still using
np.concatenate(list(audio_queue.queue)), just make sure everything you push into the queue is the same dtype too.Great article! I’m able to get up to the point where audio is processed but the following error pops:
Listening… Press Ctrl+C to stop.
Exception in thread Thread-1 (transcribe_audio):
Traceback (most recent call last):
File “/usr/lib/python3.10/threading.py”, line 1016, in _bootstrap_inner
self.run()
File “/usr/lib/python3.10/threading.py”, line 953, in run
self._target(*self._args, **self._kwargs)
File “/home/user/rtt.py”, line 25, in transcribe_audio
audio_data = np.concatenate(list(audio_queue.queue)) # Combine buffered audio
ValueError: need at least one array to concatenate
Stopping…
Listening… Press Ctrl+C to stop.
Exception in thread Thread-2 (transcribe_audio):
Traceback (most recent call last):
File “/usr/lib/python3.12/threading.py”, line 1073, in _bootstrap_inner
self.run()
File “/usr/lib/python3.12/threading.py”, line 1010, in run
self._target(*self._args, **self._kwargs)
File “/home/oem/real_time_transcription.py”, line 69, in transcribe_audio
audio_data = np.concatenate(list(audio_queue.queue)) # Combine buffered audio
^^^^^^^^^^^^^^^^^^^^^^^^^^^^^^^^^^^^^^^
ValueError: need at least one array to concatenate
I don’t know what should I do
How can I solve that?
Traceback (most recent call last):
File “/home/oem/real_time_transcription.py”, line 1, in
import sounddevice as sd
ModuleNotFoundError: No module named ‘sounddevice’
@Diana,
The error ModuleNotFoundError: No module named ‘sounddevice’ means that the Python module sounddevice isn’t installed on their system.
After installation finishes, try running the script again.
It said “error: externally-managed-environment”, then I tried to update python but somehow, I couldn’t.
Everything is ok until
” File “/home/oem/real_time_transcription.py”, line 44
python3 real_time_transcription.py
^^^^^^^^^^^^^^^^^^^^^^^
SyntaxError: invalid syntax”
@Diana,
The error you’re seeing happens because the line:
is a command meant to be run in the terminal, not inside the Python script.
Make sure to remove that line from your .py file. Instead, open your terminal and run the script by typing:
This will execute the script correctly without causing a syntax error.
“audio_data = np.concatenate(list(audio_queue.queue)) # Combine buffered audio
ValueError: need at least one array to concatenate”
What should I do?
Hello, Thanks for this article.
Unfortunately, entering of step “
pip install openai-whisper” was interrupted unsuccessfully showing:Collecting openai-whisper Downloading openai-whisper-20240930.tar.gz (800 kB) ━━━━━━━━━━━━━━━━━━━━━━━━━━━━━━━━━━━━━━━━ 800.5/800.5 kB 8.7 MB/s eta 0:00:00 Installing build dependencies ... done Getting requirements to build wheel ... error error: subprocess-exited-with-errorDo you have any hints for me? Thank you in advance.
Rainer
@Rainer,
The error you’re encountering is likely due to a compatibility issue with Python 3.13 or some dependencies that are not yet compatible with this version. Whisper and many other Python packages are not fully compatible with Python 3.13 yet. You should switch to a stable version like Python 3.10 or 3.11.