The scope of this tutorial is to explain how we can edit and make changes to Network Configurations on RHEL/CentOS 8/7 from the command line only, and, more specifically how we can set up a Static IP address on network interfaces using system network-scripts, which is a must be configured to serve Internet-facing network services, and how to configure or change RHEL/CentOS system hostname.
Also will show you, how we can manage or disable unwanted system services, such as Network Manager, which is no longer needed in-case you use a manual static IP configured on network scripts, Avahi-Daemon which is, also, not needed on a server and represents a seriously security gap, unless you installed the server on your Laptop and you want to instantly browse your network for other services, and on the final will present you Network Manager Text User Interface – nmtui, a system utility that can ease the job of editing your system network settings with advanced Interface configurations like creating Bond, Bridge, Team and VLAN Interfaces.
Requirements
- Installation of “CentOS 8.0″ with Screenshots
- Installation of RHEL 8 with Screenshots
- How to Enable RHEL Subscription in RHEL 8
- CentOS 7.0 Minimal System Installation
- RHEL 7.0 Minimal System Installation
- Active RHEL 7.0 Subscriptions and Functional Repositories
Also, be aware that most of the configurations offered by editing system files should not be performed from a remote location using SSH service until you establish a continued and reliable network connection using a fixed IP address.
On this page
Step 1: Disable Unwanted System Services in CentOS
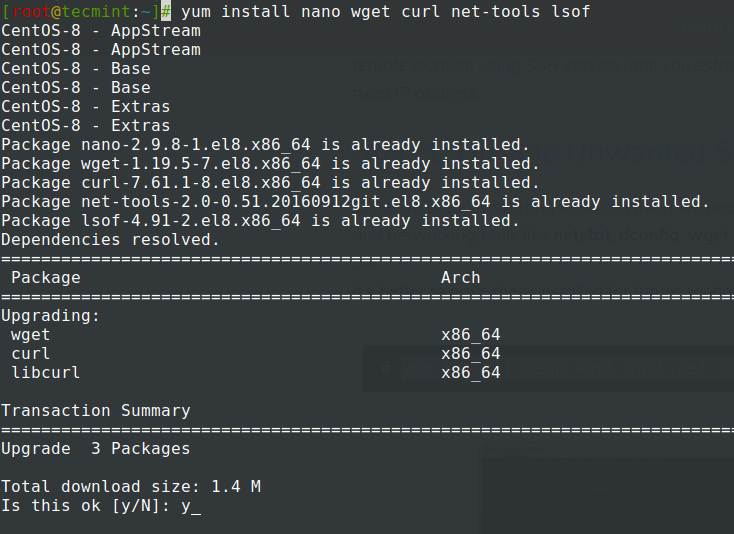
1. Before actually starting to do anything we need to make sure that our system has some necessary editing and networking tools like netstat, ifconfig, wget, curl, and lsof installed, some of them will not be used on this step but it’s better to have them installed for future configurations.
# yum install nano wget curl net-tools lsof
2. After the tools have installed run ifconfig to get your Network Interfaces settings and status, and, then run netstat or lsof command to check what services are running by default on our server.
# ifconfig
# netstat -tulpn
# lsof -i
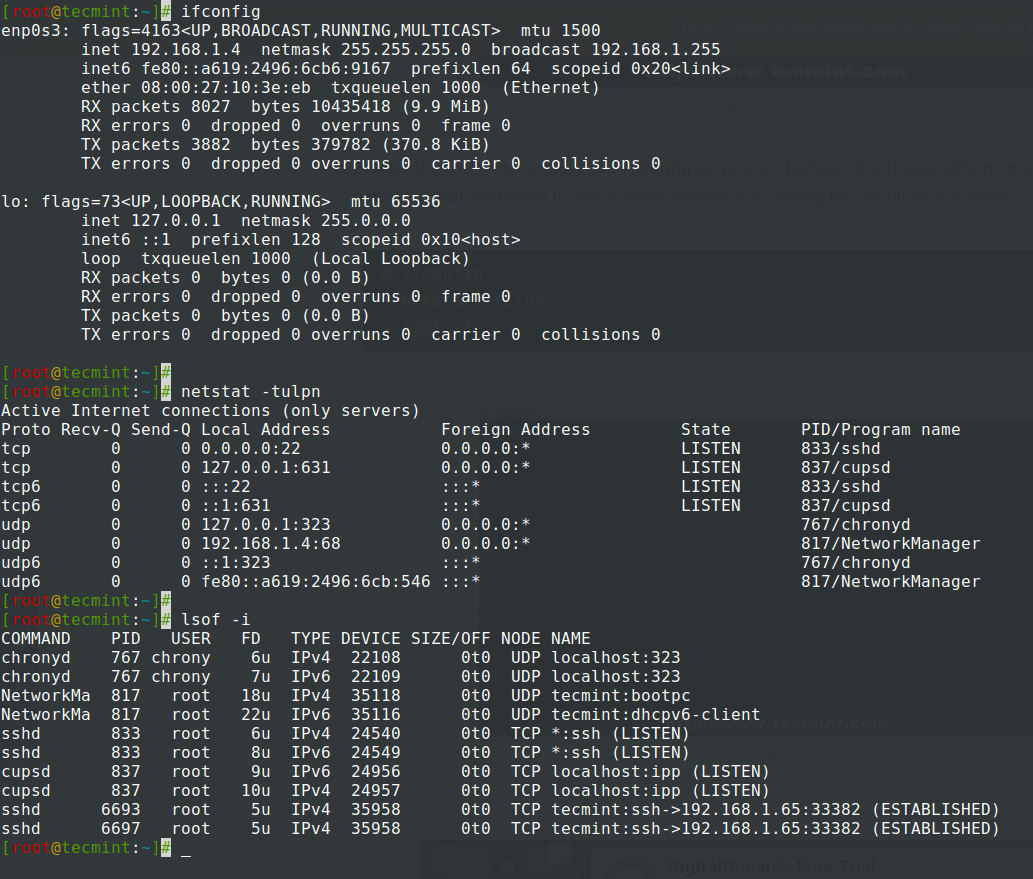
3. The netstat command output is pretty self-explanatory and shows a list of sockets associated with their running program name.
If, for example, our system will not be used as a mail service you can stop Postfix master daemon which runs on localhost and, also stop and disable other unwanted services using the following commands – the only service I advise not to stop or disable for now is SSH if you need remote control over the server.
Stop Postfix Service
# systemctl stop postfix
# systemctl disable postfix
# systemctl status postfix

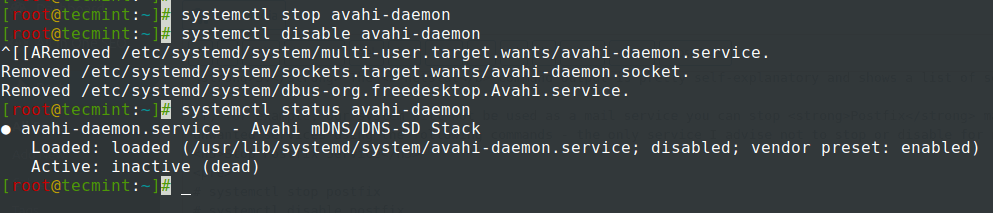
Stop Avahi Daemon Service
# systemctl stop avahi-daemon
# systemctl disable avahi-daemon
# systemctl status avahi-daemon
4. You can, also, use old init commands to stop or disable services but since Red Hat now implements systemd process and service management, you should better get used to systemctl commands and use it often.
If you use Arch Linux then it should be a piece of cake to switch to systemd – although all init commands now are linked and pass-through systemd filter.
# service postfix stop
# chkconfig postfix off
5. If you want to get a list of all started services run the service command and for an exhaustive report use systemctl.
# service --status-all
# systemctl list-unit-files

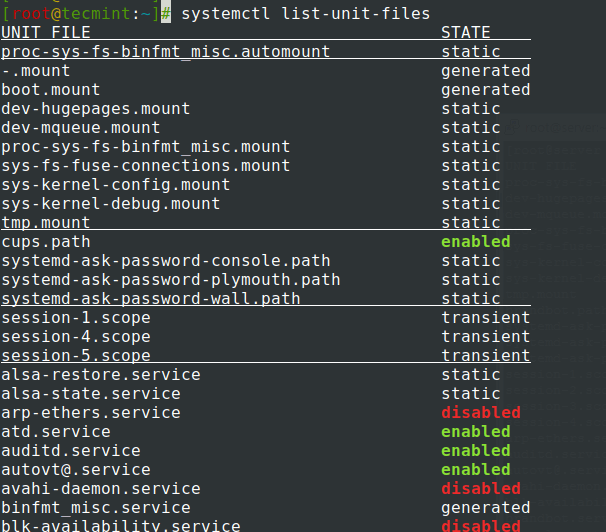
6. To manage services run the systemctl command using the most important switches: start, stop, restart, reload, disable, enable, show, list-dependencies, is-enabled, etc. followed by your service name.
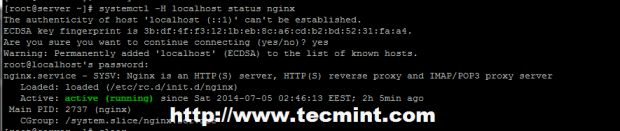
Also, another important feature that the systemctl command can also run on a remote server through SSH service on a specified host using -H option and perform the same actions as locally.
For example, see the command and screenshot below.
# systemctl -H remote_host start remote_service
Step 2: Configuring Static IP Address on CentOS
7. Before start editing Network Interface Card system files make sure that from now on and until you set static IP, you have physical or any other type of access to your server, because this step requires bringing down your network interface and connections.
Although it can be done smoothly without disrupting your connectivity and activate connection after reboot. There is no way you can test it before reboot if you only have a single NIC attached. Still, I will present to you with the entire method and indicate the steps needed to be avoided in case you want to maintain your connectivity and test it afterward.
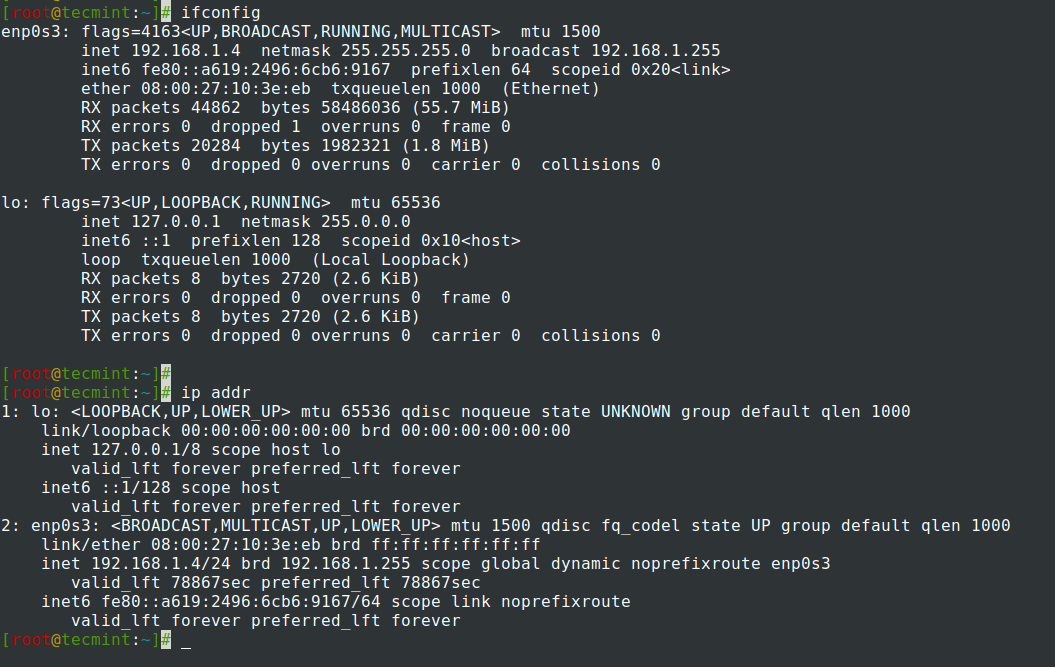
8. Now move to /etc/sysconfig/network-scripts/ path, open and choose your Network Interface you want to assign static IP for editing – to get all NICs names to use ifconfig or IP command as shown.
# ifconfig
OR
# ip addr
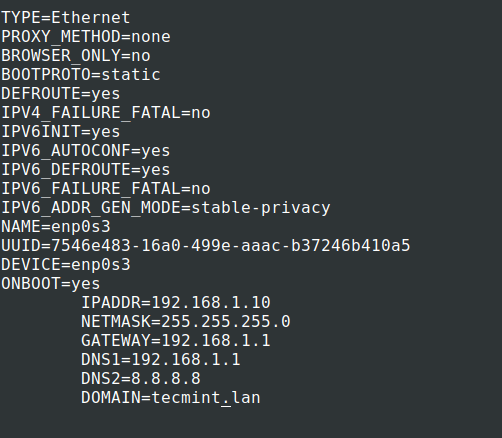
9. Next, use the following network template to edit the file and make sure that the ONBOOT statement is set on YES, BOOTPROTO is set to static or none and don’t change HWADDR and UUID values provided by default.
# nano /etc/sysconfig/network-scripts/ifcfg-enp0s3
Make the following changes as shown.
TYPE=Ethernet
PROXY_METHOD=none
BROWSER_ONLY=no
BOOTPROTO=static
DEFROUTE=yes
IPV4_FAILURE_FATAL=no
IPV6INIT=yes
IPV6_AUTOCONF=yes
IPV6_DEFROUTE=yes
IPV6_FAILURE_FATAL=no
IPV6_ADDR_GEN_MODE=stable-privacy
NAME=enp0s3
UUID=7546e483-16a0-499e-aaac-b37246b410a5
DEVICE=enp0s3
ONBOOT=yes
        IPADDR=192.168.1.10
        NETMASK=255.255.255.0
        GATEWAY=192.168.1.1
        DNS1=192.168.1.1
        DNS2=8.8.8.8
        DOMAIN=tecmint.lan
10. After finishing editing the file, close it, and move to resolv.conf file if you want DNS servers enabled system-wide.
# nano /etc/resolv.conf
Here just add your DNS servers using nameserver statement.
nameserver 192.168.1.1
nameserver 8.8.8.8
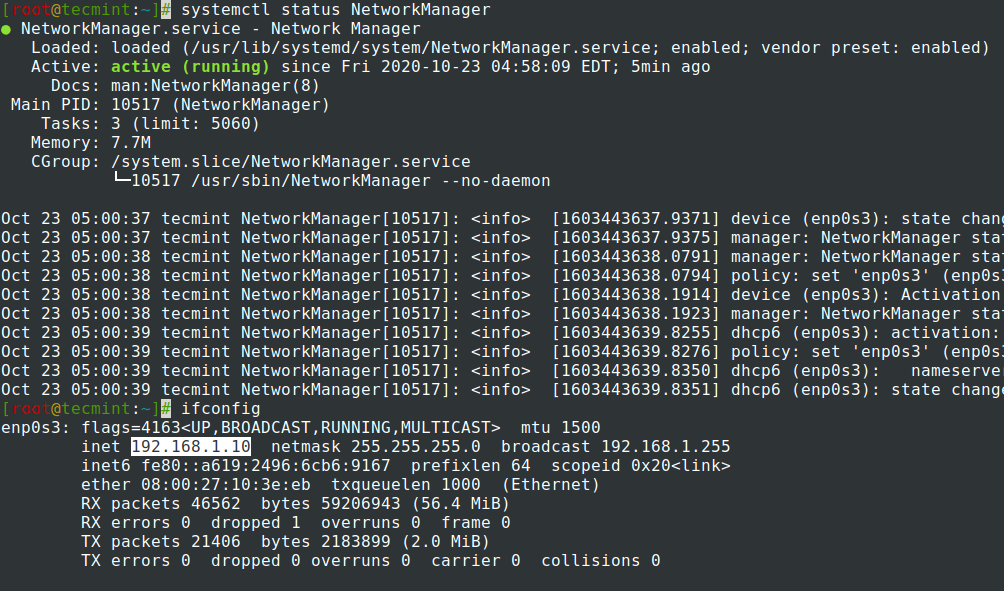
11. Now Network Interface is configured with a static IP, the only thing remaining is to restart your network or reboot your system and use ifconfig or IP command to view the IP address and test configuration using ping command.
# systemctl restart NetworkManager
NOTE: After restart use the newly static IP address configured to perform remote login with SSH.
# systemctl status NetworkManager
# ifconfig
# ip addr show
Step 3: Setting Hostname in CentOS
12. To adjust system hostname system-wide, open hostname and hosts file located on /etc path and edit both the following way.
Hostname File
# nano /etc/hostname
Here you can add just the name of the system but it’s a good idea to append the .dot domain to.
server.tecmint.lan
Hosts File
# nano /etc/hosts
Here add the same hostname as above on the 127.0.0.1 line before the localhost.localdomain statements.
127.0.0.1 server.tecmint.lan localhost.localdomain …

Alternatively, you can set hostname using the hostnamectl command as shown.
# hostnamectl -set-hostname tecmint.lan
13. To test if your hostname is correctly set use hostname command.
# hostname -s  # For short name
# hostname -f  # For FQDN mame
Step 4: Set Static IP Address on CentOS Using Nmtui Tool
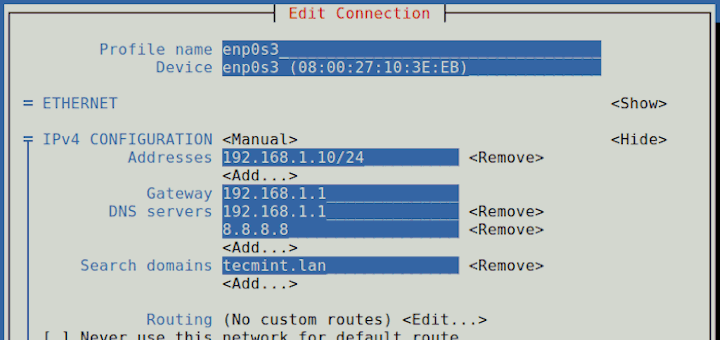
14. NetworkManager Text User Interface (TUI) tool, nmtui, is an RHEL intuitive tool which provides a text interface to configure networking by controlling Network Manager, which helps to edit advanced network settings such as assign static IP addresses to Network Interfaces, activate or disable a connection, edit WI-FI connections, set your system hostname or create advanced Network interfaces like InfiniBand, bond, bridge, team or VLAN.
NetworkManager-tui is installed by default in RHEL/CentOS 7.0, but if for some reason its missing issue the following command to install it.
# yum install NetworkManager-tui
14. To start Network Manager Text User Interface run the nmtui command and use TAB or arrow keys to navigate through and press Enter to select an option. If you want to directly edit or connect a specific interface run the following options.
# nmtui edit enp0s3
# nmtui connect enp0s3
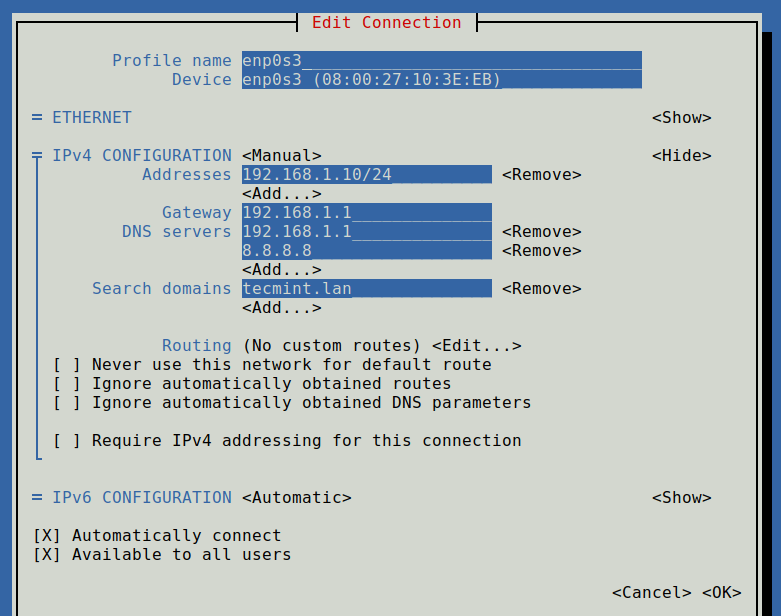
If you want to set static IP you can, also, use Network Manager Text User Interface as a facile alternative to actually edit network interfaces files, with a limited number of options that method has to offer, but make sure Network Manager service is enabled and started on your system.


After 2 hours tests, Good all be fine, it works fine, just Added : In smb.conf file configuration in [Anonymous]
1- be sure that your server has a static connection
2- added user with password : smbpasswd -a username
Thank For Author I have make a samba configuration in 2 hours
I feel learning with quick manner in this site Thank you very much
I also routinely disable NetworkManager on my servers, but do note that “nmtui” (and also nmcli) are NetworkManager clients, so you cannot use them if you have disabled NetworkManager.
Excellent!. This is the ONLY post on setting static IP on Centos which is correct. Simple flow.
All: Just follow the steps as is.
Great explanation. Great job guys.
Great article. The static IP configuration works great on my RHEL 7 server vm.
Just have a question. The Red Hat documentation says that BOOTPROTO should be set to “none”. My copy of your configuration only works with BOOTPROTO=static as you used in your example. If I set it to none the ip address does not get updated. I am having some discussions with our Linux sys admins since they are insisting that I should follow only the Red Had docs and this is a problem as I can’t make it work with BOOTPROTO=none. Is there a reason why it only works with BOOTPROTO=static?
If it works with bootptoto=static then stick with this option as long as it does the job right! As far as i know it should work also with none (none actually specifies that no boot-time protocol should be used but the IP value from IPADDR=1.2.3.4 variable should be updated for NIC at boot time).
@Ehwan Kho: Just use ip link show or ifconfig -a command and you should see all your NICs names. You can also use nmtui to edit your new card settings.
How do I add a new network card – NIC? I tried using lspci | grep Ethernet, it display that it 2 cards. My question now how could I know its name? as they are not using the eth1, eth2 et al.. And I can’t see /etc/udev/rules.d/70-persistent-net.rules. Your thoughts are highly appreciated.
In my opinion you can use both approaches, manual editing NICs interfaces or configure static IP using NM or nmtui if you dont have a GUI. But for a better control and flexibility over your NICs you should go with manual configurations, without NM. If you go with manual without NM don’t forget to use NM_CONTROLLED=no and ONBOOT=yes parameters.
please matie cezar can you teach me how to network a small firm.
i will be happy if you can teach me form scratch to the level of networking a firm.
i want to learn the installation and configuration
I ALWAYS disable network manager on Servers, it’s too dynamic and wastes resources. Why Red Hat is pushing that crap I don’t know, but I haven’t met anyone who wants it on a server. It’s great for desktops, and laptops, but NOT servers.
Also, the DNS settings need to stick to being setup in the resolv.conf file, not spread out in the ifcfg scripts. Keeps the config manageable and easy to troubleshoot.
From going over the documentation on RHEL/CentOS 7, it appears that they’re really pushing for NetworkManager to be the default way to manage networking. For servers (not desktop) do you believe it’s best to disable NetworkManager and just assign static IPs normally as you have instructed or do you believing managing all the network through net manager is worth it?
The reason I ask is because I only deal with servers (not desktops) and I’ve seen many times NetworkManger causing major network issues. So I’m still on the fence whether or not to do things through netManager. Specially considering that rhel 7 is using it by default.