NIC teaming is the aggregation or bonding of two or more network links into a single logical link to provide redundancy and high availability. The logical interface/link is known as a team interface. In the event that the active physical link goes down, one of the backup or reserved links automatically kicks and ensures an uninterrupted connection to the server.
Teaming Terminologies
Before we roll our sleeves, it’s crucial to familiarize yourself with the following terminologies:
- Teamd – This is the nic teaming daemon that uses the libteam library to communicate with team devices via the Linux kernel.
- Teamdctl– This is a utility that allows users to control an instance of teamd. You can check and change the port status, as well as switch between backup and active states.
- Runner – These are units of code written in JSON and are used for the implementation of various NIC teaming concepts. Examples of runner modes include Round robbin, load balancing, broadcast, and active backup.
For this guide, we will configure NIC teaming using the active-backup mode. This is where one link remains active while the rest are on standby and reserved as backup links incase the active link goes down.
On this page
Without much further ado, let’s begin.
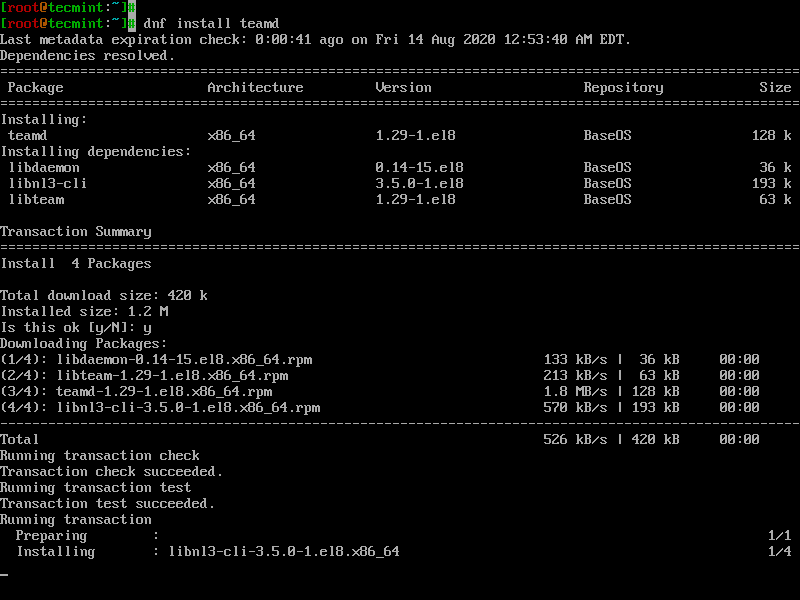
Step 1: Install the teamd Daemon in CentOS
Teamd is the daemon that is responsible for creating a network team that will act as the logical interface during runtime. By default, it comes installed with CentOS/RHEL 8. But if, for whatever reason, it’s not installed, execute the following dnf command to install it.
$ sudo dnf install teamd
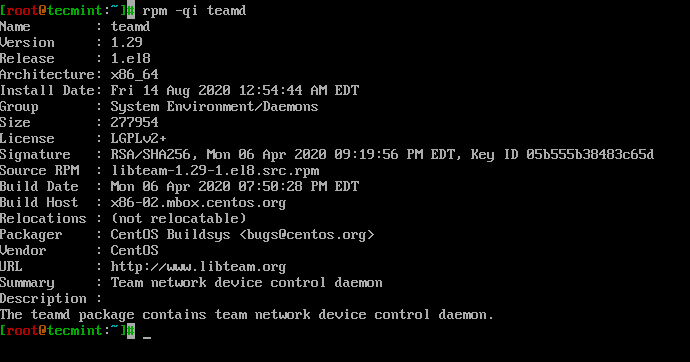
Once installed verify that teamd is installed by running the rpm command:
$ rpm -qi teamd
Step 2: Configure NIC Teaming in CentOS
To configure NIC teaming we will use the handy nmcli tool that can be used for the management of NetworkManager service. In my system, I have 2 NIC cards that I’m going to bond or combine to create a logical team interface: enp0s3 and enp0s8. This may be different in your case.
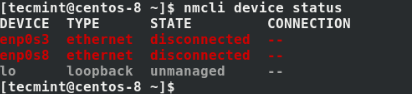
To confirm the active network interfaces run:
$ nmcli device status

The output confirms the existence of 2 active network connections. To gather more information about the interfaces like UUID, run the command:
$ nmcli connection show

To create a network teaming link or interface, which will be our logical link, we are going to delete the existing network interfaces. Thereafter we will create slave interfaces using the deleted interfaces and then associate them with the teaming link.
Using their respective UUID’s execute the commands below to delete the links:
$ nmcli connection delete e3cec54d-e791-4436-8c5f-4a48c134ad29
$ nmcli connection delete dee76b4c-9alb-4f24-a9f0-2c9574747807

This time when you check the interfaces, you’ll notice that they are disconnected and provide no connection to the server. Basically, your server will be isolated from the rest of the network.
$ nmcli device status
Next, we are going to create a team interface called team0 in active-backup runner mode. As earlier stated, the active backup runner mode uses one active interface and reserves the others for redundancy in case the active link goes down.
$ nmcli connection add type team con-name team0 ifname team0 config '{"runner": {"name": "activebackup"}}'

To view the attributes assigned to the team0 interface run the command:
$ nmcli connection show team0
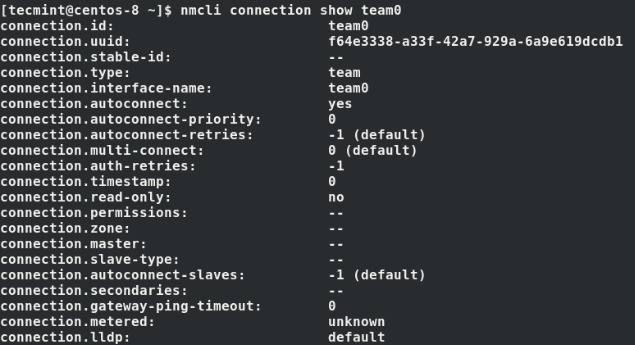
Perfect! At this point, we only have one interface up, which is the team0 interface as shown.
$ nmcli connection show

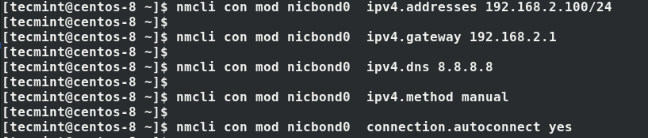
Next, configure IP address for the team0 interface as shown using the nmcli command. Be sure to assign the IP’s according to your network’s subnet & IP addressing scheme.
$ nmcli con mod team0 ipv4.addresses 192.168.2.100/24
$ nmcli con mod team0 ipv4.gateway 192.168.2.1
$ nmcli con mod team0 ipv4.dns 8.8.8.8
$ nmcli con mod team0 ipv4.method manual
$ nmcli con mod team0 connection.autoconnect yes
Thereafter, create slave links and associate the slaves to the team link:
$ nmcli con add type team-slave con-name team0-slave0 ifname enp0s3 master team0
$ nmcli con add type team-slave con-name team0-slave1 ifname enp0s8 master team0

Check the status of the links again, and you’ll notice that the slave links are now active.
$ nmcli connection show

Next, deactivate and activate the team link. This activates the connection between the slave links and the team link.
$ nmcli connection down team0 && nmcli connection up team0

Next, verify the state of the team link connection as shown.
$ ip addr show dev team0

We can see that the link is up with the correct IP addressing that we configured earlier.
To retrieve additional details about the team link, run the command:
$ sudo teamdctl team0 state
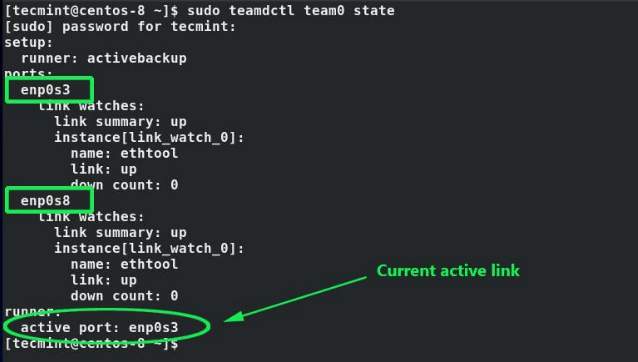
From the output, we can see that both links (enp0s3 and enp0s8) are up and that the active link is enp0s8.
Step 3: Testing Network Teaming Redundancy
To test our active-backup teaming mode, we will disconnect the currently active link – enp0s3 – and check whether the other link kicks in.
$ nmcli device disconnect enp0s3
$ sudo teamdctl team0 state
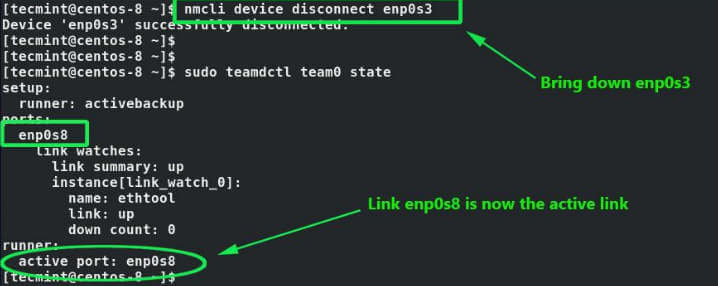
When you check the status of the teaming interface, you’ll find that the link enp0s8 has kicked in and serving connections to the server. This confirms that our setup is working!
Step 4: Deleting a Network Teaming Interface
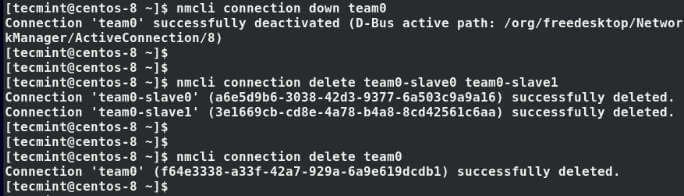
If you wish to delete the teaming interface/link and revert to default network settings, first bring down the teaming link:
$ nmcli connection down team0
Next, delete the slaves.
$ nmcli connection delete team0-slave0 team0-slave1
Finally, delete the teaming interface.
$ nmcli connection delete team0
At this point, all the interfaces are down and your server is not reachable. To activate your network interfaces and regain connectivity, run the commands:
$ sudo ifconfig enp0s3 up
$ sudo ifconfig enp0s8 up
$ sudo systemctl restart NetworkManager
Conclusion
NIC teaming offers an excellent solution for network redundancy. With 2 or more network interfaces, you can configure a teaming interface in any runner mode to ensure high availability in the event one link goes down accidentally. We do hope that you found this guide helpful. Hit us up and let us know how your experience was.


Hi,
To create bonding, Follow below steps.
1. create a file ifcfg-bondX and add below lines.
DEVICE=bond0
IPADDR=192.168.0.1
NETMASK=255.255.255.0
ONBOOT=yes
HOTPLUG=no
BOOTPROTO=none
USERCTL=no
BONDING_OPTS=”bonding parameters separated by spaces” # Such as BONDING_OPTS=”miimon=100 mode=1″
NM_CONTROLLED=no
2. After creating bonding interface, its time to configure slave interface.
3. Edit interface files and add below lines.
DEVICE=ethX
BOOTPROTO=none
ONBOOT=yes
HOTPLUG=no
MASTER=bond0
SLAVE=yes
USERCTL=no
NM_CONTROLLED=no
4. Restart the network service to load the newly added configuration.
#service network restart
This is explained a bit further at below link.
https://www.kernel.org/doc/Documentation/networking/bonding.txt
We trying to configure em2 and em3 two bonds in Redhat 6.7 but not success ,
Bond0 and bond1 configured W/O any issue but due to some oracle dB limitation we em2 and em3 two bonds
Please suggest
Hi Joginder,
Bonding needs at least 2 nic. You can refer to below article.
https://www.kernel.org/doc/Documentation/networking/bonding.txt
i have configured. but eth0 and eth1 are same mac address. could you please help me on this issue.
@Muthu,
Open each file and modify the MAC address, that’s it and don’t forget to restart the network service.
why is it i followed the steps but when i type ifconfig i dont have an ip?
@Medina,
May I know any error you getting while running ifconfig? also let me know on which Linux distributions you’re trying?
the problem is i cant ping the gateway of the nic bonding. i can ping the ip address but the gateway i cant.
i’m using it on redhat linux 6.6. the only problem is i cant ping the gateway. i cannot access the bonding using putty. i always access it remotely
Hello and thanks for this page. Only a quick question. Please can you tell me if another IP address is needed in addition to the existing IP from the network interfaces?. In other words, if I have got eth0 and eth1 with its respectives IP, is another IP required for bonding?
Thanks a lot.
Nice post, thank you.
Small typo in eth1 editing , kindly change
For eth1
# vi /etc/sysconfig/network-scripts/ifcfg-eth0
@Radha,
Thanks for informing us about that typo..We’ve fixed in the writeup….
Hi Expert,
My network bonding works perfectly after do this setting but I’ve an other issue after i done all this configuration given here my “network connection icon got red “x””.
It’s this normal after do the bonding?
I’m using Rhel 6.5
Please advise.
Thank you.
Network Manager in my experience needs to be off.
Flag is NM_CONTROLLED=”no” on each interface
Another useful flag in Bonding is selecting which interface is going to be the primary. This is useful if you have two switches and you want to have preference which switch the traffic goes over.
BONDING_OPTS=”mode=1 miimon=100 primary=em1″
primary=em1 means that it will always have em1 interface (Sorry Dell Server, EM1 is also considered eth0) if you lose this link which I have tested by pulling the cable. You lose two pings and em2 or eth1 whichever you are using takes over the load. When you plug the cable back in it will drop 2 pings and switch back to EM1 or eth0
networkmanager is running, and I create my bond at boot in /etc/rc.local
If the secondary slave is marked for DHCP, it will spontaneously leave your bond0 interface. Check the mac addresses of your slaves with ifconfig, if they don’t match, there’s a problem.
Killing networkmanager may also work. Seriously RedHat, straighten out your networking stack.
Hi,
That’s Excellent.
But for above NIC bonding could you please put the details of eth0 and eth1 before bonding.
Novice to the Linux world and ether channel bonding!!
Thanks
Hi All,
Can anyone tell me how to manually test the failover without bringing down the master interfaces
ifenslave -c bond0 eth1
this will change the active slave to eth1 without bringing down the master. if eth1 is of couse configured as the second slave.
or to manually failover
sudo ifconfig eth0 down
the bond will failover to eth1
sudo ifconfig eth0 up
sudo ifconfig eth1 down
the bond will fail back over to eth0
sudo ifconfig eth1 up
Sorry but shouldnt the entry for eth1 read “/etc/sysconfig/network-scripts/ifcfg-eth1”? (above it reads “eth0”). Could confuse some people. ;)
Please also mention mode of bonding.
I had the hwaddr commented out for each interface in the bond. Once I removed the comment and updated the driver it worked. Lesson learned.
I am running Oracle Linux 5.7 (Red Hat based) and have configured bonding. I can activate the bond manually once the host is up but the bonded interfaces do not exist on reboot and the bond fails. Any ideas?
add commands in /etc/rc.local file to load at boot time.
@joe: pl. share your bond interface as well as physical interface details
I’ve set up channel bonding following these steps on CentOS 6.3 bonding eth1 and eth2. The device seems to bond okay, but once bonded, the network traffic just stops. No ping, no nothing. Any clues?
These are both ports on a Syba dual port gigabit adapter (Realtek chipset).
Estou com o mesmo problema.
Look up policy based routing
I’ve been agonizing with this also for a while.
NetworkManager service is mucking it up. stop it and I bet all your pings become consistent.
to stop it:
#service NetworkManager stop
to kill it on boot up:
#chkconfig –level 2345 NetworkManager off
Excellent how to. However, the ifcfg-bond0 needs the line defining the default gateway.
as in:
GATEWAY=192.168.1.1
Otherwise you will not be able to get off that subnet.