A Linux Foundation Certified Engineer is a skilled professional who has the expertise to install, manage, and troubleshoot network services in Linux systems, and is in charge of the design, implementation and ongoing maintenance of the system-wide architecture.

Introducing The Linux Foundation Certification Program.
In Part 1 of this series, we showed how to install squid, a proxy caching server for web clients. Please refer to that post (link given below) before proceeding if you haven’t installed squid on your system yet.
In this article, we will show you how to configure the Squid proxy server in order to grant or restrict Internet access, and how to configure an http client, or web browser, to use that proxy server.
My Testing Environment Setup
Squid Server
Operating System :	Debian Wheezy 7.5
IP Address 	 :	192.168.0.15
Hostname	 :	dev2.gabrielcanepa.com.ar
Client Machine 1
Operating System :	Ubuntu 12.04
IP Address 	 :	192.168.0.104
Hostname	 :	ubuntuOS.gabrielcanepa.com.ar
Client Machine 2
Operating System :	CentOS-7.0-1406
IP Address 	 :	192.168.0.17
Hostname	 :	dev1.gabrielcanepa.com.ar
Let us remember that, in simple terms, a web proxy server is an intermediary between one (or more) client computers and a certain network resource, the most common being access to the Internet. In other words, the proxy server is connected on one side directly to the Internet (or to a router that is connected to the Internet) and on the other side to a network of client computers that will access the World Wide Web through it.
You may be wondering, why would I want to add yet another piece of software to my network infrastructure?
Here are the top 3 reasons:
1. Squid stores files from previous requests to speed up future transfers. For example, suppose client1 downloads CentOS-7.0-1406-x86_64-DVD.iso from the Internet. When client2 requests access to the same file, squid can transfer the file from its cache instead of downloading it again from the Internet. As you can guess, you can use this feature to speed up data transfers in a network of computers that require frequent updates of some kind.
2. ACLs (Access Control Lists) allow us to restrict the access to websites, and / or monitor the access on a per user basis. You can restrict access based on day of week or time of day, or domain, for example.
3. Bypassing web filters is made possible through the use of a web proxy to which requests are made and which returns requested content to a client, instead of having the client request it directly to the Internet.
For example, suppose you are logged on in client1 and want to access www.facebook.com through your company’s router. Since the site may be blocked by your company’s policies, you can instead connect to a web proxy server and have it request access to www.facebook.com. Remote content is then returned to you through the web proxy server again, bypassing your company’s router’s blocking policies.
Configuring Squid – The Basics
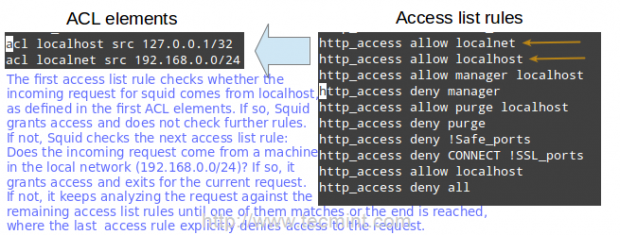
The access control scheme of the Squid web proxy server consists of two different components:
- The ACL elements are directive lines that begin with the word “acl” and represent types of tests that are performed against any request transaction.
- The access list rules consist of an allow or deny action followed by a number of ACL elements, and are used to indicate what action or limitation has to be enforced for a given request. They are checked in order, and list searching terminates as soon as one of the rules is a match. If a rule has multiple ACL elements, it is implemented as a boolean AND operation (all ACL elements of the rule must be a match in order for the rule to be a match).
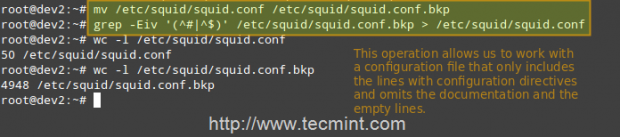
Squid’s main configuration file is /etc/squid/squid.conf, which is ~5000 lines long since it includes both configuration directives and documentation. For that reason, we will create a new squid.conf file with only the lines that include configuration directives for our convenience, leaving out empty or commented lines. To do so, we will use the following commands.
# mv /etc/squid/squid.conf /etc/squid/squid.conf.bkp
And then,
# grep -Eiv '(^#|^$)' /etc/squid/squid.conf.bkp

OR

# grep -ve ^# -ve ^$ /etc/squid/squid.conf.bkp > /etc/squid/squid.conf
Now, open the newly created squid.conf file, and look for (or add) the following ACL elements and access lists.
acl localhost src 127.0.0.1/32
acl localnet src 192.168.0.0/24
The two lines above represent a basic example of the usage of ACL elements.
- The first word, acl, indicates that this is a ACL element directive line.
- The second word, localhost or localnet, specify a name for the directive.
- The third word, src in this case, is an ACL element type that is used to represent a client IP address or range of addresses, respectively. You can specify a single host by IP (or hostname, if you have some sort of DNS resolution implemented) or by network address.
- The fourth parameter is a filtering argument that is “fed” to the directive.
The two lines below are access list rules and represent an explicit implementation of the ACL directives mentioned earlier. In few words, they indicate that http access should be granted if the request comes from the local network (localnet), or from localhost. Specifically what is the allowed local network or local host addresses? The answer is: those specified in the localhost and localnet directives.
http_access allow localnet
http_access allow localhost
At this point you can restart Squid in order to apply any pending changes.
# service squid restart 		[Upstart / sysvinit-based distributions]
# systemctl restart squid.service 	[systemd-based distributions]
and then configure a client browser in the local network (192.168.0.104 in our case) to access the Internet through your proxy as follows.
In Firefox
1. Go to the Edit menu and choose the Preferences option.
2. Click on Advanced, then on the Network tab, and finally on Settings…
3. Check Manual proxy configuration and enter the IP address of the proxy server and the port where it is listening for connections.
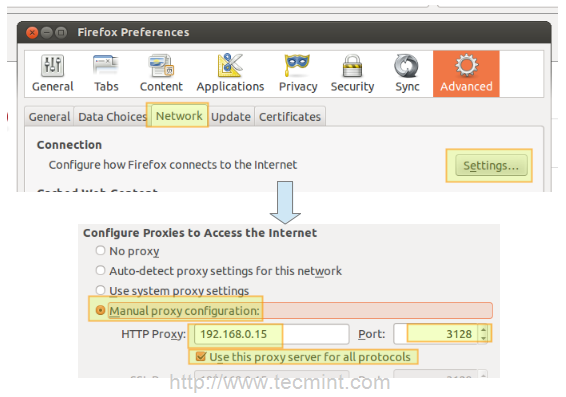
Note That by default, Squid listens on port 3128, but you can override this behaviour by editing the access list rule that begins with http_port (by default it reads http_port 3128).
4. Click OK to apply the changes and you’re good to go.
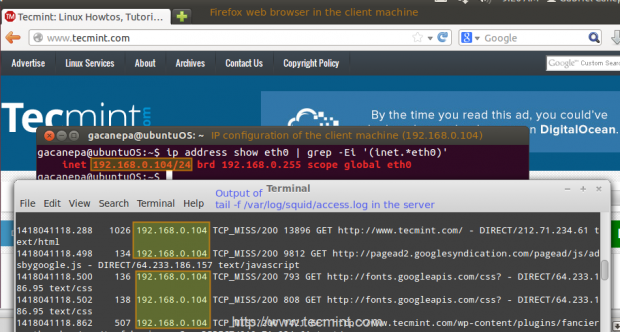
Verifying that a Client is Accessing the Internet
You can now verify that your local network client is accessing the Internet through your proxy as follows.
1. In your client, open up a terminal and type,
# ip address show eth0 | grep -Ei '(inet.*eth0)'
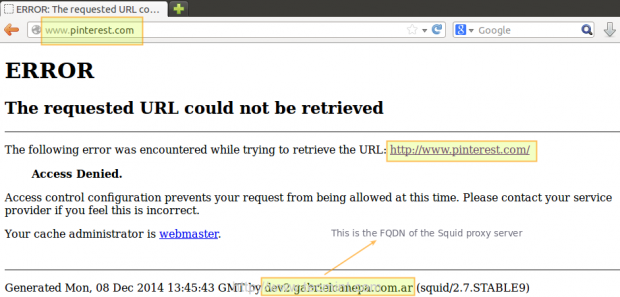
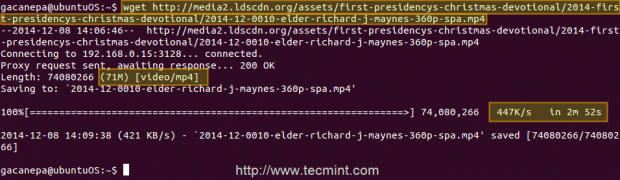
That command will display the current IP address of your client (192.168.0.104 in the following image).
2. In your client, use a web browser to open any given web site (www.tecmint.com in this case).
3. In the server, run.
# tail -f /var/log/squid/access.log
and you’ll get a live view of requests being served through Squid.
Restricting Access By Client
Now suppose you want to explicitly deny access to that particular client IP address, while yet maintaining access for the rest of the local network.
1. Define a new ACL directive as follows (I’ve named it ubuntuOS but you can name it whatever you want).
acl ubuntuOS src 192.168.0.104
2. Add the ACL directive to the localnet access list that is already in place, but prefacing it with an exclamation sign. This means, “Allow Internet access to clients matching the localnet ACL directive except to the one that matches the ubuntuOS directive”.
http_access allow localnet !ubuntuOS
3. Now we need to restart Squid in order to apply changes. Then if we try to browse to any site we will find that access is denied now.
Configuring Squid – Fine Tuning
Restricting access by domain and / or by time of day / day of week
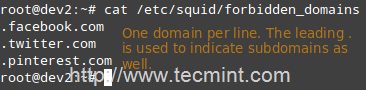
To restrict access to Squid by domain we will use the dstdomain keyword in a ACL directive, as follows.
acl forbidden dstdomain "/etc/squid/forbidden_domains"
Where forbidden_domains is a plain text file that contains the domains that we desire to deny access to.
Finally, we must grant access to Squid for requests not matching the directive above.
http_access allow localnet !forbidden
Or maybe we will only want to allow access to those sites during a certain time of the day (10:00 until 11:00 am) only on Monday (M), Wednesday (W), and Friday (F).
acl someDays time MWF 10:00-11:00
http_access allow forbidden someDays
http_access deny forbidden
Otherwise, access to those domains will be blocked.
Restricting access by user authentication
Squid support several authentication mechanisms (Basic, NTLM, Digest, SPNEGO, and Oauth) and helpers (SQL database, LDAP, NIS, NCSA, to name a few). In this tutorial we will use Basic authentication with NCSA.
Add the following lines to your /etc/squid/squid.conf file.
auth_param basic program /usr/lib/squid/ncsa_auth /etc/squid/passwd
auth_param basic credentialsttl 30 minutes
auth_param basic casesensitive on
auth_param basic realm Squid proxy-caching web server for Tecmint's LFCE series
acl ncsa proxy_auth REQUIRED
http_access allow ncsa
Note: In CentOS 7, the NCSA plugin for squid can be found in /usr/lib64/squid/basic_nsca_auth, so change accordingly in above line.

A few clarifications:
- We need to tell Squid which authentication helper program to use with the auth_param directive by specifying the name of the program (most likely, /usr/lib/squid/ncsa_auth or /usr/lib64/squid/basic_nsca_auth), plus any command line options (/etc/squid/passwd in this case) if necessary.
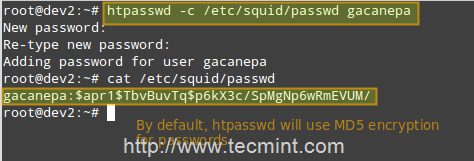
- The /etc/squid/passwd file is created through htpasswd, a tool to manage basic authentication through files. It will allow us to add a list of usernames (and their corresponding passwords) that will be allowed to use Squid.
- credentialsttl 30 minutes will require entering your username and password every 30 minutes (you can specify this time interval with hours as well).
- casesensitive on indicates that usernames and passwords are case sensitive.
- realm represents the text of the authentication dialog that will be used to authenticate to squid.
- Finally, access is granted only when proxy authentication (proxy_auth REQUIRED) succeeds.
Run the following command to create the file and to add credentials for user gacanepa (omit the -c flag if the file already exists).
# htpasswd -c /etc/squid/passwd gacanepa
Open a web browser in the client machine and try to browse to any given site.
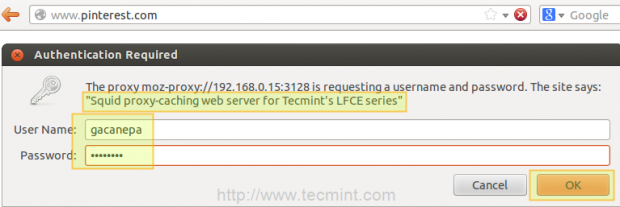
If authentication succeeds, access is granted to the requested resource. Otherwise, access will be denied.
Using Cache to Sped Up Data Transfer
One of Squid’s distinguishing features is the possibility of caching resources requested from the web to disk in order to speed up future requests of those objects either by the same client or others.
Add the following directives in your squid.conf file.
cache_dir ufs /var/cache/squid 1000 16 256
maximum_object_size 100 MB
refresh_pattern .*\.(mp4|iso) 2880
A few clarifications of the above directives.
- ufs is the Squid storage format.
- /var/cache/squid is a top-level directory where cache files will be stored. This directory must exist and be writeable by Squid (Squid will NOT create this directory for you).
- 1000 is the amount (in MB) to use under this directory.
- 16 is the number of 1st-level subdirectories, whereas 256 is the number of 2nd-level subdirectories within /var/spool/squid.
- The maximum_object_size directive specifies the maximum size of allowed objects in the cache.
- refresh_pattern tells Squid how to deal with specific file types (.mp4 and .iso in this case) and for how long it should store the requested objects in cache (2880 minutes = 2 days).
The first and second 2880 are lower and upper limits, respectively, on how long objects without an explicit expiry time will be considered recent, and thus will be served by the cache, whereas 0% is the percentage of the objects’ age (time since last modification) that each object without explicit expiry time will be considered recent.
Case study: downloading a .mp4 file from 2 different clients and testing the cache
First client (IP 192.168.0.104) downloads a 71 MB .mp4 file in 2 minutes and 52 seconds.
Second client (IP 192.168.0.17) downloads the same file in 1.4 seconds!
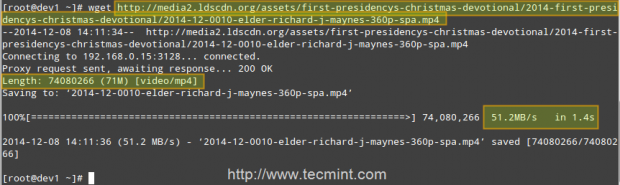
That is because the file was served from the Squid cache (indicated by TCP_HIT/200) in the second case, as opposed to the first instance, when it was downloaded directly from the Internet (represented by TCP_MISS/200).
The HIT and MISS keywords, along with the 200 http response code, indicate that the file was served successfully both times, but the cache was HIT and Missed respectively. When a request cannot be served by the cache for some reason, then Squid attempts to serve it from the Internet.

Conclusion
In this article we have discussed how to set up a Squid web caching proxy. You can use the proxy server to filter contents using a chosen criteria, and also to reduce latency (since identical incoming requests are served from the cache, which is closer to the client than the web server that is actually serving the content, resulting in faster data transfers) and network traffic as well (reducing the amount of used bandwidth, which saves you money if you’re paying for traffic).
You may want to refer to the Squid web site for further documentation (make sure to also check the wiki), but do not hesitate to contact us if you have any questions or comments. We will be more than glad to hear from you!


I want to separate out the destination URLs based on source IPs.
Below is my configuration:-
Its not working as expected as I am able to access whitelist.txt URLs from IPs in 10.0.8.0/24.
Can someone help me in verifying the same and let me know what’s wrong with the config?
Hey,
Thanks for the great tutorial. I’m able to have 1 user with a password on the subnet but was wondering what the command is to activate more users at the same time.
So for example, from IP 20 to 40 have s1:s2 for user 1 and then 41 to 250 have d1:d2 for user 2.
I hope this makes sense.
Hi. Nice tutorial. I wonder if its possible to have user permissions for each port on the proxy.
ex: user1 can only connect to port 3128 and user2 can only connect to port 3129.
Is this possible ?
Thank you so much in advance.
Yes, it is possible.
I am using squid proxy setup, but I have a problem that my clients VPN unblock the proxy settings. Could you help me?
Hello there tecmint, I send a request on my squid server and it detects that it has a request but it doesn’t response, because my mobile phone has no load/balance, but if I have load or data it works fine,
Can you help me how to allow my squid server to response even I don’t have load?
unable to start squid daemon … ssl_ctx_set_alpn_protos unable to relocation error
How can I create a proxy site to show HTTP site through https site. I want to restrict some certain domain to allow the I framing of that proxy site. How can I do that?
Hi, I would like to ask you. What will happen if there is client 3 and the client download the same file as client 1 and client 2. so what will happen to the time taken? Is it reducing as well?
I did tried them and the time is reducing as well but i don’t have the right justification why is it happened.
If you have some experience with this or any justification kindly please reply my comment here. Thank you in advance.
Hi; is there any firewall configuration for accomplish this lab, I implemented these steps in a CentOS 7 Virtual Machine as squid server and Linux Mint Rebbeca as client but I had to disable iptables on CentOS machine, none of the rules I added worked.
What rules are you using and why are you using iptables instead of firewalld (the default)?
It might be more helpful to emphasize a squid via a text-based browser since there is no GUI on the LFCE.
Hey Gabriel,
Thanks for sharing it, I am looking for it on the internet, Finally found it here. Thanks a lot. Keep sharing and keep helping others.
Glad to hear it was useful!
Hi,
Why in this picture you repeat the rule: http_access allow localhost, is neccesary? because was declare in the first line.
Thanks
Hello All,
I am configured the squid server in our environment within same network (lan network),on my squid server there is two ip one for my lan ip and second for internet. i have to provide internet access on on my rest network which reachable on my lan network.
Not sure what your question is. Please clarify.
Hi,
We have using squid proxy server for one of our web server. Now we are facing an issue while listing components (source control components) more than 200 in numbers, it is throwing error shown as below.
Service failed to communicate with repository https://xxx.xxxx.com:9443/ccm/: CRJAZ0098E The following service failed: com.ibm.te
am.scm.common.rest.IScmRichClientRestService{/ccm/service/com.ibm.team.scm.common.rest.IScmRichClientRestService}. The server returned the HT
TP error 400 with this error text: Bad Request.
But if we access the same list command using the direct web server link, it listing all the components (totally we have 350 components).
Is there any specific configuration in squid to increase the limit?
Please help us to over come this issue. Thanks in advance.
I’m sorry but this is out of the scope of the LFCE certification, which is what this article was written for. We also offer support services on demand for requests like yours. If you’re interested, just let us know and we’ll reach out to you!
great article but how or where did you setup the client machine and squid server.
For client setup refer to the In Firefox section. The instructions to set up the server are in the rest of the article.
Hi.
Could you confirm if Squid server can restrict logging in to Facebook with company given username and password only?
Example:
In Facebook, i can login company User1 as username. but when i try myUser1 in Facebook, proxy server will block.
Hi Gabriel,
I am configured squid server in our environment then setup the proxy in all machine’s but after that i am not able access mail in my Thunderbird GUI i am stock for this reason all is working fine but user not able to access mail i know squid not support smtp, pop and imap can you please suggest me what do in this case.
I’m sorry but this is out of the scope of the LFCE certification, which is what this article was written for. We also offer support services on demand for requests like yours. If you’re interested, just let us know and we’ll reach out to you!
Hi Gabriel Canepa
I want to implement squid 3.3 in RHEL 7 but could not succeeded. Before this I have worked on RHEL 5. Everything worked fine over there but I am struck in RHEL 7.
My scenario is as under:
enp0s25 (LAN): 192.168.10.10 (internal zone)
enp2s0 (WAN): 202.83..190.110 (external zone)
Gateway (Router): 192.168.10.0
I want to forward all incoming traffic of port 80 from any client; route to live IP via enp0s25 (squid interface for LAN).
I want users to add proxy in their browsers but use gateway IP for other purposes (To reduce load on router). The users must retain router IP as their default-gateway in Network Connection Settings.
I want explicit proxy. I need exact traffic forwarding rules & PREROUTING/POSTROUTING with DNAT (whichever is applicable). How can I achieve my target?
I did the following upto yet but failed to achieved my target.
net.ipv4.ip_forward = 1 (For Traffic Forwarding)
firewall-cmd –permanent –zone=public –add-forward-port=port=80:proto=tcp:toport=3128:toaddr=192.168.10.10
firewall-cmd –permanent –zone=public –add-port=3128/tcp
firewall-cmd –permanent –add-masquerade
firewall-cmd –reload
Kindly tell me the exact commands to be executed using firewalld.
Your early response will be appreciated.
Thank You
Abdullah,
I’m sorry but your question is out of the scope of this article and the LFCE certification. If you need support for the scenario you have described, kindly go to https://www.tecmint.com/services/ and we can talk.
Thanks for this tutorial. I have my squid 3.3.8 installed and running on LinuxMint 17 in a virtualbox. When I issued the command ‘sudo tail -f /var/log/squid3/access.log‘ I see lots of TCP/MISS, even after accessing the same site on different machine.
What could be the problem. I don’t think squid is caching same the website when accessed on different machine.
Appreciate your help
One of our customer uses our proxy server, PDFs are building correctly on the server side, but they aren’t transferring to our client machines due to what they think is a proxy time out issue.
Actually, small PDF file using the system, and that transfers to my local machine without issue.
So the problem is the big PDFs, which are taking about 1hr to create.
They send a dummy package every 10 minutes to keep the connection, but customer thinks the proxy servers are timing out before then. Does that make sense?
can you help me know what the “current time” out time is?
does the below lines decide time out or what decides the time out?
refresh_pattern ^ftp: 1440 20% 10080
refresh_pattern ^gopher: 1440 0% 1440
refresh_pattern . 0 20% 4320
@kadambari,
A quick search for squid timeout in Google returned this result: http://www.squid-cache.org/Doc/config/request_timeout/. Without knowing much about your actual environment I’m afraid I can’t say for sure whether this will help or not. Keep in mind that the logs are your best friends. Have you found anything in the Squid log that may point you in the right direction?
Hi Mr Gabriel,
im looking for a proxy solution and finally i found squid web proxy solution , i try to install it on 3 different platforms : Windows server , Ubuntu Server 16.04 and Centos 7 , i do not have success because i try to make it transparent , without configuring client browser ;
now my question is if i make it non transparent proxy , and i should configure the browsers of my clients one by one , and some day a client learn how to disable this configuration from the browser then he will be able to surf the net without passing through the proxy , i find this stupide solution !
for me in the beginning i thought that after installing squid on the os ( ubuntu or centos in the middle : net router squidServerLAN) he will not let the user in the lan connect only after configure his browser , else no internet will be established .
please i need answer.
Is there any guide about blocking files by their signatures using squid ?
I want to write my own code to check if a file have the specific signature and block it if necessary and use this code with squid.
@nadav,
Do you mean blocking access to certain types of files (video, music, to name two examples) via Squid? If so, this link may be helpful: http://www.cyberciti.biz/faq/squid-content-filter-block-files/. Let us know if it helps, but you can rest assured that this specific question is out of the scope of the LFCE exam.
Great work Sir.
Sir please help me in “How to limit bandwidth of users, clients or lab computers”
I have more than 2000 lab PCs.
Types of clients
Type 1: unlimited access to bandwidth
Type 2: 1.5 Mbps
Type 3: 512 Kbps
I have 4 labs in which i want to implement bandwidth control policy.
Please guide me
Thanks
@Najam,
Are different types of clients in separate networks, or how do you distinguish one type from another? In other words, how do you define a client type, and assign it to a specific person, or IP address?
A-Block 10.10.2.0/24
B-Block 10.10.3.0/24
C-Block 10.10.4.0/24
D-Block 10.10.5.0/24
E-Block 10.10.6.0/24
F-Block 10.20.0.0/24
Sir I want that the students of A,B&C block use only 512Kb and the users of
D&E use 1mbps only and the users of F-Block use unlimited
@Najam,
You should look into the ClientBandwidthLimit and DelayPools features of Squid. They are documented in the Squid wiki. This may require you to compile Squid from source, though.
If you came to this page while preparing to take the LFCE exam, you can rest assured that you will NOT be asked to perform such task (limiting bandwidth on a per-network basis) during the exam. On the other hand, if you need help to do this for your job or a homework assignment, we at Tecmint.com offer support services for a reasonable price. Feel free to contact us for a quote.
Thank you Sir.
Sir Basically I’m a student and I’m working on my Project I can’t afford your services I shall be thankful to if you help me a little bit more. How this ClientBandwidthLimit works
Once again Thanks.
@Najam,
Please read the documentation and get back to us after you’ve tried what it says in the links I already shared. The kind of support you need and the time it would take for us to provide it to you is beyond our grasp at this point. Thank you for your understanding.
Hi,
I have configured squid proxy server but there is one problem, when I set proxy setting in google chrome browser then skype application is not working and when I remove the proxy setting it is working. And this issue is not with firefox browser.
How to resolve this can you please advice ?
@Rahul,
As opposed to Firefox, Google Chrome usually takes its proxy settings from the system settings. By changing the one, you change the other (at least that’s the case in Windows). You will have to separately set the proxy configuration for Skype. (Skype menu –> Options –> Advanced for me, using Skype 4.1 for Linux). See image here: http://postimg.org/image/6odi3fd63/
Hi,
I just took the exam, I had a question about squid using w3m for a user.
for example, when user1 uses w3m it is automatically passing through squid.
question is how do I set that up?
thanks
@Ricky,
One way you can do that is adding the HTTP_PROXY variable to the user’s .bash_profile file, like so:
HTTP_PROXY=’http://[IP or hostname]:port’
export HTTP_PROXY
Then source .bash_profile:
. .bash_profile
Or have the user log out and log back in.
thanks mate
will try to do it.
how do we reverse the proxy?
@imran,
The reverse proxy is out of the scope of the LFCE certification. However, if you’re interested in the topic, check the Squid wiki here: http://wiki.squid-cache.org/SquidFaq/ReverseProxy
how to prevent client from changing proxy setting when proxy server IP is assign, from web browser like firefox,chrome.
@rahul,
I believe your question refers to web browser configuration (which is performed on the client) rather than proxy server configuration, which is the topic of this article. You will have better luck if you post your question in a Firefox or Chrome forum.
sir, I was not successful at the local configuration on the access restrictions when the website
I’ve done in the following configuration file squid.conf
acl localhost src 127.0.0.1
http_access allow localhost
http_port 3128
acl forbidden_domains dstdomain “/etc/squid/forbidden_domains”
http_access allow localnet !forbidden_domains
on forbidden_domains file I added the site domain .facebook.com
after I added the following syntax in squid.conf :
http_access allow localnet !forbidden_domains
there is an error :
The proxy server is refusing connections
What should I do? please help sir,
Do you get that error while trying to access Facebook? If so, that is to be expected. Otherwise, is the client PC on the same network as your proxy? In any event, please feel free to use a service such as Pastebin to share your entire proxy configuration (feel free to obfuscate private or sensitive data) and TinyPic to share a screenshot of the proxy configuration in your web browser.
First off, great work on the tutorial series!
I noticed a small change in the newest version of squid, 3.3.8 on CentOS 7
NSCA plugin for squid can be found in /usr/lib64/squid/basic_nsca_auth instead of /usr/lib/squid/nsca_auth.
Keep up the good work!
Cheers,
Jan
Thank you for pointing that out and for sharing with the rest of the community!
@Ravi, please add the correction suggested by Jan above.
@Gariel,
I am not getting what needs to be corrected? and who is Jan? where he added his suggestions? couldn’t find one…
Hey Gabrial,
Awesome tutorial series. one thing i found,
Maximum_object_size should be before cache_dir as per squid configuration otherwise maximum object size is set to very small size. so it will not cache large files. Please correct that in tutorial.
@hardik,
That is correct my friend. Thank you for pointing that out.
@Ravi,
Please correct that in the writeup.
Hello, I have spent the past two days trying to find a solution to my situation. I see everywhere how to block specific sites and separately how to setup the authentication process. But how to you block a site and configure an authentication process to access that site?
For ex:
–>Block facebook
–>user tries to access facebook
–>website is blocked so browser requests credentials
–>credentials are provided
–>Facebook is now available for any given time frame
I understand how to have a regular authentication to be prompted at every browser restart and every hour but there must be a way to block sites, but override them with credentials
Thanks :D
To my knowledge, there is no such option in Squid. Instead of attempting to implement that solution through the use of a proxy, you may want to consider a content filter in client PCs.
Hi jeff, I just tried exactly what you asked as exercise:
auth_param basic program /usr/lib/squid3/basic_ncsa_auth /etc/squid3/passwd
auth_param basic casesensitive on
auth_param basic realm “NCSA Proxy”
auth_param basic credentialsttl 24 hours
acl ncsa proxy_auth REQUIRED
acl forbidden_domains dstdomain “/etc/squid3/forbidden-domains”
http_access deny forbidden_domains !ncsa
The meaning is that you deny the acl forbidden_domains if not supported by the ncsa authentication.
Hi, we are using Squid 2.3 on RHEL5 , my problem is we are having 3+mbps ILA and sharing to our user by proxy but its not responding like ILA bandwidth , and after restarting squid service its work find but within 10-15mints its again get slowed….I’m new to Squid , can you help me out what can be done for smooth internet service.
thanx.
It will be great if this website has a Print friendly button or a Download as a Pdf to view it offline.
@SRN,
Surely, we will try to implement both options to download pages in PDF format to view offline..
@Rajsekhar,
Thank you for your kind comment :). We will consider your suggestion. Thank you!
for refresh_pattern I had to provide min percent and max values as follow to just make squid start
refresh_pattern .*\.(mp4|iso) 0 0% 2880
# yum -q list squid
Installed Packages
squid.x86_64 7:3.1.10-29.el6 @base
Hello,
regarding “auth_param basic credentialsttl 30 minutes”, I have set this as low as “5 minutes” but after logging in it seems I am never asked for the username or password again. Could you pleas help me figure out why this might be?
Thanks :)
@derrend,
Please post the relevant configuration files or upload them to a public service such as Pastebin so we can take a closer look and troubleshoot your issue. You are using the right variable but there may be others that are overriding it.
Good one. :) Also include integration of Authentication techniques like Ldap, kerberos etc which helps in tracking user logs