In order to effectively use storage devices such as hard drives and USB drives on your computer, you need to understand and know how to structure them before using in Linux. In most cases, big storage devices are split into separate portions called partitions.
Partitioning enables you to split your hard drive into multiple parts, where each part acts as its own hard drive and this is useful when you are installing multiple operating systems in the same machine.
In this article, we will explain how to partition a storage disk in Linux systems such as CentOS, RHEL, Fedora, Debian and Ubuntu distributions.
Creating a Disk Partition in Linux
In this section, we will explain how to partition a storage disk in Linux using the parted command.
The first step is to view the partition table or layout on all block devices. This helps you identify the storage device you want to partition. You can do this using parted or fdisk command. We will use the former for purposes of demonstration, as follows, where the -l flag means list partition layout on all block devices.
# parted -l
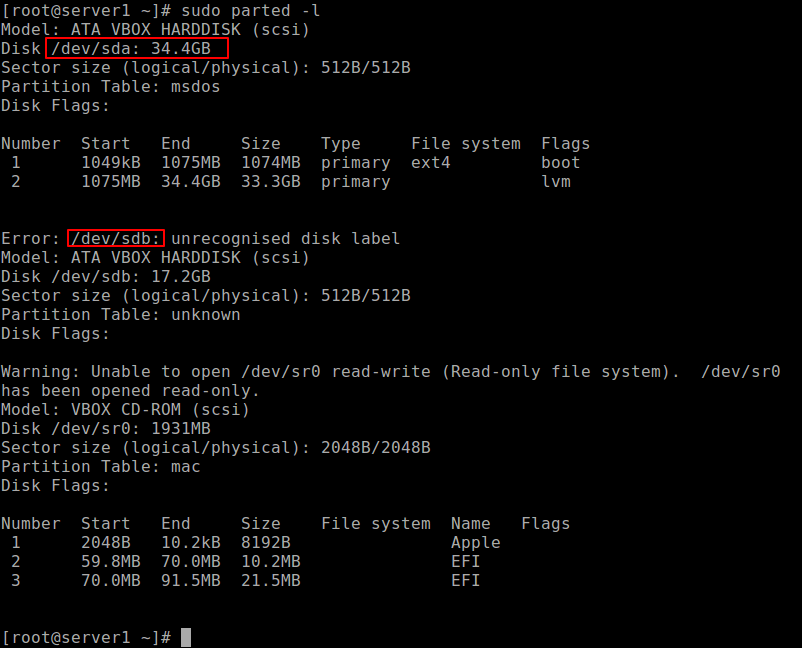
From the output of the above command, there are two hard disks attached to the test system, the first is /dev/sda and the second is /dev/sdb.
In this case, we want to partition hard disk /dev/sdb. To manipulate disk partitions, open the hard disk to start working on it, as shown.
# parted /dev/sdb
At the parted prompt, make a partition table by running mklabel msdos or gpt, then enter Y/es to accept it.
(parted) mklabel msdos
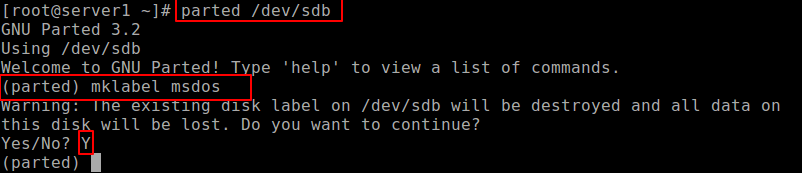
Important: Make sure to specify the correct device for partition in the command. If you run parted command without a partition device name, it will randomly pick a storage device to modify.
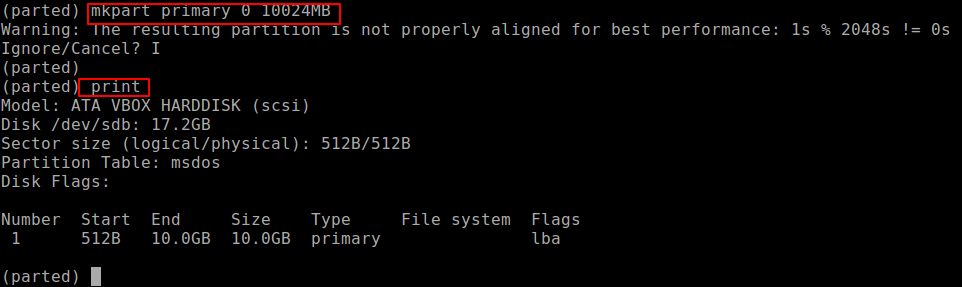
Next, create a new primary partition on the hard disk and print the partition table as shown.
(parted) mkpart primary ext4 0 10024MB
(parted) print
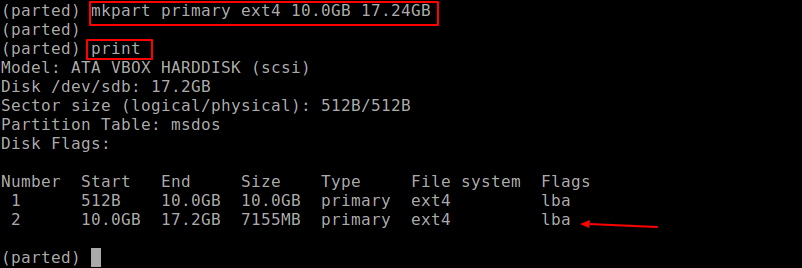
You can create another partition for the reaming space as shown.
(parted) mkpart primary ext4 10.0GB 17.24GB
(parted) print
To quit, issue the quit command and all changes are automatically saved.
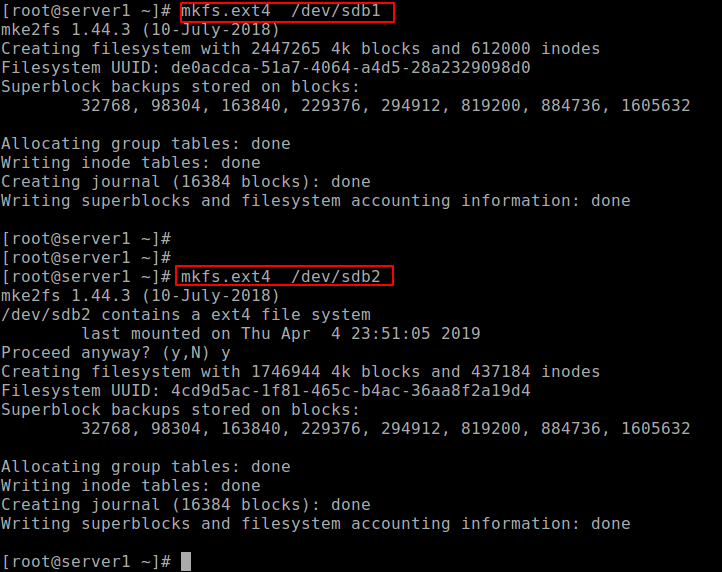
Next, create the file system type on each partition, you can use the mkfs utility (replace ext4 with the file system type you wish to use).
# mkfs.ext4 /dev/sdb1
# mkfs.ext4 /dev/sdb2
Last but not least, to access the storage space on the partitions, you need to mount them by creating the mount points and mount the partitions as follows.
# mkdir -p /mnt/sdb1
# mkdir -p /mnt/sdb2
# mount -t auto /dev/sdb1 /mnt/sdb1
# mount -t auto /dev/sdb2 /mnt/sdb2
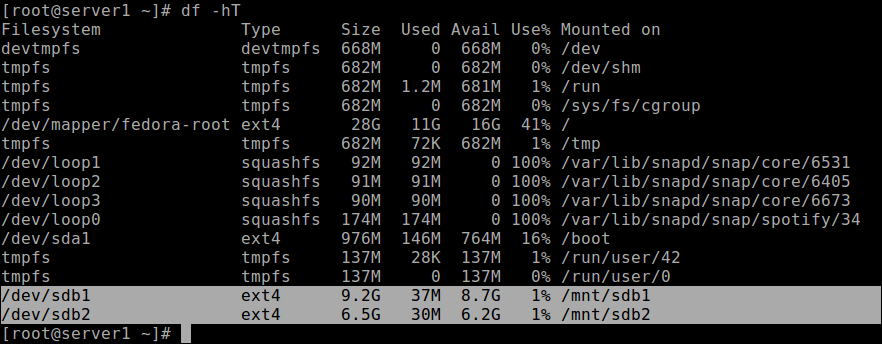
To check if the partitions are actually mounted, run the df command to report file system disk space usage.
# df -hT
Important: You may need to update /etc/fstab file to mount newly created partitions automatically at boot time.
You might also like to read these following related articles:
- 9 Tools to Monitor Linux Disk Partitions and Usage in Linux
- How to Backup or Clone Linux Partitions Using ‘cat’ Command
- 8 Linux ‘Parted’ Commands to Create, Resize and Rescue Disk Partitions
- How to Repair and Defragment Linux System Partitions and Directories
- How to Clone a Partition or Hard drive in Linux
- How to Add a New Disk to an Existing Linux Server
- Top 6 Partition Managers (CLI + GUI) for Linux
That’s all! In this article, we have shown how to partition a storage disk, create a file system type on a partition and mount it in Linux systems. You can ask questions or share you thoughts with us via the comment form below.


I successfully partitioned my drive for Linux and Windows. On boot up, I had set Linux as the default. This resulted in a screen giving me an option between OS choices. Then after a slight delay if nothing was selected the OS went to Linux.
I was having a printer issue and changed the default to Windows. Now when I boot up the options screen does not show up and my system just goes straight into Windows. I would like to change the OS setting back to Linux as the default as I had before.
Any help on getting a boot options screen in Windows would be greatly appreciated.
Thanks
@Jerry,
Why not revert the changes you did and set Linux as the default option in your Boot settings?
Before I started practicing according to your article, my machine’s partition system was as above. When I made the partition table by running “mklabel msdos“, then changed it to look like the below :
The kernel still uses the old partitions. The new table will be used at the next reboot.
Syncing disks.
What will happen after rebooting my laptop? Will I get my user login option ? will OS run in my computer ?
Warning: The resulting partition is not properly aligned for best performance.
what is this warning?
Or just use Gparted, a great graphical program that is very easy to use.
The folks at tecmint are in love with the command line. They will go through all kinds of contortions to use CLI even when GUI is much simpler and quicker.