Brief: In this article, you will learn how to create your own plugin for ONLYOFFICE Docs and how to publish it in the official plugin marketplace that is available starting from version 7.2.
ONLYOFFICE Docs is not an ordinary office suite in the traditional sense. Of course, it allows you to do what you can do using other office packages – create and edit documents, spreadsheets, and presentations, share and co-edit them online, makes fillable forms, browses and converts PDF files, and so on.
However, there is a way to make ONLYOFFICE even more powerful. What is meant here is third-party plugins, i.e. additional software tools that enhance the standard functional capabilities of the suite. For example, plugins make it possible to connect third-party services or add new user interface elements.
How to Create a Plugin for ONLYOFFICE Docs
Before you start creating your own plugin for ONLYOFFICE Docs, you need to make sure that you have a GitHub account and know the fundamentals of how to work with this platform. This is very important. If you are new to GitHub, you can take a look at the official GitHub documentation.
The plugin creation process can be divided into seven steps that you need to follow carefully:
- Preliminary activities.
- Coding.
- Adjustment of the plugin style.
- Localization (optional).
- Preparation.
- Testing.
- Publication in the plugin marketplace.
Let’s dive deeper into the plugin development.
Step 1. Fork the Plugin Marketplace Repository
First of all, you need to log into your GitHub account or create one if you don’t have one. After that, you need to create a fork of the ONLYOFFICE plugin marketplace repository that is available at the following URL address:
https://github.com/ONLYOFFICE/onlyoffice.github.io.
As a result, you will have another repository, and its URL address will be something like this:
https://github.com/YOUR-USERNAME/ONLYOFFICE/onlyoffice.github.io
After successfully forking the plugin marketplace repo, it’s necessary to create a GitHub Pages site from this repository for testing purposes. If you don’t know how to do it, please refer to the official GitHub guide.
Now that you have your own GitHub Pages site, it’s time to clone the fork to your computer.
Finally, you need to create a folder for your future plugin at:
onlyoffice.github.io/sdkjs-plugins/content/.
That’s it. You have just completed all the required preliminary activities and can proceed with the next step.
Step 2. Write the Code for Your Plugin
You don’t have to be extremely good at coding but you definitely need some basic coding knowledge to create your own plugin for ONLYOFFICE Docs.
In a nutshell, an ONLYOFFICE plugin is a folder with several files. You must create three files for your plugin to work correctly:
- config.json – This is a plugin configuration file that contains information about all the important data. In this file, there are some parameters that are required to register the plugin in the ONLYOFFICE editors. Look at this page in the official API documentation to read the full description of each parameter.
- plugin code (.js file) – This is the plugin file itself that contains the JavaScript code of your plugin. This file describes the operations that the plugin performs and how they are performed. Read this API guide to know how it works.
- index.html – This is the entry point of your plugin that connects the config.json and plugin.js files. Have a look at this example to understand what it should look like.
Apart from these obligatory files, the plugin folder can contain other files. For example, icons, plugin styles, readme files, third-party services, etc. You will find more information about such files below.
To write a good working code for your plugin, you need to know the required methods and events.
Step 3. Adjust the Style of Your Plugin
Writing code for your plugin is not enough. You also need to adjust its style so it looks like an integral part of the ONLYOFFICE editors. To do so, just add the ONLYOFFICE style sheet to the index.html file described above:
<link rel="stylesheet" href="https://onlyoffice.github.io/sdkjs-plugins/v1/plugins.css">
You can add buttons, input controls, label controls, loaders, and other elements.
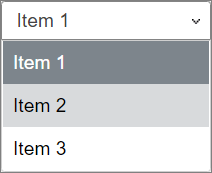
For example, to add a combo box to your plugin, you can use the select2 function:
<select id="select_example" class="" ></select>
$('#select_example').select2({
data : [{id:0, text:'Item 1'}, {id:1, text:'Item 2'}, {id:2, text:'Item 3'}],
minimumResultsForSearch: Infinity,
width : '120px'
});
The inserted combo box will look like this:
More information about the ONLYOFFICE style elements can be found here.
Step 4. Localise Your Plugin (Optional)
You can skip this step if you are going to create a plugin for English-speaking users only. However, if you want your plugin to be available in other languages, you can create the translations folder in the plugin directory and put their .json files for all languages you want to use.
Read the official API documentation to learn how here to localize your plugin correctly.
Step 5. Prepare Plugin for Publishing in ONLYOFFICE Marketplace
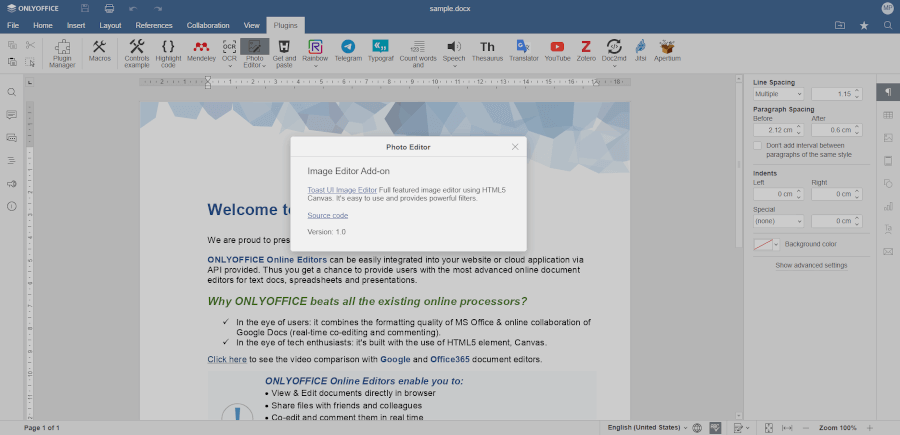
To polish the appearance of your plugin before it becomes available in the ONLYOFFICE marketplace, you need to add an About window with a short description of your plugin, its version, the developer name, etc.
For example, this is the About window of the Photo Editor plugin:
To be able to create such a window for your plugin, follow these instructions.
Also, you need to create icons for your plugin and put them into the resources folder. In general, you need 8 icons so that your plugin displays correctly in the ONLYOFFICE plugin marketplace: 4 icons (125%, 150%, 175%, and 200% scaling) for the Light and Dark interface themes.
Additionally, you can create a readme file and put it into the main plugin folder. This file can include any information you want other users to know – a description of the main features of your plugin, installation instructions, known issues, and bugs, etc.
Now your plugin is ready, and you can test it properly before publishing it in the marketplace.
Step 6. Test Your ONLYOFFICE Docs Plugin
Now it’s time to put all the files you have already created according to the instructions above in the plugin folder. Then push the plugin folder to the remote repository and test the plugin in ONLYOFFICE Desktop Editors. For this purpose, you can run the desktop app in debugging mode.
On Linux, you can open the terminal with CTRL+ALT+T. After that, enter the path to ONLYOFFICE Desktop Editors, add a space and then specify --ascdesktop-support-debug-info:
"/opt/onlyoffice/desktopeditors/DesktopEditors" --ascdesktop-support-debug-info
Test your plugin and its features.
If everything is OK, you can also test your plugin in the web version of the ONLYOFFICE suite, ONLYOFFICE Docs. In other words, your plugin can be added as a new extension.
To create the corresponding extension, you need to open the onlyoffice.github.io/store/plugin-dev/extension/inject.js file and specify the path to your plugin on the GitHub Pages site in the URL_TO_PLUGIN variable:
var URL_TO_PLUGIN = "https://YOUR-USERNAME.github.io/onlyoffice.github.io/sdkjs-plugins/content/your-plugin/"
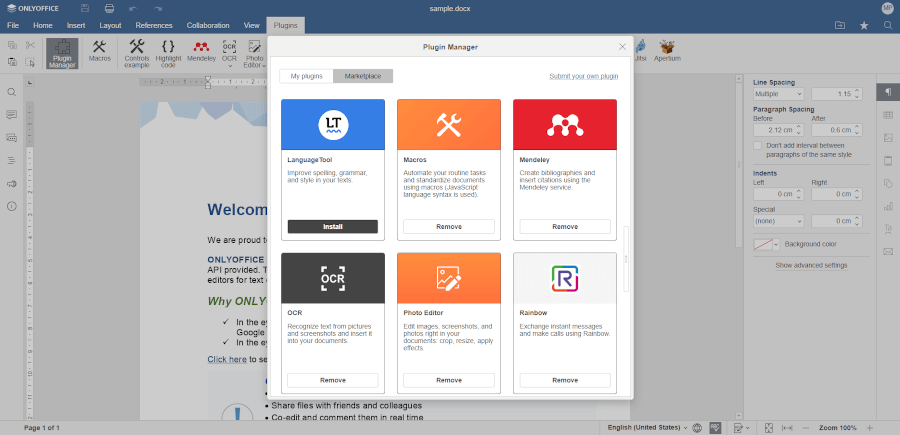
The onlyoffice.github.io/store/plugin-dev/extension folder is the extension you need. Just upload it to your web browser, run your ONLYOFFICE Docs and find your plugin in the Plugin Manager on the Plugins Tab on the top toolbar. Here is a detailed guide on how to add a plugin to a web browser.
If your plugin works as intended, you can proceed with the final step.
Step 7. Submit the Plugin to ONLYOFFICE Marketplace
Congratulations! You have gone through the plugin creation process and now you can make your plugin available for other users. For this purpose, you can create a pull request from your fork to this ONLYOFFICE repository at:
https://github.com/ONLYOFFICE/onlyoffice.github.io
If your plugin works well, the ONLYOFFICE developers will approve your pull request, and your plugin will appear in the ONLYOFFICE plugin marketplace. In this case, others will be able to install it from the marketplace with a few clicks.
We hope you find this article useful. Don’t forget to share what you think in the comments below.