Apache Tomcat is an open-source, lightweight, powerful and widely-used web server developed and maintained by Apache Foundation. It is an implementation of the Java Servlet, JavaServer Pages (JSP), Java Expression Language (EL) and Java WebSocket technologies, and provides a pure Java HTTP server to run Java web-based applications.
This article will walk you throughout the installation and configuration of Apache Tomcat 9 with remote access to the web interface on RHEL 8 Linux.
If you’re looking to have Tomcat on RHEL/CentOS 7, follow this article to Install Apache Tomcat on RHEL/CentOS 7.
Step 1: Installing Java on RHEL 8
To install Java on RHEL 8, first, update the system packages and install the default available version of Java 8 or Java 11 using the following dnf commands as shown.
# dnf update
# dnf install java-1.8.0-openjdk-devel  	#install JDK 8
OR
# dnf install java-11-openjdk-devel		#install JDK 11
Once the installation finishes, you can verify the installed Java version on the system using the following command.
# java -version
Sample Output
openjdk version "1.8.0_222"
OpenJDK Runtime Environment (build 1.8.0_222-b10)
OpenJDK 64-Bit Server VM (build 25.222-b10, mixed mode)
Step 2: Installing Apache Tomcat on RHEL 8
Once JAVA has been installed on the system, now it’s time to download the latest version of Apache Tomcat (i.e. 9.0.24) is the most recent stable version at the time of writing this article.
If you want to verify the version, head over to the official Apache download page and check if there is a newer version available to download.
Alternatively, you can download the latest version of Apache Tomcat using the following wget command and set up it as shown.
# cd /usr/local
# wget http://www-us.apache.org/dist/tomcat/tomcat-9/v9.0.24/bin/apache-tomcat-9.0.24.tar.gz
# tar -xvf apache-tomcat-9.0.24.tar.gz
# mv apache-tomcat-9.0.24 tomcat9
Note: If newer Apache Tomcat version available, make sure to replace the version number above with the latest version.
The Apache Tomcat server is now deployed in the /usr/local/tomcat9 directory, you can verify the contents by running the pwd command and list the directory content as well.
# pwd tomcat9/
# ls -l tomcat9/
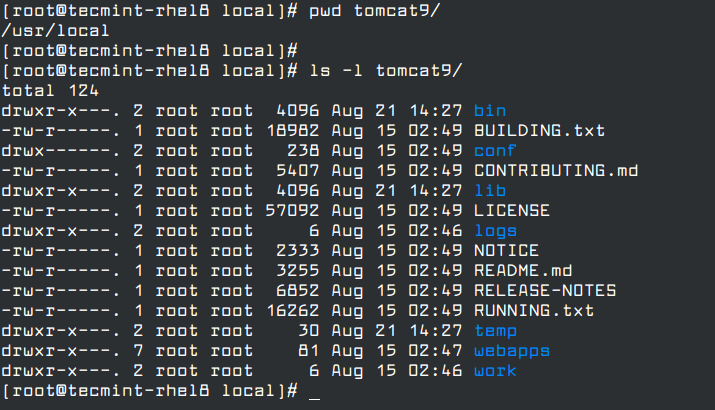
The following is a description of each of the sub-directories in the installation directory of Apache Tomcat.
- bin – contains the executables.
- conf – contains configuration files.
- lib – stores library files.
- log – stores log files.
- temp – contains temporary files.
- webaaps – stores web application files.
Step 3: Running Apache Tomcat Under Systemd in RHEL 8
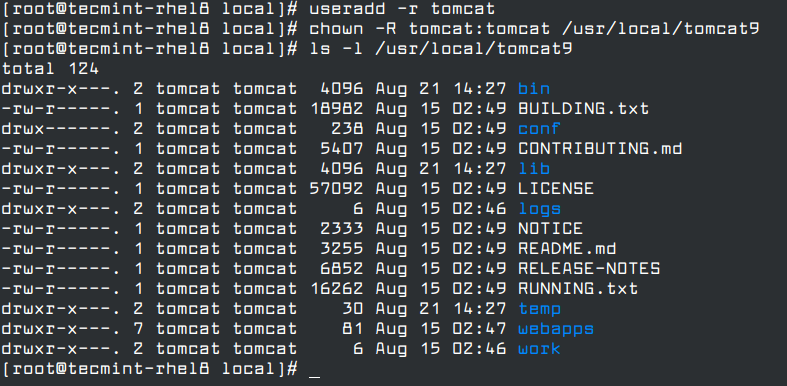
To easily manage the Apache Tomcat daemon, you need to run it as a service under systemd (system and service manager). The service will run with permissions of a system user called tomcat which you need to create it using useradd command.
# useradd -r tomcat
Once the tomcat user is created, give it permissions and ownership rights to the Tomcat installation directory and all of its contents using the following chown command.
# chown -R tomcat:tomcat /usr/local/tomcat9
# ls -l /usr/local/tomcat9
Next, create a tomcat.service unit file under /etc/systemd/system/ directory using your favorite text editor.
# vi /etc/systemd/system/tomcat.service
Copy and paste the following configuration in the tomcat.service file.
[Unit]
Description=Apache Tomcat Server
After=syslog.target network.target

[Service]
Type=forking
User=tomcat
Group=tomcat

Environment=CATALINA_PID=/usr/local/tomcat9/temp/tomcat.pid
Environment=CATALINA_HOME=/usr/local/tomcat9
Environment=CATALINA_BASE=/usr/local/tomcat9

ExecStart=/usr/local/tomcat9/bin/catalina.sh start
ExecStop=/usr/local/tomcat9/bin/catalina.sh stop

RestartSec=10
Restart=always
[Install]
WantedBy=multi-user.target
Save the file reload the systemd configuration to apply the recent changes using the following command.
# systemctl daemon-reload
Then start the tomcat service, enable it to auto-start at system boot and check the status using the following commands.
# systemctl start tomcat.service
# systemctl enable tomcat.service
# systemctl status tomcat.service
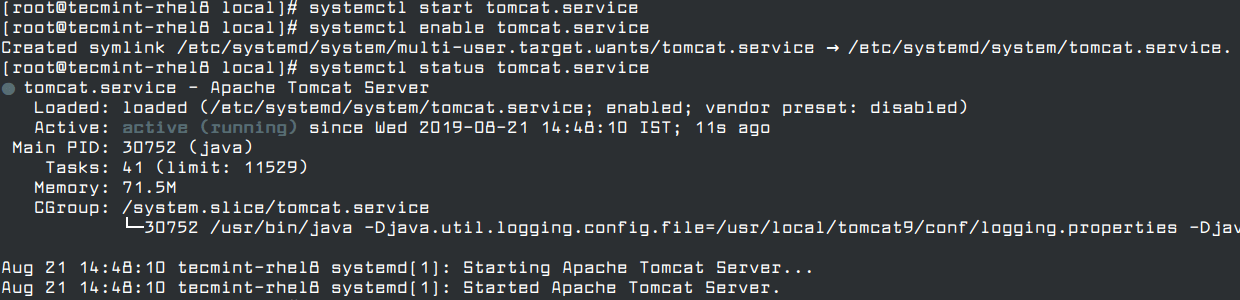
Tomcat uses port 8080 and 8443 for HTTP and HTTPS requests respectively. You can also confirm that the daemon is up and listening by checking the HTTP port among all listening ports on the system using netstat command.
# netstat -tlpn

If you have the firewalld service running, you must open the ports 8080 and 8443 before accessing the web interface for Tomcat, using the firewall-cmd command as shown.
# firewall-cmd --zone=public --permanent --add-port=8080/tcp
# firewall-cmd --zone=public --permanent --add-port=8443/tcp
# firewall-cmd --reload
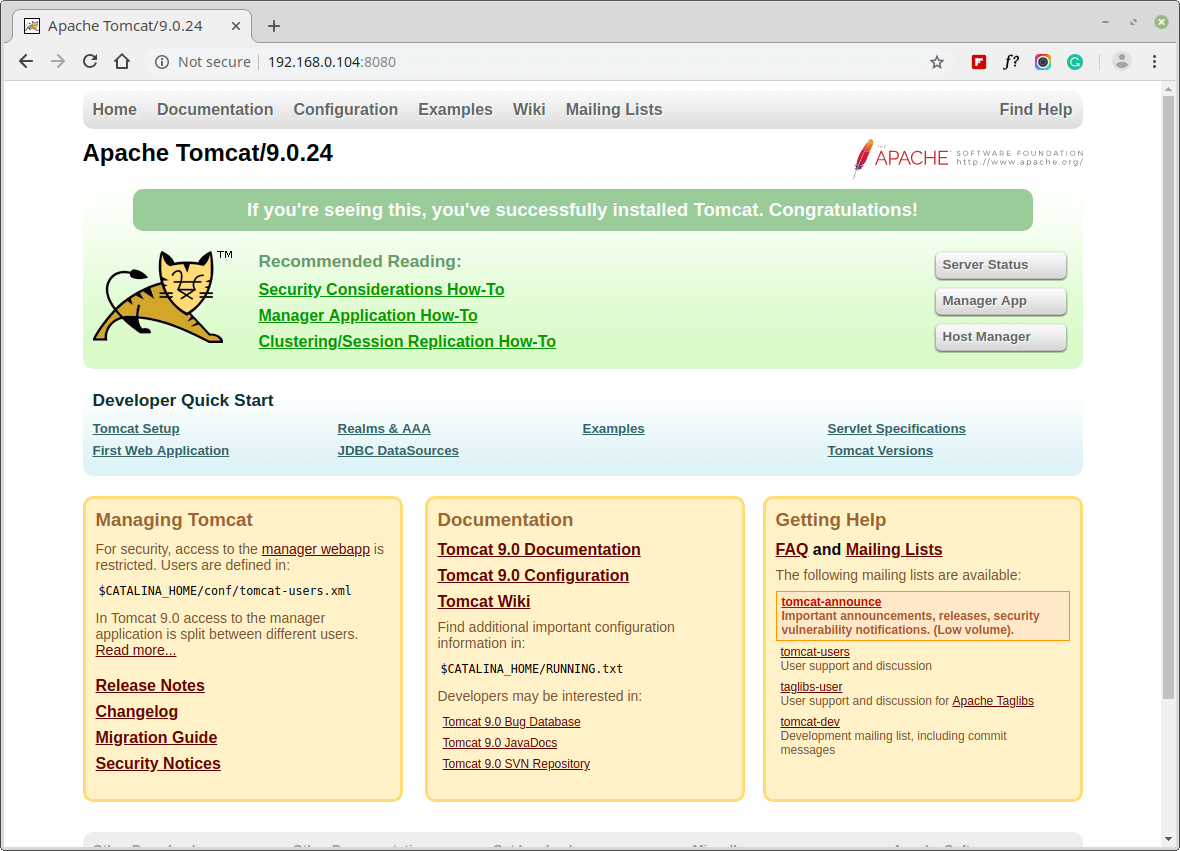
Step 4: Access Apache Tomcat Web Interface
Now that you have installed, configured and started Tomcat as a service, and allowed requests to the daemon via the firewall, you can test the installation by trying to accessing the web interface using the URL.
http://localhost:8080
OR
http://SERVER_IP:8080
Once you see the page shown in the screenshot, you’ve successfully installed Tomcat.
Tomcat includes a web application called Manager used to deploy a new web application from the uploaded contents of a WAR file, deploy a new web application, list the currently deployed web applications, and the sessions that are currently active for those web apps, and much more.
It also provides a Host Manager application used to manage (create, delete, etc.) virtual hosts within Tomcat.
Step 5: Enable HTTP Authentication for Tomcat Manager and Host Manager
To ensure restricted access to the Manager and Host Manager apps in a production environment, you need to configure basic HTTP authentication in the /usr/local/tomcat9/conf/tomcat-users.xml configuration file.
# vi /usr/local/tomcat9/conf/tomcat-users.xml
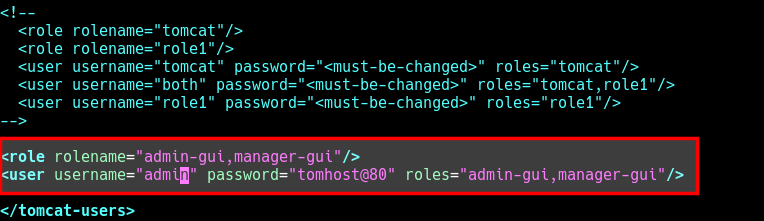
Copy and paste the following configuration within the <tomcat-users> and </tomcat-users> tags as shown in the screenshot. This configuration adds the admin-gui and manager-gui roles to a user named “admin” with a password of “tomhost@80”.
<role rolename="admin-gui,manager-gui"/>
<user username="admin" password="tomhost@80" roles="admin-gui,manager-gui"/>
Save the changes in the file and exit.
Step 6: Enable Remote Access to Tomcat Manager and Host Manager
By default, access to the Manager and Host Manager apps is restricted to the localhost, the server on which Tomcat is installed and running. But you can enable remote access to a specific IP address or network e.g your LAN.
To enable remote access to the Manager app, open and edit the configuration file /opt/apache-tomcat-9.0.24/webapps/host-manager/META-INF/context.xml.
# vi /usr/local/tomcat9/webapps/manager/META-INF/context.xml
Then look for the following line.
allow="127\.\d+\.\d+\.\d+|::1|0:0:0:0:0:0:0:1" />
change it to this to allow tomcat access from IP address 192.168.56.10.
allow="127\.\d+\.\d+\.\d+|::1|0:0:0:0:0:0:0:1 |192.168.56.10" />
You can also allow tomcat access from the local network 192.168.56.0.
allow="127\.\d+\.\d+\.\d+|::1|0:0:0:0:0:0:0:1 |192.168.56.*" />
or allow tomcat access from any host or network.
allow="127\.\d+\.\d+\.\d+|::1|0:0:0:0:0:0:0:1 |.*" />

Then save the changes in the file and close it.
Similarly, enable remote access to the Host Manager app in the file /usr/local/tomcat9/webapps/host-manager/META-INF/context.xml as shown above.
Next, restart the tomcat service to apply the recent changes.
# systemctl restart tomcat.service
Step 7: Access Tomcat Manager Web Apps
To access the Tomcat Manager web app, you can click on the link as shown in the screenshot or use the URL.
http://localhost:8080/manager
OR
http://SERVER_IP:8080/manager
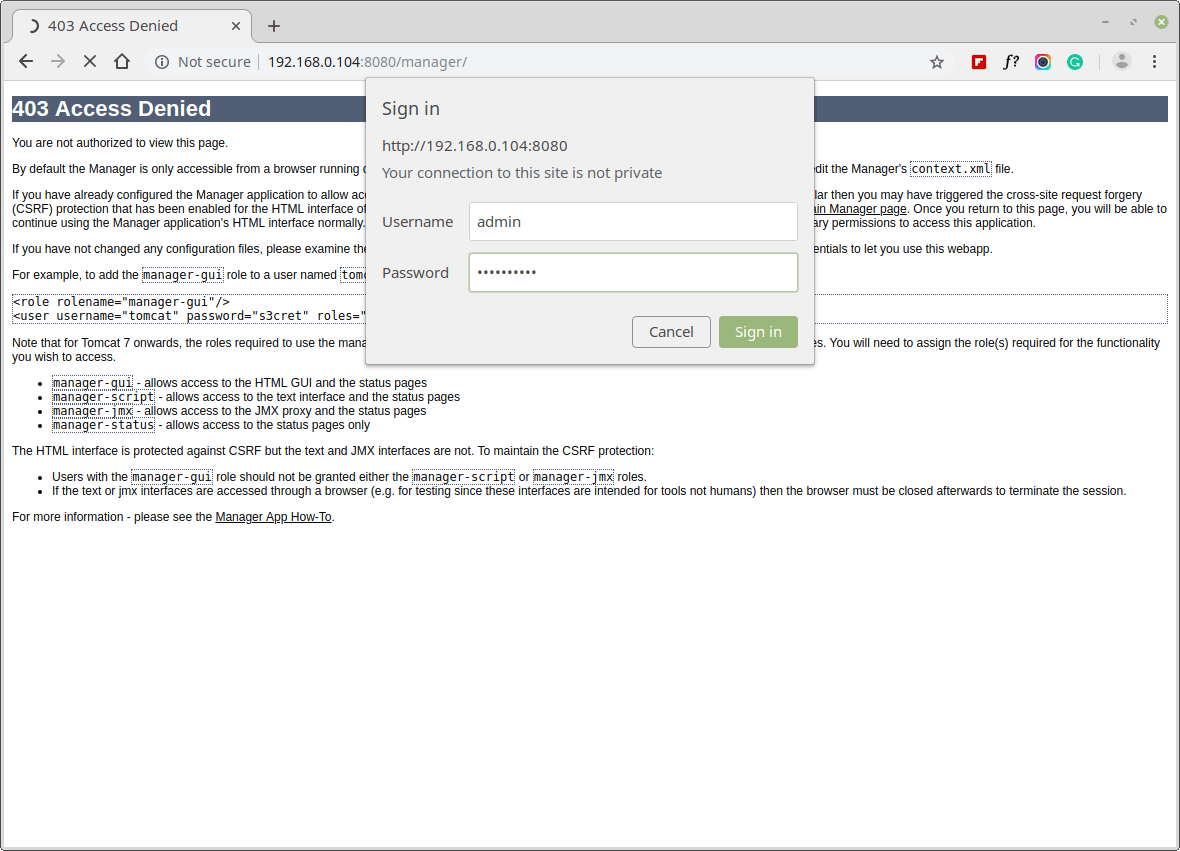
You will be asked to authenticate: enter the username and password you created earlier on to log into the manager app as shown in the screenshot.
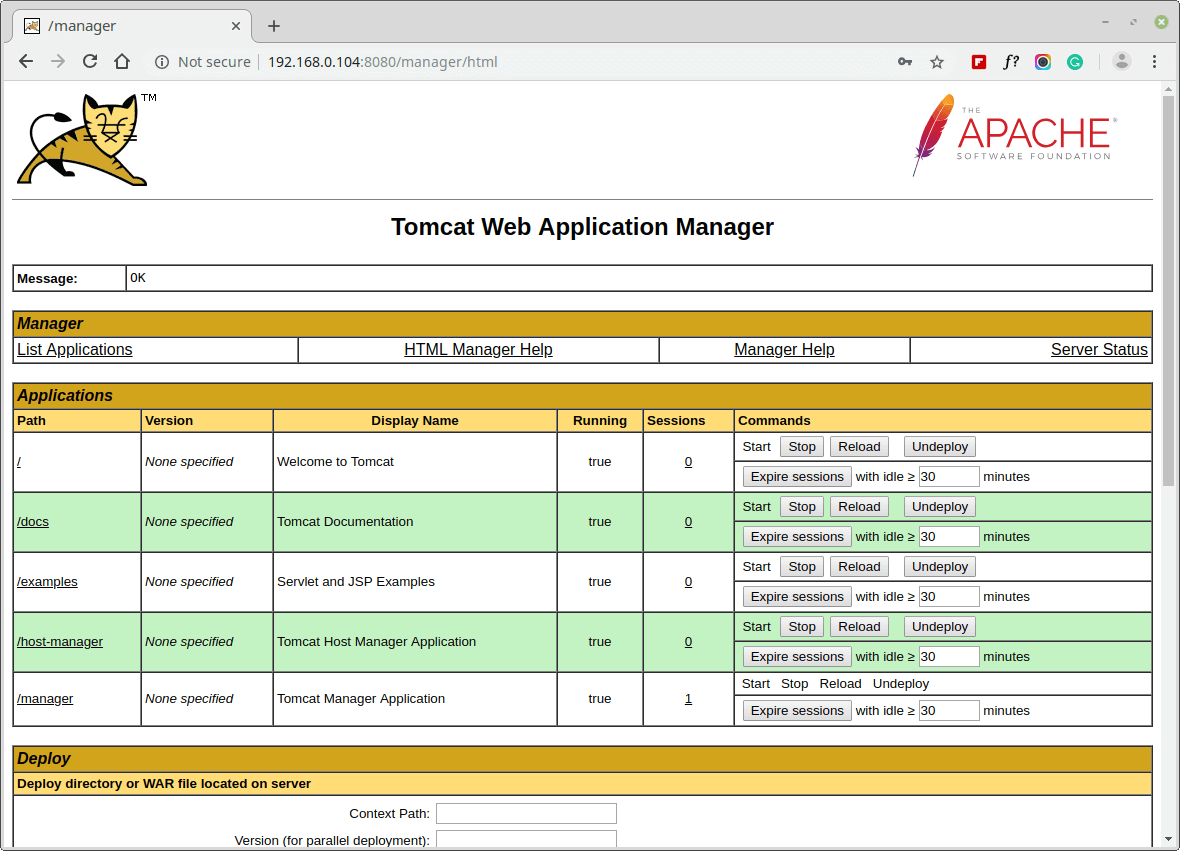
The following screenshot shows the Manager app HTML interface where you can deploy a new web application from the uploaded contents of a WAR file, deploy a new web application or list existing apps and do more.
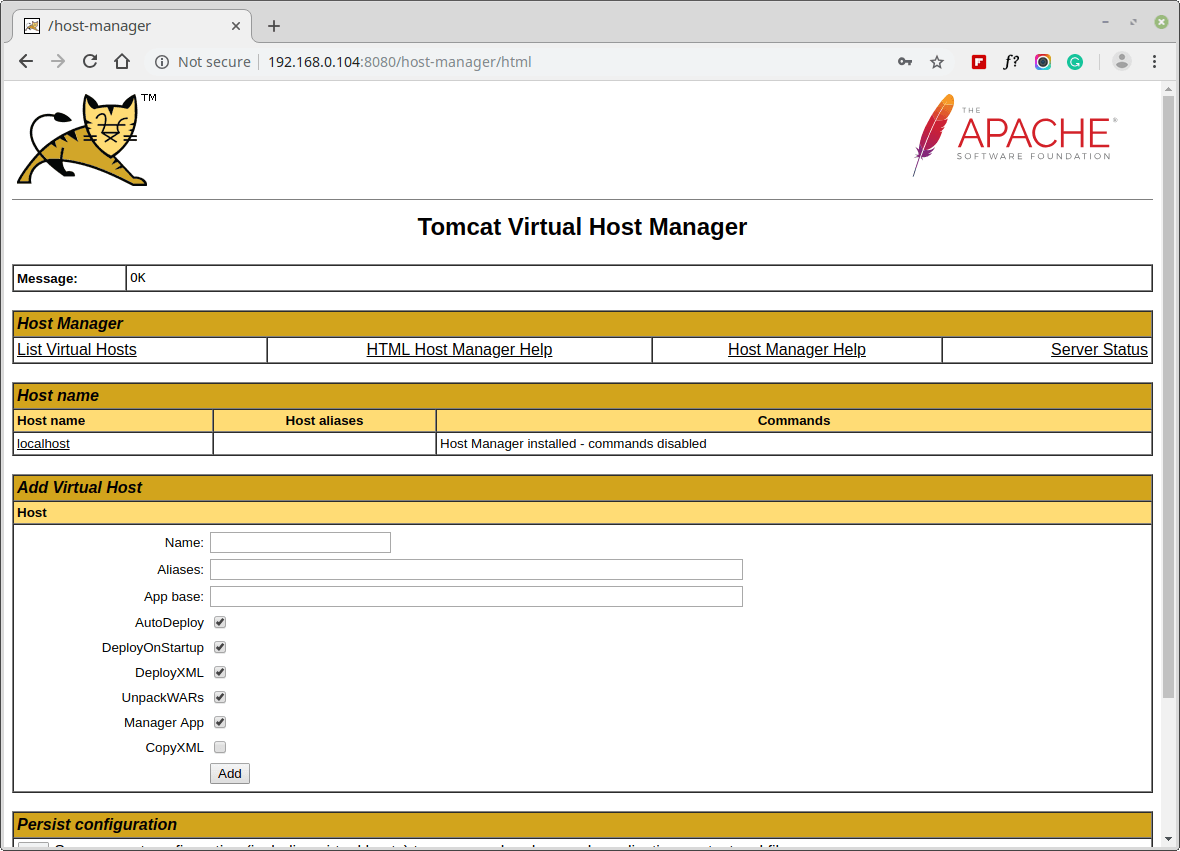
Step 8: Access Tomcat Host Manager Web Apps
To access the Host Manager, go to any of the following URL.
http://localhost:8080/host-manager
OR
http://SERVER_IP:8080/host-manager
Congratulations! You have successfully installed and configured Apache Tomcat on your RHEL 8 server. For more information, see the Apache Tomcat 9.0 documentation.

Thank you very much, it is a perfect step-by-step guide and worked right away for me without any knowledge of Red Hat.
Thank you, Aaron,
Great explanation!
Thanks to your team, I liked it, but I can’t deploy when the WAR file to upload. next error: This site can’t be reached and localhost:8080/host-manager/ 403 Access Denied I hope your team will help me. Thank you guys
thank you
The instructions for installing tomcat9 on RHEL8 are spot-on! I’m a rough beginner and got it up and running using your instructions. Well Done!