MongoDB is an open-source, modern document database management system designed for high performance data persistence, high availability, as well as automatic scaling, based on the state-of-the-art technology of NoSQL. Under MongoDB, a record is a document, which is a data structure that comprises of field and value pairs (MongoDB documents are comparable to JSON objects).
Because it provides high performance and great scalability features, it is being used for building modern applications that require powerful, mission-critical and high-availability databases.
In this article, we will explain how to install MongoDB, manage its service and setup basic authentication on Ubuntu 18.04.
Important: You should note that the developers of MongoDB only offer packages for 64-bit LTS (long-term support) Ubuntu releases such as 14.04 LTS (trusty), 16.04 LTS (xenial), and so on.
Read Also: How to Install MongoDB on Ubuntu 16.04/14.04 LTS
Step 1: Installing MongoDB on Ubuntu 18.04
1. Ubuntu’s official software package repositories comes with the latest version of MongoDB, and can be easily installed using the APT package manager.
First update the system software package cache to have the most latest version of the repository listings.
$ sudo apt update
2. Next, install MongoDB package that includes several other packages such as mongo-tools, mongodb-clients, mongodb-server and mongodb-server-core.
$ sudo apt install mongodb
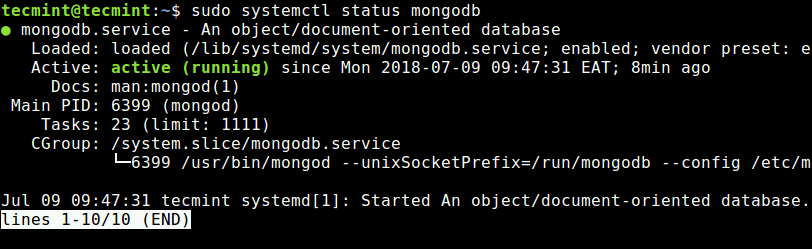
3. Once you have successfully installed it, the MongoDB service will start automatically via systemd and the process listens on port 27017. You can verify its status using the systemctl command as shown.
$ sudo systemctl status mongodb
Step 2: Managing the MongoDB Service
4. The MongoDB installation comes as a systemd service and can be easily manageable via a standard systemd commands as shown.
To stop running MongoDB service, run the following command.
$ sudo systemctl stop mongodb
To start a MongoDB service, type the following command.
$ sudo systemctl start mongodb
To restart a MongoDB service, type the following command.
$ sudo systemctl restart mongodb
To disable automatically started MongoDB service, type the following command.
$ sudo systemctl disable mongodb
To enable again MongoDB service, type the following command.
$ sudo systemctl enable mongodb
Step 3: Enable Remote MongoDB Access on Firewall
5. By default MongoDB runs on port 27017, to allow access from everywhere you can use.
$ sudo ufw allow 27017
But enabling access to MongoDB from everywhere gives unrestricted access to the database data. So, it’s better to give access to specific IP address location to default MongoDB’s port using following command.
$ sudo ufw allow from your_server_IP/32 to any port 27017
$ sudo ufw status
6. By default the port 27017 is listens on the local address 127.0.0.1 only. To allow remote MongoDB connections, you need to add your server IP address to /etc/mongodb.conf configuration file as shown.
bind_ip = 127.0.0.1,your_server_ip
#port = 27017
Save the file, exit the editor, and restart MongoDB.
$ sudo systemctl restart mongodb
Step 4: Create MongoDB Database Root User and Password
7. By default MongoDB comes with user authentication disabled, its therefore started without access control. To launch the mongo shell, run the following command.
$ mongo
8. Once you have connected to the mongo shell, you can list all available databases with the following command.
> show dbs
9. To enable access control on your MongoDB deployment to enforce authentication; requiring users to identify themselves every time they connect to the database server.
MongoDB uses the Salted Challenge Response Authentication Mechanism (SCRAM) authentication mechanism by default. Using SCRAM, MongoDB verifies the supplied user credentials against the user’s name, password and authentication database (the database in which the user was created, and together with the user’s name, serves to identify the user).
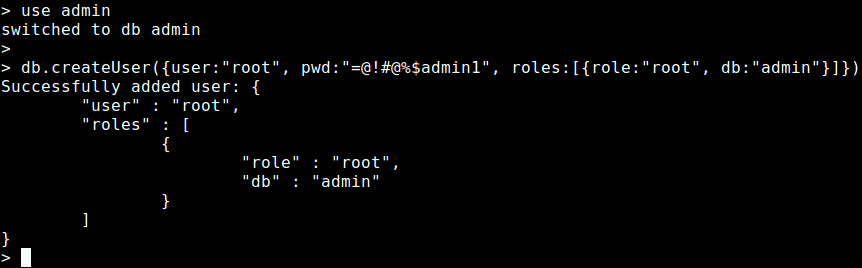
You need to create a user administrator (analogous to root user under MySQL/MariaDB) in the admin database. This user can administrate user and roles such as create users, grant or revoke roles from users, and create or modify customs roles.
First switch to the admin database, then create the root user using following commands.
> use admin
> db.createUser({user:"root", pwd:"=@!#@%$admin1", roles:[{role:"root", db:"admin"}]})
Now exit the mongo shell to enable authentication as explained next.
10. The mongodb instance was started without the --auth command line option. You need to enable authentication of users by editing /lib/systemd/system/mongod.service file, first open the file for editing like so.
$ sudo vim /lib/systemd/system/mongodb.service
Under the [Service] config section, find the parameter ExecStart.
ExecStart=/usr/bin/mongod --unixSocketPrefix=${SOCKETPATH} --config ${CONF} $DAEMON_OPTS
Change it to the following:
ExecStart=/usr/bin/mongod --auth --unixSocketPrefix=${SOCKETPATH} --config ${CONF} $DAEMON_OPTS
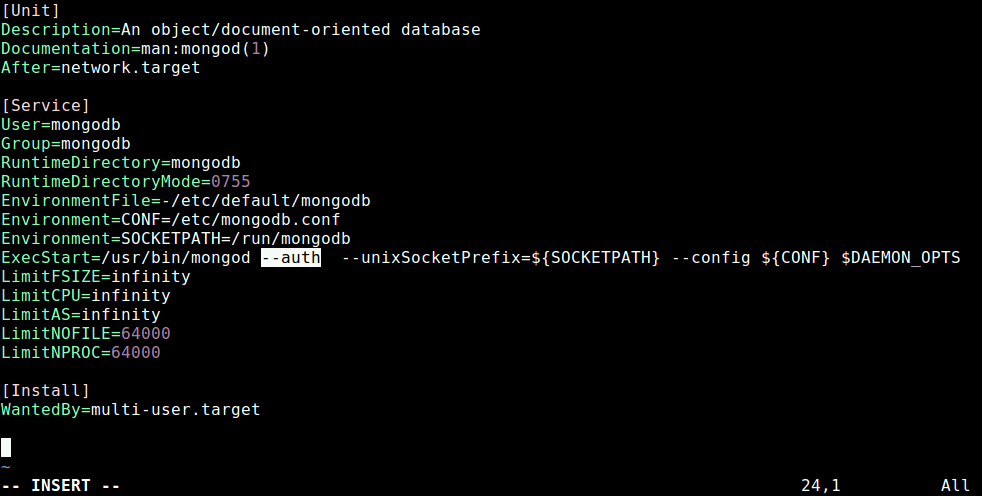
Save the file and exit it.
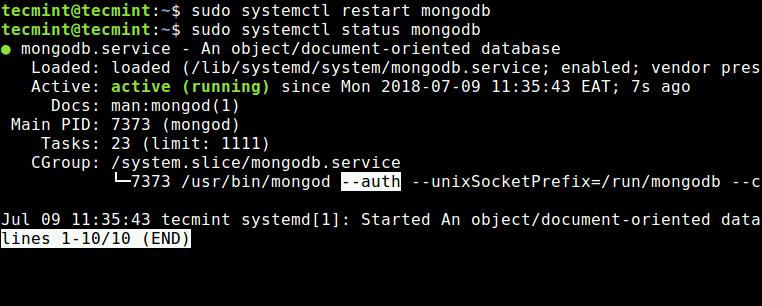
11. 8. After making changes to configuration file, run ‘systemctl daemon-reload‘ to reload units and restart the MongoDB service and check its status as follows.
$ systemctl daemon-reload
$ sudo systemctl restart mongodb
$ sudo systemctl status mongodb
12. Now when you try to connect to mongodb, you must authenticate yourself as a MongoDB user. For example:
$ mongo -u "root" -p --authenticationDatabase "admin"
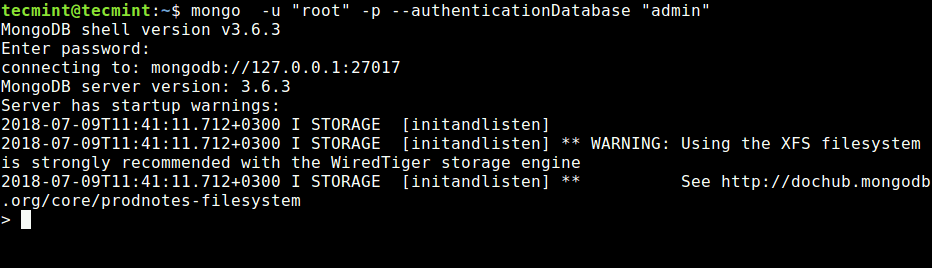
Note: It is not recommended to enter your password on the command-line because it will be stored in the shell history file and can be viewed later on by an attacker.
That’s all! MongoDB is an open-source, modern No-SQL database management system that provides high performance, high availability, and automatic scaling.
In this article, we have explained how to install and get started with MongoDB in Ubuntu 18.04. If you have any queries, use the comment form below to reach us.

When I run install
sudo apt install mongodb-org– i got:Reading package lists… Done
Building dependency tree
Reading state information… Done
Package mongodb is not available but is referred to by another package.
This may mean that the package is missing, has been obsoleted, or
is only available from another source
E: Package ‘mongodb’ has no installation candidate
I would appreciate your help
@Bio,
Try this article on installing MongoDB on Ubuntu – https://www.tecmint.com/install-mongodb-on-ubuntu/
I am on my way Thanks to your help.
This solved one of the problems I had while trying to install in many instances. Thanks for the article.
@Upulie
Great! Thanks for the feedback.
Very well written and clear! great screenshots. thanks!
Now after using systemctl daemon-reload what password to use?
@Frank
The password of the user who is invoking sudo command, note that the user should exist in the sudeors file.
Why you need modify the service file to set auth param, if you can set it in configuration file (/etc/mongodb.conf)?
@scaamanho
Okay, thanks for the useful contribution. We very much appreciate it.