Chances are that you already know what WordPress is: a free and open-source blogging tool and content management system (CMS) based on PHP and MySQL. Its official website states – in a play on words – that it is both free and priceless.
Among its distinguishing features, the possibility to install and switch between themes (the look & feel) stands out. Also, hundreds of available plugins make it possible to do almost everything with your site.
As a robust blogging tool, WordPress allows your visitors to comment on posts and thus engage in (hopefully enriching) conversations about the topics presented therein. To do so, it includes a messaging component that sends out notifications to authors when readers have commented on their posts.
In addition, when you subscribe to a post (regardless of whether you are an author or a reader), you can choose to be notified when someone comments on it.
If you have bought a shared hosting package, the mail service that WordPress depends on must have already been set up and configured for you (by the way, most shared hosting providers offer a 1-click installation of WordPress).
Suggested Read: 7 Best Web Hosting Companies to Host Website
However, if you are using a VPS and want to install and use WordPress, you will have to set up and configure the mail server (Postfix or other) that will allow WordPress to send out notifications.
In this post we will explain how to set up a full LAMP server on a cloud VPS and how to integrate WordPress with Postfix. We highly recommend you consider one of our partners while looking for a hosting provider (feel free to check our reviews about their services and plans here).
Prerequisites
In order for your WordPress to successfully send out notifications, you will need to ensure the following requirements are met:
Step 1: Setting Up DNS MX and A Records for WordPress
1. Along with the installation of the LAMP stack, you will need to add the necessary DNS MX and A records for your mail server and domain.
If you need help to do so, check the MX section in this guide and refer to the DNS manager overview before proceeding.
Although those links explain how to set up the DNS records for a Linode VPS, it should not differ significantly for other providers.
Step 2: Install LAMP Stack for WordPress in Linux
2. Set up a full LAMP (Linux – Apache – MySQL / MariaDB – PHP) stack.
Here are the instructions to do so in two major distribution families:
- Install LAMP on RHEL/CentOS 7.0
- Install LAMP on Fedora 24 Server
- Install LAMP on Fedora 23 Server
- Install LAMP on Ubuntu 16.04 (and later)
- Install LAMP on Ubuntu 15.04 (and later)
Step 3: Create a Database for WordPress
3. Create a database with a name of your choice and an account for WordPress to use. You will need this information later to edit the WordPress configuration file.
Login to the MySQL / MariaDB prompt using the root password that you chose while executing the mysql_secure_installation script in the above LAMP installation step:
# mysql -u root -p
[Enter password here]

MariaDB [(none)]> CREATE DATABASE wp_myblog;
MariaDB [(none)]> GRANT ALL PRIVILEGES ON wp_myblog.* TO 'your_username_here'@'localhost' IDENTIFIED BY 'your_chosen_password_here';
MariaDB [(none)]> FLUSH PRIVILEGES;
MariaDB [(none)]> EXIT;
Once the first three steps listed above as prerequisites have taken care of, let’s proceed with the installation and configuration of WordPress.
Step 4: Installing and Configuring WordPress
4. Download and extract the latest WordPress tarball.
# wget http://wordpress.org/latest.tar.gz
# tar xzf latest.tar.gz
# cd wordpress
5. In the wordpress directory, rename existing wp-config-sample.php to wp-config.php:
# mv wp-config-sample.php wp-config.php
then update it with your database information under the MySQL settings section (refer to the highlighted boxes in the image below):
// ** MySQL settings - You can get this info from your web host ** //
/** The name of the database for WordPress */
define('DB_NAME', 'database_name_here');

/** MySQL database username */
define('DB_USER', 'username_here');

/** MySQL database password */
define('DB_PASSWORD', 'password_here');

/** MySQL hostname */
define('DB_HOST', 'localhost');

/** Database Charset to use in creating database tables. */
define('DB_CHARSET', 'utf8');

/** The Database Collate type. Don't change this if in doubt. */
define('DB_COLLATE', '');
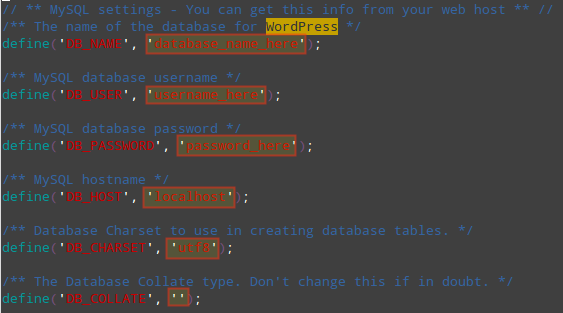
Explanation of the above settings:
- DB_NAME: the name of the database you created for WordPress (
wp_myblog). - DB_USER: the username for DB_NAME (
your_username_here). - DB_PASSWORD: the password you chose for DB_USER (
your_password_here). - DB_HOST: the hostname (usually
localhost). - DB_CHARSET: the database character set, normally should not be changed.
- DB_COLLATE: the database collation should normally be left blank.
6. Move the wordpress directory to the root directory (or to a subdirectory if you are planning on setting up other virtual hosts) of the web server.
In this example we will move wordpress to /var/www/html/wp (a subdirectory inside the Apache DocumentRoot):
# mv wordpress /var/www/html/wp
7. Open http://<ip>/wp/wp-admin/install.php in your browser and fill the requested on screen information (where <ip> is the IP address of your server):
- Site Title
- Username
- Password, twice
- Admin email
- Click “Install WordPress”
If the installation succeeds, the following page will be shown:

You can now click Login to logon to your WordPress control panel using the credentials you chose in this same step.
Step 5: Setting up Postfix to Send WordPress Notifications
At this point you have a functional LAMP environment and WordPress. In order to allow WordPress to send notifications through our own mail server, we will need to install and configure Postfix as a null client.
This means that we will only use the Postfix mail service to send mail for WordPress email notifications. Follow the instructions given in these articles depending on your chosen distribution:
Install Postfix in Ubuntu and Debian
----------- On Ubuntu and Debian systems -----------
# apt-get update && sudo apt-get install postfix
When you are asked to configure the mail server, choose:
- Mail configuration type:
Internet site - System mail name:
yourdomain.com
Install Postfix in CentOS, RHEL and Fedora
----------- On CentOS, RHEL and Fedora systems -----------
# yum update && yum install postfix
Regardless of the distro you’re using, edit /etc/postfix/main.cf with the following values:
mailbox_size_limit = 0
recipient_delimiter = +
inet_interfaces = loopback-only
You may want to refer to the Postfix official documentation for details on the above settings.
Now go ahead and write a dummy post. Then add a comment using the form at the bottom. You, as an author, should start receiving notifications in no time.
Common installation pitfalls and solutions
After you have installed WordPress, you may run into the following issues. Not a big deal – just follow the outlined instructions to fix them:
1. If you see a directory listing instead of a web page when you browse to http://<ip>/wp, this most likely means that the web server needs to be told to read the index.php file by default.
The easiest way to accomplish this task is by creating a .htaccess file inside the installation directory with the following content:
# echo 'DirectoryIndex index.php' > /var/www/html/wp/.htaccess
2. If you see php tags (<?php and / or ?>) displayed as plain text in a web page, PHP is not working properly. Make sure that your PHP version meets the requirements (>v5.2.4):
# php -v
3. Any other errors while trying to open the index.php file (including but not limited to “Headers already sent”) may be caused by any character present (including whitespaces) before the PHP beginning tag (<?php) or after the ending tag (?>) in the wp-config.php file that you configured in STEP 5 above.
Summary
In this article we have explained how to install WordPress after setting up a LAMP stack on Ubuntu or CentOS.
If you have properly set the DNS records for your domain as explained earlier, you should start receiving comment notifications immediately. If not, check the mail server logs (/var/log/maillog or /var/log/mail.log in CentOS and Ubuntu, respectively) and get back to us using the comment form below.
We will be more than glad to take a look and answer whatever questions you may have.


What should I change if multiple sites are hosted on a single server??
Hello,
I installed LAMP and ISP config on a Debian 8 VPS which comes with a whole bunch of packages, like Dovecot, SASL, Fail2Ban, Spam Assassin, Pure FTPD, Quota, and various PHP and SQL components,and I had to build and install ISP config and possibly something else. I learned that Postfix and Sendmail do not work well together. They cancel each other out.
When I set up a domain on ISP config, I set it to server, so server.sensation experience. pop3://server.sensation-experience. Imap://server.sensation-experience.com/ I set up three mailboxes, a webmaster, a test, and a send-only [email protected]/ I did this using ISP Config.
It’s similar to C-Panel, but it’s free. How do I get WordPress to communicate with the mailbox donotreply? I want people to create accounts and get e-mails from a send-only address, but I also want them to write to webmaster, which again, I already set up a mailbox for that.
Also, do you have any guides on how to certify SSL/TLS with ISP Config? Right now I am being told that the security of the certificate couldn’t be trusted. Can I use Cloudflare as another way to force https? I am already using their nameservers.
By the way, I have set up a virtual host that is different from the default, so everything is in /var/www/html/sensation-experience.com/public_html. The public_html is the document root. Inside that root folder I have /blog.
Thanks for the detail instruction!
What if I plan to host more than one site on the vps server, do I have to add each one of them to postfix?
How do I go about doing that?
@Dan,
Yes, you need to define each domain in Postfix configuration.
Thanks! Can you give me an example? let’s say I have 4 domains, onedomain.com, twodomain.com, threedomain.com and fourdomain.com.
Which part of /etc/postfix/main.cf would these domains go into and what’s the correct syntax?
@Dan,
You need to add all domains to Postfix main configuration file, one per line as explained here: https://blog.tinned-software.net/setup-postfix-for-multiple-domains/