WordPress is an open source and free blogging application and a dynamic CMS (Content Management System) developed using MySQL and PHP.
It has a huge number of third-party plugins and themes. WordPress is currently one of the most popular blogging platforms available on the internet and is used by millions of people across the globe.
In this tutorial we are going to explain how to install the popular content management system – WordPress using LAMP (Linux, Apache, MySQL/MariaDB, PHP) on RHEL-based distributions such as CentOS Stream, Fedora, Rocky Linux, and AlmaLinux distributions.
Requirements
- Installation of RHEL 9 Server
- Installation of RHEL 8 Server
- Installation of CentOS Stream 9 Server
- Installation of CentOS 8 Server
- Installation of AlmaLinux 9 Server
- Installation of AlmaLinux 8 Server
- Installation of Rocky Linux 8 Server
- Installation of Fedora Server
Installing EPEL and Remi Repository
The installation that we will perform will be on Rocky Linux, but the same instructions also work on RHEL, CentOS Stream, Rocky Linux, and AlmaLinux distributions.
First, install and enable EPEL and Remi repository using the following commands.
------------------- On RHEL 9 Based Distributions -------------------
# dnf install https://dl.fedoraproject.org/pub/epel/epel-release-latest-9.noarch.rpm
# dnf install http://rpms.remirepo.net/enterprise/remi-release-9.rpm

------------------- On RHEL 8 Based Distributions -------------------
# dnf install https://dl.fedoraproject.org/pub/epel/epel-release-latest-8.noarch.rpm
# dnf install http://rpms.remirepo.net/enterprise/remi-release-8.rpm

------------------- On Fedora 36/35 -------------------
# dnf install https://rpms.remirepo.net/fedora/remi-release-36.rpm
# dnf install https://rpms.remirepo.net/fedora/remi-release-35.rpm
Since we are going to use PHP 8, we will need to reset the default PHP and enable the PHP 8 version using the following commands.
# yum install dnf-utils
# dnf module list php
# dnf module reset php
# dnf module enable php:remi-8.0

Installing LAMP Stack for WordPress
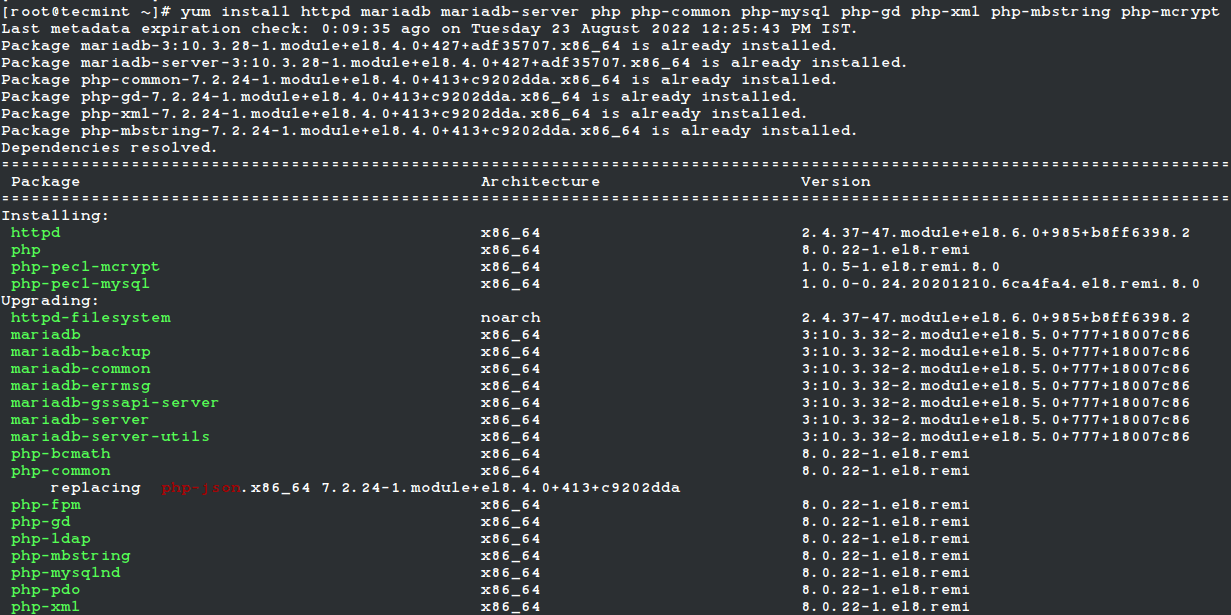
Now we are ready to install all the required packages related to our LAMP stack using the following command.
# yum install httpd mariadb mariadb-server php-gd php-soap php-intl php-mysqlnd php-pdo php-pecl-zip php-fpm php-opcache php-curl php-zip php-xmlrpc wget
Now that the installation is complete, we will need to start and secure our MariaDB installation.
# systemctl start mariadb
# mysql_secure_installation
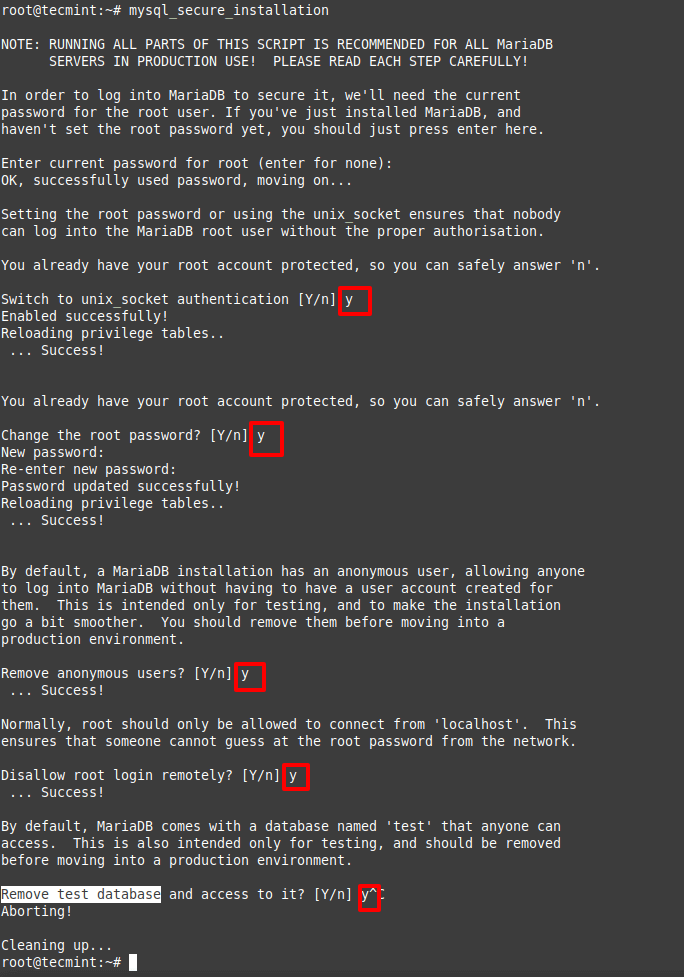
Follow the instructions on the screen to answer the questions related to your MariaDB server security.
Then we will configure MariaDB to start automatically on system boot:
# systemctl enable mariadb
Next, we will do the same for the Apache web server:
# systemctl start httpd
# systemctl enable httpd
Creating WordPress MySQL Database
Our WordPress will require a database and a database user. To create one, simply use the following commands. Feel free to replace the database name, user, and password as per your preferences:
# mysql -u root -p
Enter password:

## Create database ##
CREATE DATABASE wordpress;

## Creating new user ##
CREATE USER wordpress@localhost IDENTIFIED BY "secure_password";

## Grant privileges to database ##
GRANT ALL ON wordpress.* TO wordpress@localhost;

## FLUSH privileges ##
FLUSH PRIVILEGES;

## Exit ##
exit
Preparing WordPress Installation
Now we are ready to download the latest WordPress archive using the following wget command:
# cd /tmp && wget http://wordpress.org/latest.tar.gz
Next extract the archive in our web directory:
# tar -xvzf latest.tar.gz -C /var/www/html
The above will create the following directory, which will contain our WordPress script:
/var/www/html/wordpress
Now change the ownership of that directory to user “apache” and set appropriate permissions:
# chown -R apache:apache /var/www/html/wordpress
# chmod -R 775 /var/www/html/wordpress
Next, configure the SELinux context for the directory and its contents.
# dnf install policycoreutils-python-utils
# semanage fcontext -a -t httpd_sys_rw_content_t "/var/www/html/wordpress(/.*)?"
# restorecon -Rv /var/www/html/wordpress
Creating Apache Virtual Host for WordPress
We will create a separate virtual host for our WordPress install. Open /etc/httpd/conf/httpd.conf with your favorite text editor:
# vi /etc/httpd/conf/httpd.conf
And add the following code at the bottom of the file and replace the marked text with the information related to your installation:
<VirtualHost *:80>
ServerAdmin [email protected]
DocumentRoot /var/www/html/wordpress/
ServerName tecminttest.com
ServerAlias www.tecminttest.com

<Directory "/var/www/html/wordpress">
Options Indexes FollowSymLinks
AllowOverride all
Require all granted
</Directory>

ErrorLog /var/log/httpd/tecminttest_error.log
CustomLog /var/log/httpd/tecminttest_access.log common
</VirtualHost>
Save your changes and restart Apache:
# systemctl restart httpd
Installing WordPress on Website
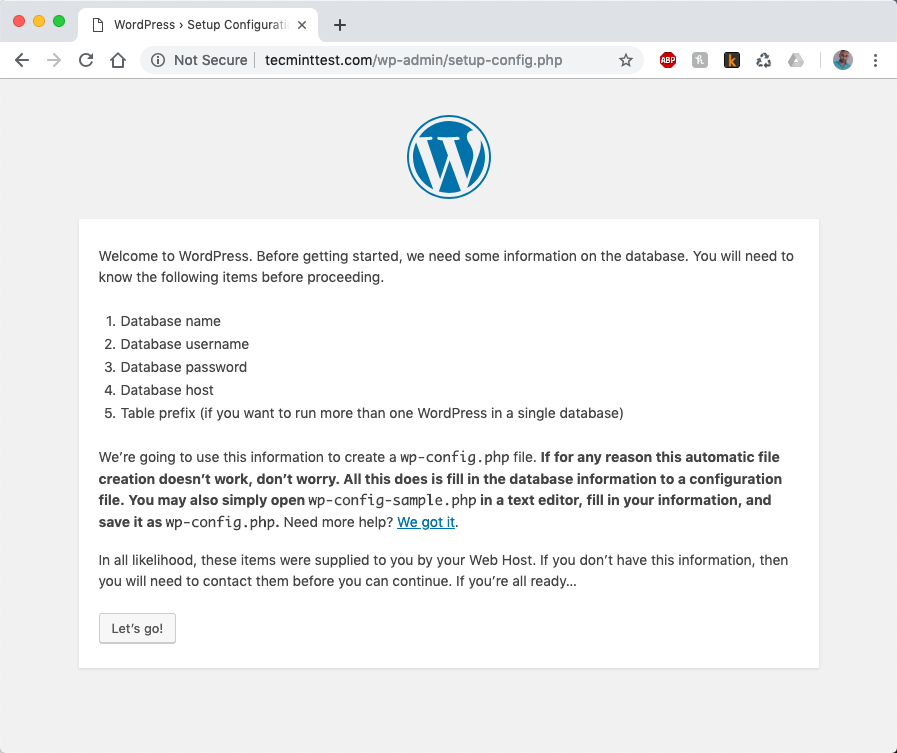
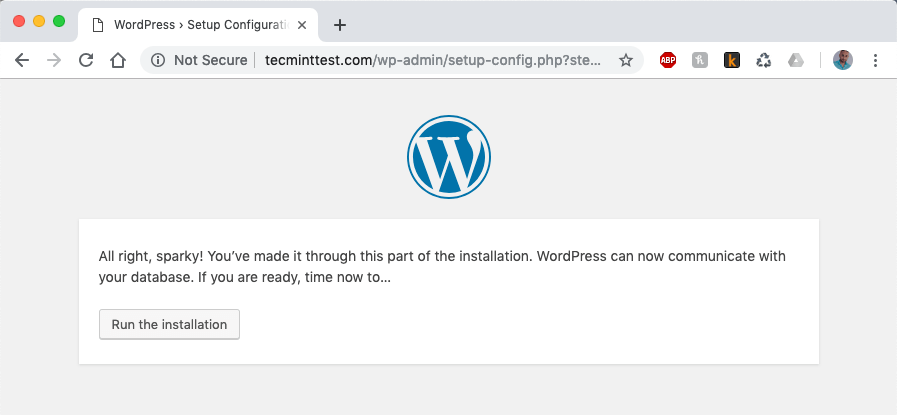
Now we are ready to run our WordPress installation. To start the installation you can access either your server’s IP address at http://ip-address or if installing locally you can use http://localhost or if you are using a real domain, you can use the domain instead. You should see the following page:
When you click on Let’s Go button, you will be redirected to the next page of the installation, where you will have to enter the database details we created earlier.
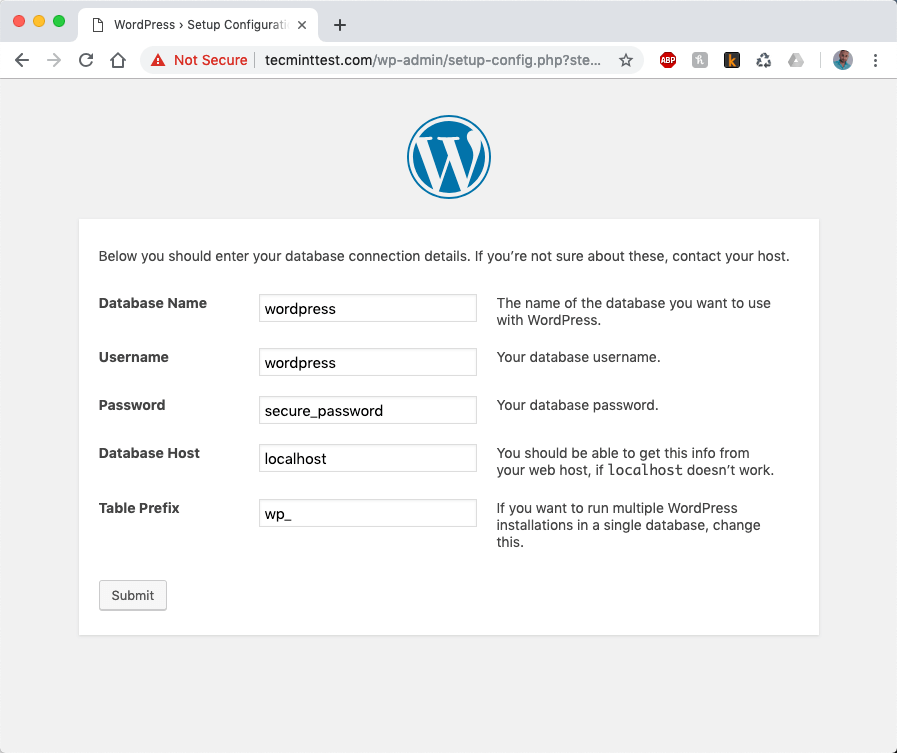
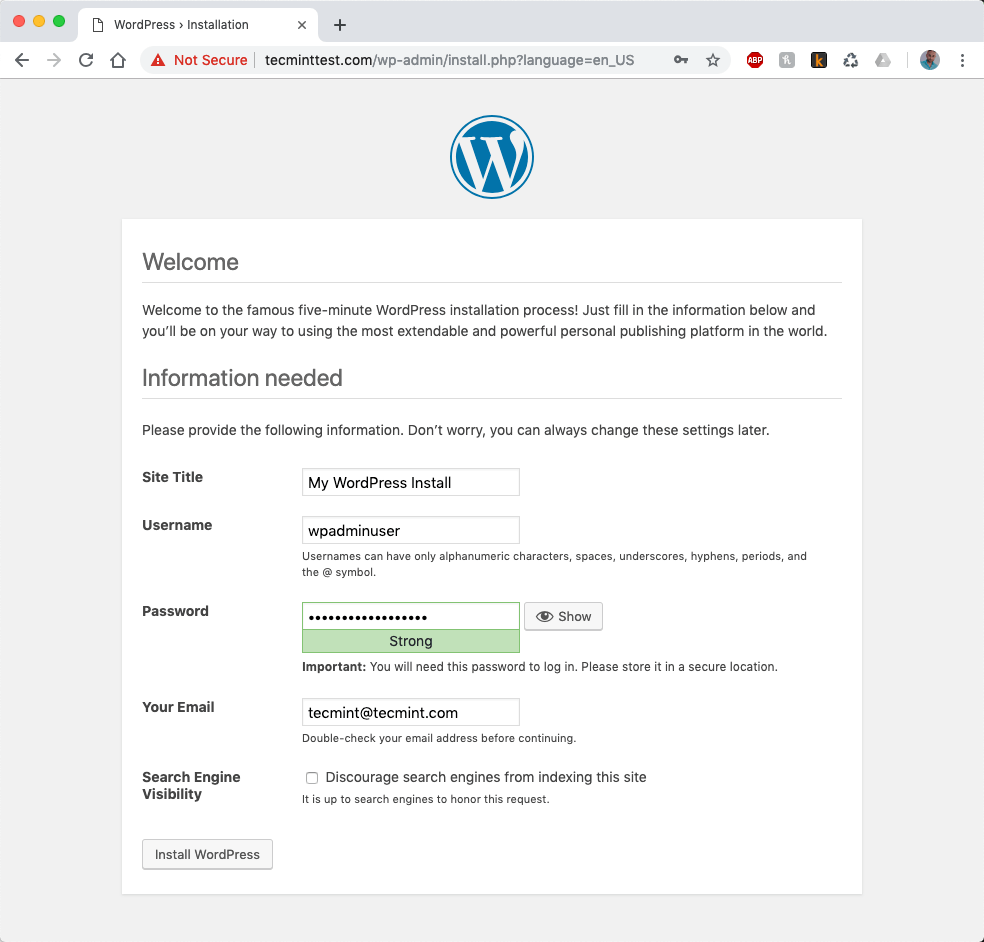
When you have entered the details, click the submit button. WordPress will attempt to create its configuration file called wp-config.php. If everything is fine you should see the following page:
Once you click the “Run the installation” button, you will be asked to enter some details about your website: Site Title, Username, Password, and Email address.
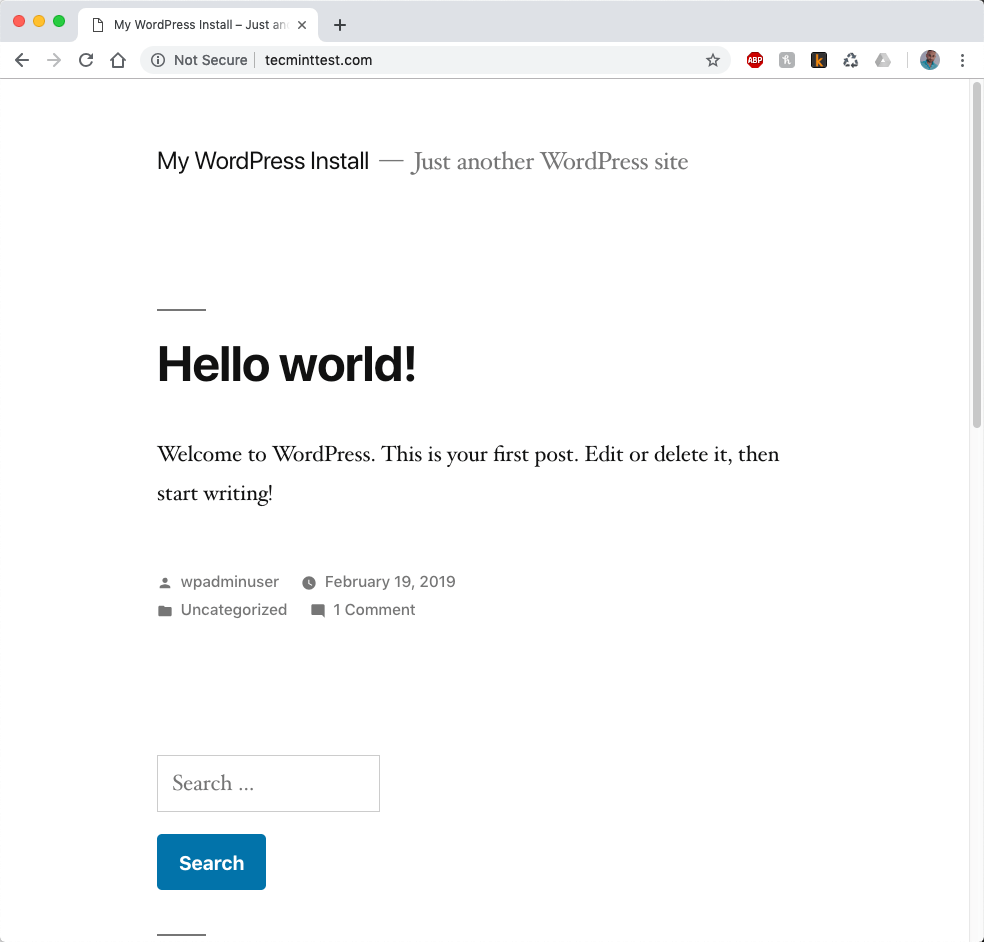
When you have filled in all the required information finalize the installation by clicking the button at the bottom. Your installation is now complete. Your front page should look something like the image below:
And the WordPress dashboard looks as follows:
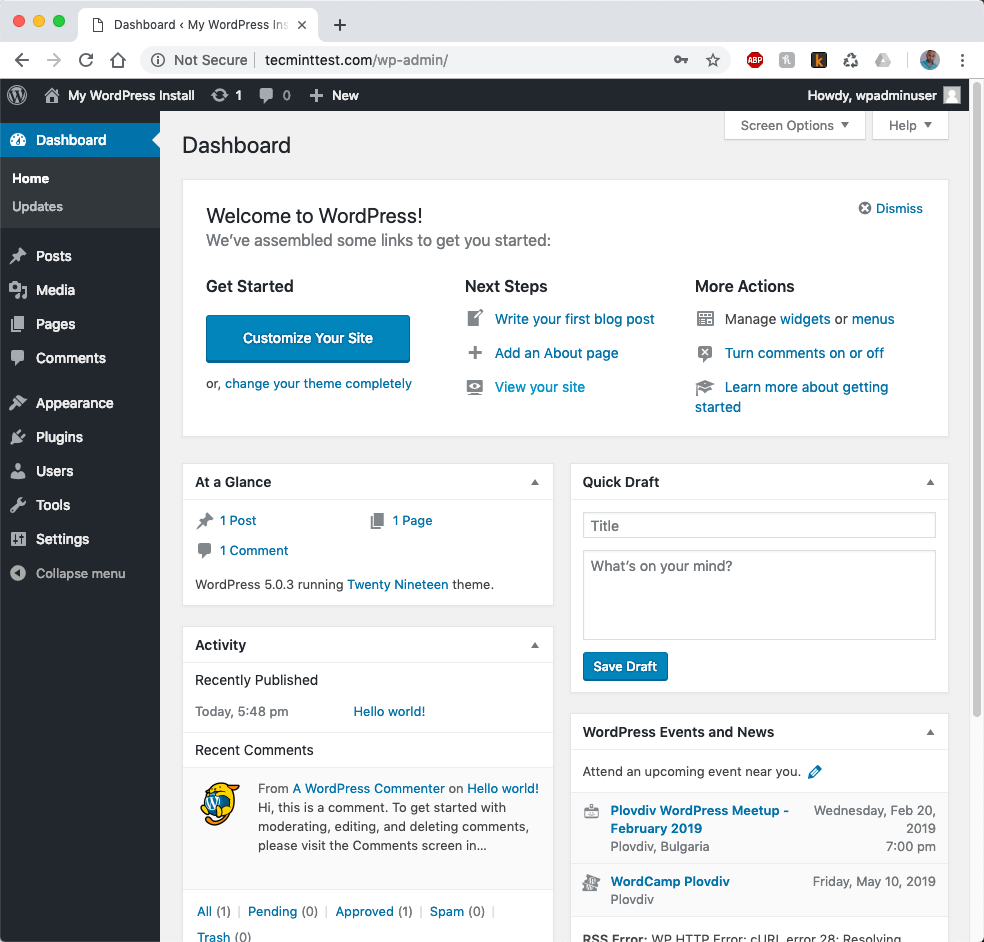
You can now start managing your WordPress website.
Conclusion
You have successfully completed the installation of WordPress using LAMP on CentOS 7. If you had any difficulties or questions, please submit them in the comment section below.


Hello,
Everything works beautifully except:
I can build, view, and modify my WordPress site from my Windows PC on the same local network that the Centos7 WordPress server is on. However, it takes too long to view it from the internet (anywhere but my own network).
The home page takes up to 5 minutes to load, and most times it doesn’t load at all. The server is a 3 GHz Xeon with 8gb memory and an SSD. The firewall on my router and my server are both allowing port 80 access to the server. Any ideas? Thanks!
Followed all the instruction, but stuck when I enter my domain in a browser. I ran the windows network diagnostics and the troubleshooter said my domain was online but not responded to any connection attempt. what should I do?
@Valeria,
What error code you are getting on the browser while checking the domain?
I followed these instructions, and everything worked, but I ended up with MariaDB 5.5. What did I miss?
@User,
First remove the older MariaDB with the repository if you installed using MariaDB repo, then try to follow the instructions again.
I installed MariaDB and started and enabled it. When I enter
mysql_secure_installationit asks for root password. I hit enter to leave it blank but it says access denied. it won’t accept any password I enter.How can I fix that?
@Oscar,
It seems there is an earlier version of MySQL that exists on the server with a password. If you don’t remember MySQL root password, you can Reset MySQL or MariaDB Root Password in Linux.
Followed each step, but then WordPress has no permission to edit files, like editing the htaccess, or updating, etc.
I tried some suggestions I found over the internet, either a plugin (All in one WordPress security) but still can’t make it work.
Any idea?
@Fede,
Try to set WordPress files owner to Apache, for example.
Hi Ravi, Thank you for the manual. It is very comprehensive and useful. Can you extend a little bit the instructions to cover the ssl. It should be good if you show a way to protect the wp-admin with ssl
@Asenka,
You can use Let’s Encrypt free SSL to on your WordPress as explained here – How to Install Let’s Encrypt SSL Certificate to Secure Apache on RHEL/CentOS 7/6
Couldn’t install plugins, ended up granting apache ownership to wordpress directory. That did fix the issue but I’m uncertain of security implications.
Also needed PHP7 because of some plugin so ended up redoing installation with the following:
For RHEL 7, step one is missing this command that must be executed BEFORE ‘mysql_secure_installation:’
Otherwise, the following error is encountered:
ERROR 2002 (HY000): Can't connect to local MySQL server through socket '/var/lib/mysql/mysql.sock' (2)
I see many error in error log
017/03/31 18:06:16 [crit] 19398#0: *1220 connect() to unix:/tmp/php_fpm.sock failed (2: No such file or directory) while connecting to upstream, client: 66.249.79.97, server: https://faptorrent.com, request: "GET / HTTP/1.1", upstream: "fastcgi://unix:/tmp/php_fpm.sock:", host: "faptorrent.com"
Thanx to save my time install configure its done grate job.
On where it says ## Grant Privileges to Database ##
GRANT ALL ON wordpress.* TO wordpress@localhost;
On the 2nd line where it mentioned wordpress twice, does that mean your giving user: wordpress rights to database wordpress? or is it the site@locallhost?
@Jonthue,
Yes you correct, we’ve giving privileges to user ‘wordpress’ on database ‘wordpress’..
admin console gui not working. showing only texts only. Any help on this?
domain.com/wp-admin – login page -> ok
after login, there is not graphics /images. only text are shown. Hard to manage the wordpress. Kindly help me to resolve this problem
Hellpo there! Thiss is my 1st comment here so I just wanted
to give a quick shout out and tell you I really enjoy reading through your articles.
Cann you recommend anny otyher blogs/websites/forums that deazl with the same subjects?
Thanks for your time!
Hi Ravi,
I followed every step but nothing seems to work. The default Nginx greeting is still displayed at localhost:80. Could you show me a way out?
Are these enough? Cause I am having trouble uploading giving error:
The uploaded file could not be moved to wp-content/uploads/2013/05….
Which web server instructions you followed? If Apache, change set apache ownership to wp-content folder.
Opps, here is the youtube link https://www.youtube.com/watch?v=qiNybMFB_Xg
Guys I was having trouble setting up my LAMP WordPress locally, but this youtube video shows you a step by step approach even if you don’t have a LAMP installed. Now I can have my fashion design business template up and running :) .
Hi Ravi,
I’m a complete newbie to Linux and WordPress…and just wanted to say that your article
was well laid out and very simple to follow..
Thank You..
hallo sir,
i have configured wordpress on linux cent os webserver. and i am trying to configure ldap connection between wordpress and active directory.
i have used most of the plugin from wordpress but couldn’t get succed.
can you please suggest me or help me.
this will help me so much
thanks in advance
Can you share a article regarding Flexlm License management? License file, How to install, License start, stop, re-read, remove etc..
Regards, Supriyo
Dear sir, i try to configure it using LNMP. i reached on step 5,but 6 step not working on my laptopits show 403 error.
I think you not properly configured your nginx. Please cross verify again, if any let me know
great article. thanks for sharing it.
please avoid using __if’s__ within your nginx’s server block as ‘if is evil’ (http://wiki.nginx.org/IfIsEvil)
instead, use try_files, for example:
——————-
location / {
try_files $uri $uri/ @rewrites;
}
location @rewrites {
rewrite ^(.*)$ /index.php?q=$1 last;
}
——————-
Hi Ravi,
It is a good doc… I followed the fedora LAMP but getting message 404 not found…
Kindly help me to fix it…
Thanks
Justin
Ok, Which method you followed Apache or Nginx?
Good informative article. Would have been much better if you demonstrated installation of phpmyadmin and configuring BIND as well. Since no one would be running their blog on the server’s IP without a domain.
dose not work with centos 5?
I know it’s in there somewhere, but I have no idea how to access my wordpress installation. I can’t FTP yet for some reason and I am too dumb to know how to get that to work. I may have to throw in the towel on this.
@ Adam,
You have used wrong (comma) in the following line. that’s the reason you getting syntax error.
define(‘DB_NAME’, ‘MY_DATA_BASE_NAME’);
Use this following line with proper commas used. it will work..
define(‘DB_NAME’, ‘MY_DATA_BASE_NAME’);
@Ravi Slaive
Thank you for your help, but inputting the correct commas (Is saw the slight difference) still did not work. I input this:
define(‘DB_NAME’, ‘MY_DATA_BASE_NAME’);
Still get this:
-bash: syntax error near unexpected token `’DB_NAME’,’
The error itself telling that you have used wrong commas
`’DB_NAME’,’
it should be ’DB_NAME’,
Why not you copy my whole configuration of Step5 and then modify it.
Forgive me for my ridiculous amount of n00bness on this. But what comma is there other than the one next to the enter key? I’m on a Mac in the default Terminal app if that helps. All I see is this one:
All Terminal will do is this one:
‘
But I copy and pasted your edits and still get errors:
define(’DB_NAME’, ’MY_DATA_BASE_NAME’);
-bash: syntax error near unexpected token `’DB_NAME’,’
@Adam,
Please mail me your wp-config.php file at [email protected]. We will modify and give your proper one.
I am on a LEMP install. I followed your LEMP install to a T on my CentOS server. I am literally stuck on the very last step before going into wordpress. When I type this in:
define(‘DB_NAME’, ‘MY_DATA_BASE_NAME’);
I get the following error:
-bash: syntax error near unexpected token `’DB_NAME’,’
I am a n00b, and a frustrated one.
Great article! Thanks so much for sharing. However I am receiving a 404 error when browsing to mydomain.tv/wordpress. I added the 127.0.0.1 wordpress to /etc/hosts and it’s still no good. I had been following this tutorial, http://www.howtoforge.com/perfect-server-centos-6.2-x86_64-with-nginx-ispconfig-3 to install the server and had to stop before installing courier imap, so I thought I would install WordPress. Hopefully someone can give me pointers on what I may have missed. Thanks!
It is very good article I have followed the same steps to configure wordpress in Fedora 17 with nginx. But it is not working for me . Couldn’t resolve the name wordpress when I am trying to access it via browser. Please help
@Sreekanth
To resolve hostname just add the following line to your /etc/hosts file.
127.0.0.1 wordpress
and try browsing again. it should work on all browsers. if it doesn’t work you need to look into other things.