When it comes to Content Management Systems, WordPress reigns supreme. WordPress powers nearly 43% of all the websites hosted online followed by its competitors such as HubSpot CMS, Joomla, Drupal, Wix, and Shopify to mention a few. It is opensource and absolutely free to download and install.
In this guide, we will show you how to install Worpress on RHEL 8 with the Nginx webserver.
Prerequisites
Before we get started, here is a list of requirements that you need to have.
- Ensure that Nginx, MariaDB, and PHP are installed on RHEL 8.
- The latest version of WordPress – requires PHP 7.4 and later. The default repositories only provide PHP 7.2. You can install the latest PHP version using the Remi repository instead.
With the requirements out of the way, let us get started!
Step 1: Create a WordPress Database
To get the ball rolling, We will start off by creating the database for the WordPress installation, which stores all the WordPress files.
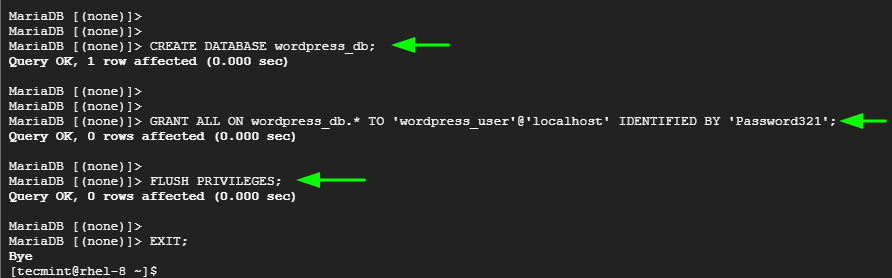
To do so, first, log in to the MariaDB database:
$ sudo mysql -u root -p
Once logged in, create the WordPress database and database user, and then grant all the privileges to the database user.
MariaDB [(none)]> CREATE DATABASE wordpress_db;
MariaDB [(none)]> GRANT ALL ON wordpress_db.* TO 'wordpress_user'@'localhost' IDENTIFIED BY 'StrongPassword';
MariaDB [(none)]> FLUSH PRIVILEGES;
MariaDB [(none)]> EXIT;
Step 2: Install PHP-FPM and Additional PHP Modules
The PHP-FPM (FastCGI Process Manager) is an alternative FastCGI daemon for PHP that enables a webserver to handle strenuous loads. Therefore, we will install PHP-FPM alongside other PHP modules as shown
$ sudo dnf install php php-mysqlnd php-pdo php-gd php-mbstring php-fpm
Next, enable and start the PHP-FPM daemon.
$ sudo systemctl enable php-fpm
$ sudo systemctl start php-fpm
The PHP-FPM service needs a little modification. So, edit the file shown.
$ sudo nano /etc/php-fpm.d/www.conf
The user and group attributes are set, by default, to apache. Modify this to nginx as follows.

Save and exit the configuration file and then restart PHP-FPM for the changes to apply.
$ sudo systemctl restart php-fpm
Be sure to confirm that the service is running.
$ sudo systemctl status php-fpm

Step 3: Install WordPress in RHEL
Moving forward, we are going to download the WordPress binary file from the official WordPress download page. You can download the file in either a zipped or tarball format.
On the command line, run the following wget command:
$ wget https://wordpress.org/latest.zip
Once the download is complete, unzip the file.
$ unzip latest.zip
This extracts the file into a folder called ‘wordpress‘.
Next, copy the wp-sample-config.php file to the wp-config.php file.
$ cp wordpress/wp-config-sample.php wordpress/wp-config.php
We are going to modify the wp-config.php file. Which is one of the core WordPress files that contain details of your server and installation details.
$ sudo vi wordpress/wp-config.php
Navigate to the database section as you can see and provide the database name, database user, and password as indicated.
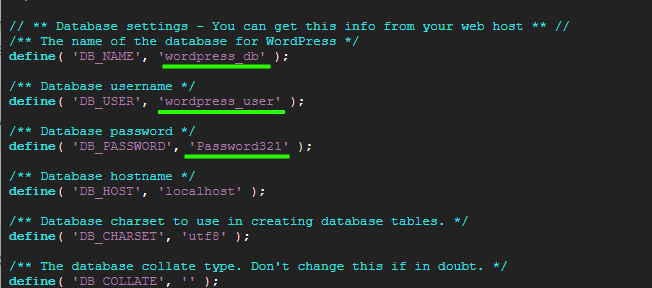
Save the changes and exit the configuration file.
Next, copy the wordpress folder to the /usr/share/nginx/html path and set the directory ownership and permissions as follows.
$ sudo cp -R wordpress /usr/share/nginx/html
$ sudo chown -R nginx:nginx /usr/share/nginx/html
$ sudo chmod -R 775 /usr/share/nginx/html
Step 4: Configure Nginx for WordPress
Next, we will create a server block file for WordPress. Create is as shown.
$ sudo vim /etc/nginx/conf.d/wordpress.conf
Add these lines. Don’t forget to replace example.com with your server’s domain name.
server {
listen 80;

server_name example.com;
root /usr/share/nginx/html/wordpress;
index index.php index.html index.htm;

location / {
try_files $uri $uri/ /index.php?$args;
}

location = /favicon.ico {
log_not_found off;
access_log off;
}

location ~* \.(js|css|png|jpg|jpeg|gif|ico)$ {
expires max;
log_not_found off;
}

location = /robots.txt {
allow all;
log_not_found off;
access_log off;
}

location ~ \.php$ {
include /etc/nginx/fastcgi_params;
fastcgi_pass unix:/run/php-fpm/www.sock;
fastcgi_index index.php;
fastcgi_param SCRIPT_FILENAME $document_root$fastcgi_script_name;
}
}
Save and exit the configuration file.
Next, modify the Nginx main configuration file.
$ sudo vim /etc/nginx/nginx.conf
Navigate to the server section. Locate the line that starts with root and specify the path to the webroot directory.
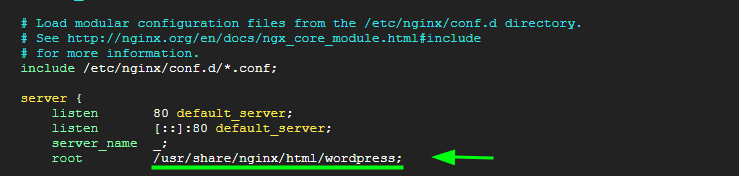
Save the changes and exit the configuration file.
At this point, check to see if all the changes made to Nginx are okay.
$ sudo nginx -t
The output shown indicates that all is well and that we can proceed.

For all the changes to apply, once again, restart Nginx and PHP-FPM services.
$ sudo systemctl restart nginx
$ sudo systemctl restart php-fpm
Also, remember to set SELinux to permissive. To do that, edit the SELinux configuration file.
$ sudo vim /etc/selinux/config
Set the SELinux value to permissive. Then save the changes and exit the configuration file.
Step 5: Finalize WordPress Installation from a Web Browser
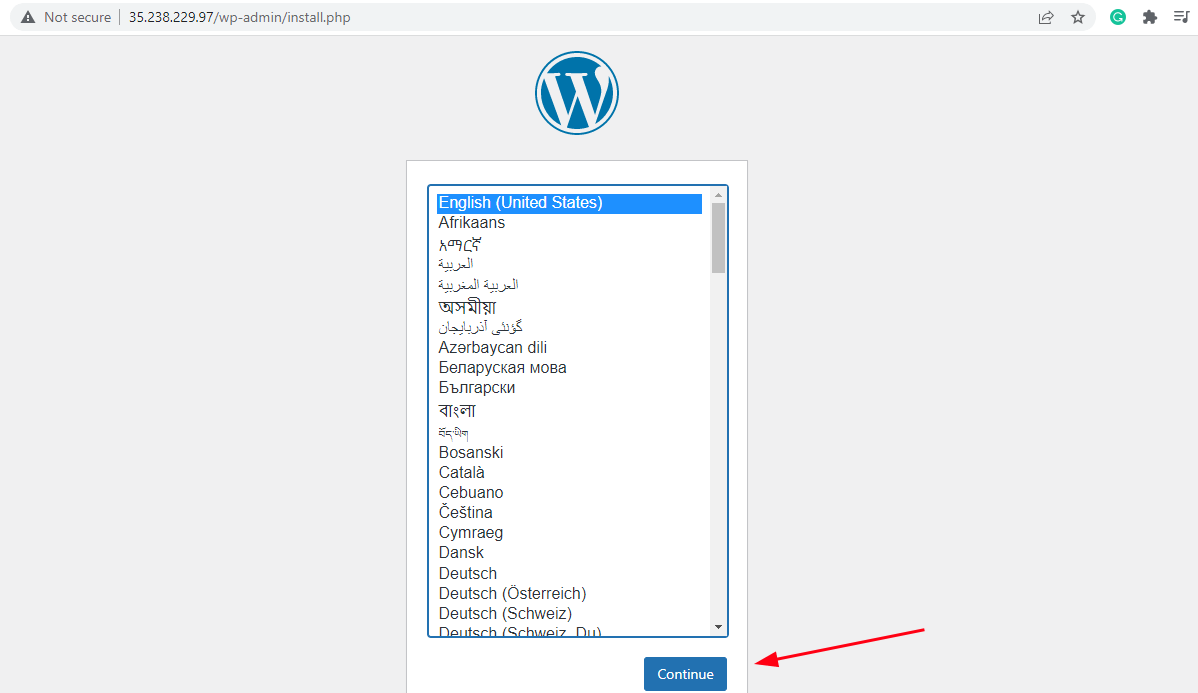
So far, all the configurations are in place. The only thing left is to complete the installation on the web browser. To do so, launch your web browser and browse your server’s IP address
http://server-ip
Select the installation language and click ‘Continue’.
In the next step, fill in the required details including the Site title, Username, Password, and so on.
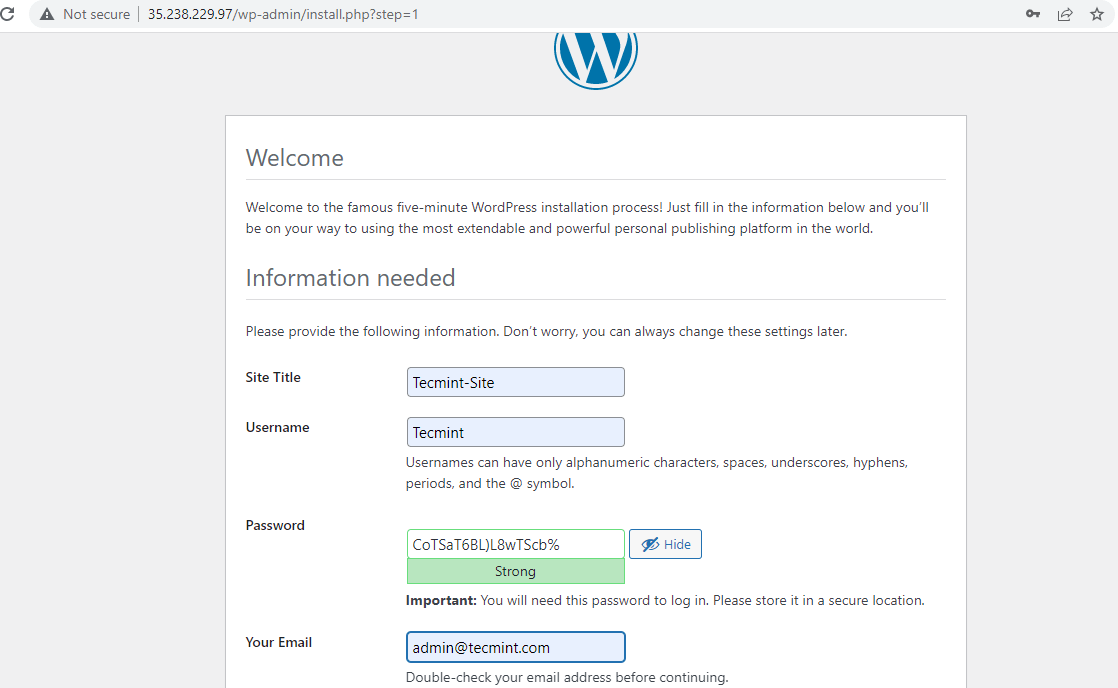
Then scroll down and click on the ‘Install WordPress’ button.

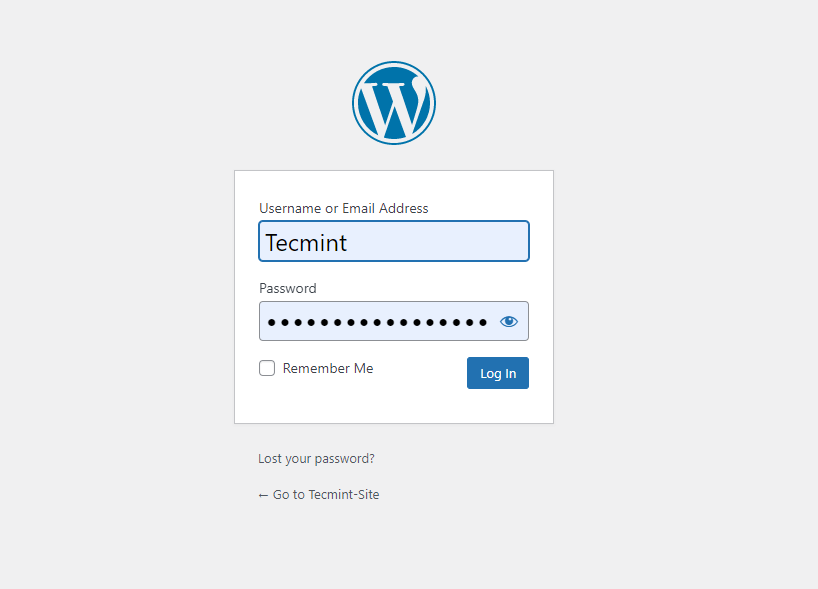
The installation is done before you even realize it. To finalize the setup, click on the ‘Log in‘ button.

This takes you straight to the Login page shown. Simply provide your username and password and click on the ‘Login’ button.
This takes to you the new and crisp WordPress dashboard. From here you can easily start creating and styling your website or blog using various themes, and plugins for added functionality.
And that’s it as far as installing WordPress on RHEL with Nginx is concerned. We hope you enjoyed this guide.