Brief: In this guide, we will discuss some practical examples of the ip command. By the end of this guide, users will be able to perform networking tasks efficiently in Linux from the command line interface.
System administrators often need to perform networking tasks on Linux servers. There are a variety of graphical and command-line tools available in the market. However, most Linux users prefer to use the ip command due to its simplicity and rich functionality.
The ip command is a new networking command-line utility that is used to assign an IP address to a network interface or configure/update useful network variables on a Linux system.
It is a part of the iproute2 package and offers several network administration tasks such as bringing up or down network interfaces, assigning and removing IP addresses and routes, managing ARP cache, and much more.
The ip command is much similar to the old ifconfig command, but it is greatly more powerful with more functions and capabilities added to it.
The ifconfig command has been deprecated and replaced by the ip command in all modern Linux distributions. However, the ifconfig command is still works and available for most Linux distributions.
[ez-toc]
Note: Please take a configuration file backup before doing any changes.
1. Permanently Configure Static IP Address in Linux
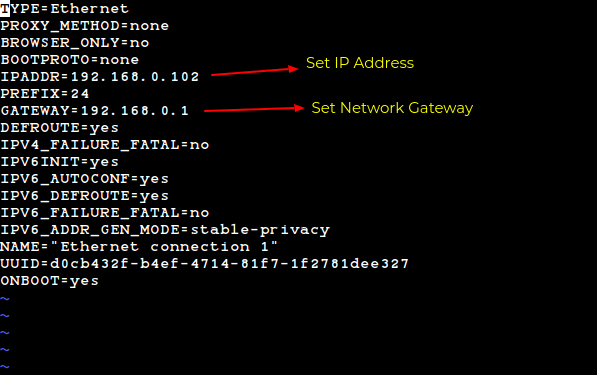
To permanently configure a static IP address in Linux, you need to update or edit the network configuration file to assign a static IP address to a system. You must be a superuser with a su (switch user) command from the terminal or command prompt.
Set Static IP Address in RHEL Systems
Open and edit the network configuration files for (eth0 or eth1) using your favorite text editor. For example, assigning IP Address to eth0 interface as follows on RHEL-based distributions.
# vi /etc/sysconfig/network-scripts/ifcfg-eth0 [On RHEL/CentOS/Fedora and Rocky Linux/AlmaLinux]
Set Static IP Address in Debian Systems
To configure the permanent static IP address, you need to modify your network interface configuration file /etc/network/interfaces to make permanent changes as shown below for Debian-based distributions.
$ sudo nano /etc/network/interfaces [On Debian, Ubuntu and Mint]

Next, restart network services after entering all the details using the following command.
$ sudo systemctl restart networking
2. Temporary Configure Static IP Address in Linux
For temporary network configurations, you can use the ip command to assign an IP address to a specific interface (eth2) on the fly.
# ip addr add 172.19.1.10/24 dev eth2
OR
$ sudo ip addr add 172.19.1.10/24 dev eth2
Note: Unfortunately all these settings will be lost after a system restart.
3. How to Display All Network Interfaces
In ip command, the link object represents the network interface. We can use the show command with it to display all network interfaces.
Now, let’s display all network interfaces using the following command:
$ ip link show
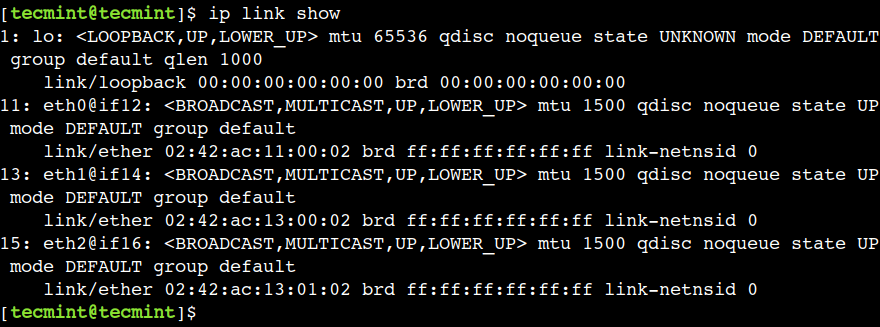
The above output shows the details of all network interfaces, such as interface name, flags, status, link address, broadcast address, etc.
4. How to Check an IP Address of a Specific Network Interface
To get the depth information of your individual network interface like IP Address, and MAC Address information, use the following command as shown below.
$ ip link show eth2

So far, we used the link object shows detailed information about the network interfaces. However, it doesn’t show the IP address associated with the network interface. To overcome this limitation, we can use the addr object with the ip command.
Let’s understand this with an example.
$ ip addr show
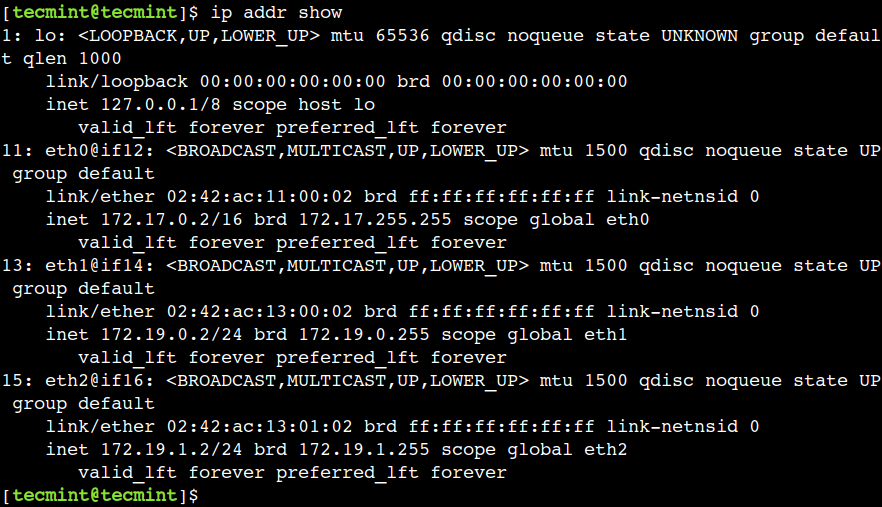
Here, we can see that, now output shows the IP addresses of all network interfaces along with other details.
To display the IP address of the individual network interface, just need to provide the network interface name as an argument to the command.
$ ip addr show eth2
5. How to Display IP Address in Colored Output
The ip command shows detailed information about the network objects. However, sometimes we need to take a look at the limited information. In such cases, we can enable the colored output. This option highlights important details in different colors.
Let’s use the --color option of the command to display the output in different colors:
$ ip --color addr show eth2

In the above output, we can see that the interface name, ethernet address, and state are highlighted in different colors.
6. How to Display IP Address in JSON Format
In the previous examples, we saw that the ip command shows meaningful information. However, it is not an easy task to parse the raw output and extract meaningful information using rudimentary scripts. In such cases, we can instruct the ip command to generate the output in a JSON format.
So, let’s use the -j option with the command to display the same output in a JSON format:
$ ip -j link show eth2

This method comes in handy while doing automation because JSON is a widely accepted format and there are many JSON parser libraries/tools available in various programming languages.
7. How to Make JSON Output More Readable
In the previous example, we used the -j option to display output in a JSON format. This default JSON format is compact and space efficient. However, the output is not easy to read due to a lack of indentation.
To overcome this limitation, we can use the -p option which makes the output more readable by indenting it. Let’s understand this with the below example:
$ ip -j -p link show eth2
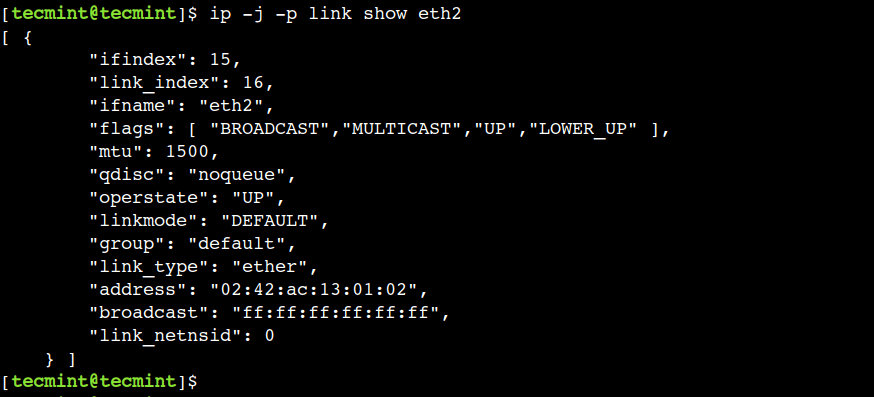
Here, we can see that the same output is much more readable as compared to the previous examples.
8. How to Remove an IP Address From the Network Interface
In the previous example, we used the add sub-command to assign an IP address. In a similar way, we can use the del sub-command to remove a particular IP address.
The following command will remove an assigned IP address from the given interface (eth2).
# ip addr del 172.19.1.10/24 dev eth2
OR
$ sudo ip addr del 172.19.1.10/24 dev eth2
Now, let’s verify that the IP address has been removed:
$ ip -j -p addr show eth2
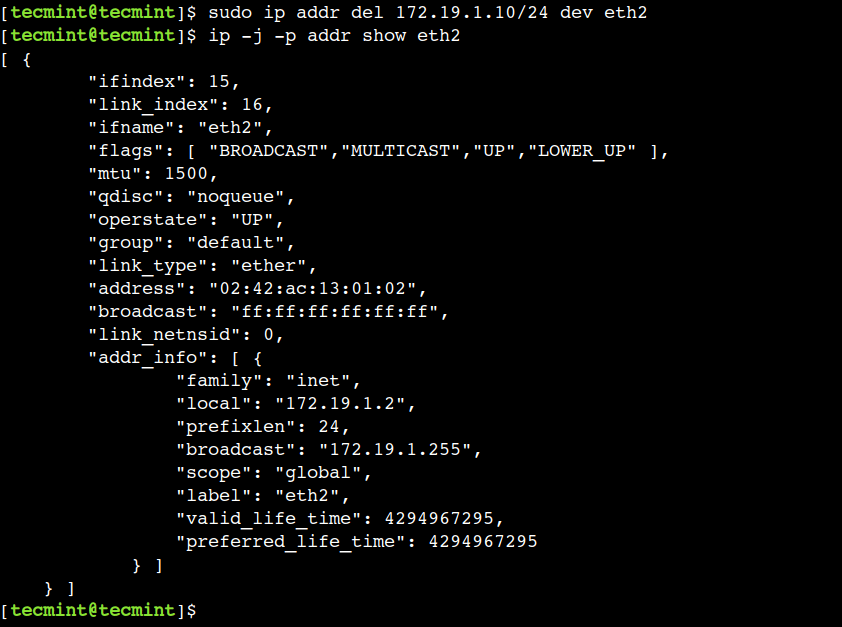
In the above output, we can see that the now eth2 network interface has only one IP address.
9. How to Enable the Network Interface
The “up” flag with interface name (eth2) enables a network interface. For example, the following command will activate the eth2 network interface.
# ip link set eth2 up
OR
$ sudo ip link set dev eth2 up
Now, let’s check the updated status:
$ ip -j -p link show eth2 | grep operstate

10. How to Disable the Network Interface
The “down” flag with interface name (eth2) disables a network interface. For example, the following command will De-activates the eth2 network interface.
# ip link set eth2 down
OR
$ sudo ip link set eth2 down
Now, let’s check the status of the eth2 network interface:
$ ip -j -p link show eth2 | grep operstate

The above output shows the modified state of the network interface.
11. How to Flush IP Addresses of Network Interface
In the previous example, we saw how to use a del sub-command to remove an IP address. However, sometimes we need to remove all IP addresses of the particular network interface. In such cases, we can use the flush sub-command.
First, use the flush sub-command to remove all the IP addresses of the eth2 network interface:
$ sudo ip addr flush eth2
Now, let’s check that all IP addresses of the eth2 network interface have been removed:
$ ip -j -p addr show eth2
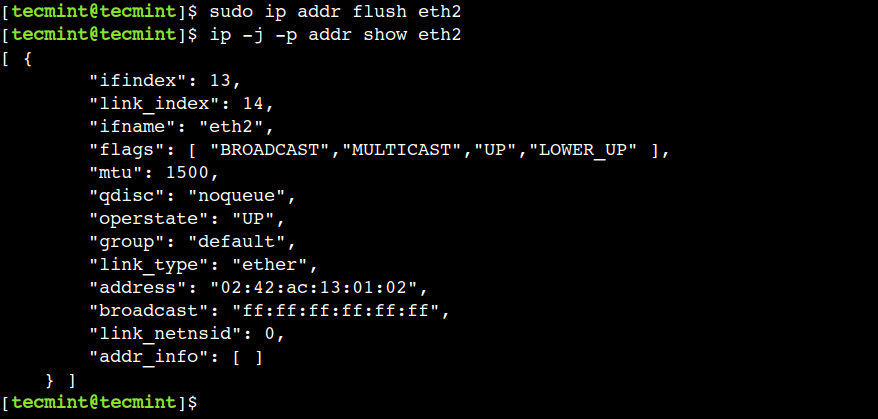
In the above output, the addr_info field shows the empty JSON array. This indicates there isn’t any IP address associated with the eth2 network interface.
12. How Do I Check Routing Table
A routing table stores the necessary information to forward a network packet to the correct destination. We can use the route object of the ip command to display the routing rules.
Let’s use the below command to list the all rules of the routing table:
$ ip route show

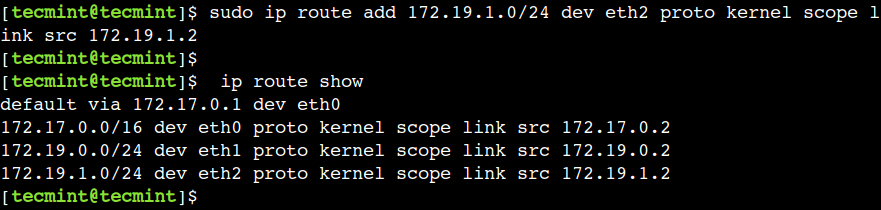
In the above output, the first column represents the destination whereas the last column represents the source IP address.
13. How Do I Add New Static Route
Why do you need to add static routes or manual routes, because the traffic must not pass through the default gateway? We need to add static routes to pass traffic from the best way to reach the destination.
$ sudo ip route add 172.19.1.0/24 dev eth2 proto kernel scope link src 172.19.1.2
Now, let’s verify that the entry has been added successfully:
$ ip route show
15. How to Remove Static Route
The del sub-command removes a particular entry from the routing table. For example, the below command removes the entry of the eth2 device route:
$ sudo ip route del 172.19.1.0/24
Now, let’s verify that the entry has been removed successfully:
$ ip route show

16. How Do I Add Permanent Static Routes
All the above routes will be lost after a system restart. To add a permanent static route, edit file /etc/sysconfig/network-scripts/route-eth2 (We are storing static route for (eth2). By default, the route-eth2 file will not be there and need to be created.
Set Permanent Route in RHEL Systems
# vi /etc/sysconfig/network-scripts/route-eth2
and add the following lines and save and exit.
172.19.1.0/24 via 172.19.1.2 dev eth2
Set Permanent Route in Debian Systems
Open the file /etc/network/interfaces and at the end add the persistence static routes. IP Addresses may differ in your environment.
$ sudo vi /etc/network/interfaces
auto eth2
iface eth2 inet static
address 172.19.50.2
netmask 255.255.255.0
gateway 172.19.50.100
#########{Static Route}###########
up ip route add 172.19.1.0/24 via 172.19.1.2 dev eth2
Next, restart network services after entering all the details using the following command.
$ sudo systemctl restart networking
17. How Do I Add the Default Gateway
In networking, the default gateway plays an important role. It gets used when the routing table doesn’t contain any information about the destination.
The default gateway can be specified globally or for interface-specific config files. The advantage of the default gateway is that we have more than one NIC present in the system. You can add the default gateway on the fly as shown below the command.
First, let’s add an eth0 network interface as a default gateway:
$ sudo ip route add default via 172.17.0.1
Now, let’s verify the default gateway setting using the following command:
$ ip route show

Please note that we have executed this command on a test machine. Be careful while using this command in the production environment.
18. How to Remove a Default Gateway
We can use the following command to remove the default gateway:
$ sudo ip route del default
Now, let’s list the routing table to verify the default gateway has been removed:
$ ip route show

19. How to Display ARP Cache
ARP stands for the Address Resolution Protocol, which is used to find the MAC address associated with the particular IP address.
We can use the neigh object with the ip command to display the ARP cache:
$ ip neigh show

In the above command, the neigh represents neighboring objects.
20. How to Add an ARP Entry
To create a new ARP entry, we can use the add sub-command with the neigh object.
$ sudo ip neigh add 172.19.1.0 lladdr 02:42:e3:40:a6:b1 dev eth2
Now, let’s list the ARP cache entries:
$ ip neigh show

In the above output, we can see the new entry for the eth2 network interface.
21. How to Remove an ARP Entry
Like other network objects, we can use the del sub-command to remove the ARP entry. For example, the below command removes the ARP entry of the eth2 network interface:
$ sudo ip neigh del 172.19.1.0 dev eth2
Now, let’s verify that the entry has been removed by listing the ARP cache:
$ ip neigh show

22. How to Flush the ARP Entries
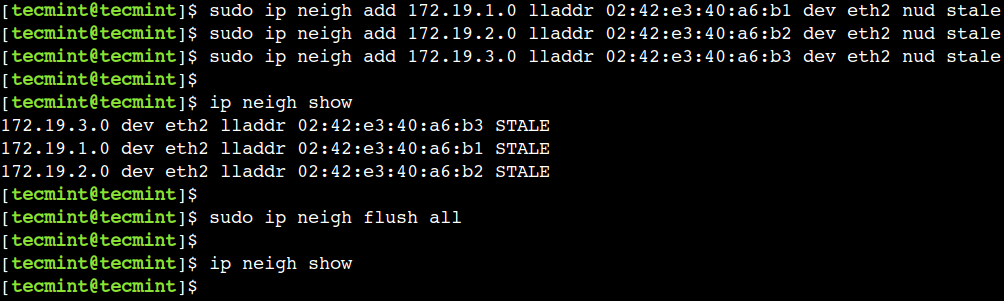
We can use the flush sub-command to remove multiple ARP entries. To understand this, first, add a few ARP entries with the STALE state:
$ sudo ip neigh add 172.19.1.0 lladdr 02:42:e3:40:a6:b1 dev eth2 nud stale
$ sudo ip neigh add 172.19.2.0 lladdr 02:42:e3:40:a6:b2 dev eth2 nud stale
$ sudo ip neigh add 172.19.3.0 lladdr 02:42:e3:40:a6:b3 dev eth2 nud stale
Next, verify that the new entries have been added successfully:
$ ip neigh show
Then, flush all the entries using the below command:
$ sudo ip neigh flush all
Finally, verify that all the entries have been removed:
$ ip neigh show
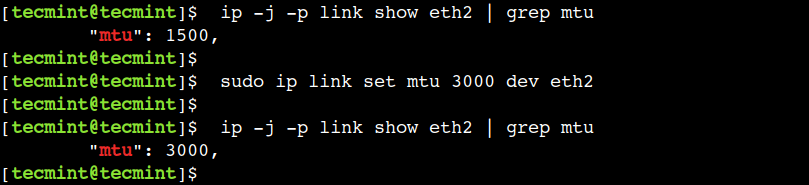
23. How to Set MTU for Network Interface
MTU stands for Maximum Transmission Unit, which represents the largest packet size that can be transmitted in a single transaction. We can manipulate the MTU size as per our performance requirements.
First, let’s find the MTU of the eth2 network interface:
$ ip -j -p link show eth2 | grep mtu
Next, update the MTU size of the eth2 network interface to 3000:
$ sudo ip link set mtu 3000 dev eth2
Finally, verify that the MTU has been updated successfully:
$ ip -j -p link show eth2 | grep mtu
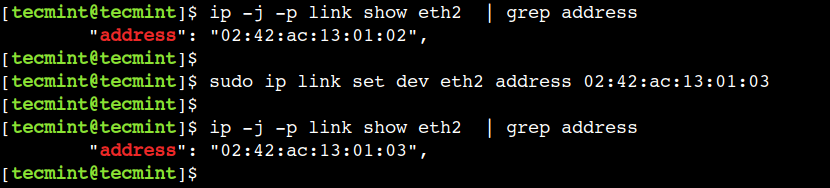
24. How to Change the Network Mac Address
The ip command allows us to change the MAC address of the network interface. To achieve this, we can use the set sub-command with the link object:
First, list the current MAC address of the eth2 network interface:
$ ip -j -p link show eth2 | grep address
Next, change the MAC address of the network interface using the below command:
$ sudo ip link set dev eth2 address 02:42:ac:13:01:03
Finally, verify that the MAC address has been changed:
$ ip -j -p link show eth2 | grep address
Please refer manual page doing man ip from the terminal/command prompt to know more about IP Command.
$ man ip
Conclusion
In this article, we discussed some common examples of the ip command. One can use these examples in day-to-day life to perform network administration.
Do you know of any other best example of the ip command in Linux? Let us know your views in the comments below.


