This is the 6th part of our ongoing Logical Volume Management series, in this article we will show you how to migrate existing logical volumes to other new drive without any downtime. Before moving further, I would like to explain you about LVM Migration and its features.

What is LVM Migration?
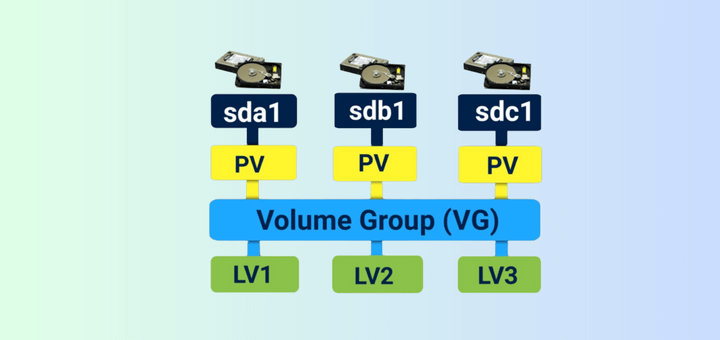
LVM migration is one of the excellent feature, where we can migrate the logical volumes to a new disk without the data-loss and downtime. The purpose of this feature is it to move our data from old disk to a new disk. Usually, we do migrations from one disk to other disk storage, only when an error occur in some disks.
Features of Migration
- Moving logical volumes from one disk to other disk.
- We can use any type of disk like SATA, SSD, SAS, SAN storage iSCSI or FC.
- Migrate disks without data loss and downtime.
In LVM Migration, we will swap every volumes, file-system and it’s data in the existing storage. For example, if we have a single Logical volume, which has been mapped to one of the physical volume, that physical volume is a physical hard-drive.
Now if we need to upgrade our server with SSD Hard-drive, what we used to think at first? reformat of disk? No! we don’t have to reformat the server. The LVM has the option to migrate those old SATA Drives with new SSD Drives. The Live migration will support any kind of disks, be it local drive, SAN or Fiber channel too.
Requirements
- Creating Flexible Disk Storage with Logical Volume Management – Part 1
- How to Extend/Reduce LVM’s in Linux – Part 2
There are two ways to migrate LVM partitions (Storages), one is using Mirroring method and other using pvmove command. For demonstration purpose, here I’m using Centos6.5, but same instructions can also be supported for RHEL, Fedora, Oracle Linux and Scientific Linux.
My Server Setup
Operating System :	CentOS 6.5 Final
IP Address	 :	192.168.0.224
System Hostname	 :	lvmmig.tecmintlocal.com
Step 1: Check for Present Drives
1. Assume we are already having one virtual drive named “vdb“, which mapped to one of the logical volume “tecmint_lv“. Now we want to migrate this “vdb” logical volume drive to some other new storage. Before moving further, first verify that the virtual drive and logical volume names with the help of fdisk and lvs commands as shown.
# fdisk -l | grep vd
# lvs

Step 2: Check for Newly added Drive
2. Once we confirm our existing drives, now it’s time to attach our new SSD drive to system and verify newly added drive with the help of fdisk command.
# fdisk -l | grep dev

Note: Did you see in the above screen, that the new drive has been added successfully with name “/dev/sda“.
Step 3: Check Present Logical and Physical Volume
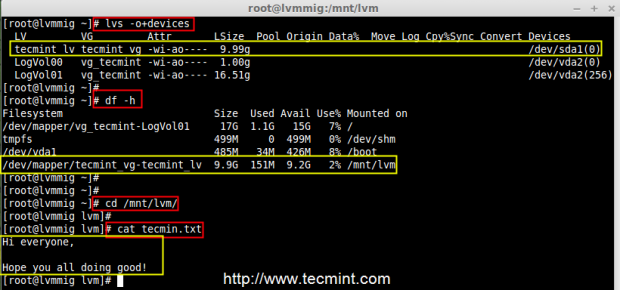
3. Now move forward to create physical volume, volume group and logical volume for migration. Before creating volumes, make sure to check the present logical volume data under /mnt/lvm mount point. Use the following commands to list the mounts and check the data.
# df -h
# cd /mnt/lvm
# cat tecmint.txt

Note: For demonstration purpose, we’ve created two files under /mnt/lvm mount point, and we migrate these data to a new drive without any downtime.
4. Before migrating, make sure to confirm the names of logical volume and volume group for which physical volume is related to and also confirm which physical volume used to hold this volume group and logical volume.
# lvs
# vgs -o+devices | grep tecmint_vg

Note: Did you see in the above screen, that “vdb” holds the volume group tecmint_vg.
Step 4: Create New Physical Volume
5. Before creating Physical Volume in our new added SSD Drive, we need to define the partition using fdisk. Don’t forget to change the Type to LVM(8e), while creating partitions.
# pvcreate /dev/sda1 -v
# pvs

6. Next, add the newly created physical volume to existing volume group tecmint_vg using ‘vgextend command’
# vgextend tecmint_vg /dev/sda1
# vgs

7. To get the full list of information about volume group use ‘vgdisplay‘ command.
# vgdisplay tecmint_vg -v

Note: In the above screen, we can see at the end of result as our PV has added to the volume group.
8. If in-case, we need to know more information about which devices are mapped, use the ‘dmsetup‘ dependency command.
# lvs -o+devices
# dmsetup deps /dev/tecmint_vg/tecmint_lv
In the above results, there is 1 dependencies (PV) or (Drives) and here 17 were listed. If you want to confirm look into the devices, which has major and minor number of drives that are attached.
# ls -l /dev | grep vd

Note: In the above command, we can see that major number with 252 and minor number 17 is related to vdb1. Hope you understood from above command output.
Step 5: LVM Mirroring Method
9. Now it’s time to do migration using Mirroring method, use ‘lvconvert‘ command to migrate data from old logical volume to new drive.
# lvconvert -m 1 /dev/tecmint_vg/tecmint_lv /dev/sda1
- -m = mirror
- 1 = adding a single mirror

Note: The above migration process will take long time according to our volume size.
10. Once migration process completed, verify the converted mirror.
# lvs -o+devices

11. Once you sure that the converted mirror is perfect, you can remove the old virtual disk vdb1. The option -m will remove the mirror, earlier we’ve used 1 for adding the mirror.
# lvconvert -m 0 /dev/tecmint_vg/tecmint_lv /dev/vdb1

12. Once old virtual disk is removed, you can re-check the devices for logical volumes using following command.
# lvs -o+devices
# dmsetup deps /dev/tecmint_vg/tecmint_lv
# ls -l /dev | grep sd

In the above picture, did you see that our logical volume now depends on 8,1 and has sda1. This indicates that our migration process is done.
13. Now verify the files that we’ve migrated from old to new drive. If same data is present at the new drive, that means we have done every steps perfectly.
# cd /mnt/lvm/
# cat tecmin.txt
14. After everything perfectly created, now it’s time to delete the vdb1 from volume group and later confirm, which devices are depends on our volume group.
# vgreduce /dev/tecmint_vg /dev/vdb1
# vgs -o+devices
15. After removing vdb1 from volume group tecmint_vg, still our logical volume is present there because we have migrated it to sda1 from vdb1.
# lvs

Step 6: LVM pvmove Mirroring Method
16. Instead using ‘lvconvert’ mirroring command, we use here ‘pvmove‘ command with option ‘-n‘ (logical volume name) method to mirror data between two devices.
# pvmove -n /dev/tecmint_vg/tecmint_lv /dev/vdb1 /dev/sda1
The command is one of the simplest way to mirror the data between two devices, but in real environment Mirroring is used more often than pvmove.
Conclusion
In this article, we have seen how to migrate the logical volumes from one drive to other. Hope you have learnt new tricks in logical volume management. For such setup one should must know about the basic of logical volume management. For basic setups, please refer to the links provided on top of the article at requirement section.


Does this mirror?
"pvmove -n /dev/tecmint_vg/tecmint_lv /dev/vdb1 /dev/sda1"My understanding is it moves all the data from /dev/vdb1 to /dev/sda1 and deleted the original data.
How can we use
lvconvet -m 0 ***if existing volume made of multiple disks. I have/datavolume made of/dev/sda1(100GB) &/dev/sdb1(200GB). I have done the mirroring with/dev/sdc1(310GB) . But when i runlvconvert -o m /dev/datvg/datalv /dev/sda1it removed/dev/sdc1. Not the/dev/sda1and/dev/sdb1.Very nice step sir…
Hi Babin,
Thanks for your wonderful and very useful Information.
I have one issue : My old LV has ext4 FS but i need to move this data in New LUN with XFS FS . this is how
Thanks,
M.N.KUmar
title says moving to a new Volume Group, but the steps show moving to a new Physical Volume. Blog title is inaccurate
Hello Babin,
the steps work’s for a vg with single lv.
i have a question what if we have 3 lvs from single vg :
sp09lonprod1:~ # vgs
VG #PV #LV #SN Attr VSize VFree
datavg 1 3 0 wz–n- 37.00g 1020.00m
====
sp09lonprod1:~ # lvs
LV VG Attr LSize Pool Origin Data% Move Log Copy% Convert
appserverlv datavg -wi-ao– 30.00g
loglv datavg -wi-ao– 5.00g
mrlv datavg -wi-ao– 1.00g
======
sp09lonprod1:~ # df -h
Filesystem Size Used Avail Use% Mounted on
/dev/mapper/datavg-appserverlv
30G 17G 12G 59% /appserver
/dev/mapper/datavg-mrlv
1008M 34M 924M 4% /mr
/dev/mapper/datavg-loglv
5.0G 147M 4.6G 4% /log
== ==
we maintain only a single disk to clients ( even though we have a an option of adding a new disk to existing vg and extending F/S
but we don’t do that in our org.) , now i need to migrate all my data and lvs to new disk . how can i do if i follow your steps,
i normally do with making backup (tar the exixting f/s) and crating a new vg and new lvs on new disk and then copying all the data to the respective mount points after making F/s.. but its to long and time taking..
can you help me to make this short.
currents disk’s;
sp09lonprod1:~ # fdisk -l |grep -i sd
Disk /dev/sdb: 39.7 GB, 39728447488 bytes
/dev/sdb1 1 4830 38796272 8e Linux LVM
Disk /dev/sda: 16.1 GB, 16106127360 bytes
/dev/sda1 * 1 64 512000 83 Linux
/dev/sda2 64 1959 15215616 8e Linux LVM
sdb1(30GB) needs to be moved to new disk xx of 65gb
the same size of existing lvs of old disk need to be presented to the new disk
do i need to create 3 pvs as per required size on new disk and do as your steps specified in this doc ???
Thanks in advance,
Krishna.
@Krishna,
In this case, we can use pvmove by mentioning multiple disks ( source to destination).
Hi Krishan,
You can do this by mirroring lv wise.
Very useful technote. All steps are very neatly explained and worked perfectly for me.
Hi Babin,
My colleague had created VM onVirtual Box. It is arround 50 GB total. out of that as follows
Filesystem Size Used Avail Use% Mounted on
/dev/sda2 35G 12G 22G 34% /
/dev/sda1 190M 12M 169M 7% /boot
/dev/sda3 13G 12G 465M 97% /data
none 1.1G 0 1.1G 0% /dev/shm
Main Application is running on /data. It is about to full the data partition.
It is not lvm partition.
Please give me any suggestion.
is any way extend the /data size or reduce the size of / and increase the /data partion.
Hi Shailesh,
If it’s not a LVM we can extend or reduce the volume size.
Hi Babin,
Thanks for such nice article.
I am having some scenario such as we want to move the Stripped LV using pvmove to another server.
Can you help us regarding the same. As I have mentioned that these are Stripped LV so destination should have the Stripped LV after migration.
Thank you,
Anil Rarthod
Babin I need your help!
I have a VM image with two virtual disks. On this VM, there is only one volume group, vg0. But vg0 is made of two physical volumes – one from each disk.
I have added a third disk and cloned the two primary partitions on the above OS, but now need to copy over the LVM partitions to the disk. How can I do this in Suse 11? I thinking to just copy the whole vg0 over to the new disk, not sure how…
thanks
Copy paste will not work, Currently i don’t have the steps for Suse once i get free will setup a test environment and let you know the result.
Thanks for giving such a technics
@ Dharma,
Thanks for your valuable feedback..
Hi
I am very new to linux.just a doubt,If I use lvmove for migration.the lvextend and filesystem resize also required to reflect the new size of disk in lvm.
@anis
We don’t have to use the lvextend and resize while using move commands.
Great description, thanks. Just moved all data from a running Oracle database to another drive – worked perfectly!
Additional hint: for removing an LV which spans multiple devices, it seems you have to list all the devices when doing -m 0.
For example, given
[root@zldinfra1 ~]# lvs –all –segments -o +devices
LV VG Attr #Str Type SSize Devices
[ora_u03_lv_mimage_0] oravg iwi-aom- 1 linear 5.00g /dev/sdb1(56320)
[ora_u03_lv_mimage_0] oravg iwi-aom- 1 linear 15.00g /dev/sdc1(55203)
[ora_u03_lv_mimage_1] oravg iwi-aom- 1 linear 5.00g /dev/sde2(107522)
[ora_u03_lv_mimage_1] oravg iwi-aom- 1 linear 15.00g /dev/sde2(133126)
[ora_u03_lv_mlog] oravg lwi-aom- 1 linear 4.00m /dev/sde2(108802)
to get rid of the (original) mirror copy spanning both sdb1 and sdc1, the following works:
[root@zldinfra1 ~]# lvconvert -m 0 /dev/oravg/ora_u03_lv /dev/sdc1 /dev/sdb1
Logical volume ora_u03_lv converted.
[root@zldinfra1 ~]# lvs –all –segments -o +devices
LV VG Attr #Str Type SSize Devices
ora_u03_lv oravg -wi-ao– 1 linear 5.00g /dev/sde2(107522)
ora_u03_lv oravg -wi-ao– 1 linear 15.00g /dev/sde2(133126)
@Martin
Thank you.
Well explained article. Appreciate your efforts.
This is a really easy to follow guide for a complex subject. Tip of the hat to you. Nice on.
Can you create a tutorial for arch Linux plz?
You saved my day.
Thank you.
@ DeadFire, It’s here https://www.tecmint.com/manage-multiple-lvm-disks-using-striping-io/
thank!
where part V?
@XFire Same steps for Debian too.. Have a try please and let me know if you have any issue while setup.
But what if your vg is associated with 2 pv and you don’t know on which pv the data are resides so how will you migrate that lv which has made up from P.E of that 2 pvs. Please reply me… I am trying but my thinking just stuck by this confusion…
If possible then please make a article on it.
And thank you for this article. It gives me more idea.
I am trying from my side but if have an idea about it then pls ans me
But what if your vg is associated with 2 pv
Ans: vgs -o+devices will show the related PV
and you don’t know on which pv the data are resides so how will you migrate that lv which has made up from P.E of that 2 pvs.
Ans: lvs -a -o+devices
will show lv under which pv. And we can find using dmsetup deps, will show the devices which pv related, As well here we need to understand about the major number and minor number of devices.
Run ls -l /dev | grep sd
to know the major number and minor number of the specific device get the output from lvs -a -o+ devices and compare the major number and minor number of dmsetup, ls -l output. To understand it please have a look at below image.
http://i.imgur.com/uQtcmze.png
Please reply me… I am trying but my thinking just stuck by this confusion…
If possible then please make a article on it.
Ans: Sure will updated soon..
And thank you for this article. It gives me more idea.
I am trying from my side but if have an idea about it then pls ans me
And also I know we can take backup and then we would make it easy. but if there is a any new concept then that will be really helpful
Any chance for a Debian howto?