Installation of Xen Orchestra
Xen Orchestra, as mentioned earlier, is a web based method for managing XenServer infrastructures. The officially supported and suggested product to use in a production environment is the Xen Orchestra Appliance, or often called XOA.
This appliance is a pre-built and highly stable Debian virtual guest that can be installed to a XenServer host or run through VirtualBox.
Once XOA is up and running, the Xen Orchestra web interface is available and can be used to manage XenServers.
There are many benefits to using the official XO appliance but there is also the ability to install Xen Orchestra from sources as well. Installing from sources provides all of the latest and greatest bug fixes and feature enhancements directly from the Xen Orchestra development team.
The next few paragraphs will walk through the process of manually installing Xen Orchestra on a Debian 8 Jessie install. It is assumed that a Debian 8 system is already running and fully updated from the official Debian repositories.
To see how to install Debian 8 please see the walk through found here Installation of Debian 8 Jessie.
The official guide to building XO from source can be found here. The following are modified steps to accomplish the same task on a host running Debian 8 Jessie.
The first step to building Xen Orchestra (XO) from sources is to install the necessary dependencies. According to the XO documentation the dependencies can be installed with the following command.
# apt-get install wget build-essential redis-server libpng-dev git python-minimal
Next node.js needs to be installed as it is required by XO. The installation of node.js can be accomplish by following the next few steps.
# wget -c https://raw.githubusercontent.com/visionmedia/n/master/bin/n
# chmod u+x n
# ./n lts
# npm i -g npm
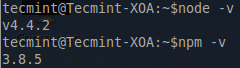
Be sure to check that the proper versions of both 'node' and 'npm' are installed with the following commands.
# node -v
# npm -v
After the successful completion of these commands, all the necessary dependencies are installed and the system is ready to begin the installation of the XO server and XO web components.
# git clone -b stable http://github.com/vatesfr/xo-server
# git clone -b stable http://github.com/vatesfr/xo-web
# ls -l

The first step is to prepare the XO-Server. All of the commands to prepare the XO server must be issued from within the 'xo-server' directory.
# cd xo-server
# npm install && npm run build
This process will take some time (circa 5 minutes) and does require an active Internet connection. Once complete the server configuration file needs to be created and modified to point to the web information that will be built in the next paragraphs.
The 'xo-server' and 'xo-web' folders are assumed to be in the same parent directory according to the installation instructions; modify to fit the environment as needed.
To accomplish the server’s configuration issue the following commands.
# cp sample.config.yaml .xo-server.yaml
# nano .xo-server.yaml
Once the '.xo-server.yaml' file is opened, navigate toward the bottom of the file and locate the line ‘# List of files/directories which will be served.’. Below this line there is a line that will be commented out with a ‘#’ and the comment needs to be removed.
If xo-server and xo-web directories are in the same parent folder, change the line to: '/': '../xo-web/dist' (single quotes are needed in the preceding code).
Otherwise, make the appropriate changes to the path for the 'xo-web/dist/' folder. (NOTE: A privileged user is required to bind to port 80).
If a non-privileged user is to be used, locate the line 'port: 80' in the '.xo-server.yaml' file and change the port value to a port number above 1024. This guide will use port 8080 by setting the port directive as such 'port: 8080'.

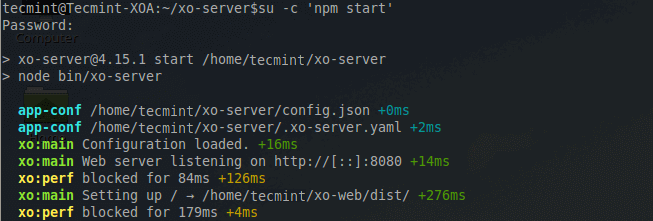
Save the changes to this file and exit the text editor. At this point the server should be able to be started successfully. Test this before continuing by issuing the following command (To stop the server, hit 'ctrl' + 'c' keys).
$ su -c 'npm start'
Now the web files for the XO server need to be prepared. This is a simple process that must be done from within the 'xo-web' directory.
$ cd ../xo-web
$ npm install
$ npm run build
The build process for the web files will take time and requires an active Internet connection as well. Once the process is complete, the server can be started again and will deliver the newly created web files.
$ cd ../xo-server
$ su -c 'npm start'
At this point open a web browser and navigate to the XO-Server's IP address and port number. In the configuration above, the server was opened on port 8080 so to connect to Xen Orchestra, the following url will be needed:
http://:8080
Once successfully connected, the default user-name and password are as follows:
User-name: [email protected]
Password: admin
A successful login should result in the following web page loading.
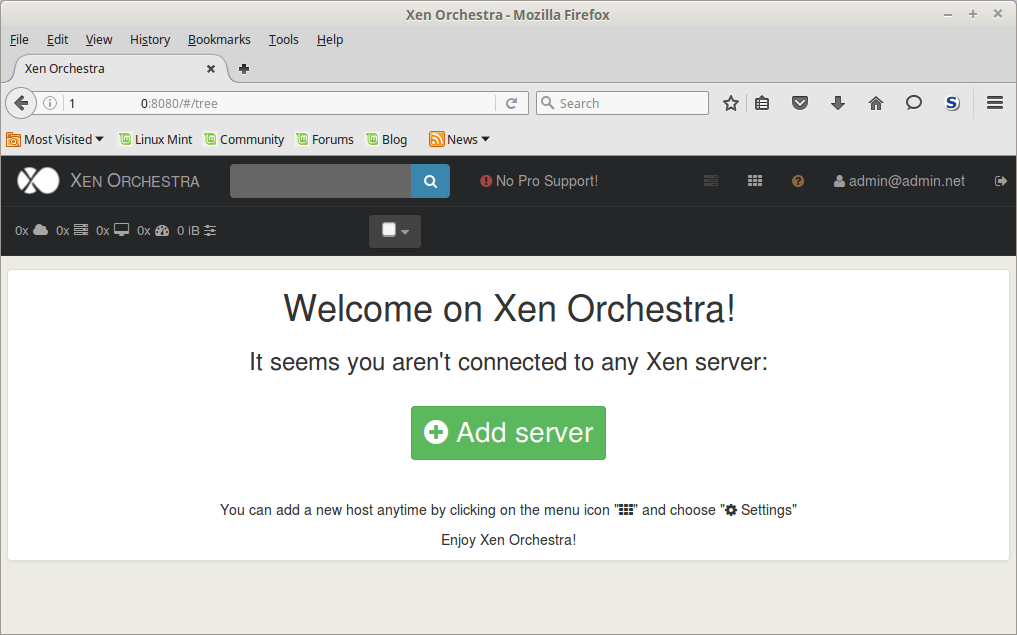
At this point Xen Orchestra is working and ready to be used to manage XenServer hosts.
NOTE: As mentioned earlier, it is strongly recommended that the official Xen Orchestra appliance be used to manage production XenServer hosts! These instructions walked the reader through installing the absolute newest feature set of Xen Orchestra from sources.

Hi there is some other solution apart from Xen Orchestra for Linux (Debian strech)
hello sandro i came across a project call archipel archipelproject.org looks like an alternative solution to XO but am not sure its in active development!
Sandro/Biyi,
There is openxenmanager available in most distributions. Personally have had hit or miss luck with it but it is a viable option if you don’t wish to use Xen Orchestra or XenCenter.
Rob,
i think Sandro is looking for an alternative solution similar to XO, something more of a web app, i think OXM is a native app. Have you seen archipel ( archipelproject.org )? maybe you could review it!
Biyi,
Ah, you’re correct OXM is a local package for most distros. I’ve not heard of archipel but will definitely take a look at it!
Hi Rob,
How should we update this to the latest release?
Abdul,
Which part are you wanting to update? XenCenter can be downloaded from a XenServer running XenServer 7.
Hi Rob,
I’m looking to update Xen Orchestra, I’ve installed it from the tutorial above, and its running fine. I’m just concerned if I pull the latest release, would it affect my existing setup?
Abdul,
The open source Xen Orchestra appliance will sadly require the use of ‘git’ commands in order to update it. One of the benefits of buying the actual appliance is that it has an ‘upgrade’ button to make upgrading easier. I’m reviving my old install from a snapshot and I will share the steps/results.
Biyi,
Indeed the backup functionality is available from the sources. From the Xen Orchestra main page (one where all the XenServer host and guests are displayed) next to the user currently logged in name, there is an icon of nine little tiles. Click on that icon and halfway down there will be a link to the backup manager. From the backup manager, a schedule of VM back ups can be created as well as rolling snapshots. Let me know if this is what you are needing.
hello rob!, nice article thanks, please does the source installation of Xen orchestra comes with VM backup tools?
Biyi,
Indeed the backup functionality is available from the sources. From the Xen Orchestra main page (one where all the XenServer host and guests are displayed) next to the user currently logged in name, there is an icon of nine little tiles. Click on that icon and halfway down there will be a link to the backup manager. From the backup manager, a schedule of VM back ups can be created as well as rolling snapshots. Let me know if this is what you are needing.
yes exactly what i need thanks, i really need to convince my organization to adopt server virtualization, i needed to be sure of all the tools that can be used on non-windows OS (not using xencenter). Thanks a lot rob
You’re quite welcome. The one thing I know off the top is that High Availability tools currently aren’t manageable through Xen Orchestra. You have to enable/disable it manually through the CLI on the XenServer master host.