Even when some IT people hear the phrase “Database replication“, they often associate it with the need of having multiple copies of the same information to avoid data loss in the event of hardware failure or data corruption. While that is true at some extent, there is much more to database replication than the common concept of backing up a database and data availability.

Among other benefits of database replication in a master-slave setup we can mention:
- Backups can be done on the slave server without affecting (and being affected by) the write operations in the master.
- Resource-intensive operations (such as data analysis) can be performed on the slave without influencing the performance of the master.
In this article we will explain how to set up master-slave replication in MariaDB 10.1. As opposed to classic replication, MariaDB introduced the concept of Global Transaction IDs (GTIDs) in v10.0, which allows to change a slave to connect to and replicate from a different master easily. On top of that, the state of the slave is recorded in a crash-safe way (updates to the state are done in the same transaction as the updates to the data).
If you’re looking for MySQL replication under CentOS/RHEL 6, follow this guide Setup MySQL (Master-Slave) Replication on CentOS/RHEL 6
Installing MariaDB 10.1 in CentOS/RHEL 7 and Debian 8/9
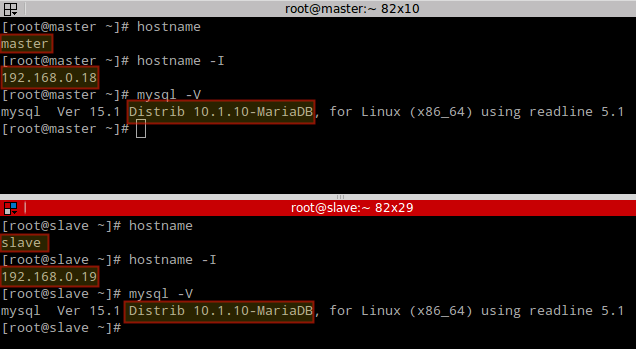
Our testing environment consists of the following machines (both are CentOS 7):
Master: 192.168.0.18
Slave: 192.168.0.19
To install the latest version of MariaDB, we will need to add their repositories to our servers. If you’re using older version of MariaDB say 5.5, consider upgrading to latest 10.1 version using below article.
In CentOS/RHEL
Create a file named MariaDB.repo inside /etc/yum.repos.d with the following contents on both Master and Slave systems:
# MariaDB 10.1 CentOS repository list - created 2016-01-23 14:16 UTC
# http://mariadb.org/mariadb/repositories/
[mariadb]
name = MariaDB
baseurl = http://yum.mariadb.org/10.1/centos7-amd64
gpgkey=https://yum.mariadb.org/RPM-GPG-KEY-MariaDB
gpgcheck=1
Save the file and install MariaDB on both servers using yum:
# yum update && yum install MariaDB-server MariaDB-client
In Debian/Ubuntu
Add the key to authenticate packages and the MariaDB repository:
# apt-get install software-properties-common
# apt-key adv --recv-keys --keyserver keyserver.ubuntu.com 0xcbcb082a1bb943db
# add-apt-repository 'deb [arch=amd64,i386] http://mirror.edatel.net.co/mariadb/repo/10.1/debian jessie main'
Note: Replace distribution name and codename in the above highlighted line.
Install using apt-get command:
# apt-get update
# apt-get install mariadb-server
Once you have installed MariaDB, run the mysql_secure_installation procedure on both master and slave, let’s set up a sample test database in the master machine.
Setting Up a Sample MySQL Database on Master
We will now set up in the master server the Employees database from https://github.com/datacharmer/test_db (which provides a dataset of 4 million records spread over six tables) in two simple steps:
Clone the repository and use it to import the sample database to your MariaDB installation:
# git clone https://github.com/datacharmer/test_db
# cd test_db
# mysql < employees.sql
Configuring MySQL Server on Master
To configure the master, follow these steps:
STEP 1: Edit the /etc/my.cnf file. Under the [mysqld] section, add the following four lines:
log-bin
server_id=1
replicate-do-db=employees
bind-address=192.168.0.18
and restart MariaDB:
# systemctl restart mariadb
STEP 2: Log on to the MariaDB server as root, create the user slave and assign the necessary grants:
MariaDB [(none)]> CREATE USER 'slave'@'localhost' IDENTIFIED BY 'SlavePassword';
MariaDB [(none)]> GRANT REPLICATION SLAVE ON *.* TO slave IDENTIFIED BY 'SlavePassword' WITH GRANT OPTION;
MariaDB [(none)]> FLUSH PRIVILEGES;
MariaDB [(none)]> FLUSH TABLES WITH READ LOCK;
MariaDB [(none)]> SHOW MASTER STATUS;
The last command (SHOW MASTER STATUS) returns the current position in the binary log (the exact coordinates that indicate at exactly which point the slave should start replicating from:

STEP 3: Exit the MariaDB prompt (with exit;) and use the following command to take a snapshot of the employees database. When you hit Enter, you will be prompted to type the password for root you set up earlier through mysql_secure_installation:
# mysqldump -u root -p employees > employees-dump.sql
After the dump is completed, connect to the database server again to unlock the tables and then exit:
MariaDB [(none)]> UNLOCK TABLES;
MariaDB [(none)]> exit;
STEP 4: Copy the dump to the slave:
# scp employees-dump.sql [email protected]:/root/
STEP 5: Run the mysql_upgrade procedure to upgrade the system tables (you will be prompted to enter the MariaDB root password):
# mysql_upgrade -u root -p
STEP 6: Allow the database service through the firewall:
# firewall-cmd --add-service=mysql
# firewall-cmd --add-service=mysql --permanent
# firewall-cmd --reload
Now let’s configure the slave.
Configuring MySQL Server on Slave
To configure the slave, follow these steps:
STEP 1: Create the account to perform the replication tasks. Connect to the local MariaDB server with:
# mysql -u root –p
and enter the password you set up earlier.
STEP 2: Once connected to the database server, create the user and an empty database, and grant permissions:
MariaDB [(none)]> CREATE DATABASE employees;
MariaDB [(none)]> GRANT ALL PRIVILEGES ON employees.* TO 'slave'@'localhost' WITH GRANT OPTION;
MariaDB [(none)]> FLUSH PRIVILEGES;
STEP 3: Exit the MariaDB prompt and load the dump created in the master server:
# mysql -u root -p employees < employees-dump.sql
STEP 4: Edit the /etc/my.cnf file to assign a server ID to the slave under the [mysqld] section. Note that it needs to be a different integer than 1, as we used 1 in the master:
server_id=2
replicate-do-db=employees
Restart the database server:
# systemctl restart mariadb
STEP 5: Run the mysql_upgrade procedure to upgrade the system tables (you will be prompted to enter the MariaDB root password):
# mysql_upgrade -u root -p
STEP 6: Once the dump has been imported to the slave, we are only a few steps to begin replicating. Log on to the database and run the following commands in the MariaDB prompt. Pay special attention to the MASTER_LOG_FILE and MASTER_LOG_POS variables, which should match the values returned by SHOW MASTER STATUS in STEP 2 of “Configuring the master” above.
MariaDB [(none)]> CHANGE MASTER TO
  MASTER_HOST='192.168.0.18',
  MASTER_USER='slave',
  MASTER_PASSWORD='SlavePassword',
  MASTER_PORT=3306,
  MASTER_LOG_FILE='master-bin.000001',
  MASTER_LOG_POS=314,
  MASTER_CONNECT_RETRY=10,
  MASTER_USE_GTID=current_pos;
STEP 7: Start the slave and check its status without exiting the MariaDB prompt:
MariaDB [(none)]> START SLAVE;
MariaDB [(none)]> SHOW SLAVE STATUS\G;
Not that you need this now, but note that you can stop the slave with:
MariaDB [(none)]> STOP SLAVE;
if the SHOW SLAVE STATUS\G; command returns any errors. Use those errors to troubleshoot and then run START SLAVE; to test again.
Test MySQL/MariaDB Database Replication
Let’s add a record to the employees table in the master server:
MariaDB [(none)]> INSERT INTO employees (emp_no, birth_date, first_name, last_name, gender, hire_date) VALUES (500000, '1983-07-12', 'Dave', 'Null', 'M', '2014-12-12');
Then verify that this change was replicated in the slave:
MariaDB [(none)]> USE employees;
MariaDB [(none)]> SELECT * FROM employees WHERE emp_no=500000;
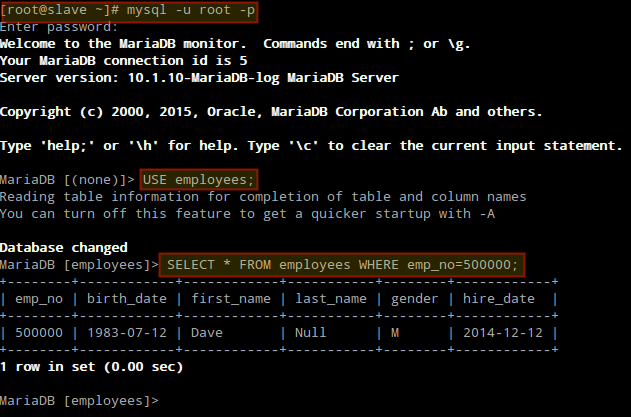
As you can see, replication is working correctly from master to slave.
Summary
In this article we have explained how to install the latest version of MariaDB in CentOS/RHEL 7 and Debian 8/9, and discussed how to set up master-slave replication with GTIDs. For more information, you may want to refer to the MariaDB Replication Guide, and don’t hesitate to contact us using the form below if you have questions or comments.