In the data center world, large capacity Storage Area Networks (SAN) have become the minimum standard. As cloud providers and virtualization also continue to make massive impacts in the technology world, the need for even more SAN storage space has become evident.
Most SAN hardware is comprised of a minimalistic controller (or set of controllers) and a large collection of high capacity drives all configured to support high amounts of data availability and integrity.
Many of these specialized products are made by big name vendors such as Netapp, Dell Equalogic, HP Storageworks, or EMC and have price tags attached to them that only the largest of enterprises can afford.
Realistically, these devices are nothing more than large hard disk arrays with a controller providing the space of those hard disks out to networked clients. Many technologies have existed over the years that provide this functionality or similar functionality at a substantially cheaper price point.
The Debian GNU/Linux distribution provides packages that allow a Debian system to serve the purpose of an enterprise level SAN storage device at a mere fraction of the cost! This allows everyone from basic home users or large data-centers to obtain the benefits of SAN storage without having to spend a fortune on a vendor proprietary solution.
This article will look at how a Debian 9 (Stretch) system can be setup to serve out disk space using a system known as Internet Small Computer Systems Interface or iSCSI for short. iSCSI is an Internet Protocol (IP) based standard for providing block (hard drive) storage to other systems. iSCSI works in a client server model but uses different names to distinguish the client from the server.
In iSCSI terminology, the server that is serving out the ‘disk space‘ is known as an iSCSI ‘Target‘ and the system that is requesting/utilizing the disk space is known as the iSCSI ‘Initiator‘. So in other words, an ‘Initiator‘ requests block storage from a ‘Target‘.
Environment Setup
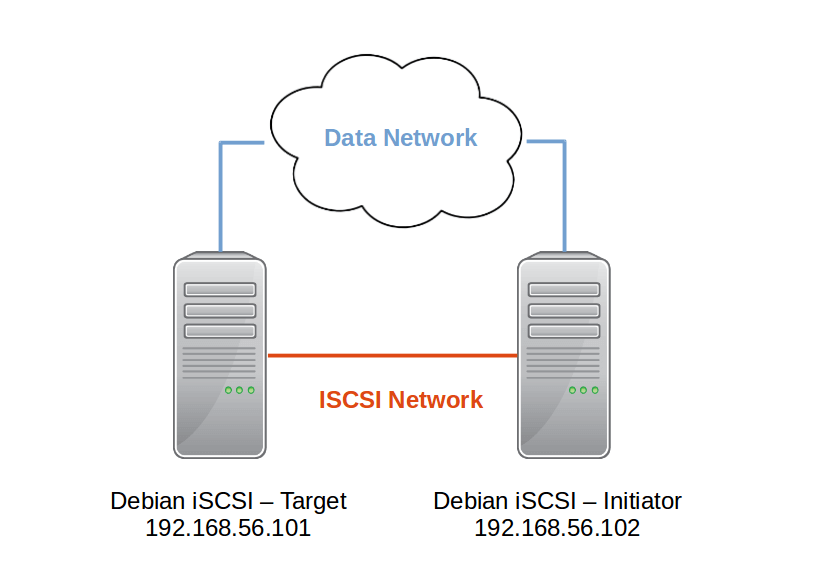
This guide will walk through a basic setup involving a simple iSCSI server (target) and client (initiator) both running Debian 9 (Stretch).
Debian iSCSI Target: 192.168.56.101/24
Storage: Contains two extra hard drives to be used as the storage in the iSCSI setup
Debian iSCSI Initiator: 192.168.56.102/24
The network can be viewed as below:
Debian iSCSI Target Configuration
In the iSCSI world, the target is considered the host that contains the storage devices to be used by the initiator.
In this article the server with the IP of 192.168.56.101 is being used as the target. All configurations will be done on that host for this section.
The first step is the installation of the necessary packages to allow the Debian system to serve out iSCSI targets. This software package is known as Target Framework (TGT).
The other item that is being used for this guide is the Logical Volume Management (LVM) tools as Logical Volumes (LVs) will be used as the storage backing for the iSCSI target.
Both packages can be installed with the following commands.
# apt-get update
# apt-get install tgt lvm2
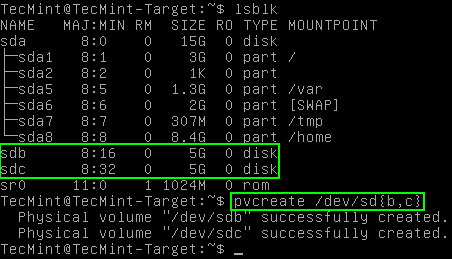
Once the packages are installed, LVM will be used to prepare the hard disks on the target for use as an iSCSI LUN. The first command is used to prepare the disks for inclusion in a LVM setup. Be sure to modify the command as needed for different scenarios!
# lsblk (Only used to confirm disks to be used in the LVM setup)
# pvcreate /dev/sd{b,c}
Once the disks have been prepared with the above ‘pvcreate‘ command, it is time to create a volume group out of these particular disks. The volume group is required in order to create the Logical Volumes that will act as the iSCSI storage later.
To create a volume group, the ‘vgcreate‘ command is needed.
# vgcreate tecmint_iscsi /dev/sd{b,c}
# vgs  (Only needed to confirm the creation of the volume group)

Notice in the output above that the system responds that the Volume Group was created but it is always a good idea to double check as seen above with the ‘vgs‘ command. The capacity of this volume group is only 9.99GB. While this is a particularly small volume group, the process would be the same for disks of larger capacity!
The next step is the creation of the logical volume that will act as the disk to the iSCSI client (initiator). For this example the entirety of the the volume group will be used but isn’t necessary.
The logical volume will be created using the ‘lvcreate‘ command.
# lvcreate -l 100%FREE tecmint_lun1 tecmint_iscsi
# lvs  (Simply used to confirm the creation of the logical volume)

The above ‘lvcreate‘ command might be a little confusing at first glance but the break down is as such:
- lvcreate – Command used to create the logical volume.
- -l 100%FREE – Create the logical volume using all of the volume group’s free space.
- -n tecmint_lun1 – The name of the logical volume to be created.
- tecmint_iscsi – The name of the volume group to create the logical volume within.
Once the logical volume has been created, it’s time to create the actual LUN (Logical Unit Number). The LUN will be the storage device that the initiator will connect to and use later.
Creating a LUN is very simple and requires only a few steps. The first step will be the creation of the configuration file. This file will reside in the ‘/etc/tgt/conf.d‘ directory and for this article it will be called ‘TecMint_iscsi.conf‘.
To create this file use a text editor.
# nano /etc/tgt/conf.d/TecMint_iscsi.conf
Within this file, all the necessary configuration information for this LUN will be configured. There are a lot of options that can be placed in this file but for now a basic LUN with mutual Challenge Handshake Authentication Protocol (CHAP) will be configured.
The LUN’s definition will exist between two ‘target‘ statements. For more parameters that can go in the target statement, review the manual page for the ‘targets.conf‘ file by issuing ‘man 5 targets.conf‘.
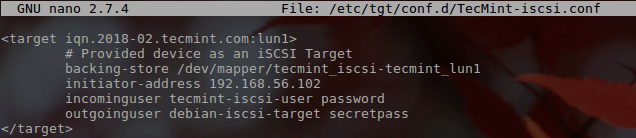
<target iqn.2018-02.tecmint.com:lun1>
     # Provided device as an iSCSI target
     backing-store /dev/mapper/tecmint_iscsi-tecmint_lun1
     initiator-address 192.168.56.102
    incominguser tecmint-iscsi-user password
     outgoinguser debian-iscsi-target secretpass
</target>
There’s a lot going on above. A quick explanation may be helpful to most.
- The first line begins the particular iSCSI LUN configuration. In this case the LUN labeled ‘iqn.2018-02.tecmint.com:lun1‘. The ‘iqn‘ part indicates that this will be an iSCSI qualified name. The ‘2018-02‘ is an arbitrarily chosen date combination. ‘tecmint.com‘ is the domain that this particular LUN belongs. Finally, the ‘lun1‘ is used as the name for this particular target.
- The second line above illustrates a comment. Comments can exist in the target configuration files and must be prefaced with a ‘#‘ symbol.
- The third line is where the actual storage space that will be used by the initiator exists. In this case the storage backing will be the logical volume that was created earlier in the guide.
- The fourth line is the IP address that is expected from the initiator. While this isn’t a required configuration item, it can help increase security.
- The fifth line is the incoming username/password. Much like the initiator address above, this parameter isn’t required either but can help to secure the LUN. Since this guide is also covering iSCSI mutual CHAP, this parameter is required. This line indicates the username and password that the target will expect from the initiator in order to connect to this LUN.
- The sixth line is the username/password that the target will provide to the initiator to allow for mutual CHAP authentication to take place. Normally this parameter is not required but this article is covering mutual CHAP authentication so this parameter is required.
- The final line is the closing statement for the target definition. Pay attention to the closing slash in front of the keyword target!
Once the appropriate configurations for the LUN have been typed out, save the changes and exit the text editor. If using nano, hit ctrl+o to save and then hit ctrl+x to exit nano.
Once the configuration file has been created, the tgt service should be restarted so tgt is aware of the new targets and the associated configuration.
This can be done with one of the following commands and is dependent on the init system in use.
# service tgt restart  (For sysv init systems)
# systemctl restart tgt  (For systemd init systems)
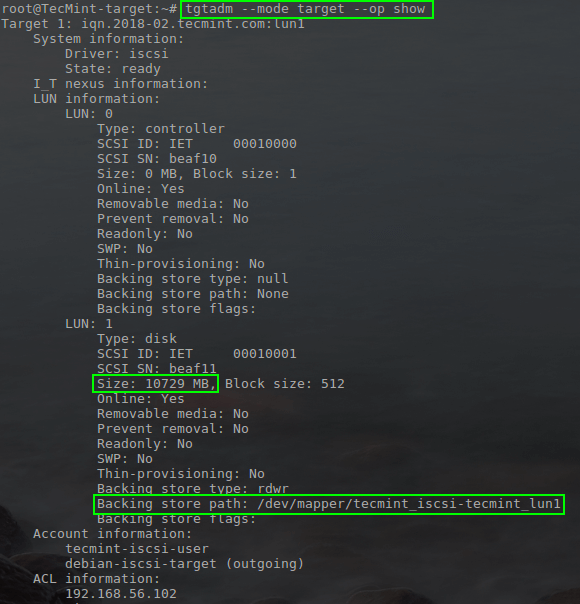
Once tgt has been restarted, it is important to check to ensure that the iSCSI target is being made available according to the configuration file created.
This can be accomplished with the ‘tgtadm‘ command.
# tgtadm --mode target --op show (This will show all targets)
This concludes the configuration of the target. The next section will work through the configuration of the initiator.
Debian iSCSI Initiator Configuration
The next step in using the previously configured iSCSI target is the configuration of the iSCSI initiator.
A different Debian 9 system will be used as the initiator in this article but any system that can utilize the iSCSI protocol can connect to the previously configured target; this could include hypervisors like XenServer/ESXi or other distributions like Red Hat, Debian, or Ubuntu.
The first step in this process for this Debian initiator is the installation of the proper packages for iSCSI.
# apt-get update
# apt-get install open-iscsi
Once apt has finished the configuration of the open-iscsi packages, the iSCSI initiator configuration can begin. The first step will be to communicate with the target to get the initial configuration information for the target prepared.
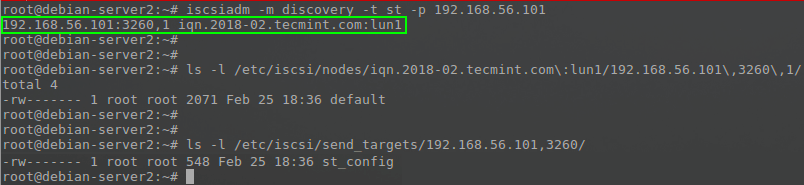
# iscsiadm -m discovery -t st -p 192.168.56.101
When this command runs, it will respond back with the name of the lun configured earlier for this particular host. The above command will also generate two files for the newly discovered LUN information.
Now the file created for this node will need to have the CHAP information configured in order for this iSCSI target to actually be accessible by the initiator.
Technically this information could be setup for the entire system as a whole but in the event that a host connects to different LUNs with different credentials, placing those credentials in the specific node configuration file can mitigate any issues.
The node configuration file will exist in the directory ‘/etc/iscsi/nodes/‘ and will have a directory per LUN available. In the case of this article (note that paths will change if names/IP addresses are changed).
# /etc/iscsi/nodes/iqn.2018-02.tecmint.com\:lun1/192.168.56.101\,3260\,1/default
To work with this file, any text editor can be used.
# nano /etc/iscsi/nodes/iqn.2018-02.tecmint.com\:lun1/192.168.56.101\,3260\,1/default
Within this file there will be several already configured options for the respective target that were determine during the ‘iscsiadm‘ command run earlier.
Since this particular Debian target/initiator setup is using mutual CHAP, some more options need to be changed and added to this file and then a login to the iSCSI target performed.
The changes to this file are:
node.session.auth.authmethod = CHAP                    #Enable CHAP Authentication
node.session.auth.username = tecmint-iscsi-user        #Target to Initiator authentication
node.session.auth.password = password                  #Target to Initiator authentication
node.session.auth.username_in = debian-iscsi-target    #Initiator to Target authentication
node.session.auth.password_in = secretpass             #Initiator to Target authentication
The above options will allow this target to authenticate to the initiator as well as allow the initiator to authenticate to the target.
There is another option in this particular file that may need to be changed depending on the administrator’s preferences and that is the ‘node.startup‘ parameter.
If following this guide, the ‘node.startup‘ option will be set to ‘manual‘ at this point. This may not be desired. If the administrator wishes to have the iSCSI target connected when the system starts up, change ‘manual‘ to ‘automatic‘ as such:
node.startup = automatic
Once the above changes have been made, save the file and exit. At this point the open-iscsi initiator service needs to be restarted in order to read these new changes and connect to the iSCSI target.
This can be accomplished with one of the following commands depending on the init system in use.
# service open-iscsi restart   (For sysv init systems)
# systemctl restart open-iscsi (For systemd init systems)

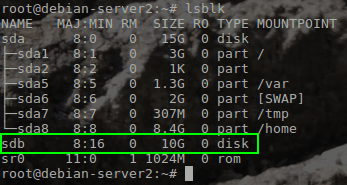
Notice in the green box above that the iSCSI initiator was able to log into the target. To further confirm that the iSCSI target is indeed available to the initiator, we can check the system for extra disk drives that are available using the ‘lsblk‘ command and checking the output for extra drives.
# lsblk
The other command that can be used on the initiator to confirm a connection to the target is ‘iscsiadm‘ as such:
# iscsiadm -m session

The final place to confirm a connection would be on the target itself using the ‘tgtadm‘ command to list any iSCSI connections.
# tgtadm --mode conn --op show --tid 1

From this point, the newly attached iSCSI device can be used similar to any normally attached disk! Partitioning, filesystem creation, mounting, and/or persistent mounting can all able be handled normally.
One big caution to be aware of with iSCSI devices is if the iSCSI target contains important filesystems that are needed as the initiator is booting, make sure to use the ‘_netdev‘ entry in the ‘/etc/fstab‘ file to ensure that the iSCSI device is connected before the system continues booting!


Very good article, I recommended it !
Hi, a correction:
it should be:
Pepe,
Thanks. Had that in the screenshot and explanation of the command but must’ve missed getting it into that one area! We’ll get it fixed.
Hey, had this same issue, and it isn’t fixed, would be super cool if you could at some point! Cheers!
No success. This line worked: iscsiadm -m discovery -t st -p 192.168.1.26, returning 192.168.1.26:3260,1 iqn.2018-06.com.zyxel:nas540-target-1.rjrdaugc.
Nothing else worked, after editing the files and restarting services, nothing happened, no errors, nothing.
Is there something unique about a Zyxel NAS?
I am Mohammad Ali and i am very interested in this article to setup one in my server.