Following previous tutorials concerning the Zabbix series, this article describes how to install and set up an instance of a Zabbix agent to run as a service on Microsoft Windows systems in order to monitor your infrastructure windows environments, especially server machines.
Requirements
- How to Install Zabbix on RHEL/CentOS and Debian/Ubuntu – Part 1
- How to Configure Zabbix to Send Email Alerts to Gmail Account – Part 2
- How to Install and Configure Zabbix Agents on Remote Linux – Part 3
Step 1: Download and Install Zabbix Agent on Windows
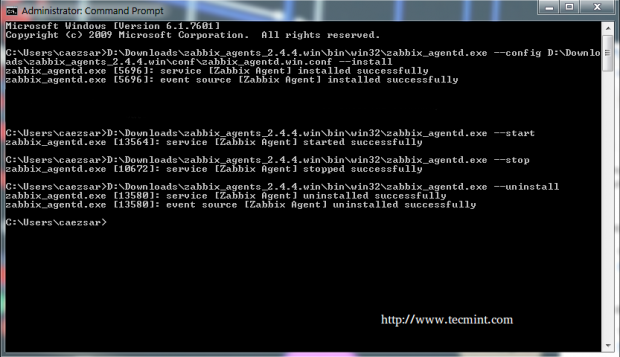
1. The pre-compiled zip agents for Windows environments can be obtained from the official Zabbix download page and manually installed and started on the system using windows Command Prompt as in the following example:
C:\Users\caezsar><full system path to zabbix_agentd.exe> --config <full system path to zabbix_agentd.win.conf> --install
For example, suppose you’ve downloaded and extracted the Zabbix agent zip archive to D:\Downloads\zabbix_agents-5.4.7\, run the following command to install the service:
C:\Users\caezsar>D:\Downloads\zabbix_agent-5.4.7\bin\win32\zabbix_agentd.exe --config D:\Downloads\zabbix_agent-5.4.7\conf\zabbix_agentd.conf --install
2. After the service has been installed on your Windows host, open zabbix_agentd.win.conf file and manually edit the following parameters:
Server=IP of Zabbix Server
ServerActive=IP of Zabbix Server
Hostname=use the FQDN of your windows host
3. To start the service just type:
C:\Users\caezsar>D:\Downloads\zabbix_agents-5.4.7\bin\win32\zabbix_agentd.exe --start
To stop the service run the same command as above with --stop argument and to uninstall the service use the --uninstall argument.
C:\Users\caezsar>D:\Downloads\zabbix_agent-5.4.7\bin\win32\zabbix_agentd.exe --stop
C:\Users\caezsar>D:\Downloads\zabbix_agent-5.4.7\bin\win32\zabbix_agentd.exe --uninstall
4. A second and more convenient method to install and automatically configure the Zabbix agent on Windows environments is by downloading the Zabbix Agent installer MSI package specific to your system architecture.
5. Once the Zabbix agent MSI file has been downloaded on your system, run it and supply the required information in order to configure and install the agent on the target monitored host as it follows:
Hostname: use the FQDN of your windows host (the hostname value should match the “Full Computer name” configured for your machine)
Zabbix server Name: use the IP of the Zabbix Server
Agent Port: 10050
Remote Command: check this value
Active Server: IP of Zabbix Server
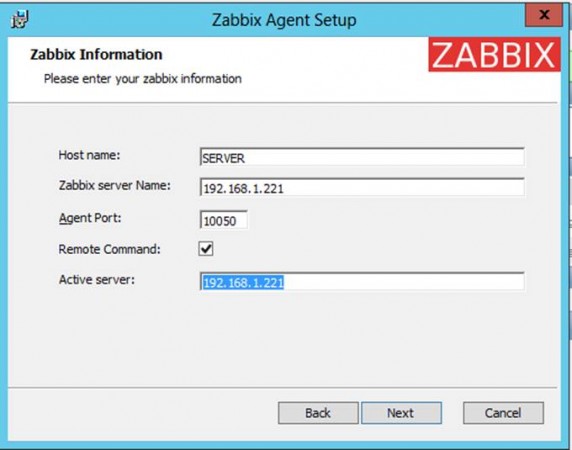
If you need to modify the Zabbix configuration file with other custom values at a later date, the conf file can be found on the %programfiles%\Zabbix Agent\ path.
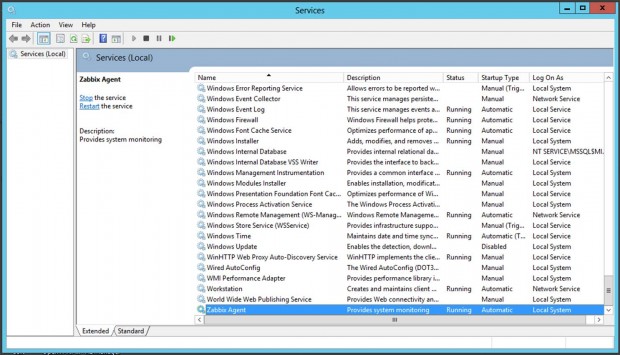
6. After you’ve finished the setup, open Windows Command Prompt with Administrator privileges, run services.msc command in order to open Windows Services utility, and locate Zabbix Agent service to check if the service is running and automatically started after reboot.
services.msc
From this console, you can manage the service (start, stop, pause, resume, enable or disable).
Step 2: Configure Windows Firewall and Test Zabbix Agent
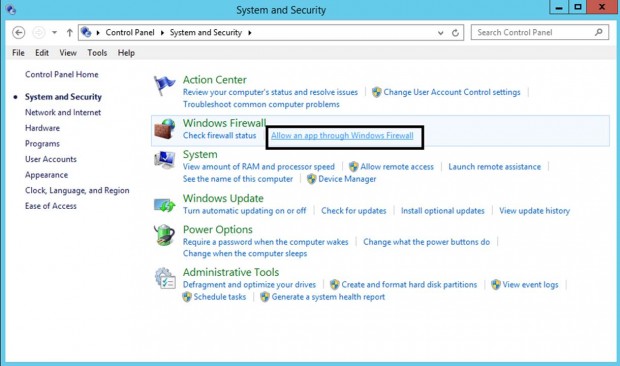
7. Almost all Windows-based systems have Windows Firewall active and running, therefore Zabbix agent port must be opened in the firewall in order to communicate with the Zabbix server.
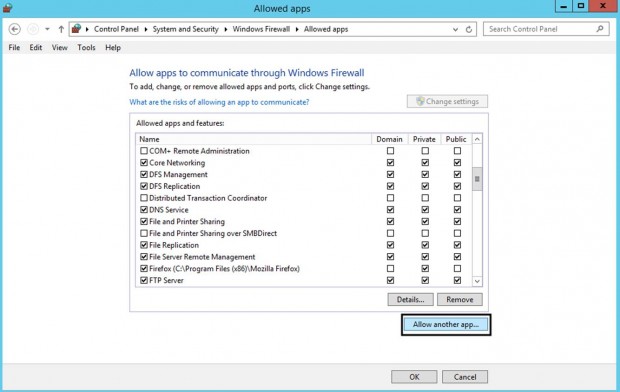
In order to open the Zabbix agent port in the windows firewall, open Control Panel -> System and Security – > Windows Firewall and hit on Allow an app through Windows Firewall.
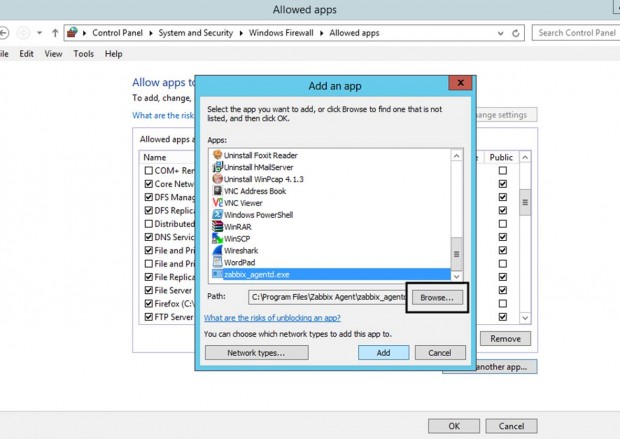
8. Next, click on Allow another app button and a new window should open. Use the Browse button to navigate and add Zabbix agent executable file (usually found in %programfiles%\Zabbix Agent\ if you installed it using MSI program), then hit on Add button to add the service.
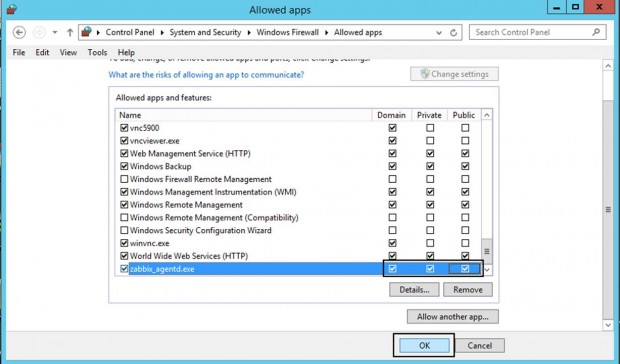
9. Next, make sure you check and open the firewall rule on the network segment where the Zabbix server is located in your network and hit the OK button to finish and apply the configuration.
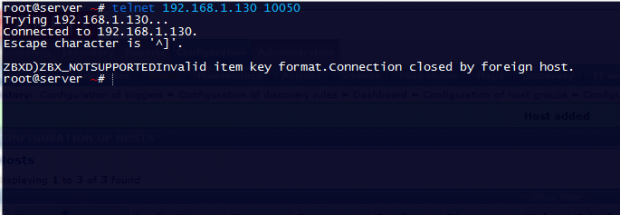
10. In order to test if the Zabbix agent running on windows is reachable from the Zabbix server-side, use telnet or netcat command on Zabbix server against windows agent IP-Port and a Connected message should appear. Hit Enter key to generate an error message and automatically disconnect from the agent:
telnet <Windows_agent IP Address> 10050
Step 3: Add Zabbix Agent Monitored Windows Host to Zabbix Server
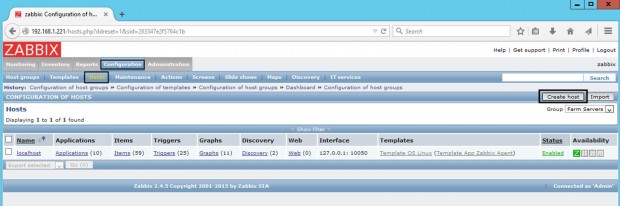
11. Once the windows agent has been tested from the command line and everything looks fine, go to Zabbix Server web interface, move to Configuration tab -> Hosts, and hit on Create Host button in order to add the Windows monitored host.
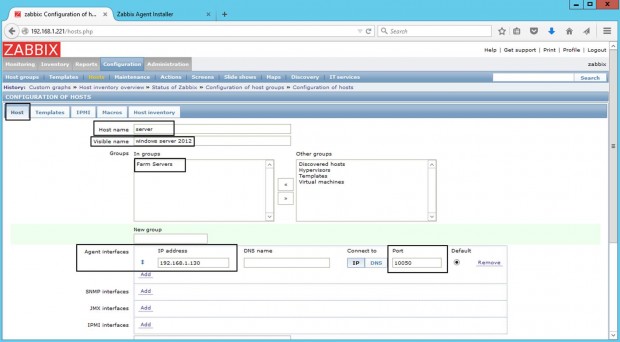
12. On the Host window add the FQDN of your windows agent machine in Hostname filed, add an arbitrary name to Visible name filed in order to easily identify the monitored machine on Zabbix panel, make sure the host is included in a Group Servers, and add the IP Address of your windows host in Agent interfaces filed. The Port value leaves it unchanged.
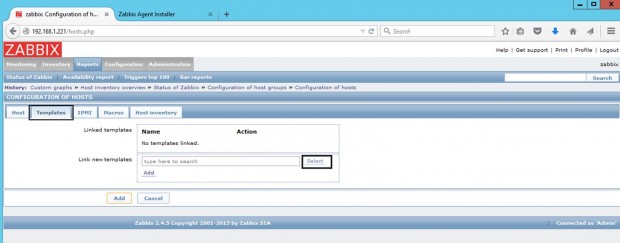
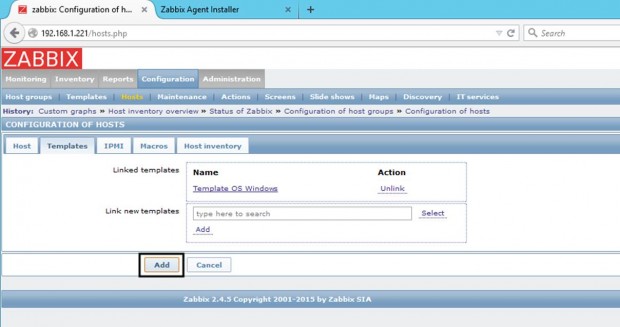
13. Next, go to the Template tab and hit on Select button. A new window with Zabbix Templates should appear. Navigate through this window, check Template OS Windows, and hit on Select button to add the template.
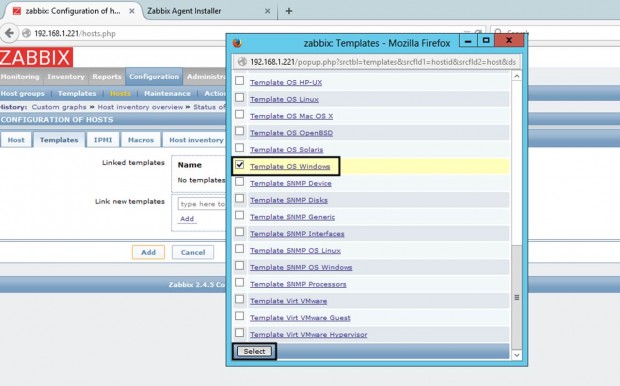
14. Once the Template OS Windows appears on Link new templates filed, hit on Add button in order to link this template to the windows host configuration.
Finally, after the Template OS Windows is visible in Linked Templates filed hit on the below Add button to complete the process and add the entire Windows host configuration.

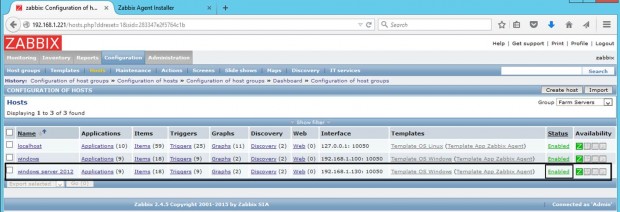
15. After your monitored windows machine has been added return to Configuration -> Hosts and the windows Host should now be present in this window as illustrated below screenshot.
That’s all! Just assure that your windows host Status is set to Enabled and wait a few minutes in order for the Zabbix server to contact the windows agent side and process the received remote data.
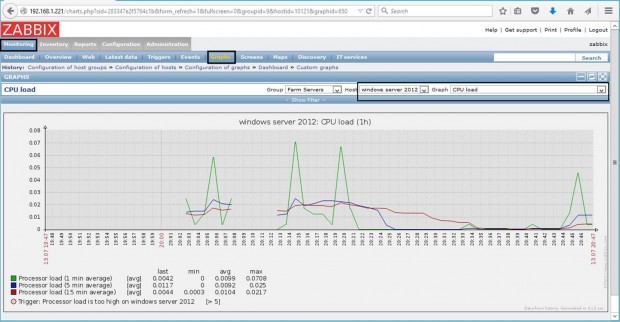
As an example, to get a graphical inside of the CPU load on the monitored Windows machine go to Zabbix web console Monitoring tab -> Graphs, select the windows machine host name and CPU load Graph and all the collected data so far should be presented into a nice graphical chart.


Hi,
I am having problems with the agent, Zabbix server cant read the network interface from Zabbix agent. in log I get error
active check "net.if.in["Broadcom BCM5709C NetXtreme II GigE (NDIS VBD Client)",dropped]" is not supported: Cannot obtain network interface information.I am using HyperV on this server and have a virtual network that is connected to the virtual switch. Zabbix agent is trying to get information from my physical network on the server, and not from the virtual network that has all required information for the network (IP, DNS.. etc)
can I specify to zabbix_agent which interface should it get information from?
Hi man!
I wish the better for you! This tutorial helps me a lot! I was trying for days to enable agent on windows for my zabbix and I lost a little, but very important configuration: Choose a template for station. I searched a lot (on Zabbix Manual too) and I only found here! And now it works!
Thanks a lot!
Hi, i want to know how i can open the interface graphic of zabbix !!! thanks
Navigate to zabbix server ip address
Hi,
I am installing Zabbix on Ubuntu Serve 16.04. I can install everything. when I add new windows host, got some error like “ERROR: Cannot add host, Incorrect arguments passed to function.“. I have installed zabbix-agentd on windows and pointing to the correct ip address of Zabbix server.
I can telnet from Zabbix Server to the clients and windows firewall on the client has been allowed zabbix-agent for all network zone. can you give me some steps to fix this?
Thanks,
Sor
Hi Matei,
This is a nice guide, but how can i do it on a public IP? My zabbix server is on my premise but the agent is on a different block( Public IP)
Thanks!
use the public clients IPs or use a VPN solution to connect external clients to your premises.
Hi,
What are the systems requirements for the installation of Zabbix Agent on a host?
1. How much disk space does it take?
2. How much storage does it take?
3. What’s the CPU load?
https://www.zabbix.com/documentation/2.0/manual/installation/requirements
Hello
I installed the agent and I can connect with my zabbix server via Telnet.
But my zabbix can’t monitor my server.
In the log files there is ‘cannot send list of active checks to “ipadress”: host “hostname” not found’
Can you help me?
Set the monitored system hostname to match the IP Address
I followed the guide, added success windows server into zabbix to monitor. guys after added server please reload the zabbix services and wait for whole configuration is reloaded in back end it may be take 5 min or more..
Nice guide, all OK!
So one question. How can i add DHCP Windows Clients?
My network have lot of Win 7 clients, how can i add all?
Thanks for guide!
You need to configure Windows clients with static IP addresses. If you use a DHCP server to automatically assign IP addresses to windows clients on you network then you need to manually instruct DHCP server to assign the same IP address for each client based on the specific NIC’s MAC address, even if you use a Linux or Windows DHCP server.
Also, don’t forget that every monitored windows host need to have Zabbix agent installed and configured.
I followed the guide, added susccess windows server into zabbix to mornitor
But i got some problem when showing total memory, graph no display anything , it’s just empty
@Matei Cezar: Can you help me?
Thank so much
Does other graphs concerning that specific windows host impose the same same problem, no data appears? What about other hosts graphics, or linux hosts? Their graphs are displayed? Did you test the zabbix agent using telnet to see if it’s reachable from zabbix server? A blind suggestion for now would be to check the time on the windows monitored host to see if it’s synchronized with Zabbix server.Also, on zabbix server check the php.ini timezone setting!