MySQL is a powerful open source Relational Database Management System or in short RDBMS. It was released back in 1995 (20 years old). It uses Structured Query Language which is probably the most popular choice for managing content within a database. The latest MySQL version is 5.6.25 and was released on 29 May 2015.
An interesting fact about MySQL is the fact that the name comes from Michael Widenius’s (MySQL’s creator) daughter My. Even though there are plenty of interesting facts about MySQL, this article is meant to show you some useful practices to help you manage your MySQL server.
In April 2009 the MySQL project was bought by Oracle. As a result a MySQL community fork called MariaDB was created. The main reason for creating the fork was to keep the project free under the General Public License.
Today MySQL and MariaDB are one of the most (if not the most) frequently used RDBMS used for web applications such as WordPress, Joomla, Magento and others.
This article will show you some basic, yet useful tips how to optimize the fine tune the performance of MySQL/MariaDB. Please keep in mind that this article assumes that you already have MySQL or MariaDB installed. If you are still wondering how to install them on your system, you can follow our extensive guides here:
- Installing LAMP on RHEL/CentOS 7
- Installing LAMP on Fedora 22
- Setting Up LAMP on Ubuntu 15.04
- Installing MariaDB on Debian 8
- Install MariaDB on Gentoo Linux
- Install MariaDB on Arch Linux
Important: Before we start – do not accept this suggestions blindly. Each MySQL setup is unique and requires additional thought, before making any changes.
Things you need to know:
- MySQL/MariaDB configuration file is located in
/etc/my.cnf. Every time you modify this file you will need to restart the MySQL service so the new changes can take effect. - For writing this article MySQL version 5.6 has been used as template.
1. Enable InnoDB file-per-table
First it is important to explain that InnoDB is a storage engine. MySQL and MariaDB use InnoDB as default storage engine. In the past MySQL used to keep database tables and indexes in a system tablespace. This approach was meant for servers which sole purpose is database processing and their storage disk is not used for any other purposes.
The InnoDB provides more flexible approach and each database information is kept in a .ibd data file. Each .ibd file represents a tablespace of its own. That way database operations such as “TRUNCATE” can be completed faster and you may also reclaim unused space when dropping or truncating a database table.
Another benefit of this configuration is the fact that you can keep some of the database tables in a separate storage device. This can greatly improve the I/O load on your disks.
The innodb_file_per_table is enabled by default in MySQL 5.6 and above. You can see that in /etc/my.cnf file. The directive looks like this:
innodb_file_per_table=1
2. Store MySQL Database Data on Separate Partition
Note: This setup only works with MySQL, but not with MariaDB.
Sometimes OS read/writes can slow down the performance of your MySQL server, especially if located on same hard drive. Instead, I would recommend using separate hard drive (preferably SSD) for the MySQL service.
To complete, this you will need to attach the new drive to your computer/server. For the purpose of this article, I will assume that the drive will be under /dev/sdb.
The next step is to prepare the new drive:
# fdisk /dev/sdb
Now press “n” to create new partition. Next press “p” to make the new partition primary. After that, set the partition number from 1-4. After that you will select the partition size. Press enter here. On the next step you will need to configure the size of the partition.
If you wish to use the entire disk press enter once more. Otherwise you can manually set the size of the new partition. When ready press “w” to write the changes. Now we will need to create a filesystem for our new partition. This can be easily done with:
# mkfs.ext4 /dev/sdb1
Now we will mount our new partition in a folder. I have named my folder “ssd” and created in the root directory:
# mkdir /ssd/
We are ready to mount the new partition we just made in the new folder:
# mount /dev/sdb1 /ssd/
You can perform the mount at startup by adding the following line in /etc/fstab file.
/dev/sdb1 /ssd ext3 defaults 0 0
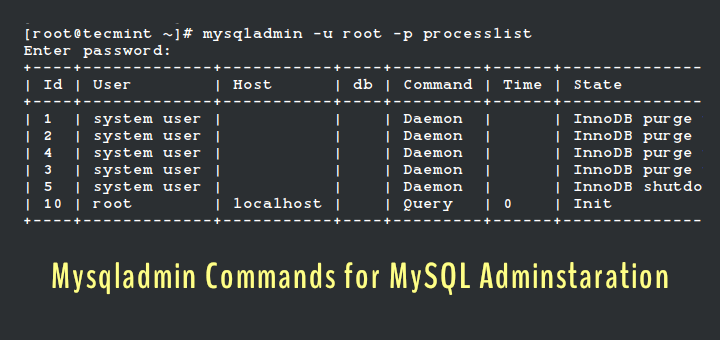
Now you are ready to move MySQL to the new disk. First stop the MySQL service with:
# service mysqld stop
I would recommend you stopping Apache/nginx as well to prevent any attempts to write in the databases:
# service httpd stop
# service nginx stop
Now copy the entire MySQL directory in the new drive:
# cp /var/lib/mysql /ssd/ -Rp
This may take a while depending on the site of your MySQL databases. Once this process is complete rename the MySQL directory:
# mv /var/lib/mysql /var/lib/mysql-backup
Next we will create a symlink.
# ln -s /ssd/mysql /var/lib/mysql
Now you are ready to start your MySQL and web service:
# service mysqld start
# service httpd start
# service nginx start
At this point your MySQL databases will be accessed from the new drive.


Hello ,
I got a dedicated server with the following characteristics.
On Linux server with Centos7 installs and more detailed specifications below.
The problem with this is that I do not know the correct configuration for the error problem 504 Gateway Timeout Error, and I usually have this error on sites.
Someone guides me?
What are the best settings & config for “my.cnf” “nginx.cnf” “php.ini”? Guidance if possible?
thanks .
I have been learning more and more about tuning/hardening from your website when referencing Maria/DB. Thanks for the great presentations and the easy to copy one-liners for my SSH session. Cheers!
I really appreciate your explanation and problem solving methodologies. It’s Awesome article. Thank you very much for the time and effort.
Good job!
Does not work anymore: “Error: mysqlcheck doesn’t support multiple contradicting commands.”
You will have to execute the repair and optimize separately.
Really helpful
Formatted the fs as ext4 then write fstab using ext3. Makes no sense.
“2. Store MySQL Database Data on Separate Partition Note: This setup only works with MySQL, but not with MariaDB.”
Same question as “Asd”, why? Would have been better to include that in the article.
Also, rather than link, I just mounted the second drive at “/var/lib/mysql”.
15. Optimize and Repair is applicable only for tables of myisam storage engine i think so..
At RHEL based systems you should call fdisk with “-c” to disable dos compatible mode which results in proper alignment of your disks.
Nice article :)
This seems to be incorrect/typo. Section 14 has “The tool is called musqltunner”. Should be “mysqltuner”
@Nick,
Corrected that typo….
“2. Store MySQL Database Data on Separate Partition
Note: This setup only works with MySQL, but not with MariaDB.”
Why? And why in 2015 ext3? :)
Excellent, thank you I will review it thoroughly.