Linux distributions have done a great job to get additional protection by bringing full disk encryption and being the market leader.
Ubuntu also is bundled with numerous features and disk encryption is one of them. Enabling full disk encryption is crucial for those who want to secure their private data at any cost even if your device is stolen as it requires you to enter the passcode at each boot.
The full disk encryption can only be enabled while installing the Operating System as the full disk encryption will be applied to each partition of your drive which also includes the boot and swap partition. And this is the reason why we are required to enable it from the beginning of the installation.
This step-by-step tutorial will guide you on how you can enable full disk encryption on Ubuntu 22.04 and for that purpose, we are going to utilize the LVM (Logical Volume Management) and LUKS (for encryption purposes).
Prerequisites:
- A bootable USB drive.
- Internet connection with enough bandwidth to download large files.
- UEFI enabled motherboard.
But before jumping to the process, let’s have a brief idea about the pros and cons of Disk Encryption.
Pros and Cons of Disk Encryption
Each feature is bundled with its pros and cons and this is also applicable in the case of disk encryption. So it is always a good idea to know what to expect and what not from the steps which are going to make.
Pros:
- Protects your sensitive data from theft – Yes, this is the most exciting feature of disk encryption as your private data will always be secured even if your system is stolen. This point is more appropriate in the case of mobile devices such as Laptops which has more chances of being stolen.
- Saves your data from surveillance – The chances of your system being hacked are minimal on Linux but can be done if the user is not smart enough to protect himself from fishy scams. Even if your computer is under attack, the hacker won’t be able to access your data which is another proof enabling it.
Cons:
- Impact on Performance – This can be only applied to the systems with few resources as the modern computer can handle the encryption without any issue but still you will find a little slower read and write speeds while usage.
According to us, full disk encryption is always the wise choice as it offers plenty of pros while it is easy to overcome the cons with a few more resources. So if you are ok with a little performance drop for better security, let’s start the encryption process.
Encrypting Entire Disk in Ubuntu 22.04
This is beginner friendly guide and it is supposed to guide you through each step meanwhile advanced users can still benefit from it.
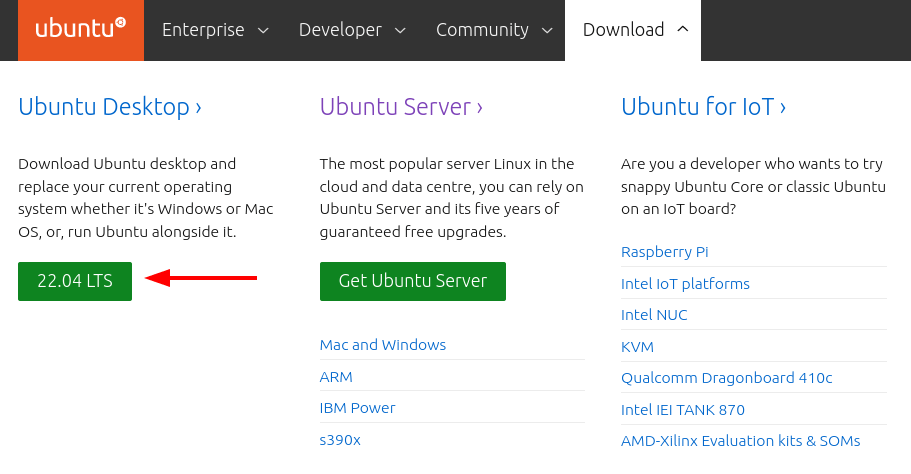
Step 1: Download Ubuntu 22.04 ISO
Visit the official Ubuntu download page and choose the Ubuntu 22.04 LTS version, which will automatically start downloading it.
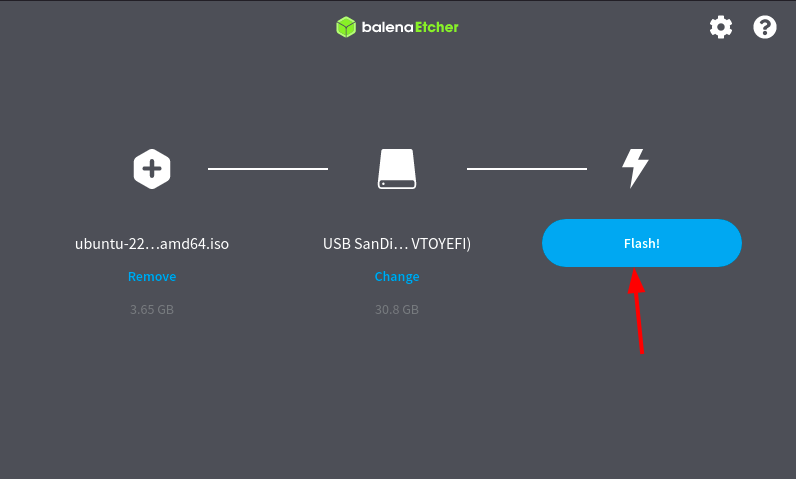
Step 2: Create a Bootable Ubuntu USB Drive
To flash the Ubuntu ISO image to the USB drive, we are going to use Balena Etcher, which will automatically detect the OS that you are currently using. Once you are done installing Balena Etcher, install it on your system.
To burn the ISO file, open balenaEtcher and select the “Flash from file” option and choose the recently downloaded Ubuntu 22.04 ISO file.
Next, choose the drive on which we want to flash the ISO file. Choose the “Select target” option and it will list all the mounted drives on your system. From the available options, choose the USB or DVD drive.
Once we have successfully flashed our USB drive, it’s time to boot from the USB drive. To boot from USB, reboot your system and use F10, F2, F12, F1, or DEL while your system boots up. From there, you have to choose your USB as your boot drive.
Step 3: Start Ubuntu Installation Using USB Drive
Once we are booted through USB, we can proceed to the partitioning and encryption part. This might overwhelm some new users as it might look complex but you just have to follow each step and you will get your system encrypted in no time.
NOTE: Some commands are different for Nvme SSD users so please read the instruction before applying the command as we have separated them when required.
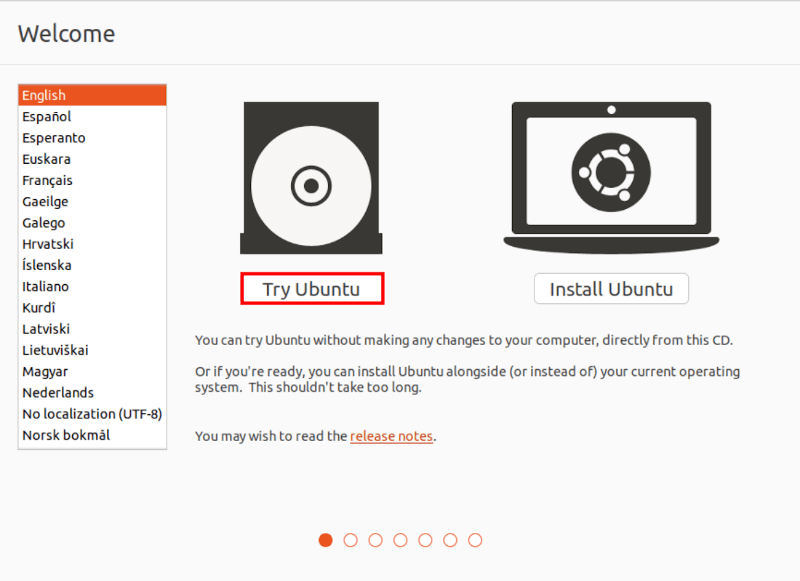
Once you boot into Ubuntu, you will get two options: Try Ubuntu and Install Ubuntu. As we are going to encrypt partitions, we are required to use a live environment. So select the first option labeled “Try Ubuntu”.
Click on Activities situated at the top left and type search for Terminal. Hit Enter on the first result and it will open Terminal for us. Next, switch to the root user, as all of the commands which we are going to use are going to require administrative privileges.
$ sudo -i
As the upcoming commands will highly rely on BASH, let’s switch from our default shell to BASH by the following command:
# bash
Next, identify the installation target, we are required to list all the mounted storage devices by the following command:
# lsblk

You can easily identify the target partition by size and in most cases, it will be named as sda and vda. In my case, it’s sda with the size of 20GB.
Allocate Variable Names to the Target Device (for HDD and SATA SSDs)
This section is only applicable for you if you are using HDD for SATA SSDs. So if you are someone equipped with Nvme SSD, allocating variable names is explained in the below step.
As my target device is named sda, I’m required to use the following command:
# export DEV="/dev/sda"
Allocate Variable Names to the Target Device (for Nvme SSDs Only)
If you are someone who is using Nvme, the naming scheme for your target device will be as /dev/nvme${CONTROLLER}n${NAMESPACE}p${PARTITION} so if there is only one partition, it would likely have a similar name to given command:
# export DEV="/dev/nvme0n1"
Now, let’s configure the variable for the encrypted device mapper by the following command:
# export DM="${DEV##*/}"
Each Nvme device will need ‘p’ in suffix so use given commands to add suffix:
# export DEVP="${DEV}$( if [[ "$DEV" =~ "nvme" ]]; then echo "p"; fi )"
# export DM="${DM}$( if [[ "$DM" =~ "nvme" ]]; then echo "p"; fi )"
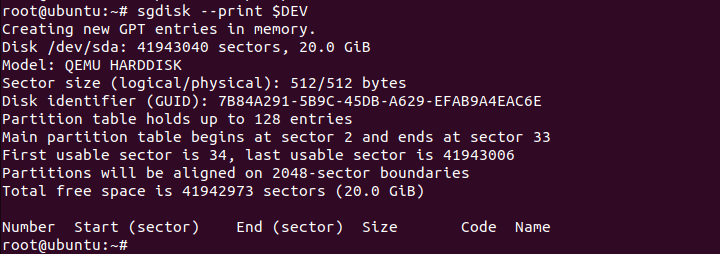
Step 4: Create a New GPT Partition
To create a new GPT partition table, we are going to utilize the sgdidk utility with the following command:
# sgdisk --print $DEV
Now we can safely remove all the data available but if you are installing this system alongside existing partitions, please avoid this step.
To format the data, utilize the following command:
# sgdisk --zap-all $DEV

Step 5: Create a New Partition for Installation
We are going to allocate a 2MB partition for BIOS-mode GRUB’s core image, 768MB boot partition, and 128MB for the EFI file system, and the remaining space will be allocated to the user where you can store your desired data.
Use the given commands one by one to partition your drive:
# sgdisk --new=1:0:+768M $DEV
# sgdisk --new=2:0:+2M $DEV
# sgdisk --new=3:0:+128M $DEV
# sgdisk --new=5:0:0 $DEV
# sgdisk --typecode=1:8301 --typecode=2:ef02 --typecode=3:ef00 --typecode=5:8301 $DEV
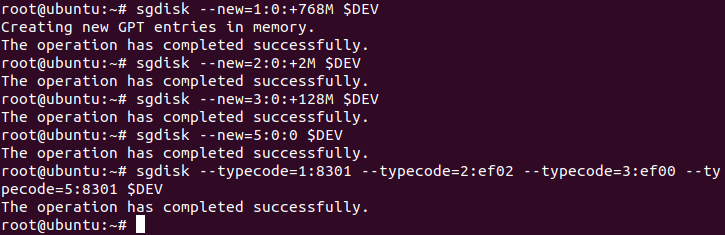
To change the name of partitions, use the given commands:
# sgdisk --change-name=1:/boot --change-name=2:GRUB --change-name=3:EFI-SP --change-name=5:rootfs $DEV
# sgdisk --hybrid 1:2:3 $DEV

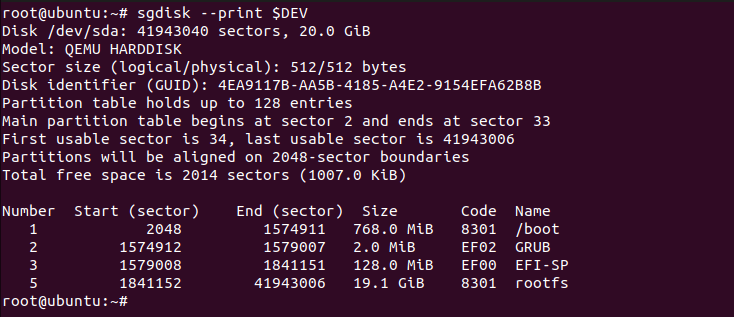
To list recently created partitions, use the following command:
# sgdisk --print $DEV
Step 6: Encrypting Boot and OS Partition
For HDD and SATA SSDs Only
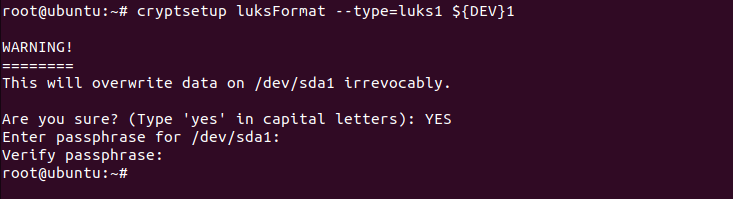
Let’s start our encryption process by encrypting the boot partition. You are required to type YES in all caps when it asks for your permission.
# cryptsetup luksFormat --type=luks1 ${DEV}1
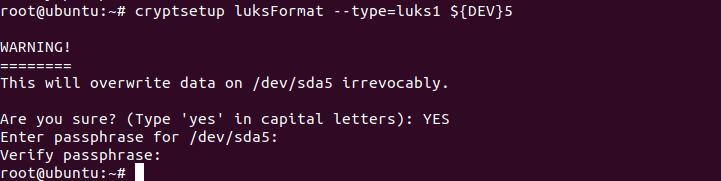
Now, let’s encrypt the OS partition by the following command:
# cryptsetup luksFormat --type=luks1 ${DEV}5
For further installation, we must unlock the encrypted partitions by using the following commands to unlock the boot and OS partitions.
# cryptsetup open ${DEV}1 LUKS_BOOT
# cryptsetup open ${DEV}5 ${DM}5_crypt
For Nvme SSDs Only
This step is only applicable if your system is equipped with Nvme SSD. Use the following commands to encrypt the boot and OS partitions:
# cryptsetup luksFormat --type=luks1 ${DEVP}1
# cryptsetup luksFormat --type=luks1 ${DEVP}5
Now, let’s unlock the encrypted partitions as it is necessary for us to process further in installation.
# cryptsetup open ${DEVP}1 LUKS_BOOT
# cryptsetup open ${DEVP}5 ${DM}5_crypt
Step 7: Format Partitions
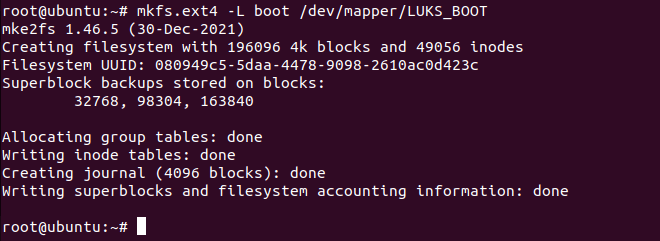
This is one of the most crucial steps as if not done, the installer will disable the ability to write file-system. Use the following command to start formatting:
# mkfs.ext4 -L boot /dev/mapper/LUKS_BOOT
Format EFI-SP partition (for HDD and SATA SSDs Only)
If your system is equipped with HDD and SATA SSD, use the following command to format it in FAT16:
# mkfs.vfat -F 16 -n EFI-SP ${DEV}3
Format EFI-SP partition (for Nvme SSDs Only)
So if your system is using Nvme SSD, you can easily format the 3rd partition using the following command:
# mkfs.vfat -F 16 -n EFI-SP ${DEVP}3
Step 8: Create Logical Volume Groups
LVM is one of those functions which I admire the most. Even if you don’t use LVM features, enabling it won’t harm your system and in the future, if you need any feature that LVM provides, you can use them without any issues.
Here, we are going to allocate 4GB to the swap partition which will use disk space when the system runs out of memory. We are also allocating 80% of free space to root so the user can utilize his disk space to max potential.
Of course, you can change it according to your use cases and even modify it in the future. Use the given commands one by one and your system will be LVM-ready in no time:
# pvcreate /dev/mapper/${DM}5_crypt
# vgcreate ubuntu--vg /dev/mapper/${DM}5_crypt
# lvcreate -L 4G -n swap_1 ubuntu--vg
# lvcreate -l 80%FREE -n root ubuntu--vg

Step 9: Start Ubuntu Installer
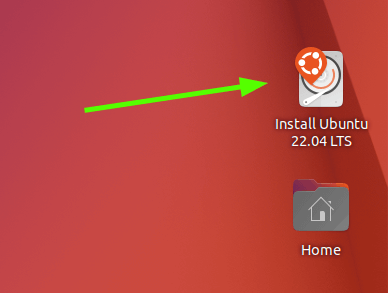
It’s time to start the Ubuntu installer. Just minimize the installer and you will find the installer on the home screen.
Whether you go with normal installation or minimal, it is up to you but some options are required to be selected to get you a better experience, and that are installing updates and third-party drivers and codecs which will surely improve your user experience and save you time after installation.

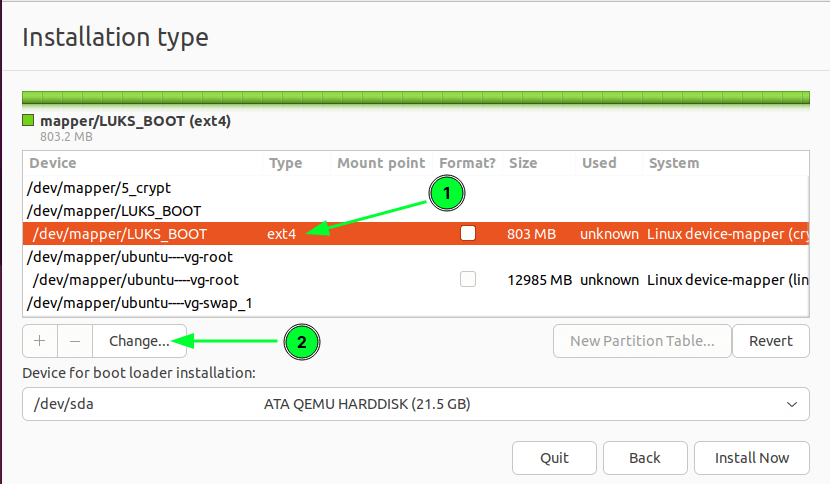
In the section of installation type, select the option labeled “Something else” which will help us to manage partitions that we have just created manually.
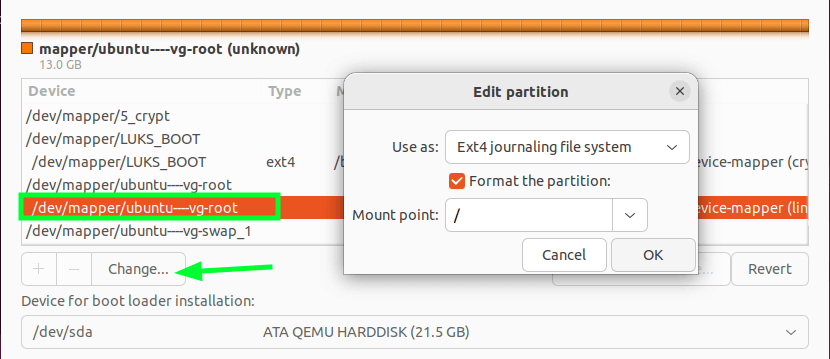
Here, you will find multiple partitions with the same name. You can easily identify the original one as the installer will mention the taken size. Now, let’s start with LUKS_BOOT.
Select LUKS_BOOT and click on the change button.
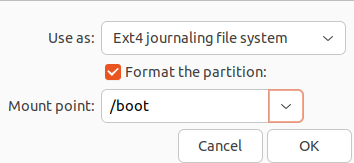
Now, select the Ext4 journaling file system in the first option. Enable Format the partition option and in mount point, select /boot.
Similarly, select ubuntu–vg-root and click on the change button. Here, select the Ext4 journaling file system in the first option. Enable Format the partition option and in the last one, choose the “/” option.
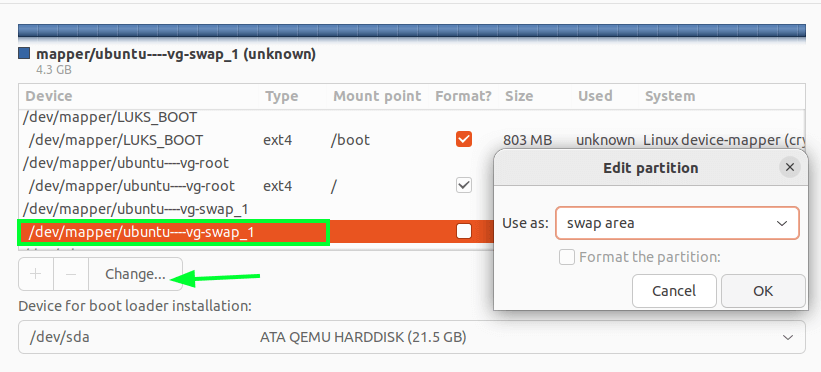
Now, select ubuntu–vg-swap_1 and click on the options button. Select the swap area option and that’s it.
Finalize the changes and choose your current location.
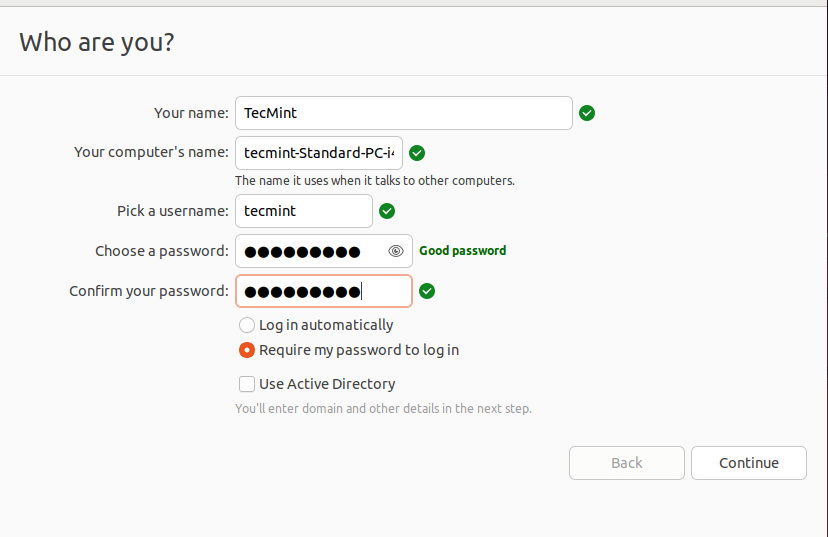
After creating the user, don’t click on the install now button as we are going to apply some commands just after creating a new user. Create the user with a strong password.
Step 10: Enable Encryption in GRUB
Just after you created a user, open your terminal and use the given commands as we are going to enable encryption on GRUB before installation starts:
# while [ ! -d /target/etc/default/grub.d ]; do sleep 1; done; echo "GRUB_ENABLE_CRYPTODISK=y" > /target/etc/default/grub.d/local.cfg

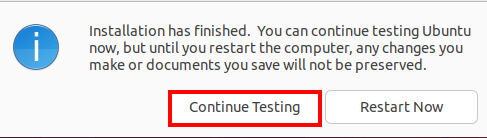
Once the installation is done, click on continue testing as we are going to some changes which still require us to use a bootable drive.
Step 11: Ubuntu Post-Installation Configuration
In this section, we are going to mount drives, install required packages, and make some necessary changes to make encryption work. So open your terminal and follow the given steps:
Create Chroot-Environment
Chroot is used to access the partitions on which we have just installed Ubuntu. Use the given commands one of which involves mounting drive and creation of chroot-environment.
# mount /dev/mapper/ubuntu----vg-root /target
# for n in proc sys dev etc/resolv.conf; do mount --rbind /$n /target/$n; done
# chroot /target
# mount -a

Install Cryptsetup-initramfs Package
Cryptsetup package will be responsible to unlock encrypted files at boot time and we can easily install it by given command:
# apt install -y cryptsetup-initramfs
Add Key Files and Supporting Scripts
The key file will be used to cross-check the passcode for decryption and it is saved at /boot/ which is also an encrypted partition. Use the given command to proceed further:
# echo "KEYFILE_PATTERN=/etc/luks/*.keyfile" >> /etc/cryptsetup-initramfs/conf-hook
# echo "UMASK=0077" >> /etc/initramfs-tools/initramfs.conf
Create a Key File and Add it to LUKS
We are going to create a key file of 512 bytes, make it secure, and also are going to add encrypted volumes. You can achieve that by utilizing the given commands:
# mkdir /etc/luks
# dd if=/dev/urandom of=/etc/luks/boot_os.keyfile bs=512 count=1
# chmod u=rx,go-rwx /etc/luks
# chmod u=r,go-rwx /etc/luks/boot_os.keyfile
Adding Keys to boot_os.file and Crypttab (for HDD and SATA SSDs Only)
This is supposed to be one of the last steps as we are pretty close to successfully encrypting our system. Use the following command to add keys at boot_os.key file.
# cryptsetup luksAddKey ${DEV}1 /etc/luks/boot_os.keyfile
# cryptsetup luksAddKey ${DEV}5 /etc/luks/boot_os.keyfile
To add keys to crypttab, use the following command:
# echo "LUKS_BOOT UUID=$(blkid -s UUID -o value ${DEV}1) /etc/luks/boot_os.keyfile luks,discard" >> /etc/crypttab
# echo "${DM}5_crypt UUID=$(blkid -s UUID -o value ${DEV}5) /etc/luks/boot_os.keyfile luks,discard" >> /etc/crypttab
Adding Keys to boot_os.file and Crypttab (for Nvme SSDs Only)
If you are using Nvme SSD, you can utilize the following command to add keys at boot_os.file:
# cryptsetup luksAddKey ${DEVP}1 /etc/luks/boot_os.keyfile
# cryptsetup luksAddKey ${DEVP}5 /etc/luks/boot_os.keyfile
Similarly, to add keys in crypttab, use the following command:
# echo "LUKS_BOOT UUID=$(blkid -s UUID -o value ${DEVP}1) /etc/luks/boot_os.keyfile luks,discard" >> /etc/crypttab
# echo "${DM}5_crypt UUID=$(blkid -s UUID -o value ${DEVP}5) /etc/luks/boot_os.keyfile luks,discard" >> /etc/crypttab
Update Initialramfs Files
Now let’s update initialramfs files as it will add unlocking scripts and key-file by the following command:
# update-initramfs -u -k all

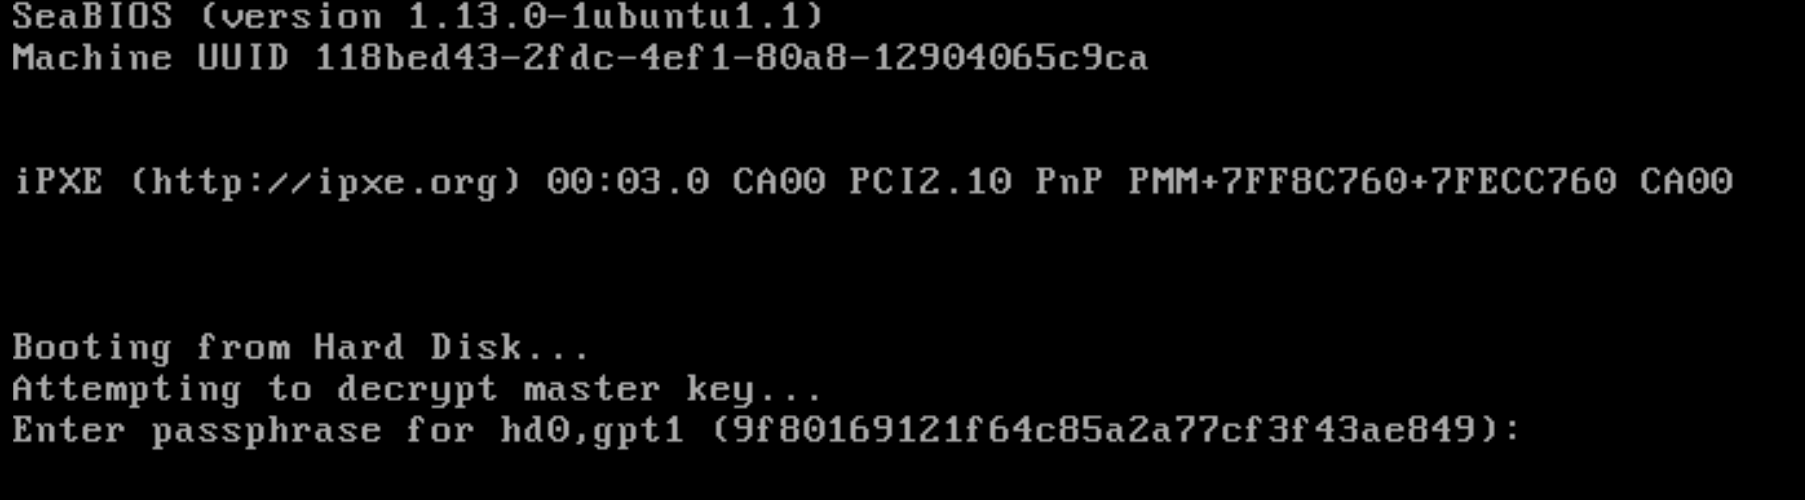
Now, reboot your system and it will get you to the GRUB pass-phrase prompt to boot your system.
The main intention behind this guide was to make an easy-to-follow procedure where even beginner can secure their system by enabling full disk encryption in Ubuntu.


Ravi, great directions! However, you forgot to include:
along with the `update-initramfs` command at the end of your instructions.
Hi!
On my Acer Swift Go 14, I now have only Ubuntu 22.04 LTS with the boot partition LUKS1-encrypted and the root partition LUKS2-encrypted.
I just followed your article “How to Encrypt Full Disk While Installing Ubuntu 22.04“! I have an NVMe SSD on my laptop. So, if I now wish to update from Ubuntu 22.04 to Ubuntu 24.04 and still keep this exact encryption setup with encrypted boot and root, how would I achieve it?
Tell me if you know a way, or can you find out what in this article needs to be changed to make it work for manually encrypting Ubuntu 24.04 during installation?
@Christian,
Hi! Thank you for following the article.
To update from Ubuntu 22.04 to Ubuntu 24.04 while maintaining your exact encryption setup with both the boot partition LUKS1-encrypted and the root partition LUKS2-encrypted, you will need to follow a manual process since the default installer doesn’t provide this specific configuration.
Warning: Before proceeding, ensure that you have backed up all important data. The following steps involve manual partitioning and encryption which can result in data loss if not done correctly. Proceed with caution and make sure you are comfortable with using terminal commands and managing disk partitions.
Here’s a step-by-step guide:
1. Download the Ubuntu 24.04 LTS ISO from the official website and Create a bootable USB drive using tools like Rufus or balenaEtcher.
2. Insert the Live USB into your Acer Swift Go 14 and boot from it.
3. Choose “Try Ubuntu” to enter the live session.
4. Set up LUKS encryption for the boot partition:
5. Set up LUKS encryption for the root partition:
6. Mount the partitions.
7. Start the Ubuntu installer from the live session. When asked about the installation type, choose “Something else” to perform manual partitioning.
8. Follow the remaining steps of the installer to complete the installation.
9. After the installation is complete, do not reboot yet. Instead, chroot into the new system:
10. Configure the initramfs to unlock both partitions at boot by editing /etc/crypttab file:
Add the following lines:
You can get the UUIDs by running:
11. Update the initramfs and GRUB configuration:
12. Exit chroot and reboot:
By following these steps, you should be able to upgrade to Ubuntu 24.04 while keeping your boot and root partitions encrypted with LUKS1 and LUKS2, respectively. If you encounter any issues or have further questions, feel free to ask!
Hi,
Is it possible for me to use Ubuntu 24.04 LTS to encrypt my USB using this method?
Thanks
@JQ,
Yes, you can use Ubuntu 24.04 LTS to encrypt your USB using the method outlined in this article.
Hi,
Can you try to find out how to achieve the same setup on Ubuntu 24.04 for encrypting the boot, swap, and root partitions as described in the article.
I tried following the article step by step, but it doesn’t boot to the start page after encrypting and installing. I would really like to have this setup on Ubuntu 24.04, as I used it on Ubuntu 22.04, and it worked very well.
Thank you.
@Christian,
Hi,
Thank you for your feedback. I understand the need for an updated guide. I will write a separate article on how to achieve the same setup for encrypting the boot, swap, and root partitions on Ubuntu 24.04.
Stay tuned for the new article!
Thank you for your patience.
Thanks a lot. When do you think you will have it ready?
@Christian,
Here is the article that demonstrates how to encrypt the full disk during Ubuntu 24.04 installation: [Encrypt Ubuntu 24.04 Installation]
Hi! It works 100%! I am using nvme ssd on a Lenovo IdeaPad 3. I was wondering how a setup with a btrfs filesystem for root could work in this fde setup? which of the commands would be different and how? Do you think you can help?
It is a pity, that it contains a few mistakes and therefore its goal was not reached. It is not for beginners. However, I testify that I have been successful through this procedure.
So if you need full disk encryption including /boot partition, which is not available via GUI, it is possible to use it and the author deserves credit for putting work into it.
Please note that recent Ubuntu update (from middle of March 2024) if installed it will break your installation and your PC will not boot anymore!
You will be watching grub prompt rolling down your screen in disbelieve and swearing loudly at those guys in Canonical, who created this evil update.
The only option to install Ubuntu 22.04 with boot encryption now is to uncheck “download updates during install” installation option in standard Ubuntu installer, otherwise your PC will be automatically updated and therefore will not boot!
Agree, Ubuntu already has nice buttons “Make me happy with encryption, I don’t have time to learn the topic, but just want to believe in security and defence” :)
Thanks for the article, I want to understand what’s going on with the safety of my OS installation under the hood.
@Slav,
You’re absolutely right! Ubuntu’s user-friendly approach to encryption makes it easier for people who want the benefits of security without delving into the technical details.
That is exactly why I don’t use Ubuntu. I’m not a system administrator and neither want nor have time to waste on setting up encrypted drives.
@Mike,
Everyone has their own preferences when it comes to operating systems. For those who prefer a more hands-off approach, there are other user-friendly distributions or OS options.
However, for those interested, Ubuntu has made strides in simplifying many processes, including drive encryption. It’s all about finding what works best for your needs.
This is a joke, right?
Why is Ubuntu used by so many if it is as hard to install as Gentoo?
This is really what is wrong with Linux, so much work goes into a shitty distros, and good ones can’t find maintainers because they all group together with this Ubuntu crap.
Luckily I read this, I was just about to use it for my home server, but Windows & docker seem to be the far superior choice after having read this.
Hi Dieter, in this case, it’s the author of this blog who is at fault for not describing the simpler option of encrypting Ubuntu via the GUI installer.
Ubuntu is known for having a SUPER easy installer, I mean it’s dead simple to install the thing a child could do it. You can click a few buttons to enable full disk encryption while installing Ubuntu THERE IS NO NEED to complete all these complicated steps listed in this blog.
@SecureOpenSource,
I apologize for any confusion caused by this article…
You are absolutely right, when installing Ubuntu using the graphical installer, you can indeed select the option to encrypt the entire disk, including the root partition.
This is done by ticking the “Encrypt the new Ubuntu installation for security” checkbox during the installation process.
Very hard, and easy to do any mistakes during setup. Ubuntu dosen’t have a GUI tool for this?
@Andres,
You can encrypt the disk during fresh Ubuntu installation via GUI installer…
What about the entry for
/in /etc/fstab? isn’t necessary?In my case, I did follow this document completely (except I only encrypted
/and not/boot) and the system is booting up without encrypted-/.This appears to be incomplete.
Step 8 contains a Syntax Error due to auto-formatting
Reads
Should read
I’m sad to report that I’ve run through this routine 8 times now on a VM and it doesn’t work. I’m confident that this whole guide is basically not working and should be marked as such.
I believe the problems are focused on the bootloader. There are also more mistakes in this than I’m willing to go back and add as comments since it doesn’t appear to be maintained.
@Geekazoid,
Sorry for the troubles you facing with this guide, we will update the guide with the newer instructions, till then I suggest you use a native Ubuntu installer to make a LUKS drive.
There are more syntax problems in step 8 with the mistaken use of the $DM variable from your LVME setup steps in the SATA/SSD steps.
# pvcreate /dev/mapper/${DM}5_crypt
# vgcreate ubuntu--vg /dev/mapper/${DM}5_crypt
# lvcreate -L 4G -n swap_1 ubuntu—vg
# lvcreate -l 80%FREE -n root ubuntu--vg
Should be:
True, would be great if you could be fixed.
In “Step 6: Encrypting Boot and OS Partition” under “For HDD and SATA SSDs Only” you have an error, where you reference the $DM var from the LVME setup which is not used at all in the SATA/SSD setup.
Cryptsetup requires the device and mapped name as arguments. You’ve given it the wrong mapped name for your 5th partition, which is “rootfs” in the SATA/SSD setup model.
Your commands:
# cryptsetup open ${DEV}1 LUKS_BOOT
# cryptsetup open ${DEV}5 ${DM}5_crypt
The correct commands:
# cryptsetup open ${DEV}1 LUKS_BOOT
# cryptsetup open ${DEV}5 rootfs
You can confirm this by using lsblk –fs before and after running these commands, so you can see the volumes being mapped.
I followed the procedure twice and still was not able to produce an encrypted Ubuntu 22.0 drive. I spent 5 hours. There were several dead ends like “update-initramfs is disabled since it is running on a read-only media”.
I found a much simpler instruction set that uses the native 22.0 install to make a LUKS drive. I didn’t have to use the command line at all. My advice to others is to disregard these instructions.
Why are you formatting in FAT 16??
Q1. Can you please explain the syntax of
sgdisk --newand why partition number 4 is skipped?Q2. cryptsetup luksFormat –type=luks1 : why not luks2 ?
Answer to Q2: Grub doesn’t support Luks2.
GRUB has supported LUKS2 since Jan 2021.
Would have been nice to mention the original document which 90% of this article is derived from: https://help.ubuntu.com/community/Full_Disk_Encryption_Howto_2019
What we can do to make it an unattended login?
It would be nice to show how can full disk encryption be done.
1. With /home partition separated from / (root partition).
2. With future fresh installation (say Ubuntu 22.10) keeping /home partition intact.
Hi Guys, I would like some help, please.
I started an Ubuntu 22.04 installation and chose encryption options. And I went to the encryption step. So I selected “Back”. I realized that I should do a backup first. Now everything (sda4) is encrypted.
Before I had Grub dual boot, windows, a 270GB data partition (NTFS) and Ubuntu 20.04. I would like to be able to open the cryptography, view the partitions, and copy my approximately 270GB of data from the d: (NTFS) partition.
How can I do this?
No ZFS instructions (that are in gui installer) with native encryption, compression, snapshots, and backups?
Hi,
A small error in the command.
It should be
ubuntu--vg(double dash, otherwise it screams that volume group is not found.Regards,
Slava
Hey article author! Now that Ubuntu 24.04 LTS is being released on April 25, how can we who have followed this FDE encryption setup on our laptops/home PCs on Ubuntu 22.04 LTS upgrade to Ubuntu 24.04 LTS and still keep the encryption intact? Is this possible?
Can you investigate if it is possible?
Christian Stoltz Norway
From the screenshots, I don’t see anything different about the installer from 20.04 LTS. This is probably a good thing.
Ok, so the server install is terminal-based. and the link you put up is for a desktop install, not a true server. I don’t see any of the options for different server types for the desktop install. i.e. ssh server, samba server, and the like.
Debian gives you all those options and a gui desktop. or the option of a terminal installs for a basic server. If you feel more comfortable with gui for a server install I would try Debian.
Just saying.
Vivek
A Server OS Is For Networking Several Computers And Can Be Accessed From Any By Remote-Desktop, Please Refer To “Controlling” On This Page…
https://help.ubuntu.com/community/HomeServer
After completing the Installation, It doesn’t get any GUI like the login window. So how i can I get that? Please help me.
Vivek, you followed Server Installation Guide that only gives Command mode, if you want Desktop mode, follow the Desktop Installation Guide.