Arch Linux is one of the most versatile GNU Linux distributions due to its simplicity and cutting-edge software packages due to its rolling release model, Arch Linux is not addressed for beginners in the Linux world.
It also provides a complicated command-line installer, with no graphical interface support. The command-line installation model makes the job of installing the system very flexible but also very difficult for Linux beginners.
On top of all, Arch Linux provides its own software package repositories via the pacman package manager. Arch Linux also provides a Multiarch environment for different CPU architectures, such as 32-bit, 64-bit, and ARM.
The software packages, dependencies, and security patches are mostly updated regularly, making Arch Linux a cutting-edge distribution with a few solid tested packages for a production environment.
Arch Linux also maintains the AUR – Arch User Repository, which is a huge community-driven software repository mirror. AUR repo mirrors allow users to compile software from sources and install it via pacman and yaourt (Yet Another User Repository Tool) package managers.
This tutorial presents a step-by-step basic Arch Linux installation process through a CD/USB bootable image on UEFI-based machines. For other customizations or details visit the Official Arch Linux Wiki page at https://wiki.archlinux.org.
Step 1: Create a Disk Partitions Layout
To get started, head to the Arch Linux download page and grab the latest ISO image. At the time of writing, the current release is Arch Linux version 2024.06.01 with Kernel 6.9 and a memory footprint of 1.1GB.
2. With the ISO image at hand, create a bootable CD/USB then plug it into your system CD/USB drive.
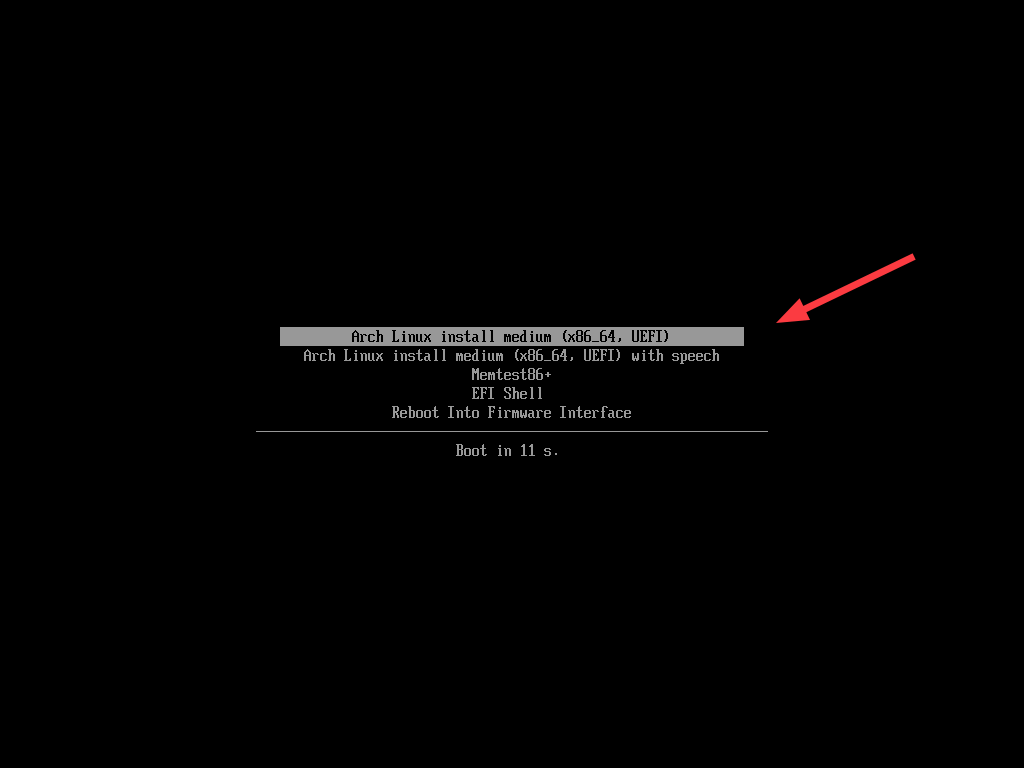
3. After the CD/USB boots up you will be presented with the first Arch Linux GRUB Installer options. Here, select the first option and press the Enter key to continue.
This will be followed by boot messages on your screen.
4. After the installer decompresses and loads the Linux Kernel you will be automatically thrown to an Arch Linux Bash terminal (TTY) with root privileges.
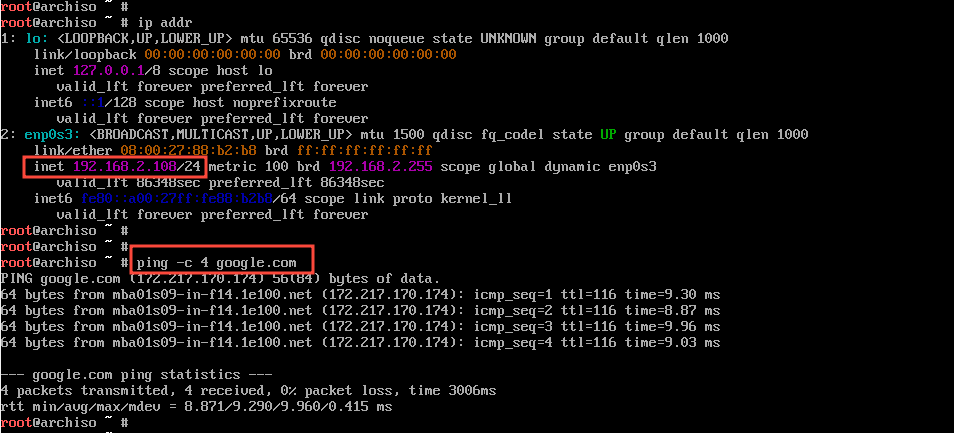
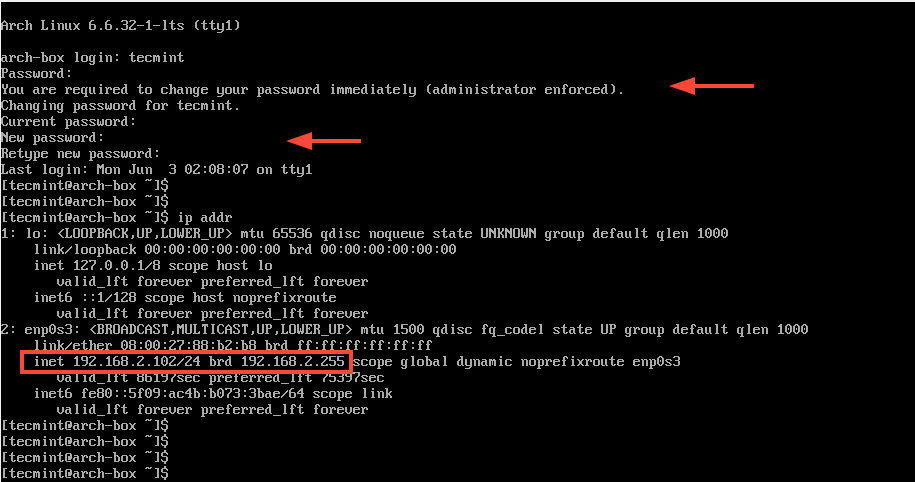
A good place to start is to check the IP configuration of your network interfaces and see whether you have internet connectivity.
ip addr
The output indicates that the active interface, enp0s3, has an IPv4 address of 192.168.2.108. This will be different in your case depending on your LAN’s IP addressing scheme.
To check internet connectivity, ping Google’s DNS (8.8.8.8).
ping -c 4 google.com
If your network is not configured to use DHCP to dynamically allocate IP addresses to clients, issue the below commands to configure an IP address manually for the Arch Live media.
ifconfig enp0s3 192.168.2.108 netmask 255.255.255.0
route add default gw 192.168.2.1
echo "nameserver 8.8.8.8" >> /etc/resolv.conf
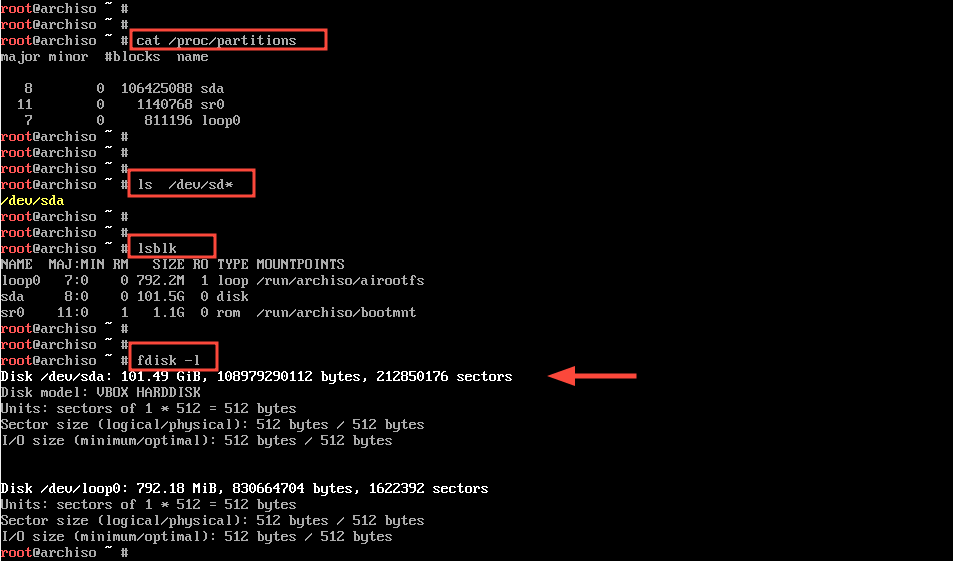
In addition, you can list the partition block allocation information.
cat /proc/partitions
Also, you can view the hard disk naming format. If you are using iSCSI, NVMe, or SSD drives, the convention will take the format /dev/sd*.
# ls /dev/sd*
In this case, we have a single hard disk represented by the format – /dev/sda. You can run the lsblk command to list all the block volumes & CDs attached to the system in a tree-like format.
lsblk
To get comprehensive information about the hard disk, run the fdisk command.
fdisk -l
If your machine is a virtual machine, the hard disks can have other names than sdx, such as xvda, vda, etc. If you are unsure, run the command below to confirm.
ls /dev | grep '^[s|v|x][v|d]'$*
In our case, we have /dev/sda.

5. In the next step, we’ll start to configure the Hard Disk partitions. You can run the cfdisk, cgdisk, parted, or gdisk utilities to perform a disk partition layout for a GPT disk. I strongly recommend using the cfdisk utility for simplicity and ease of use.
For a basic partition, the layout table uses the following structure.
- EFI System partition (/dev/sda1) with 500M size, FAT32 formatted.
- Swap partition (/dev/sda2) with 2xRAM recommended size, Swap On.
- Root partition (/dev/sda3) with at least 20G size or rest of HDD space, ext4 formatted.
Now let’s start creating a disk layout partition table by running the cfdisk command.
cfdisk /dev/sda
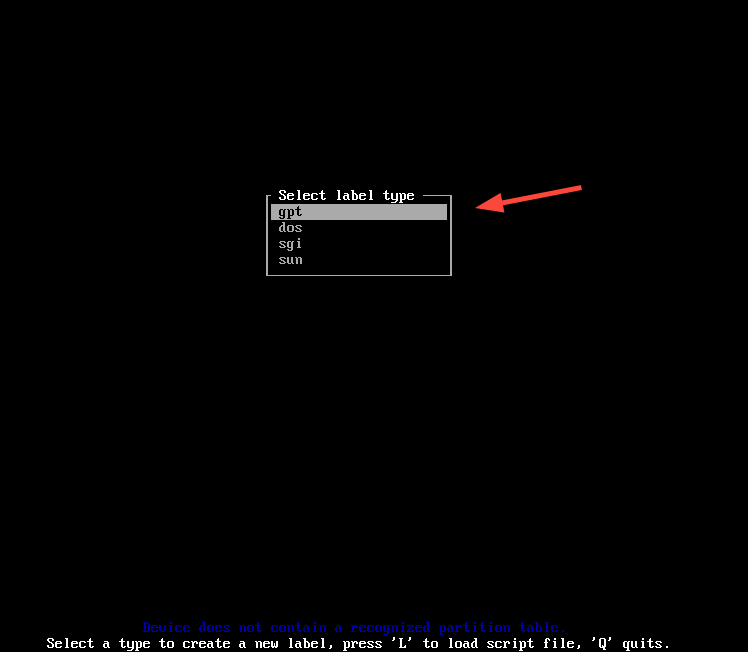
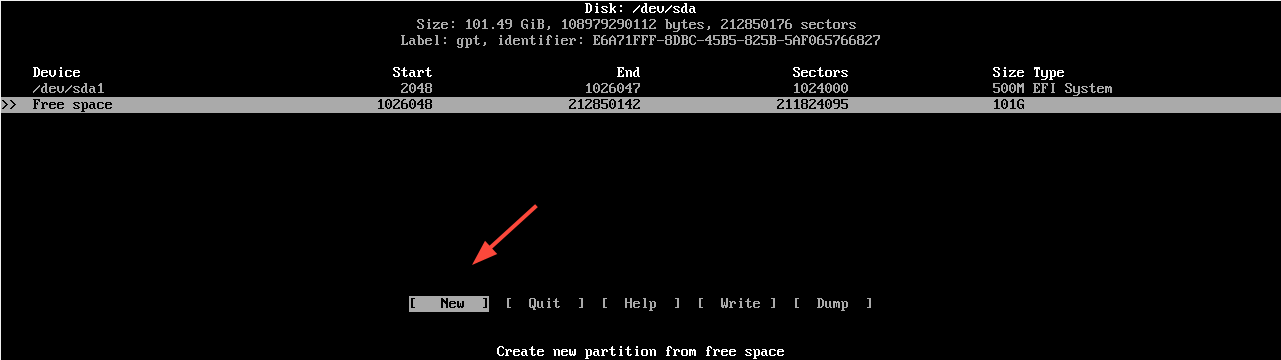
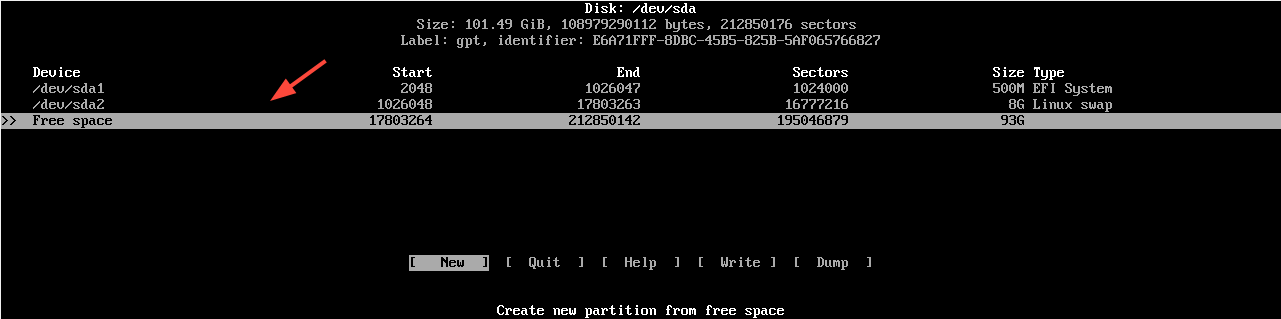
Once you run the command, you will be prompted to select the label type. select GPT, then Free Space and hit on New from the bottom menu, as illustrated.
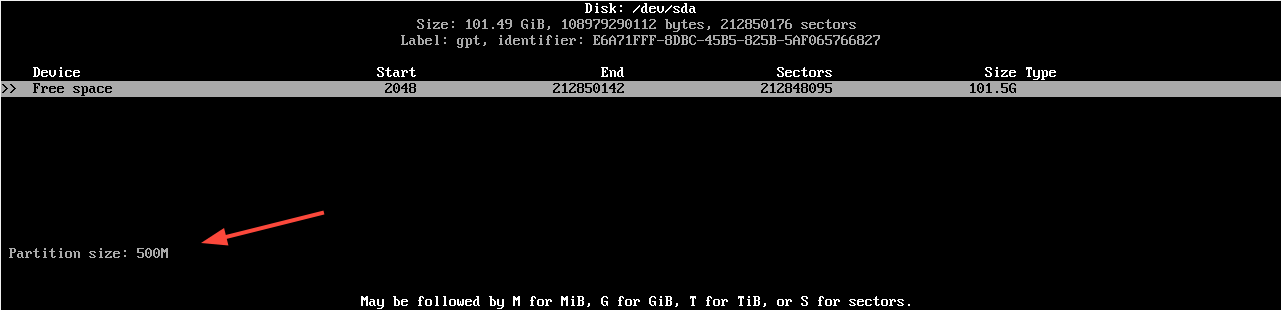
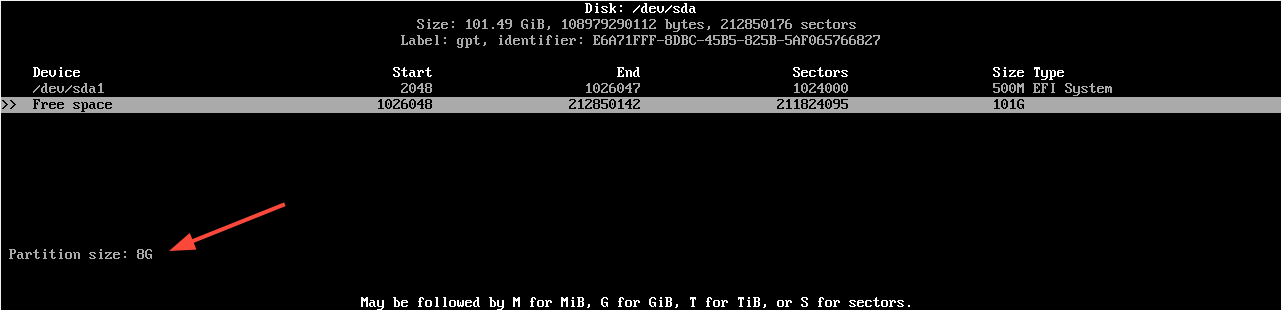
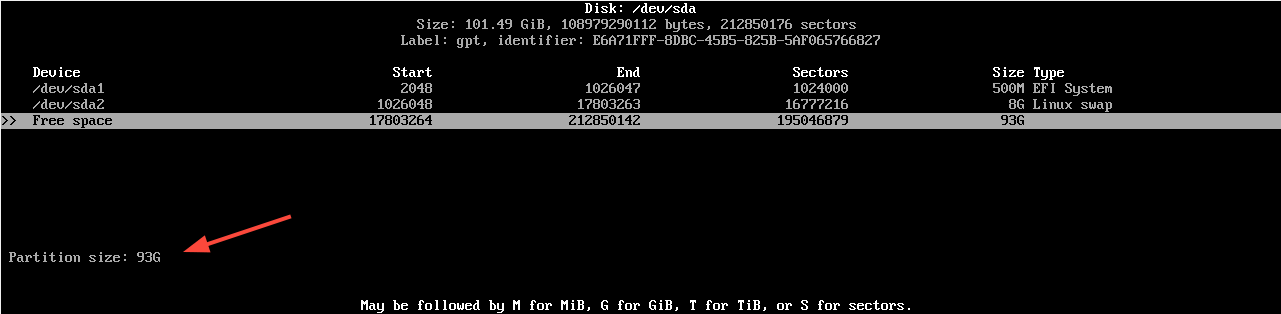
6. Type the partition size in MB (500M) and press enter key, select Type from the bottom menu, and choose EFI System partition type, as shown in the following screenshots.
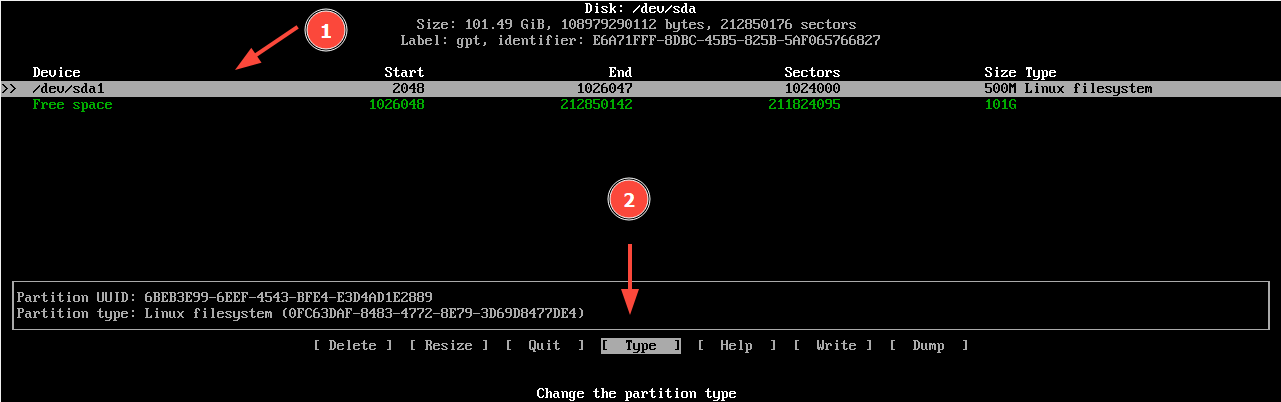

You’ve finished configuring the EFI System partition.
7. Next, let’s create the Swap partition using the same procedure. Use the down arrow key and select again the remaining Free Space.
Repeat the steps above. Select New -> partition size 2xRAM size recommended (you can safely use 1G).
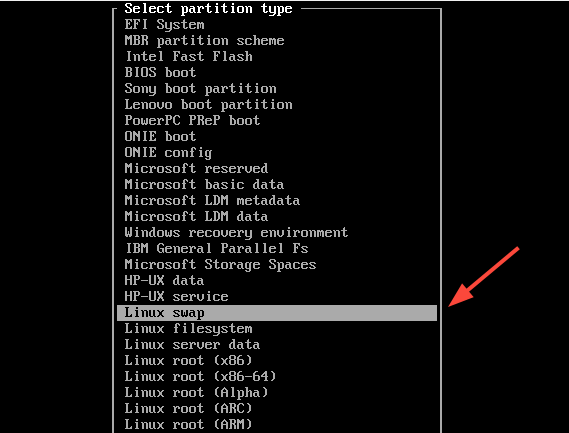
Next, select the Type option and hit ENTER.
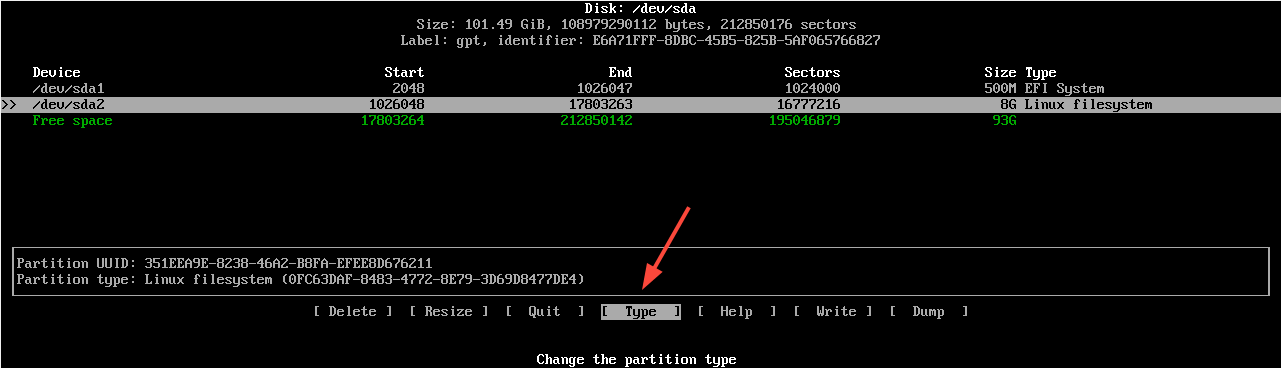
Then select the Linux Swap option.
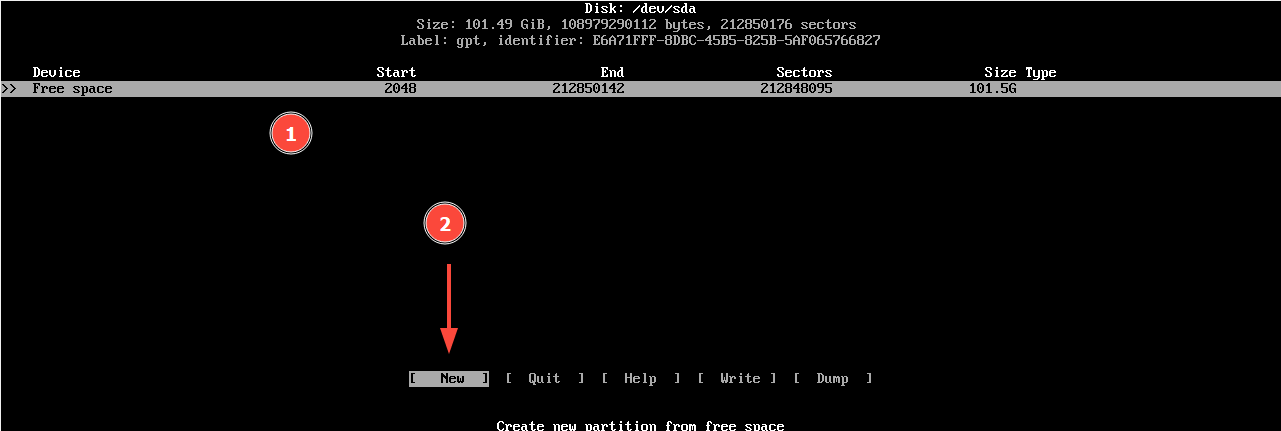
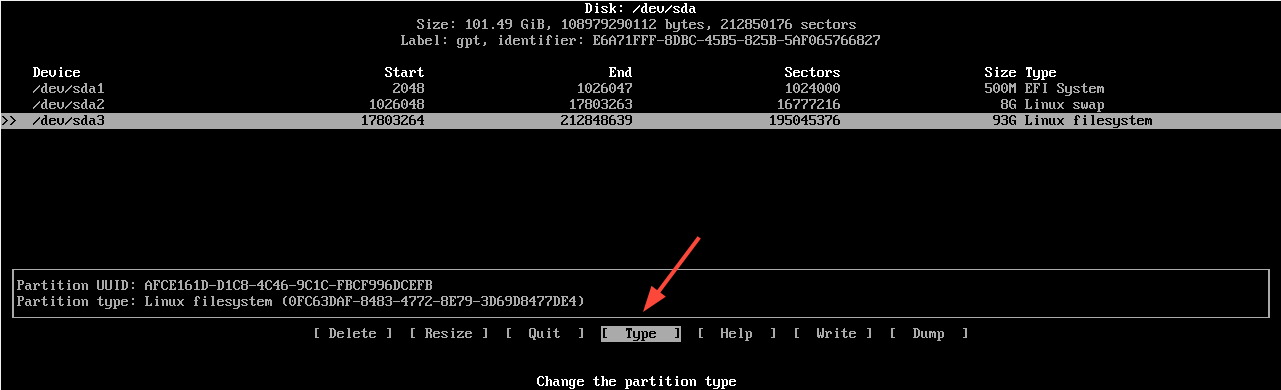
8. Finally, for /(root) partition once again, select the New option.
Specify the size. Here we will use the remaining free space which, in our case, is 93G.
Next, select the Type option.
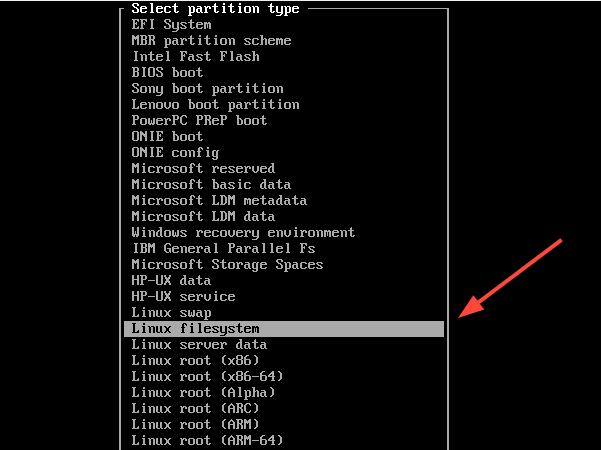
And select ‘Linux Filesystem‘.
Next, select the ‘Write‘ option to save the changes and hit ENTER.
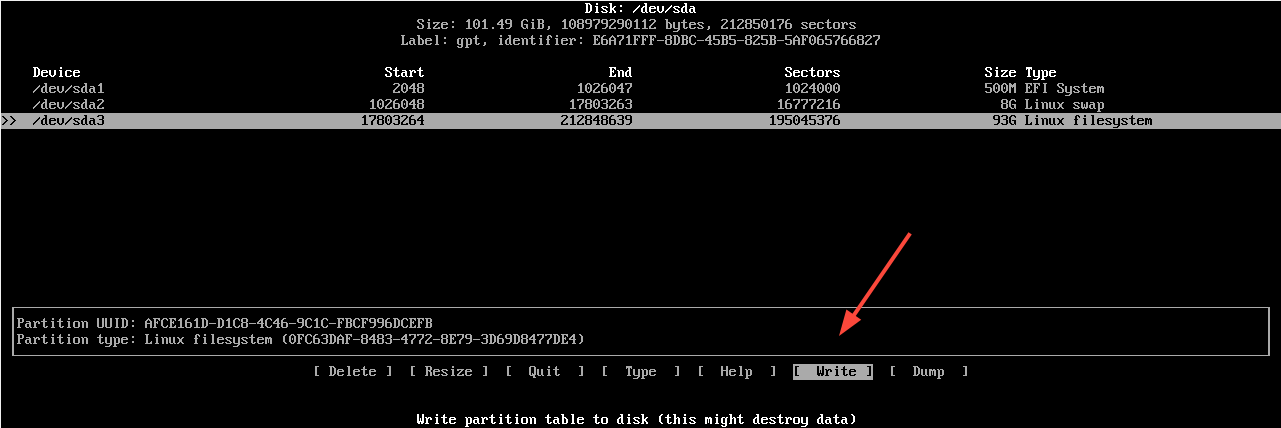
Finally, select the ‘Quit‘ option to exit the disk management console.
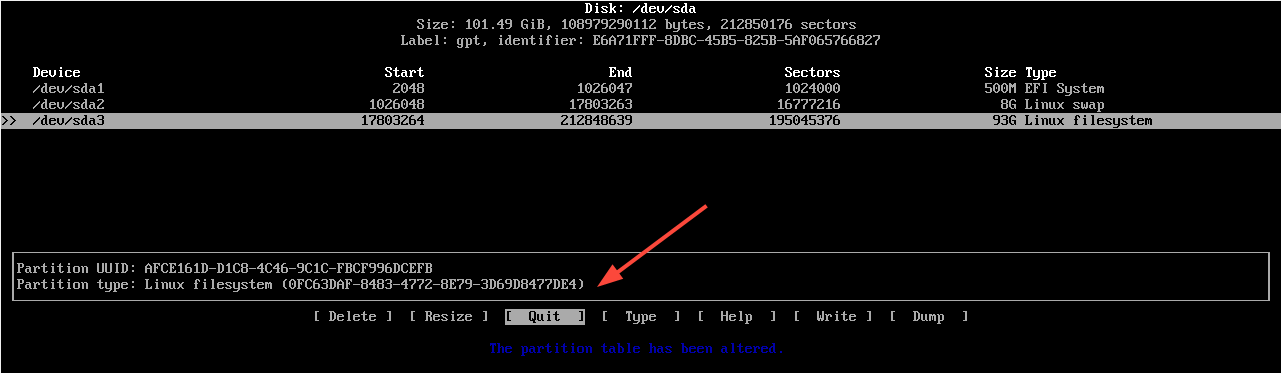
9. For now, your partition table has been written to HDD GPT but no file system has been created on top of it. You can also review the partition table summary by running the fdisk command.
fdisk -l

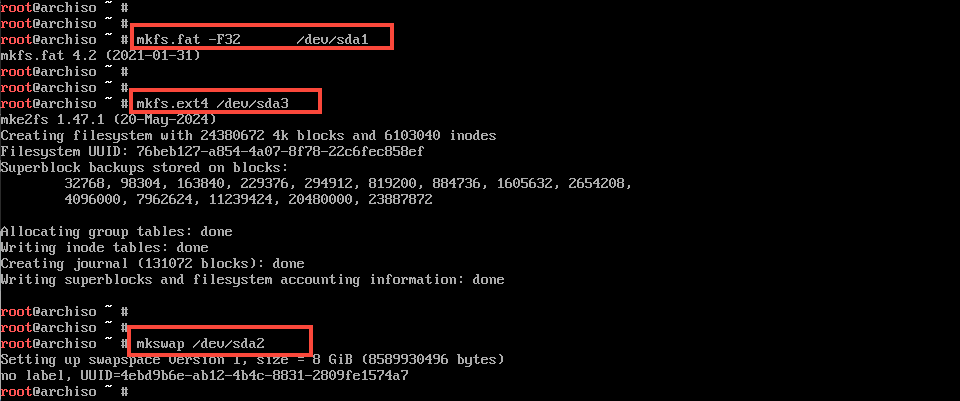
10. Now, it’s time to format the partitions with the required file systems. Issue the following commands to create a FAT32 file system for the EFI System partition (/dev/sda), to create the EXT4 file system for the root partition (/dev/sda3), and create the swap partition for /dev/sda2.
mkfs.fat -F32 /dev/sda1
mkfs.ext4 /dev/sda3
mkswap /dev/sda2
Step 2: Install Arch Linux
11. To install Arch Linux, the /(root) partition must be mounted to the /mnt directory and mount point to be accessible. Also, the swap partition needs to be initialized.
mount /dev/sda3 /mnt
swapon /dev/sda2
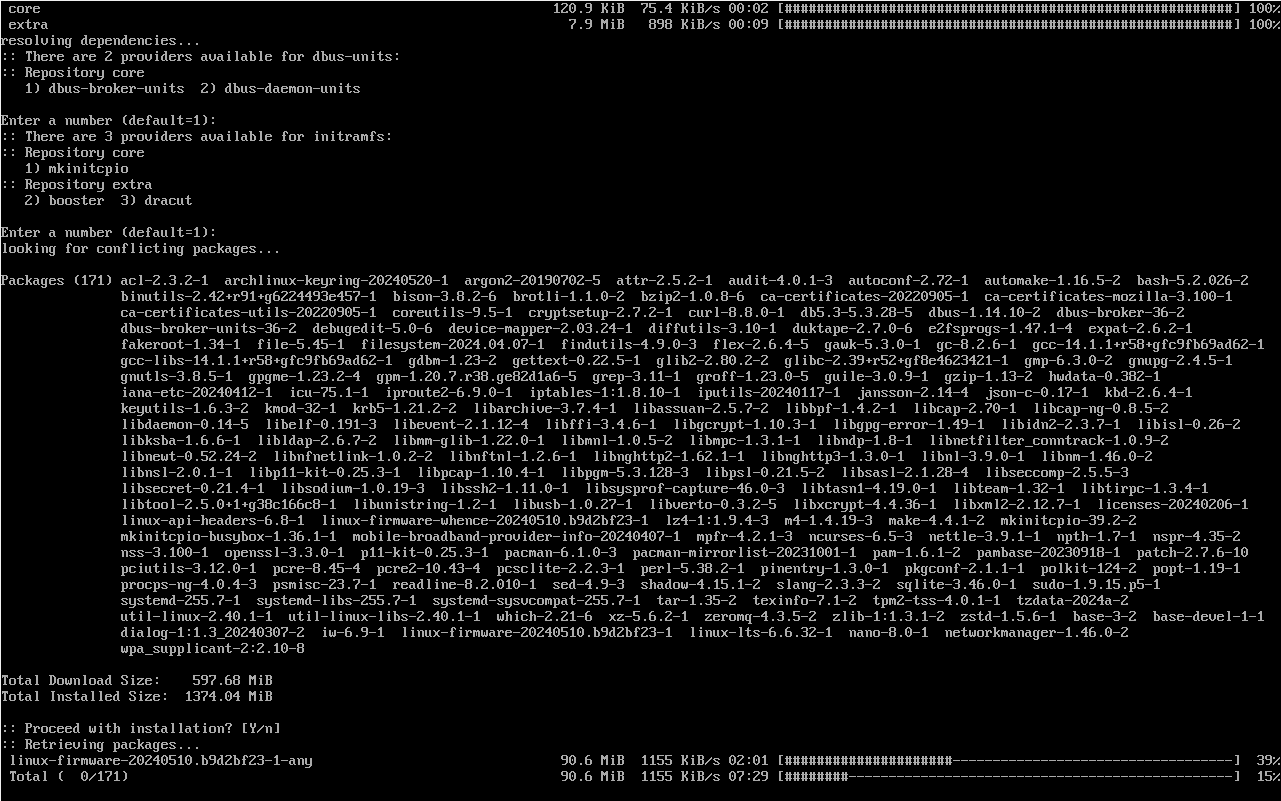
12. Next, install the base system using the following command.
pacstrap /mnt base base-devel linux-lts linux-firmware dialog iw wpa_supplicant networkmanager
Once installed, you can confirm that all the major directories required in a Linux filesystem are present by listing the contents of the /mnt directory:
ls /mnt

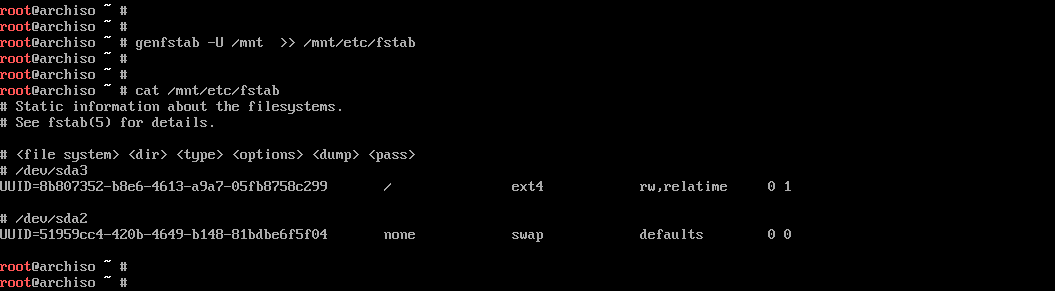
13. Next, generate the fstab file for your new Arch Linux system by issuing the following command.
genfstab -U -p /mnt >> /mnt/etc/fstab
Subsequently, inspect the fstab file content by running the below command.
cat /mnt/etc/fstab
Step 3: Arch Linux System Configuration
14. Next, to further configure Arch Linux, you must chroot into /mnt the system path and add a hostname for your system by issuing the below commands.
arch-chroot /mnt
echo "archbox-tecmint" > /etc/hostname
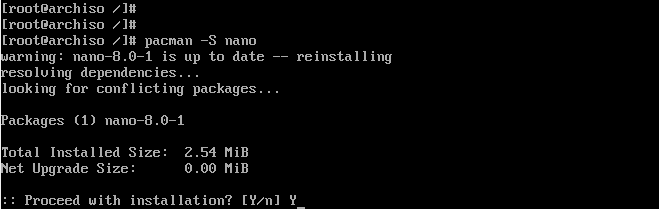
15. Next, configure your system Language.
pacman -S nano
16. Choose and uncomment your preferred encoding languages from /etc/locale.gen file then set your locale by running the following commands.
nano /etc/locale.gen
Specify your preferred locale settings by uncommenting them.

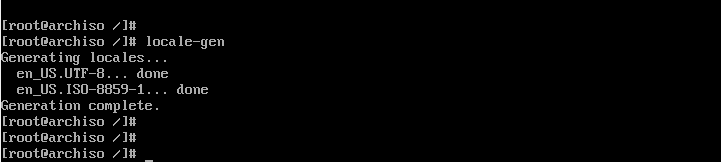
17. Generate your system language layout.
locale-gen
18. Define and export the LANG environment variable.
echo LANG=en_US.UTF-8 > /etc/locale.conf
export LANG=en_US.UTF-8
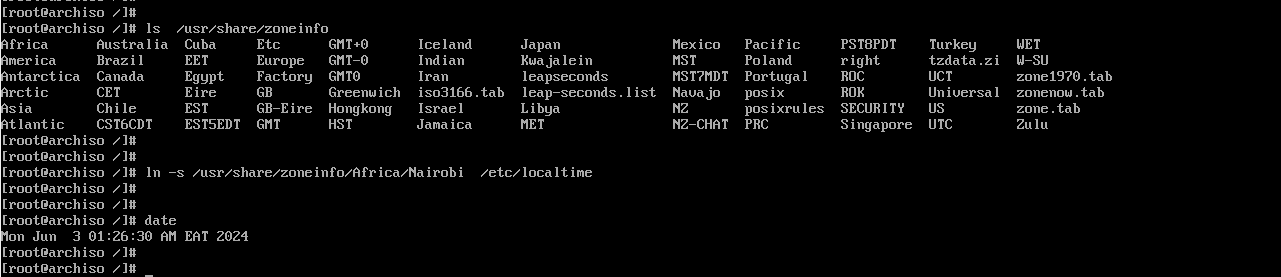
19. Next, configure the timezone. The timezones are stored in the /usr/share/zoneinfo/ directory. Configure your system time zone by creating a symlink for your sub-time zone (/usr/share/zoneinfo/Continent/Main_city) to /etc/localtime file path.
ln -s /usr/share/zoneinfo/Africa/Nairobi /etc/localtime
Run the date command to confirm your time corresponds to the set timezone.
date
20. You should also configure the hardware clock to use UTC (the hardware clock is usually set to the local time).
hwclock --systohc --utc
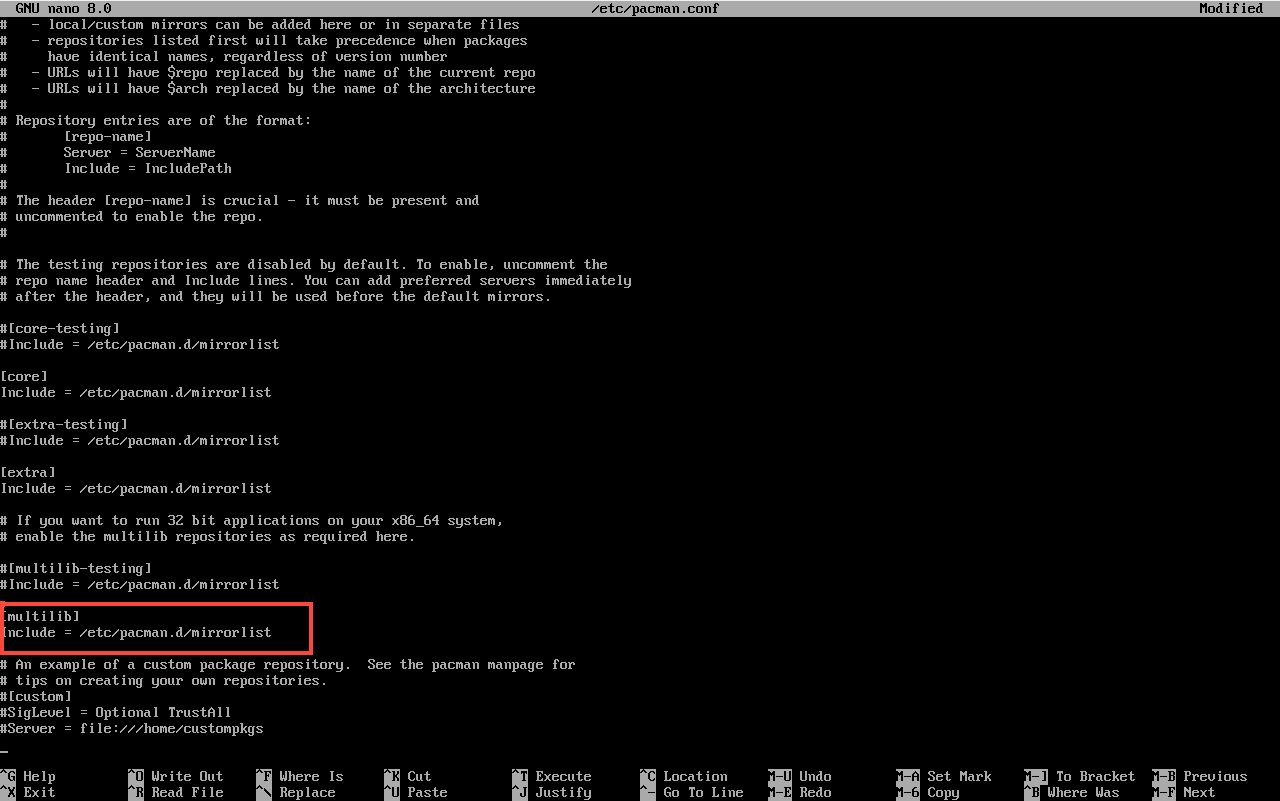
21. Like many famous Linux distributions, Arch Linux uses repo mirrors for different world locations and multiple system architectures.
The standard repositories are enabled by default, but if you want to activate Multilib repositories you must uncomment [multilib] directives from /etc/pacman.conf file, as shown in the below excerpt.
nano /etc/pacman.conf
22. After the repository file has been edited, synchronize and update database mirrors and packages by running the below command.
pacman -Syu
23. Next, set up a password for the root account and create a new user with Sudo privileges in the Arch box by issuing the commands below. Also, expire the user password to force the new user to change the password at first login.
# passwd
useradd -mg users -G wheel,storage,power -s /bin/bash your_new_user
passwd your_new_user
chage -d 0 your_new_user
24. After the new user has been added you need to install the sudo package and update the wheel group line from /etc/sudoers file to grant root privileges to the newly added user.
Be sure to install the vim text editor and sudo package first.
pacman -S sudo
pacman -S vim
25. Next, run visudo to edit the sudoers file.
visudo
Add this line.
%wheel ALL=(ALL) ALL

Save and exit.
26. Next, install the DHCP server and enable it to start on boot time.
pacman -S dhcpcd
systemctl enable dhcpcd
27 In the last step, install the Boot Loader for Arch to boot up after restart. The default boot loader for Linux distributions and Arch Linux also is represented by the GRUB package.
To install the GRUB boot loader in UEFI machines on the first hard disk run.
pacman -S grub efibootmgr dosfstools os-prober mtools

28. Next, create the EFI sub-directory in the /boot directory to mount the EFI partition which is /dev/sda1 as we saw earlier.
mkdir /boot/EFI
Now mount the EFI partition.
mount /dev/sda1 /boot/EFI #Mount FAT32 EFI partition
Run the command shown to configure the bootloader file.
grub-install --target=x86_64-efi --bootloader-id=grub_uefi --recheck

29. Finally, create the GRUB configuration file by issuing the following command.
grub-mkconfig -o /boot/grub/grub.cfg

30. Arch Linux is now installed and configured for your box. The last steps needed are to exit the chroot environment, unmount the partitions, and reboot the system by issuing the below commands.
exit
umount -a
reboot
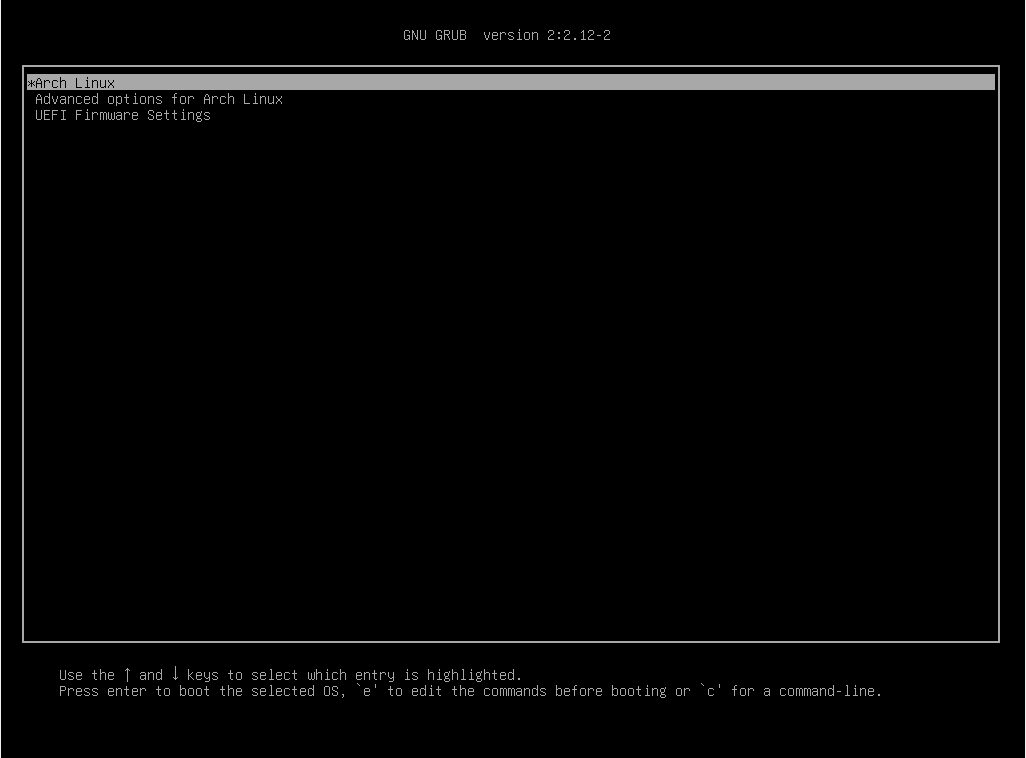
31. After reboot, remove the installation media image and the system will boot directly into the GRUB menu as shown below.
32. After reboot, log in using the regular user you created. You will be prompted to change the password before proceeding any further.
The Arch Linux system contains only the basic software packages needed to manage the system from the command line, with no Graphical User Interface.
Due to its high portability, rolling release cycles, source packages compilation, granular control over installed software, and processing speed, Arch Linux resembles in many ways with Gentoo Linux, but cannot rise to Gentoo’s complex architectural design.
However, managing an Arch Linux system is not recommended for Linux beginners. Linux beginners who want to operate Arch-like systems should first learn Arch Linux principles by installing the Manjaro Linux distribution.


Please change your article to show that dhcpd *must* be installed BEFORE the reboot, i.e.,
Otherwise, the booted ArchLinux will have no network to install *anything*.
The rest of your instructions were invaluable to me,
Thank-you!
Does /boot/EFI need to be added to /etc/fstab? I am getting dropped into `grub> ` prompt and /boot/EFI is empty. I am kind of guessing, it has been 10 years since I configured grub.
You need to update the guide with the warning if dhcpcd is not installed before the exit you will not have an internet connection.
@sclav,
Yeah sure, I will update the article with the installation of dhcpd…
Well explained indeed.
What if you want to dual-boot Ubuntu? Then the EFI partition would be already installed and so does GRUB, right?
I’m struggling with this. I have both installed, but can’t boot into Arch, the grub menu entry is never shown.
Nice tutorial!
One thing I’d point out: when installing grub, I had to tell it where the EFI directory is by adding the “
efi-directory=/boot/EFI” flag to the command.Otherwise, great information and a good explanation.
So finally a found a solution for the problem:
Then I get an error message: Failed to start dhcpcd.service: Unit dhcpcd.service does not exist
It is not possible to start dhcpcd because it is not installed (maybe not included now in the package, time ago was included), one solution is to install it with Pacman after arch-chroot for example in 16:
thanks,
Martin
@Martin,
Yes, you are right, you need to install the DHCP package to get this work. Also, we have updated the article and included the latest instructions for installing Arch Linux 2019.
Hello,
Thank you for the nice tutorial, for the UEFI installation with GRUB was for me really helpful!
Two things, unfortunately, do not work:
After the “base” installation you can’t start in “16” the command: # nano /etc/locale.gen.
because “nano” isn’t installed, so you need in the base installation following:
# pacstrap /mnt base base-devel linux linux-firmware nano (“linux linux-firmware nano” is in your tutorial missing)
So my problem:
After the installation and reboot, I cannot start the network, if I make:
Then I get an error message: Failed to start dhcpcd.service: Unit dhcpcd.service does not exist
Can you help me, please?
Thanks. Martin
Amazing article/ tutorial ! You’ve helped many people a great deal!
Same as Keith Barrow. Saved my life. 20+hours trying to figure out how to stop booting to grub command line. Thank you!!!!
Thanks, helpful article..
You’ve absolutely saved my life- spent 10hrs plus trying to get various combinations of reFINed, systemd and GRUB to get OSX off the macbook I bought from work – a lot of the instructions elsewhere are unclear – at one point I must have mounted the boot partition over the
/bootdirectory and mnixed the kernels.Your instructions to mount to
/boot/EFIand set up grub was the charm – can’t thank you enough.Os-prober is broken AT THIS MOMENT (so you might not even get this error in the future) just don’t install os-prober and the installation will go fine I’ve used this many times before (also with os-prober before it was broken)
You need to change
"ln -s /usr/share/zoneinfo/Europe/Bucharest /etc/localtime"to"ln -fs /usr/share/zoneinfo/Europe/Bucharest /etc/localtime"as the localtime link is already there.The
"-f"will force a new symlink.This is true
Solid tutorial! Very straightforward and helpful. Thank you.
great article, very good. thank you
Thank you so much for this. Installing grub on my old UEFI mobo it’s been a real pain! But now arch is up and running thanks to you and the Arch Wiki!
/etc/localtime already existed on my system. rm /etc/localtime before the ln command (or possibly use a flag on the ln command)
It’s missing a
-f, try:You can also use the hostnamectl command to set your time zone. It handles all of the symlinking and /etc/localtime stuff for you.
Do you have a tutorial on installing a graphical user interface ?
@Brian,
Yes, read this article – How to Install Cinnamon and Basic Software in Arch Linux.
The command visudo gives the following error.
I entered “EDITOR=nano” and was then able to use visudo. Might help anyone else getting stuck at that point.
@Glenn,
Thanks for sharing the tip with us, hope it will other users who facing similar issue..
Hi Ravi,
Wanted to add that the UEFI option must be enabled in the BIOS before the grub EFI can be installed. I learned the hard-way. Great instructions thank you.. Just rooted on a Intel NUC, and being used a firewall.
Hi, I followed all your directions, but I’m getting the error, “yaourt not found”. What do I do?
@Joe,
On a fresh Arch installation, Yaourt doesn’t comre pre-installed, you need to install it separately as shown in this article: How to Install and Use Yaourt in Arch Linux
Just wonder about the step where you wrote eno16777736. Where do I find this and do I write this if I don’t use Virtual Machine?
Run ip command to list NICs.
Hi I am wondering if this is possible without the Ethernet connection? How would I go about this via wifi? I am trying to install arch on a acer chrome-book 14. So far I have to rewrite/update the firmware with (UEFI) Full ROM. Then I can work on installing arch Linux from there.
Thoughts?
Thanks in advance.
You need to setup your wifi network interface while live booting Arch Live image. Consult Arch Wiki to setup wifi https://wiki.archlinux.org/index.php/Wireless_network_configuration
Had to add EFI dir to grub install to work in virtualbox:
grub-install –target=x86_64-efi –bootloader-id=grub_uefi –recheck –efi-directory=/boot/EFI
This post should honestly be in the official Arch documentation. This works 100% Congrats on the Author and thank you for your post.
At step 11 when i do
ls /mntit only shows lost+found.Hello,
It is normal, the installation process begin on step 13 with ‘packstrap’?
Regards,
Superb finally something Working…
Great tutorial, thank you!
May I suggest one thing to add before reboot.
Hi,
Great and very informative tutorial. Thank you for the post. Can you please also make such tutorial for Arch Linux dual boot with Windows 10? Again, thanks.
Manthan he does not need to make another tutorial. Windows should be installed first then install Arch Linux second. This will locate Windows and add it to the grub menu.
Login into your Arch desktop.
Open a terminal and type the following.
Install and configure bootloader:
# mkinitcpio -p linux
# pacman -S grub os-prober
# grub-install /dev/sda
# grub-mkconfig -o /boot/grub/grub.cfg
# shutdown -f -r -t 0
Superb explanation. Though extended it for minimal installation packages after OS installation.
great tutorial as always..:)
Hardware clock should add one more ‘-‘ at UTC
# hwclock –systohc –-utc
btw, the tutorial helps me alot! :) thanks
Yeah man, thanks corrected in the article..
@archuser: fdisk is not outdated ,all major linux distributions still use it , its just not compatible with GPT disks.
Due to its rolling release model, Arch is a distribution that change very rapidly and addopts new features all the time( see movig all binaries into one single location), still this doesnt mean that old good stuff arent good anymore or outdated. As long as all major linux distributions still use old years tested software components, is not fair to say that is deprecated. What would you say about centos that still use old gnome2? it’s outdated?
All tutorial focus on BIOS systems. There is no UEFI instructions. So there is no why use an UEFI partition.
Hi Ravi,
fdisk is outdated and not very useful , i think you should use cgdisk for future guides.
The /etc/sudoers should only be edited with the visudo command.
Using any other means (this includes using nano and vi to edit the file) is known to corrupt the /etc/sudoers file from time to time, leaving the system with a broken sudo authentication framework.
In step 13 it’s “pacstrap”, not “pacstarp”.
Yeah! thanks for pointing out, corrected now in write-up.
I think you need this a lot more than I do https://wiki.archlinux.org/index.php/Beginners%27_guide
12. Use CTRL+K for copy the entire row and CTRL+U for paste.
13. Why the fuck do you put that -i? Totally unnecessary.
15. Outdated. # systemctl set-locale LANG=”pt_BR.UTF-8″
tip. for change keymap #systemctl set-keymap br abnt2
tip. # ls /usr/share/kbd/keymaps/i386/qwerty/
17. This method is outdated. Use # localectl set-locale Europe/Bucharest
17. UTC clock is the default. Unnecessary.
18. Just enable multilib if needed.
19. NO. NOT USE YAOURT WITHOUT KNOWING WHAT. First learn more about arch linux and make a pkg manually.
20. Useless. base instalation is already updated.
21. Outdated. This groups is used just in rc era. With systemd just useradd -m -g users -s /bin/bash YOUR_NEW_USER
24. Use # grub-install –target=i386-pc /dev/sda or you may have problems with UEFI systens
27. You can make a # pacman -S lxde firefox and a # systemctl enable lxdm for a basic and lightweight DE.
tip. #systemctl set-x11-keymap us
28. Great tutorial.
On 17.
#timedatectl set-timezone America/Sao_Paulo
On 24.
#grub-install –target=i386-pc /dev/sda
tip. CTRL + W for search things on nano,
For notebookers:
-To connect wifi on live session
# wifi-menu
-To “wifi-menu” work after install
# pacstrap base base-devel wpa_supplicant dialog
You may want to do a tutor on how to brand or stylise Archlinux like getting colour in the command line (bash, etc), to loading screens, etc.
Many thanks for a great tutorial. I already have Arch on main system and love it.
Once you’re on the train-line you don’t need to get the engine off it.
The only issue I have with Archlinux is that it doesn’t support MySQL from the base repositories, which hinders it’s uptake on servers.
Nice guide, congratulations. Perfect for Archlinux newbies.