The two commonly used AUR helpers in Arch Linux are Yaourt and Packer. You can easily use them for Arch Linux package management tasks such as installing and updating packages.
However, the two have been discontinued in favour of yay, short for Yet Another Yaourt. Yay is a modern AUR helper written in the GO language. It has very few dependencies and supports AUR tab completion so that you don’t have to type the commands in full. Just type the first few letters and hit ENTER.
In this article, we demonstrate how you can install Yay AUR helper on Arch Linux or Manjaro which is based on Arch, and see a few examples of how you can use Yay.
Installing Yay AUR Helper in Arch Linux and Manjaro
To start off, log in as a sudo user and run the command below to download the git package.
$ sudo pacman -S git

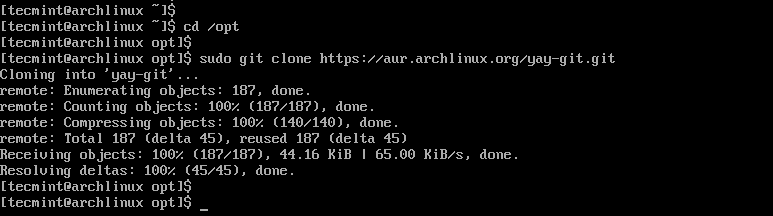
Next, clone the yay git repository.
$ cd /opt
$ sudo git clone https://aur.archlinux.org/yay-git.git
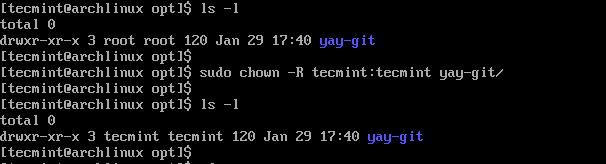
Change the file permissions from the root to the sudo user.
$ sudo chown -R tecmint:tecmint ./yay-git
To build the package from PKGBUILD, navigate into the yay folder.
$ cd yay-git
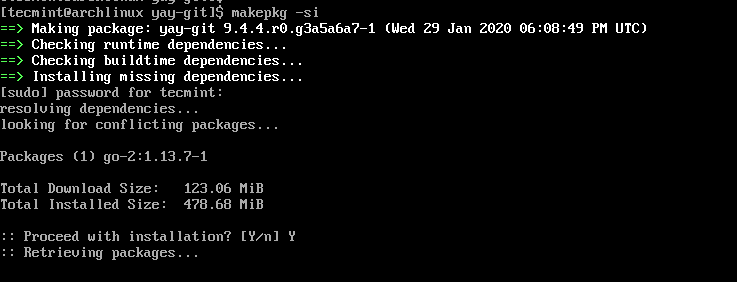
Next, you need to install base-devel package that includes essential development tools and libraries commonly used for building and compiling software.
$ sudo pacman -S --needed base-devel
$ makepkg -si
How to Use Yay in Arch Linux and Manjaro
Once you have yay installed, you can upgrade all the packages on your system using the command.
$ sudo yay -Syu
To include development packages during the upgrade run.
$ yay -Syu --devel --timeupdate
As with any other AUR helpers, you can install the packages using the command.
$ sudo yay -S gparted
To remove a package using yay use the command.
$ sudo yay -Rns package_name
To clean up all unwanted dependencies on your system, issue the command.
$ sudo yay -Yc
If you want to print system statistics using yay, run.
$ sudo yay -Ps
And this sums up this brief tutorial on how you can install the yay AUR helper in Arch Linux and Manjaro.


Please take this post down or at least, issue a warning at the top. As written, it doesn’t work and gets warnings in the end. (Fedora 38 installing Arch). We shouldn’t need to skip down to the comments section to see corrections that should be implemented into the body.
Thank you.
@Strob,
Thank you for your feedback, and we appreciate your concern. We apologize for any inconvenience the post may have caused. We have updated the content and make the necessary changes to ensure it works smoothly…
“The two commonly used AUR helpers” :)
can’t believe nobody noticed that before me?
You need to add
sudo pacman -S --needed base-develCan’t run
makepage -siwithout the base packages to run this commandOtherwise, end up with
==> ERROR: Cannot find the fakeroot binary.
==> ERROR: Cannot find the strip binary required for object file stripping.
Ops forgot.
Must add all 12 in order for this to work.
1) autoconf 2) automake 3) binutils 4) bison 5) fakeroot 6) flex
7) gcc 8) m4 9) make 10) patch 11) pkgconf
Hi, my recommendation:
Install yay is very easy and secure under your home directory:
6. Enjoy yay!
Thank you for your insights WyekS.
Was gonna say that, don’t use sudo with AUR helpers. The only thing I would add to your steps is:
Working flawlessly! Thank You!
Why the hell “sudo” the build? this is utterly wrong, useless, dangerous, and a bad habit.
(just like building things in “/opt”)
Probably a good point…
Anyway working excellent howto good for newcomer my type, thanks.
Hi and thanks for the article! Is yay install dependencies are needed for a package? for example, MPV is a dependency for smplayer; If I type
yay -S smplayer, It will install MPV as well or I have to install it manually?thanks for your respond
@Farzad,
All package managers are created to install dependency packages automatically…
Thank you so much for your response.
chown: invalid user: “tecmint: tecmint”
Hey gadzhi, tecmint is a Linux user with a corresponding group called tecmint. So in your case, this could be something else.
In your case use the syntax:
Thanks for the article! I’m new to Manjaro (I was using Kubuntu before). I can say that the switch was worth it! It is very fast when compared to Kubuntu and other Ubuntu-based distros. I was able to install yay without any issues. Just needed to tell something that the package base-devels are needed for this to work. I had to run
sudo pacman -S base-develsbefore I could install yay.Yeah good guide but there’s a Typo
/yay-gitis yay actually.‘yay‘ is for releases, whereas ‘yay-git‘ is the package for the git upstream repo.
This is a standard AUR convention.
The typo is putting the forward-slash before the directory name in the chown command.
should be:
or just
@Matt,
Corrected the command in the article.
Thanks :)
DO NOT use
sudowithyay. Pacman will prompt for privileges as needed.FYI, yay is in the Manjaro community repo and can be installed with:
I’m a new manjaro user and I was stuck following the above steps. Thank you for this!
With manjaro, just:
You’re my hero. thanks
Most welcome , Akissel.