Logical Volume Management (LVM) is a powerful tool that greatly simplifies disk space management. With LVM, the task of allocating additional space to a file system becomes effortless.
Whenever a file system requires more space, it can easily draw from the available free space in its corresponding volume group. As a result, file systems can be dynamically resized to accommodate our specific needs.
Furthermore, LVM offers robust data protection in the event of disk failures. If a disk begins to show signs of failure, we can seamlessly integrate a replacement disk into the volume group as a new physical volume.
By doing so, the logical volumes can be efficiently migrated to the fresh disk, ensuring continuity and safeguarding against any potential data loss.
In essence, LVM empowers administrators to handle disk space allocation and management with unparalleled flexibility and resilience. Its dynamic resizing capabilities and built-in redundancy features make it an indispensable asset for optimizing storage utilization and enhancing data integrity in any system configuration.
Introducing the comprehensive series “Preparation for Setting Up LVM (Logical Volume Management)“, thoughtfully crafted across Parts 1 to 6, with an in-depth exploration of the following essential topics:
Before proceeding with the LVM setup, consider the following prerequisites:
My Server Setup – Requirements
- OS – RHEL 9 with LVM Installation
- IP – 192.168.0.200
- Disks – 3 disks with 20GB each.
Check LVM Disk Storage in Linux
1. To gain insight into our LVM setup, we can utilize the following commands to reveal the distinct components: Physical Volume (PV), Volume Group (VG), and Logical Volume (LV).
# pvs
# vgs
# lvs
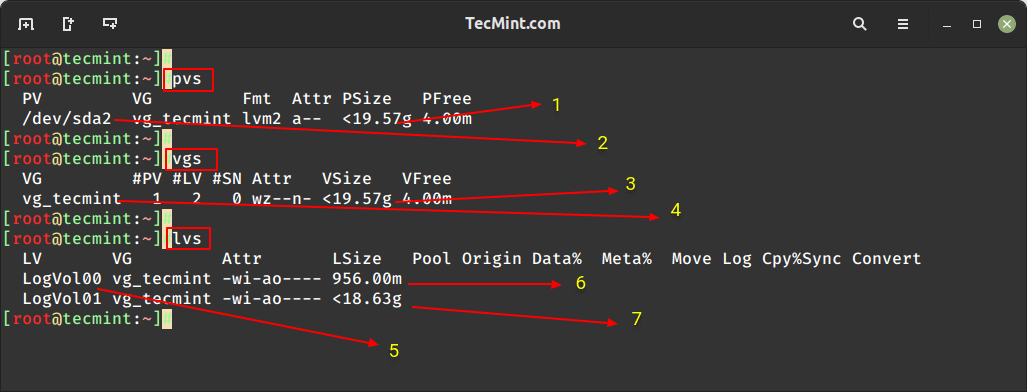
Here, is the description of each parameter shown in the above screenshot.
- Physical Disk Size (PV Size)
- The disk used was Virtual Disk sda.
- Volume Group Size (VG Size)
- Volume Group name (vg_tecmint)
- Logical Volume name (LogVol00, LogVol01)
- LogVol00 Assigned for a swap with 956MB Size
- LogVol01 Assigned for/with 18.63GB
So, from here we come to know that there is not enough free space in the VDA disk.
Create a New Volume Group in LVM
2. To create a new Volume Group, we need to add an additional 3 hard disks to this server. However, it is not compulsory to use 3 drives; just 1 is enough to create a new VG and LV (Logical Volume) inside that VG.
I am adding the following 3 disks here for demonstration purposes and to provide more feature command explanations.
sdb, sdc, sdd
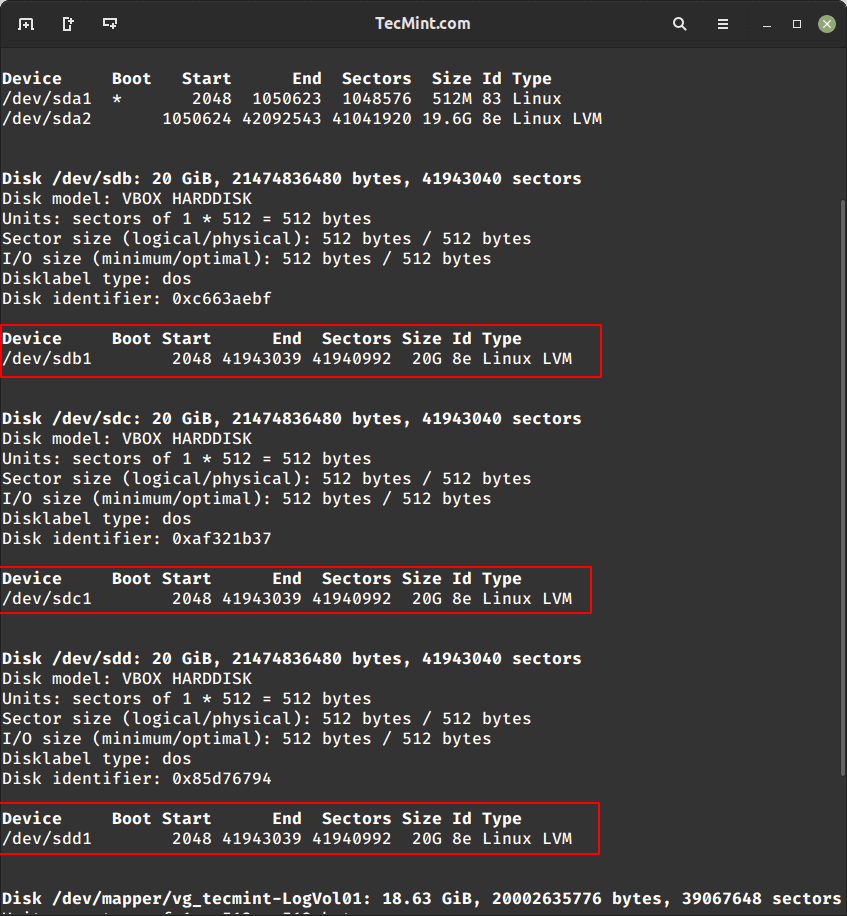
3. To list all the disks and their partitions, such as the disk name, size, partition type, start and end sectors, and more use the fdisk utility as shown.
# fdisk -l
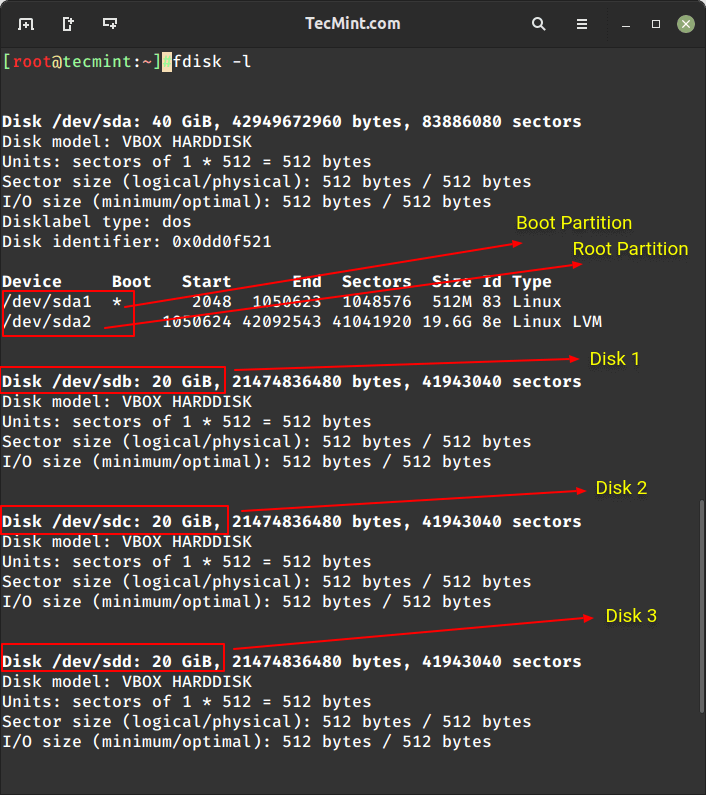
Here, is the description of each disk shown in the above screenshot.
- The default disk used for the Operating System is RHEL 9.
- Partitions defined on the default disk are as follows: (sda1 = boot), (sda2 = /).
- Additionally, added disks are mentioned as Disk1, Disk2, and Disk3.
Each and every disk is 20 GB in size.
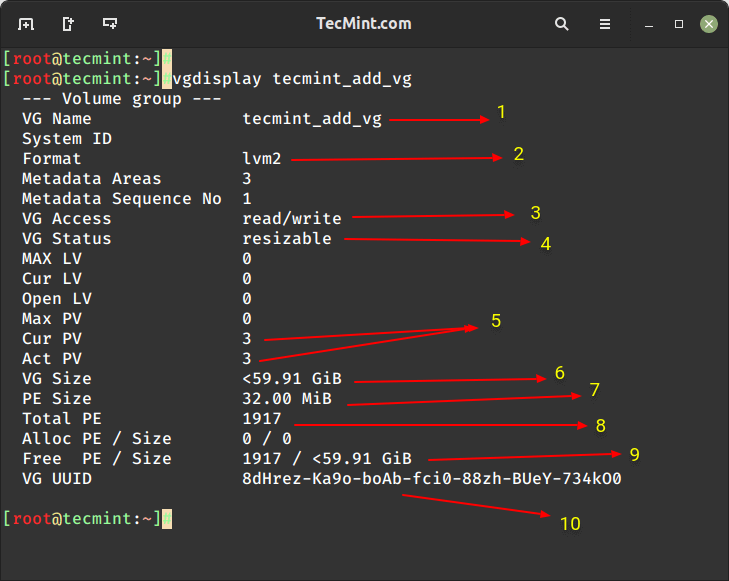
4. Now run the vgdisplay command to view the detailed information about all the Volume Groups present on the system, including their name, size, free space, physical volume (PV) information, and more.
# vgdisplay
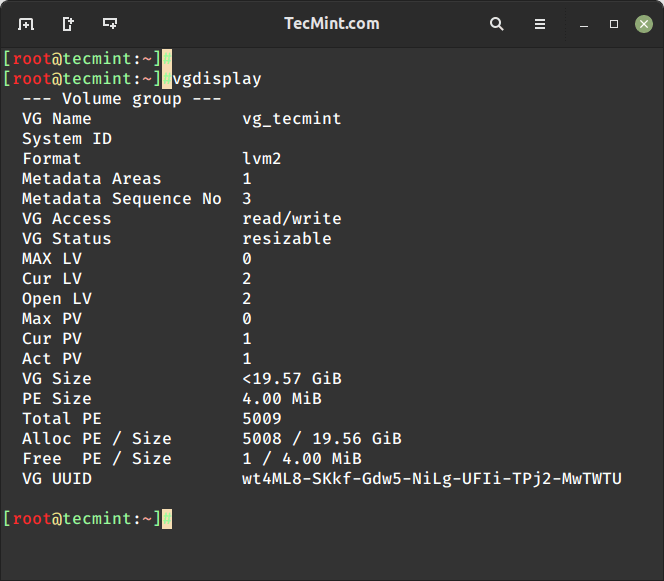
Here, is the description of each parameter shown in the above screenshot.
- VG Name – A volume group name.
- Format – LVM architecture used lvm2.
- VG Access – The Volume Group is in read-and-write mode and ready to use.
- VG Status – The Volume Group can be resized. We can expand it if we need to add more space.
- Cur LV – Currently, there are 2 Logical volumes in this Volume Group.
- CurPV and Act PV – Currently, the physical disk in use is 1 (vda), and it’s active. So, we can use this Volume Group.
- PE Size – Physical Extents (PEs) and size for a disk can be defined using either PE or GB size. The default PE size of LVM is 4 MB. For example, if we need to create a 5 GB logical volume, we can use a sum of 1280 PEs. Do you understand what I’m saying?
Here’s the explanation: 1 GB is equal to 1024 MB, so 1024 MB x 5 = 5120 PE = 5 GB. Now, divide 5120 by 4 = 1280. 4 is the default PE size.
- Total PE – This Volume Group has.
- Alloc PE – Total PE Used, full PE already Used, 5008 x 4PE = 20032.
- Free PE – Here it’s already used so there was no free PE.
5. Now list the file system disk space information, here only sda is used with /boot, /, and swap on the sda physical disk using LVM. There is no space remaining on this disk.
# df -TH

The above image shows the mount point we are using, and the 19GB is fully used for the root, so there is no free space available.
Create a Disk Partition
6. So, let’s create a new physical volume (PV) and volume group (VG) named tecmint_add_vg, and create logical volumes (LVs) within it. Here, we can create 4 logical volumes with the names tecmint_documents, tecmint_manager, and tecmint_public.
We can extend the Volume Group of the currently used VG to get more space. However, in this case, we are going to create a new Volume Group and experiment with it. Later, we can see how to extend the file systems of the Volume Group that is currently in use.
Before using a new disk, we need to partition the disk using the fdisk command as shown.
# fdisk -c /dev/sdb
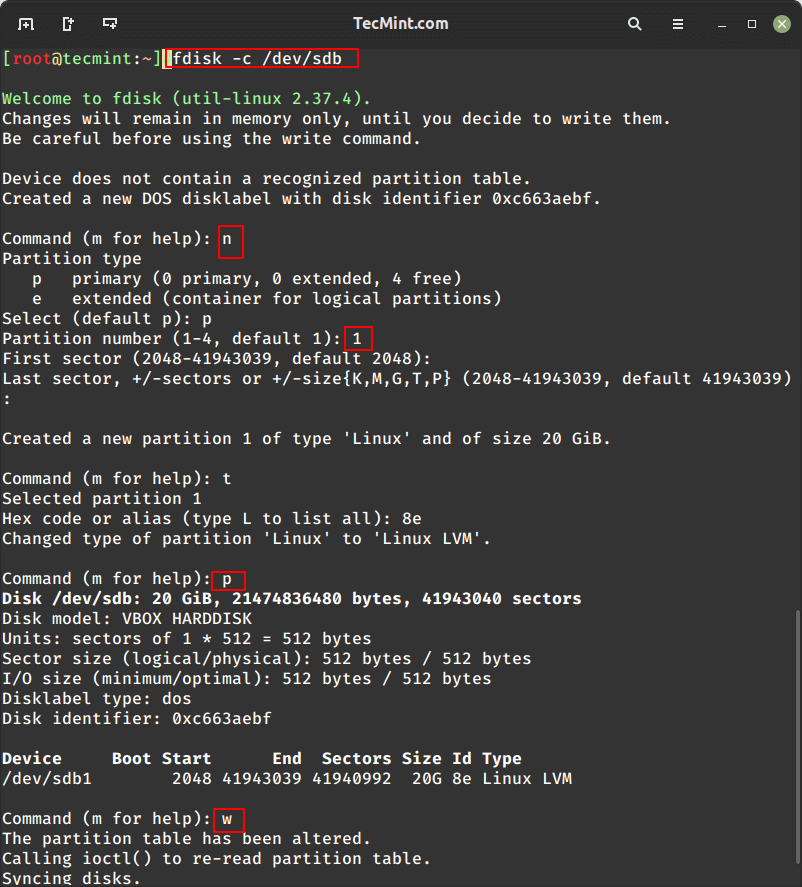
Next, follow the below steps to create a new partition.
- Choose
nto create new. - Choose
pto create a primary partition. - Choose which number of partitions we need to create.
- Press enter twice to use the full space of the disk.
- We need to change the type of newly created partition type
t. - Which number of partition need to change, choose the number which we created its
1. - Here we need to change the type, we need to create LVM so we going to use the type code of LVM as
8e, if we do not know the type code PressLto list all types of codes. - Print the partition that we created to just confirm.
- Here we can see the ID as 8e LINUX LVM.
- Write the changes and exit the fdisk.
7. Do the above steps for the other 2 disks sdc and sdd to create new partitions. Then restart the machine to verify the partition table using the fdisk command.
# fdisk -l
Create LVM Physical Volume
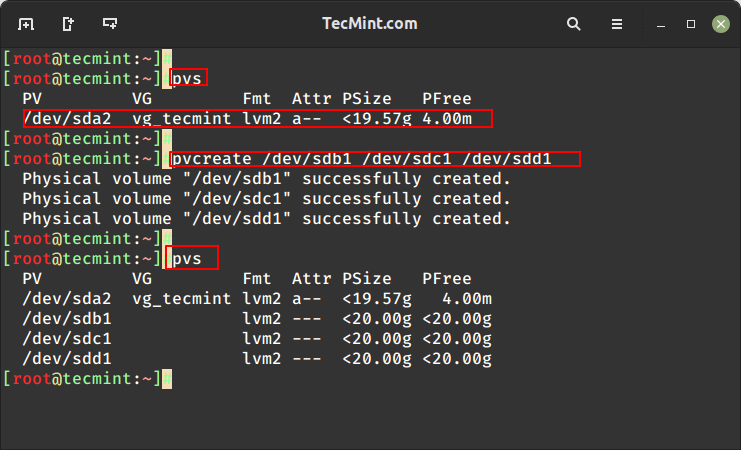
8. Now, it’s time to create Physical Volumes using all 3 disks. Here, I have listed the physical disks using the ‘pvs‘ command, and now only one default PV is listed.
# pvs
9. Then create the new physical disks and confirm the newly created physical disks.
# pvcreate /dev/sdb1 /dev/sdc1 /dev/sdd1
# pvs
Creating LVM Volume Groups
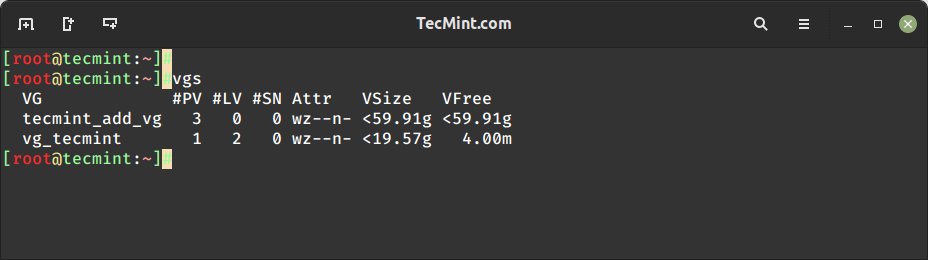
10. Create a Volume Group named tecmint_add_vg using the available free PV and a PE size of 32. To display the current volume groups, we can see that there is one volume group with 1 PV in use.
# vgs
11. This will create the volume group named tecmint_add_vg using a 32MB PE size and the 3 physical volumes we created in the last steps.
# vgcreate -s 32M tecmint_add_vg /dev/sdb1 /dev/sdc1 /dev/sdd1
12. Next, verify the volume group by running the vgs command again.
# vgs
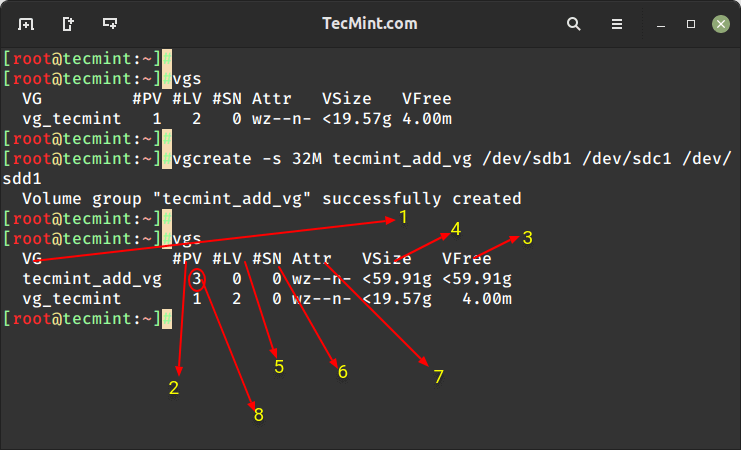
Understanding vgs command output:
- Volume Group name.
- Physical Volumes used in this Volume Group.
- Shows free space available in this volume group.
- Total Size of the Volume Group.
- Logical Volumes inside this volume group, Here we have not yet created so there is 0.
- SN = Number of Snapshots the volume group contains. (Later we can create a snapshot).
- Status of the Volume group as Writeable, readable, resizeable, exported, partial, and clustered, Here it is wz–n- that means w = Writable, z = resizeable.
- Number of Physical Volume (PV) used in this Volume Group.
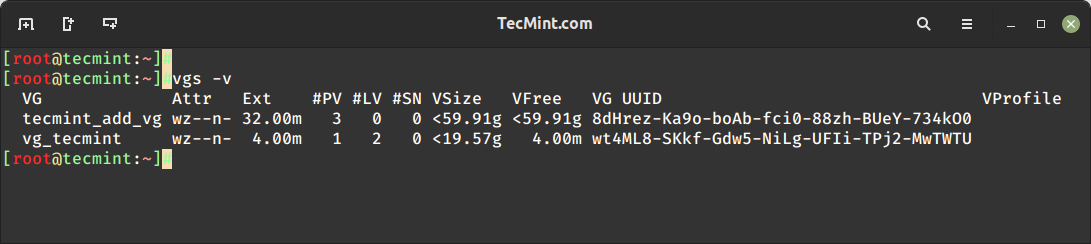
13. To display more information about the volume group use the command.
# vgs -v
14. To get more information about newly created volume groups, run the following command.
# vgdisplay tecmint_add_vg
Here, is the description of each parameter shown in the above screenshot.
- Volume group name
- LVM Architecture used.
- It can be read and write state, ready to use.
- This volume group can be resizeable.
- No Physical disk was used and they are active.
- Volume Group total size.
- A Single PE size was 32 here.
- Total number of PE available in this volume group.
- Currently, we have not created any LV inside this VG so it’s totally free.
- UUID of this volume group.
Creating LVM Logical Volumes
15. Now, create 3 Logical Volumes named tecmint_documents, tecmint_manager, and tecmint_public. Here, we will demonstrate how to create Logical Volumes using both PE size and GB size.
First, list the current Logical Volumes using the following command..
# lvs

16. These Logical Volumes are in the vg_tecmint Volume Group. To see how much free space is available to create logical volumes, list the Volume Group and available Physical Volumes using the ‘vgs‘ command.
# vgs
The volume group size is almost 60GB, and it is unused, so we can create LVs in it. Let us divide the volume group into equal sizes to create 3 Logical Volumes. That means 60GB/3 = 20GB. Each Logical Volume will be 20GB in size after creation.
Method 1: Creating Logical Volumes using PE Size
First, let us create Logical Volumes using the Physical Extent (PE) size. We need to know the default PE size assigned to this Volume Group and the total available PEs to create new Logical Volumes.
Run the following command to get this information.
# vgdisplay tecmint_add_vg
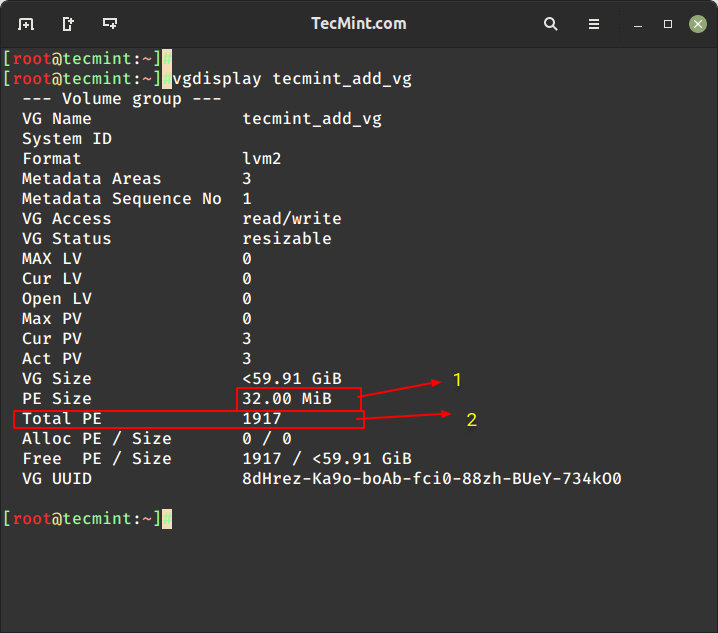
- The default PE Assigned for this VG is 32MB, Here Single PE size will be 32MB.
- Total Available PE is 1917.
Just do and see a little Calculation using the bc command.
# bc
1917PE/3 = 639 PE.
639 PE x 32MB = 20448 --> 20GB
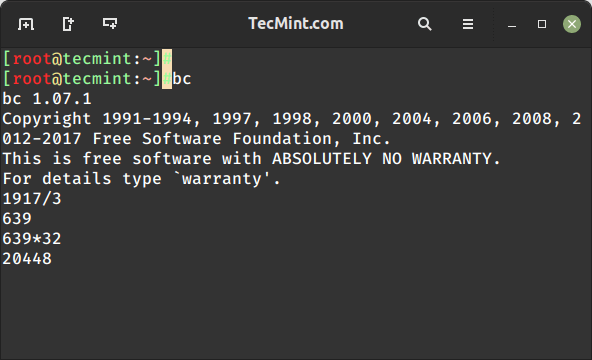
Press CRTL+D to exit from bc.
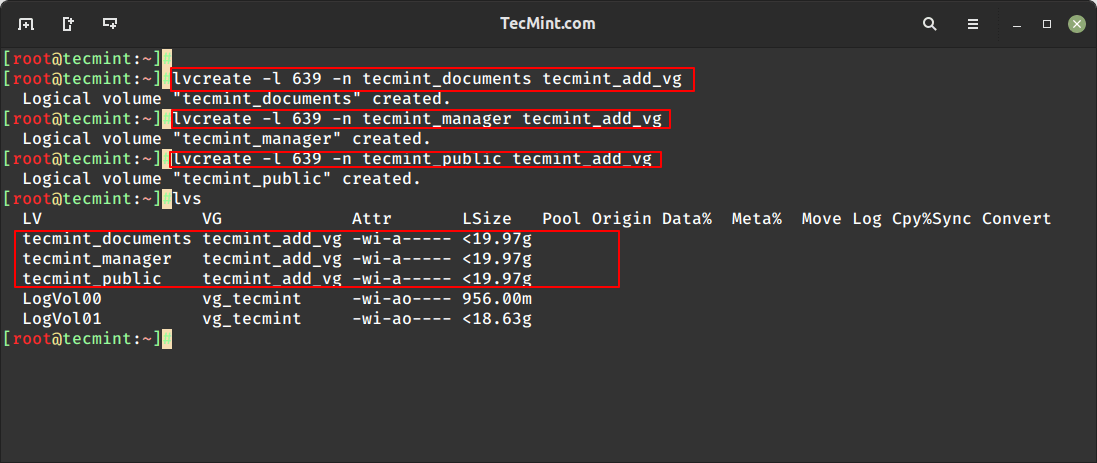
Let us now create 3 Logical Volumes using 639 PE’s. Here -l used to extend the size and -n to assign a logical volume name.
# lvcreate -l 639 -n tecmint_documents tecmint_add_vg
# lvcreate -l 639 -n tecmint_manager tecmint_add_vg
# lvcreate -l 639 -n tecmint_public tecmint_add_vg
List the created Logical Volumes using lvs command.
# lvs
Method 2: Creating Logical Volumes using GB Size
While creating Logical Volume using GB size we cannot get the exact size. So, the better way is to create using extend.
# lvcreate -L 20G -n tecmint_documents tecmint_add_vg
# lvcreate -L 20G -n tecmint_manager tecmint_add_vg
# lvcreate -L 20G -n tecmint_public tecmint_add_vg
# lvcreate -L 20G -n tecmint_public tecmint_add_vg
List the Created logical Volumes using lvs command.
# lvs
Here, we can see while creating the 3rd LV we can’t Round-up to 20GB, it is because of small changes in size, but this issue will be ignored while creating LV using Extend size.
Creating File System
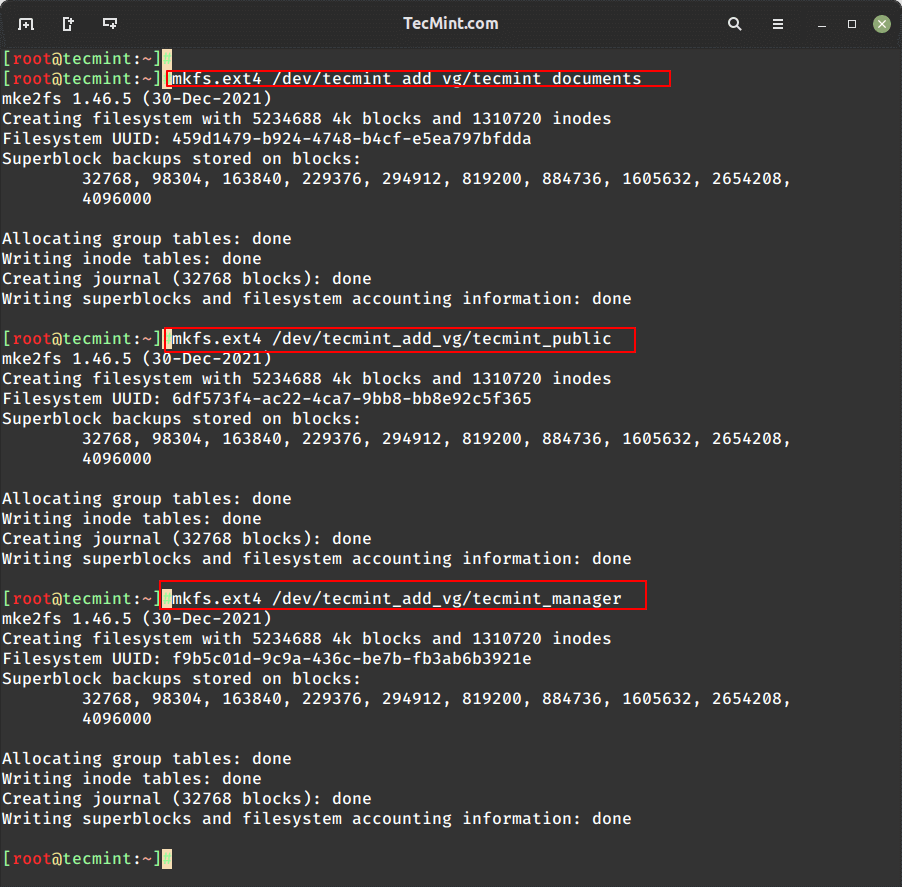
17. For using the logical volumes we need to format. Here I am using the ext4 file-system to create the volumes and going to mount them under /mnt/.
# mkfs.ext4 /dev/tecmint_add_vg/tecmint_documents
# mkfs.ext4 /dev/tecmint_add_vg/tecmint_public
# mkfs.ext4 /dev/tecmint_add_vg/tecmint_manager
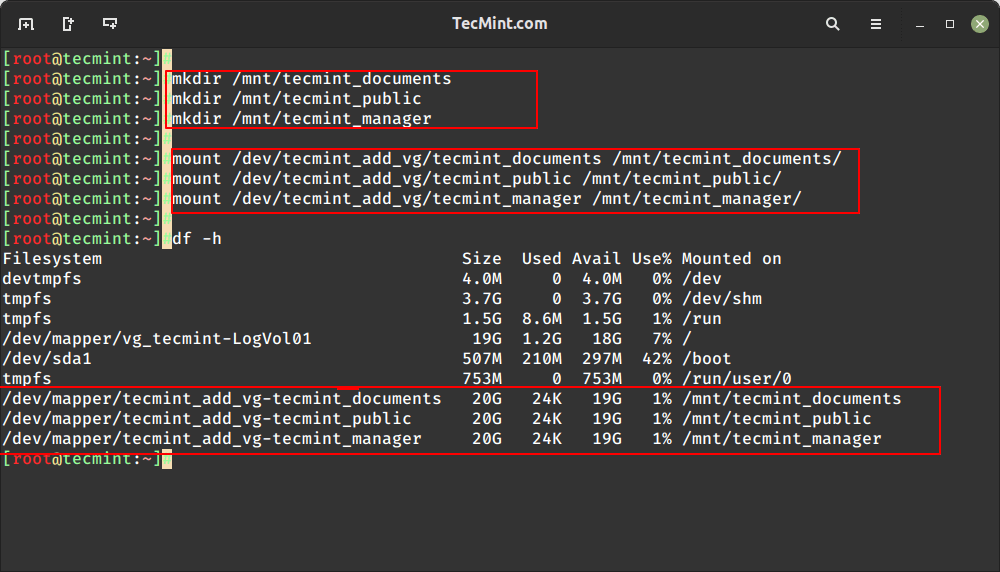
18. Let us create directories in /mnt and mount the Logical volumes that we have created file-system.
# mount /dev/tecmint_add_vg/tecmint_documents /mnt/tecmint_documents/
# mount /dev/tecmint_add_vg/tecmint_public /mnt/tecmint_public/
# mount /dev/tecmint_add_vg/tecmint_manager /mnt/tecmint_manager/
19. List and confirm the Mount point using.
# df -h
Permanent Mounting of Logical Volumes
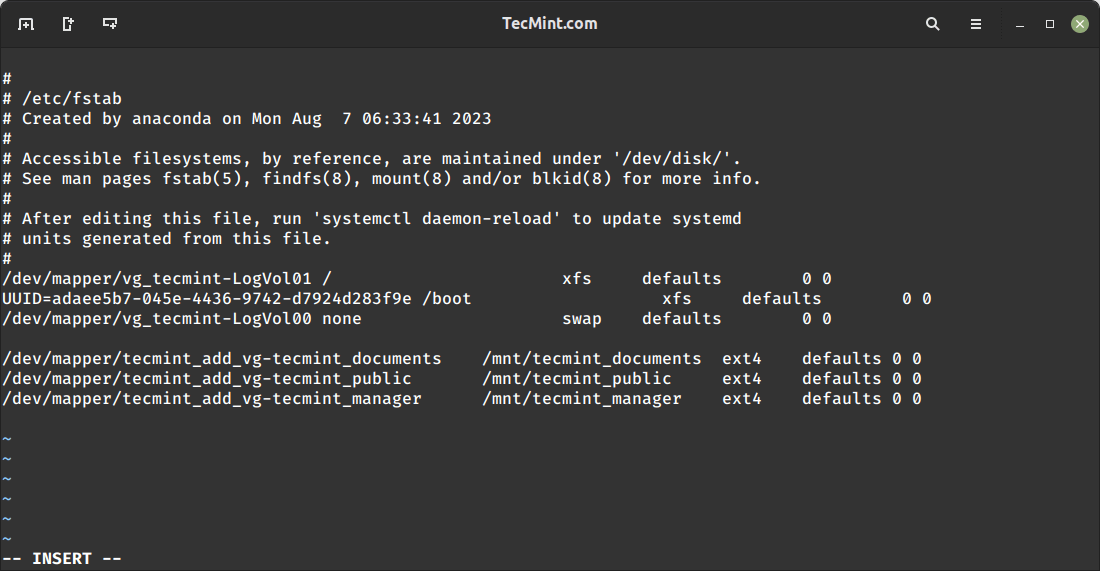
20. It’s now temporarily mounted, for permanent mount, we need to add the entry in fstab, for that let us get the mount entry from mtab using
# cat /etc/mtab
21. We need to make slight changes in the fstab entry while entering the mount entry contents copies from mtab, we need to change the rw to defaults
# vi /etc/fstab
Our fstab entries should look similar to the below sample.
/dev/mapper/tecmint_add_vg-tecmint_documents    /mnt/tecmint_documents  ext4    defaults 0 0
/dev/mapper/tecmint_add_vg-tecmint_public       /mnt/tecmint_public     ext4    defaults 0 0
/dev/mapper/tecmint_add_vg-tecmint_manager      /mnt/tecmint_manager    ext4    defaults 0 0
22. Finally, run the command mount -a to check for the fstab entry before restarting.
# mount -av
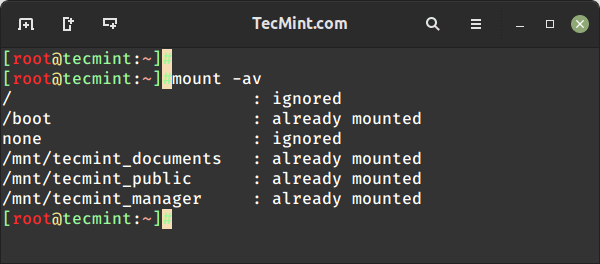
Here we have seen how to set up flexible storage with logical volumes by using physical disk to physical volume, physical volume to the volume group, and volume group to logical volumes.
In my upcoming future articles, I will see how to extend the volume group, and logical volumes, reduce logical volume, take snapshots, and restore from snapshots. Till then stay updated to TecMint for more such awesome articles.


Thanks, very helpful article…
What is the purpose of
/etc/mtabfile? what is difference between fstab and mtab?Can we use a full disk for LVM without partitioning or is it necessary to partition the disk for LVM
@ Priyashree,
We can use full disk without partitioning.
Thanks, please add more information about why we should choose a bigger or smaller PE size.
@Imad,
Bigger PE size will be good, a large number of extents will slow down the tools but it won’t affect any I/O performance. Large size file system large value of PE is good by default it will select 4 MB.
Regards,
Hello,
Good article.
I have 1 query. Can we mount more than 1 directory in same logical volume?
For example: /mnt_techmint_documents , /mnt_techmint_public on same logical volume (/dev/mapper/techmint_add_vg_techmint_documents)
@Swati,
No, You can’t mount a single Logical Volume to multiple directories.
Thanks & Regards,
Babin Lonston
Thx, It’s helpful lol
please send interview questions and answers to my mail…
How to check how much space is utilize via LV in Sectors and tracks ?
if am removing volume from vg there output is /dev/vdb2 is Still in use ?
hello.
In No 10 you told that :
“List and see how much free spaces are there to create logical volumes using pvs command”
But its picture is output of vga command
please correct the sentens and picture.
Thank you.
Thank you very much for the details. Now it’s easy for me to understand LVM concept.
Very Good… Keep it UP
Hi
Please tell – should I use system-storage-manager (ssm) for Centos 7?
Thank you
@Dmitry
System Storage manager is to manage your lvm, btrfs, dm, encrypted vls and more, If you are familiar with LVM no need of SSM
Hi Babin,
good post.
I have some doubts when trying to repeat your steps. I’m playing with oVirt 3.4 Glusterized, and CentOS 6.5 .
In my two physical hosts, added a new FC LUN with 200 GB.
How do I use it?
How do I configure multipath? I see two paths to the same LUN.
[root @ CentOS-H1 ~] # lsscsi
[0: 0: 0: 0] disk HP LOGICAL VOLUME 3.55 / dev / sda
[0: 1: 0: 0] B320i storage HP 3:55 –
[5: 0: 0: 0] cd / dvd hp DVDRAM GT80N EA02 / dev / sr0
[7: 0: 0: 0] disk VRAID 0533 DGC / dev / sdb
[7: 0: 1: 0] disk VRAID 0533 DGC / dev / sdd
[8: 0: 0: 0] disk HP iLO LUN 0 2:09 00 Media / dev / sdc
[root @ CentOS-H1 ~] # multipath -ll
36006016043a036009f784f47cf0ce411 dm-2 DGC, VRAID
size = 200G features = ‘1 queue_if_no_path’ hwhandler = “1 emc ‘wp = rw
| – + – Policy = “round-robin 0 ‘prio = 1 status = active
| `- 7: 0: 1: 0 sdd 8:48 ready active running
`- + – Policy =” round-robin 0 ‘prio = 0 status = enabled
`- 7: 0: 0: 0 SDB enable ready running 8:16
[root@CentOS-H1 ~]# pvs
PV VG Fmt Attr PSize PFree
/dev/mapper/36006016043a036009f784f47cf0ce411p1 lvm2 a– 200.00g 200.00g
/dev/sda2 vg_centosh1 lvm2 a– 558.24g 0
I’m not a Linux guy, but wanted to test the oVirt 3.4, Glusterized.
Can you give me some tips please?
Thanks in advance.
good post.
// Thanks buddy //
I have some doubts when trying to repeat your steps. I’m playing with oVirt 3.4 Glusterized, and CentOS 6.5 .
In my two physical hosts, added a new FC LUN with 200 GB.
How do I use it?
How do I configure multipath? I see two paths to the same LUN.
// If you get the LUN in two paths mean already picked by multipath. If you need to assign a alias you can edit the file under /etc/multipath.conf and give a alias find the LUN id under /dev/disks/by-id/ then give the LUN id in multipath.conf. Even we can change the permission to some other users. //
[root @ CentOS-H1 ~] # lsscsi
[0: 0: 0: 0] disk HP LOGICAL VOLUME 3.55 / dev / sda
[0: 1: 0: 0] B320i storage HP 3:55 –
[5: 0: 0: 0] cd / dvd hp DVDRAM GT80N EA02 / dev / sr0
[7: 0: 0: 0] disk VRAID 0533 DGC / dev / sdb
[7: 0: 1: 0] disk VRAID 0533 DGC / dev / sdd
[8: 0: 0: 0] disk HP iLO LUN 0 2:09 00 Media / dev / sdc
[root @ CentOS-H1 ~] # multipath -ll
36006016043a036009f784f47cf0ce411 dm-2 DGC, VRAID
size = 200G features = ‘1 queue_if_no_path’ hwhandler = “1 emc ‘wp = rw
| – + – Policy = “round-robin 0 ‘prio = 1 status = active
| `- 7: 0: 1: 0 sdd 8:48 ready active running
`- + – Policy =” round-robin 0 ‘prio = 0 status = enabled
`- 7: 0: 0: 0 SDB enable ready running 8:16
// babin 36006016043a036009f784f47cf0ce411 dm-2 DGC, VRAID // In this line you will get the alias which you have assigned in multipath.conf
// dm-2 // this is the device we going to format and create a mount point
Then to create a mount point we need to do the below steps.
# pvcreate /dev/mapper/dm-2
# vgcreate volgrp /dev/mapper/dm-2
# lvcreate -L +200G -n logvol01 /dev/mapper/dm-2
then format it and mount it under any mount point
# mkfs.ext4 /dev/mapper/volgrp-logvol01
mount it
# mount /dev/mapper/volgrp-logvol01 /mnt/babin
//
[root@CentOS-H1 ~]# pvs
PV VG Fmt Attr PSize PFree
/dev/mapper/36006016043a036009f784f47cf0ce411p1 lvm2 a– 200.00g 200.00g
/dev/sda2 vg_centosh1 lvm2 a– 558.24g 0
Above step is fine but not using a alias and it will get confuse once you have more storage disks in same machine.
//
Welcome..
excelente….
@JuanSys76 Thanks dear, Follow us to get more on LVM
Welcome bro, sorry for the typo will clear ..
Hi,
nice article, heres a little addition:
You want to use option “-c” of fdisk to make sure that there is a correct alignment (dividable with 2), without this option your partition starts at 63 which leads to a misaligned disk and reduced performance.
Greetings
Oliver
@oliver yes the option -c used there already, please have a look.
HI,
Article is good except some typos.
Keep posting such a good article.