There are several type of DNS servers such as master, slave, forwarding and cache, among them Caching-Only DNS is the one, which is easier to setup. DNS use UDP protocol so it will reduce the query time because UDP protocol does not have an acknowledgement.
Read Also: Setup Master-Slave DNS Server in CentOS 6.5
The caching-only DNS server is also known as a resolver. It will query DNS records and get all DNS information from other servers and stores the each query request in its cache for later use. While we are querying same request for the second time, it will serve from its cache, this way it reduces query time.
If you’re looking to setup DNS Caching-Only Server in CentOS/RHEL 7, follow this guide here:
Setting Up Caching-Only DNS Name Server in CentOS/RHEL 7
My Testing Environment
IP Address	:	192.168.0.200
Host-name	:	dns.tecmintlocal.com
OS		:	Centos 6.5 Final
Ports Used	:	53
Config File	:	/etc/named.conf
script file	:	/etc/init.d/named
Step 1: Installing Caching-Only DNS
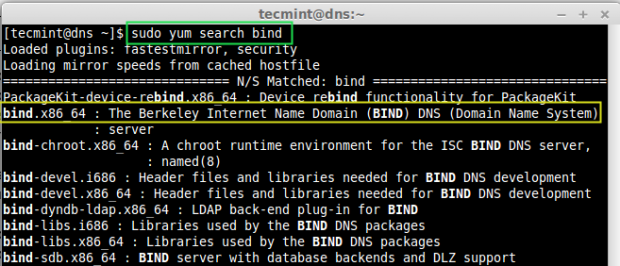
1. The Caching-Only DNS, can be installed by using package ‘bind‘. Let’s do a small search for the package name if we don’t remember the fill package name using below command.
# yum search bind
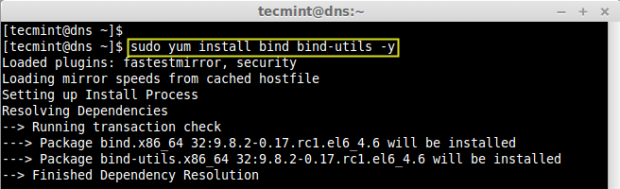
2. In the above result, you see the packages that displayed. From that we need to choose the ‘bind‘ and ‘bind-utils‘ packages, let’s install them using following ‘yum‘ command.
# yum install bind bind-utils -y
Step 2: Configure Caching-Only DNS
3. Once, DNS packages are installed, move forward to configure DNS. Open and edit ‘named.conf‘ file using vim editor.
# vim /etc/named.conf
4. Next, make changes as suggested below or you can use your settings as per your requirements. Following are the changes, that we need to do for a caching-only DNS server. Here, by default the localhost will be there, we need to add the ‘any‘ to accept query from any range of network.
listen-on port 53 { 127.0.0.1; any; };
allow-query     { localhost; any; };
allow-query-cache       { localhost; any; };
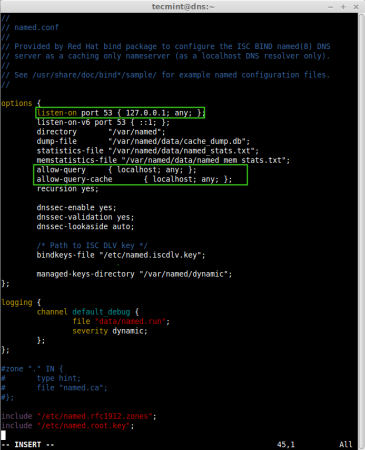
- listen-on port 53 – This say that Cache server want to use the port 53 for query.
- allow-query – This Specifies which ip address may query the server, here I have defined for localhost, from anywhere anyone can send query.
- allow-query-cache – This will add the query request to the bind.
- recursion – This will query the answer and give back to us, during query it may send query to other DNS server over the internet and pull back the query.
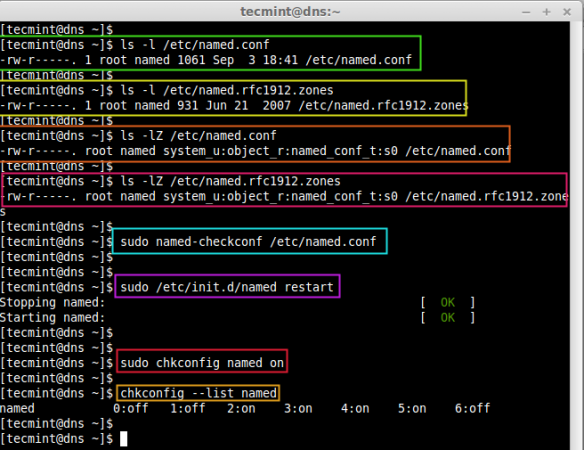
5. After editing the file, we have to confirm whether the ‘named.conf‘ files ownership was not changed from root:named, because the DNS runs under a system user named.
# ls -l /etc/named.conf
# ls -l /etc/named.rfc1912.zones
6. If the server enabled with selinux, after editing ‘named.conf‘ file, we need to check for the selinux context, every named config files need to be in “system_u:object_r:named_conf_t:s0” context as shown in the image below.
# ls -lZ /etc/named.conf
# ls -lZ /etc/named.rfc1912.zones
Okay, here we need to test DNS configuration now for some syntax error, before starting the bind service, if any error found some can be traced from /var/messages too.
# named-checkconf /etc/named.conf
After the syntax check results seems perfect, restart the service to take effect for above changes and make the service to run persistent while reboot the server and confirm the same.
# /etc/init.d/named restart
# chkconfig named on
# chkconfig --list named
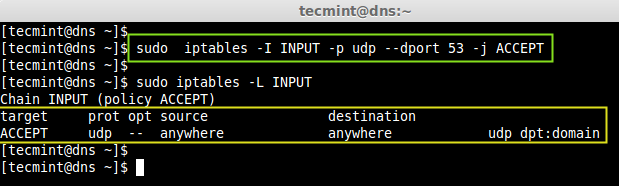
7. Next, open the port 53 on the firewall to allow the access.
# iptables -I INPUT -p udp --dport 53 -j ACCEPT
Step 4: Chroot Caching-Only DNS
8. If you want to run the DNS caching-server under chroot environment, you need to install the chroot package only, no need of further configuration, as it by default hard-link to chroot.
# yum install bind-chroot -y
Once chroot package has been installed, you can restart the named service to take new changes.
# /etc/init.d/named restart
9. Once you restart named service, it automatically create a hard-link from the /etc/named config files to /var/named/chroot/etc/ directory. To confirm, just use the cat command under /var/named/chroot.
# sudo cat /var/named/chroot/etc/named.conf
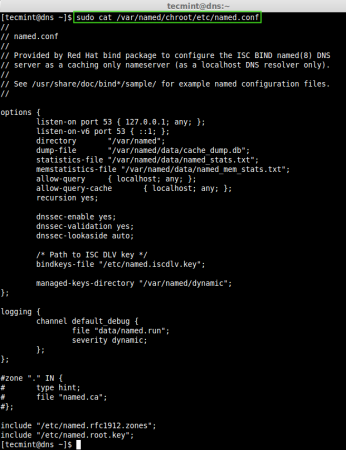
In the above configuration, you will see the same /etc/named.conf configuration, as it will be replaced while installing bind-chroot package.
Step 5: Client Side DNS Setup
10. Add the DNS caching servers IP 192.168.0.200 as resolver to the client machines.
In Debian based machines it will be under /etc/resolv.conf and in RPM based machines it will be under setup command or we can edit manually under /etc/sysconfig/network-scripts/ifcfg-eth0 file.
11. Finally it’s time to check our cache server using some tools. We can test using dig & nslookup commands in Linux systems, and in windows you can use the nslookup command.
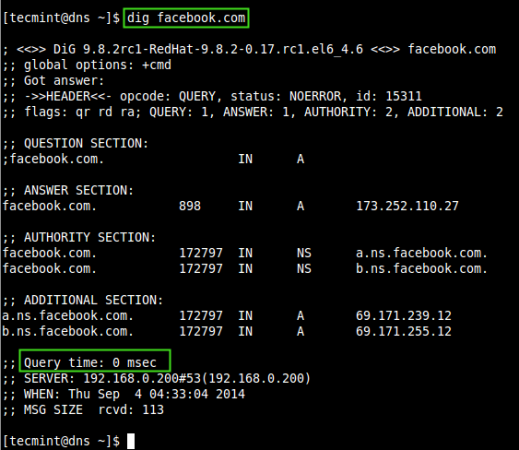
Let’s query ‘facebook.com‘ for first time, so that it will cache its query.
# dig facebook.com
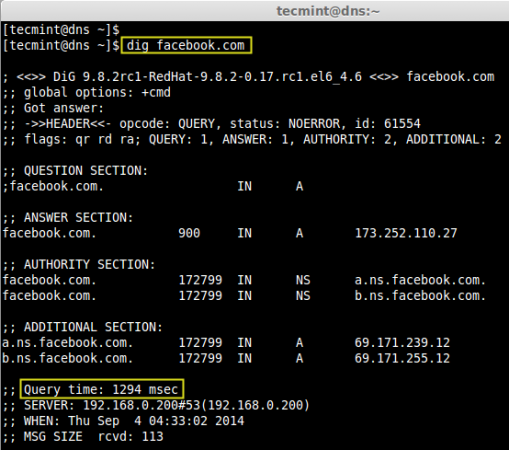
Now, issue again same query, you will get replied from our cache server till it expires.
# dig facebook.com
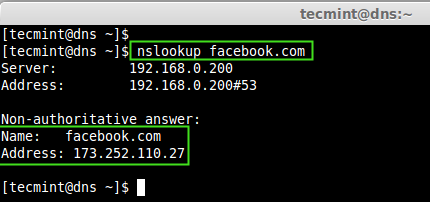
Use ‘nslookup‘ command to confirm the same.
# nslookup facebook.com
To read more about dig and nslookup command examples and usage, use the following links.
Here we have seen how successfully we have setup a DNS caching-only server using bind package and also secured it using chroot package.


Nice doc. After step 2, i see step 4.
please correct it.
Why is the zone “.” root hints and the rest of the lines commented out? Isn’t the dns cache server supposed to search recursively, meaning to start with the root hints and then go downwards until it finds the domain? If you comment out the root hints zone, how is it supposed to do that? It would need a forwarders directive.
thanks for the great info on setting the caching only dns server up with bind! I was trying to set up with both unbound on one server and bind on another and this was just what I needed. Unbound seems to not be used as much yet, maybe because it is newer than bind? In case anyone else is after unbound information I recommend checking this information which helped me a LOT:
https://www.rootusers.com/how-to-configure-a-caching-only-dns-name-server/
https://www.digitalocean.com/community/tutorials/how-to-set-up-the-unbound-caching-dns-resolver-on-freebsd-10-1
Good luck!
Would/should this configuration be locked down tighter perhaps with an acl that would disallow access to the nameserver from unauthorized/unwanted clients that might attempt to exploit for a DOS attack on another site?
Your config:
allow-query { localhost; any; };
allow-query-cache { localhost; any; };
Suggestion:
allow-query { friends; };
acl friends {
192.168.0/24;
localhost;
localnets;
};
how greate! Thank u so much.
You can use Webmin to manage in GUI, Using Webmin we can manage full server not only DNS.
Nice article, thanks for sharing, is there any option to manage DNS in GUI instead of TUI… any open source tools which could be integrated with this and for the Master/Slave DNS setup??
@ Vinodh You can use Webmin..