Domain Name Server (DNS) used for name resolving to any hosts. Master DNS servers (Primary Server) are the original zone data handlers and Slave DNS server (Secondary Server) are just a backup servers which is used to copy the same zone information’s from the master servers. Master Server will resolve the names for every hosts which we defined in the zone database and use UDP protocol, because UDP protocols never use the acknowledgement process while tcp uses acknowledgement. DNS servers also use UDP protocols to resolve the query request at the earliest.
How DNS Works?
Understanding DNS might be little confusing for newbies. Here is a brief explanation on how the DNS work’s.
Let’s say, if we need to access any website what we will do? Just type www.google.com in browser and hit enter. Hmm that’s all we know, but the fact is, how pain DNS go through it, while querying for us. While we type www.google.com the system will look for www.google.com. Whenever we type some domain name, there is a . (dot) at the end of the www.google.com that say to search the root server of namespace.
Globally there are 13 root servers available to resolve the query. At first, while we hit enter as www.google.com our browser will pass a request to our local resolver, which has entry about our master and slave DNS server info. If they don’t have info about such requested query they will pass the request to the Top Level domain (TLD), if TLD say I don’t know the request, may be the authoritative server know your request, it will forward to authoritative servers, here only www.google.com was defined as address 72.36.15.56.
In mean time authoritative server will give the answer to TLD and TLD will pass to root server and root will provide the info to browser, hence the browser will cache the DNS request for future use. Thus these long process will just resolve with in milliseconds. If they don’t know the request they will reply as NXDOMAIN. That means, there is no record any-were found in the Zone database. Hope this makes you to understand how the DNS works.
Read Also: Setup DNS Cache Server in Ubuntu
My Testing Environment
For this article, I’m using 3 machines, 2 for server setup (master and slave) and 1 for client.
---------------------------------------------------
Master DNS Server
---------------------------------------------------

IP Address	:	192.168.0.200
Host-name	:	masterdns.tecmintlocal.com
OS		:	Centos 6.5 Final
---------------------------------------------------
Slave DNS Server
---------------------------------------------------

IP Address	:	192.168.0.201
Host-name	:	slavedns.tecmintlocal.com
OS		:	Centos 6.5 Final
---------------------------------------------------
Client Machine to use DNS
---------------------------------------------------

IP Address	:	192.168.0.210
Host-name	:	node1.tecmintlocal.com
OS		:	Centos 6.5 Final
Requirement Packages
bind, bind-utils, bind-chroot
Configuration Files Used
config file	:	/etc/named.conf
script file	:	/etc/init.d/named
Port & Protocols Used
53, UDP
Setup Master DNS Server
First, verify the IP address, Hostname and Distribution version of Master DNS Server, before moving forward for setup.
$ sudo ifconfig | grep inet
$ hostname
$ cat /etc/redhat-release

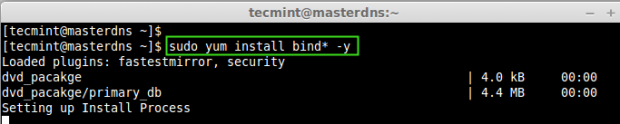
Once, you confirm that the above settings are correct, its time to move forward to install required packages.
$ sudo yum install bind* -y
Installing and Configuring Bind
After installing required packages, now define zone files in master configuration ‘named.conf‘ file.
$ sudo vim /etc/named.conf
Given below is my named.conf file entry, change the configuration file as per your need.
//
// named.conf
//
// Provided by Red Hat bind package to configure the ISC BIND named(8) DNS
// server as a caching only nameserver (as a localhost DNS resolver only).
//
// See /usr/share/doc/bind*/sample/ for example named configuration files.
//

options {
        listen-on port 53 { 127.0.0.1; 192.168.0.200; }; # Here we need to add our Master DNS Server IP.
        listen-on-v6 port 53 { ::1; };
        directory       "/var/named";
        dump-file       "/var/named/data/cache_dump.db";
        statistics-file "/var/named/data/named_stats.txt";
        memstatistics-file "/var/named/data/named_mem_stats.txt";
        allow-query     { localhost; 192.168.0.0/24; }; # subnet range where my hosts are allowed to query our DNS.
        allow-transfer     { localhost; 192.168.0.201; };  # Here we need to our Slave DNS server IP.
        recursion no;

        dnssec-enable yes;
        dnssec-validation yes;
        dnssec-lookaside auto;

        /* Path to ISC DLV key */
        bindkeys-file "/etc/named.iscdlv.key";

        managed-keys-directory "/var/named/dynamic";
};

logging {
        channel default_debug {
                file "data/named.run";
                severity dynamic;
        };
};

zone "." IN {
        type hint;
        file "named.ca";
};

## Define our forward & reverse Zone file here for tecmintlocal.com.


zone"tecmintlocal.com" IN {
type master;
file "tecmintlocal.fwd.zone";
allow-update { none; };
};

zone"0.168.192.in-addr.arpa" IN {
type master;
file "tecmintlocal.rev.zone";
allow-update { none; };
};

#####
include "/etc/named.rfc1912.zones";
include "/etc/named.root.key";

Following are the explanation of each configuration we used in above file.
- listen-on port 53 – This is used for the DNS to listen in available interfaces.
- Master DNS – Define, your Master DNS IP address to listen the query.
- Slave DNS – Define your Slave DNS, which is used to sync our zone information to resolve the hosts from Master.
- recursion no – If its set to yes, recursive queries will make the server into DDOS attack.
- Zone Name – Define your Zone name here defined as tecminlocal.com.
- type master – As this system was configured for a master server, for upcoming slave server this will be slave.
- tecmintlocal.fwd.zone – This file have the host information for this zone.
- allow-update none – If none will set. it won’t use Dynamic DNS (DDNS).
Creating Master Zone Files
At first let us define forward look-up zone entry. Here we need to create the zone files in the name of what we have define in the named.conf file as below.
tecmintlocal.fwd.zone
tecmintlocal.rev.zone
We use sample configuration files for creating forward zone files, for this we’ve to copy the sample configuration files.
$ sudo cp /var/named/named.localhost /var/named/tecmintlocal.fwd.zone
$ sudo cp /var/named/named.loopback /var/named/tecmintlocal.rev.zone

Once, you’ve copied configuration files, now edit these zones files using vim editor.
$ sudo vim /var/named/tecmintlocal.fwd.zone
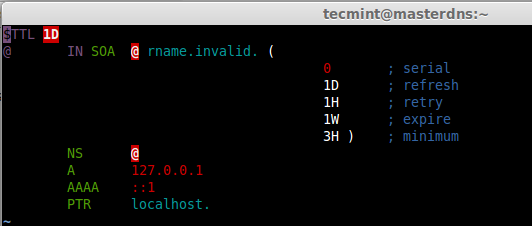
Before defining our host information in forward zone file, first have a quick look at the sample zone file.
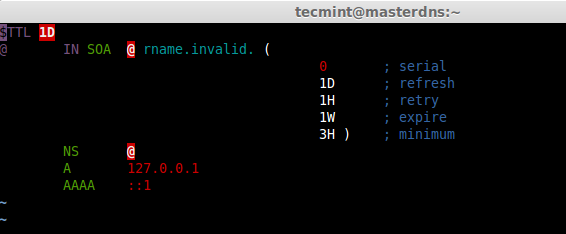
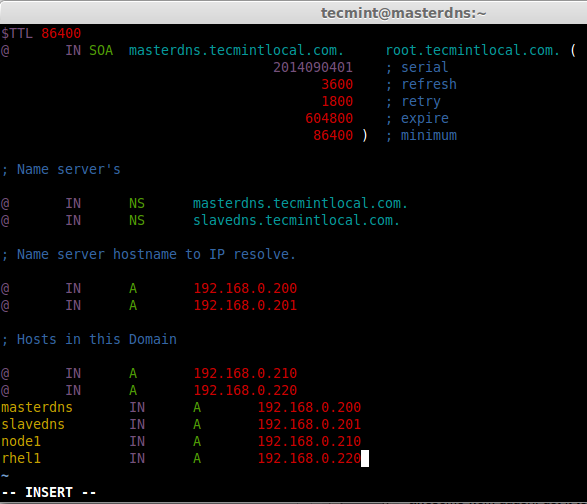
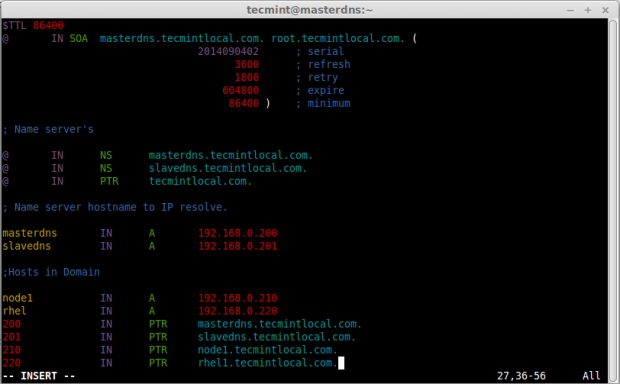
This is my forward zone configuration, append the below entry and make changes as per your need.
$TTL 86400
@       IN SOA  masterdns.tecmintlocal.com.     root.tecmintlocal.com. (
                                  2014090401    ; serial
                                        3600    ; refresh
                                        1800    ; retry
                                      604800    ; expire
                                       86400 )  ; minimum

; Name server's

@       IN      NS      masterdns.tecmintlocal.com.
@       IN      NS      slavedns.tecmintlocal.com.

; Name server hostname to IP resolve.

@       IN      A       192.168.0.200
@       IN      A       192.168.0.201

; Hosts in this Domain

@       IN      A       192.168.0.210
@       IN      A       192.168.0.220
masterdns       IN      A       192.168.0.200
slavedns        IN      A       192.168.0.201
node1           IN      A       192.168.0.210
rhel1           IN      A       192.168.0.220
Save and quit the file using wq!. After editing the forward look-up, it looks like below, Use TAB to get a decent format in zone file.
Now, create reverse lookup file, we have already made a copy of loop-back file in the name of tecmintlocal.rev.zone. So, we use this file to configure our reverse look-up.
$ sudo vim /var/named/tecmintlocal.rev.zone
Before defining our host information in reverse zone file, have a quick look of sample reverse lookup file as shown below.
This is my reverse zone configuration, append the below entry and make changes as your need.
$TTL 86400
@       IN SOA  masterdns.tecmintlocal.com. root.tecmintlocal.com. (
                                2014090402      ; serial
                                      3600      ; refresh
                                      1800      ; retry
                                    604800      ; expire
                                     86400 )    ; minimum

; Name server's

@       IN      NS      masterdns.tecmintlocal.com.
@       IN      NS      slavedns.tecmintlocal.com.
@       IN      PTR     tecmintlocal.com.

; Name server hostname to IP resolve.

masterdns       IN      A       192.168.0.200
slavedns        IN      A       192.168.0.201

;Hosts in Domain

node1           IN      A       192.168.0.210
rhel            IN      A       192.168.0.220
200             IN      PTR     masterdns.tecmintlocal.com.
201             IN      PTR     slavedns.tecmintlocal.com.
210             IN      PTR     node1.tecmintlocal.com.
220             IN      PTR     rhel1.tecmintlocal.com.
Save and quit the file using wq!. After editing the reverse look-up, it looks like below, Use TAB to get a decent format in zone file.
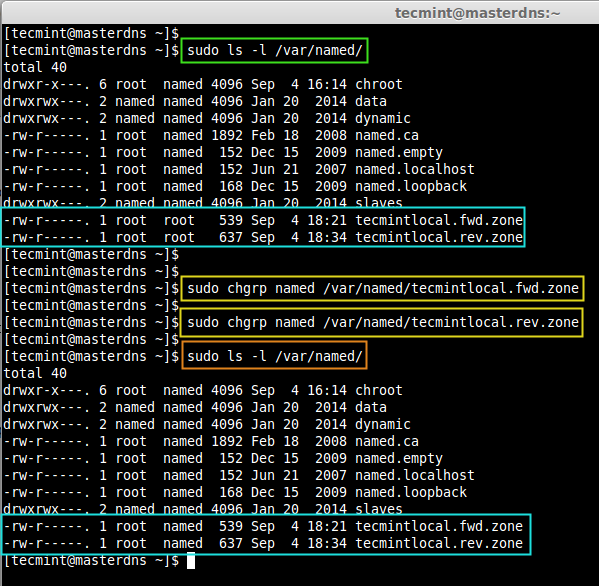
Check the group ownership of forward look-up & reverse look-up files, before checking for any errors in configuration.
$ sudo ls -l /var/named/
Here we can see both the files are in root users ownership, because files which we makes a copy from sample files are available under /var/named/. Change the group to named on both files using following commands.
$ sudo chgrp named /var/named/tecmintlocal.fwd.zone
$ sudo chgrp named /var/named/tecmintlocal.rev.zone
After setting correct ownership on the files, verify them again.
$ sudo ls -l /var/named/
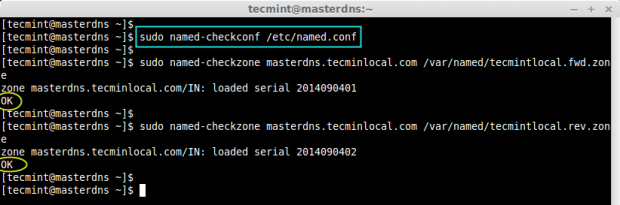
Now, check for the errors in zone files, before starting the DNS service. First check the named.conf file, then check other zone files.
$ sudo named-checkconf /etc/named.conf
$ sudo named-checkzone masterdns.tecminlocal.com /var/named/tecmintlocal.fwd.zone
$ sudo named-checkzone masterdns.tecminlocal.com /var/named/tecmintlocal.rev.zone
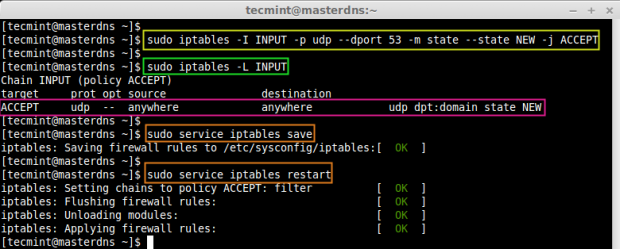
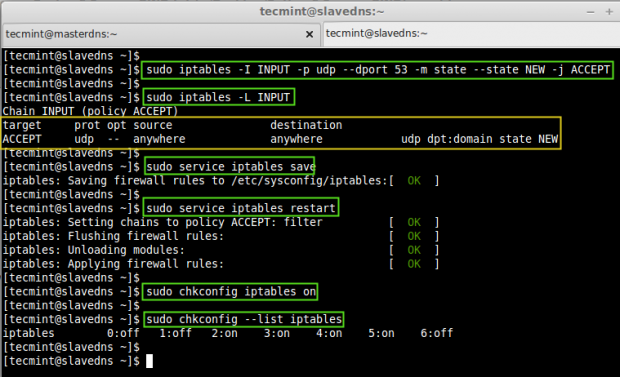
By default iptables was running and our DNS server is restricted to localhost, if client wants to resolve name from our DNS Server, then we have to allow the inbound request, for that we need to add iptables inbound rule for the port 53.
$ sudo iptables -I INPUT -p udp --dport 53 -m state --state NEW -j ACCEPT
Now, verify that the rules has been added correctly in INPUT chain.
$ sudo iptables -L INPUT
Next, save the rules and restart firewall.
$ sudo service iptables save
$ sudo service iptables restart
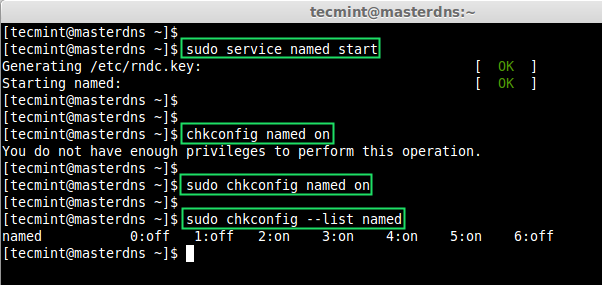
Start the named service and make it persistent.
$ sudo service named start
$ sudo chkconfig named on
$ sudo chkconfig --list named
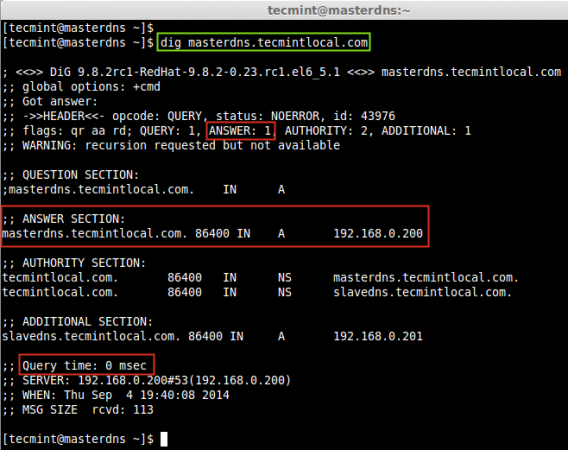
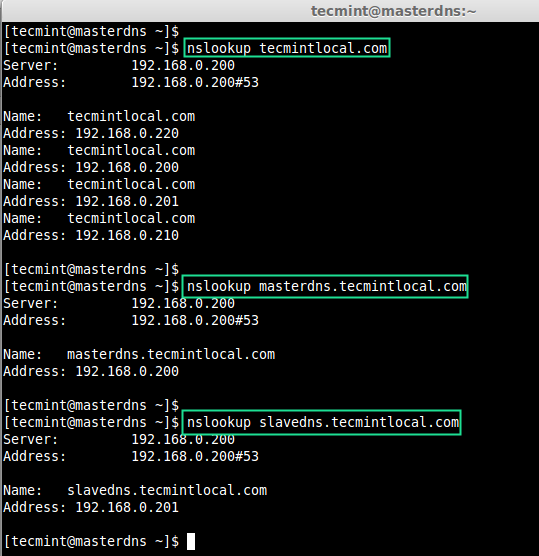
Finally, test the configured Master DNS zone files (forward and reverse), using dig & nslookup tools.
$ dig masterdns.tecmintlocal.com [Forward Zone]
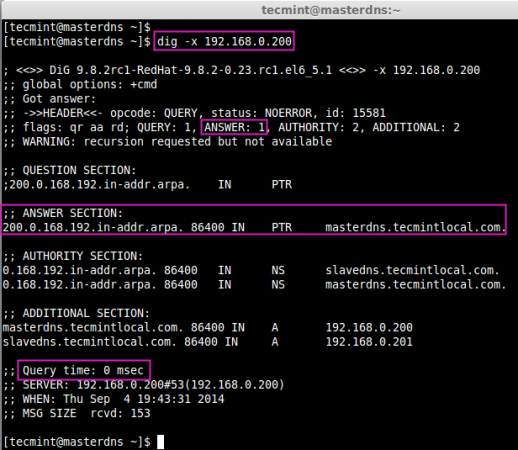
$ dig -x 192.168.0.200
$ nslookup tecmintlocal.com
$ nslookup masterdns.tecmintlocal.com
$ nslookup slavedns.tecmintlocal.com
Cool! we have configured a Master DNS, now we need to setup a Slave DNS Server. Let’s move forward to setup a slave server, This won’t take much time as master setup.
Setup Slave DNS Server
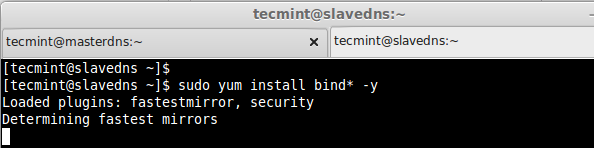
In Slave machine, also we need to install same bind packages as shown in Master, so let’s install them using following command.
$ sudo yum install bind* -y
Open and edit ‘named.conf’ file for our zone database and port listen.
$ sudo vim /etc/named.conf
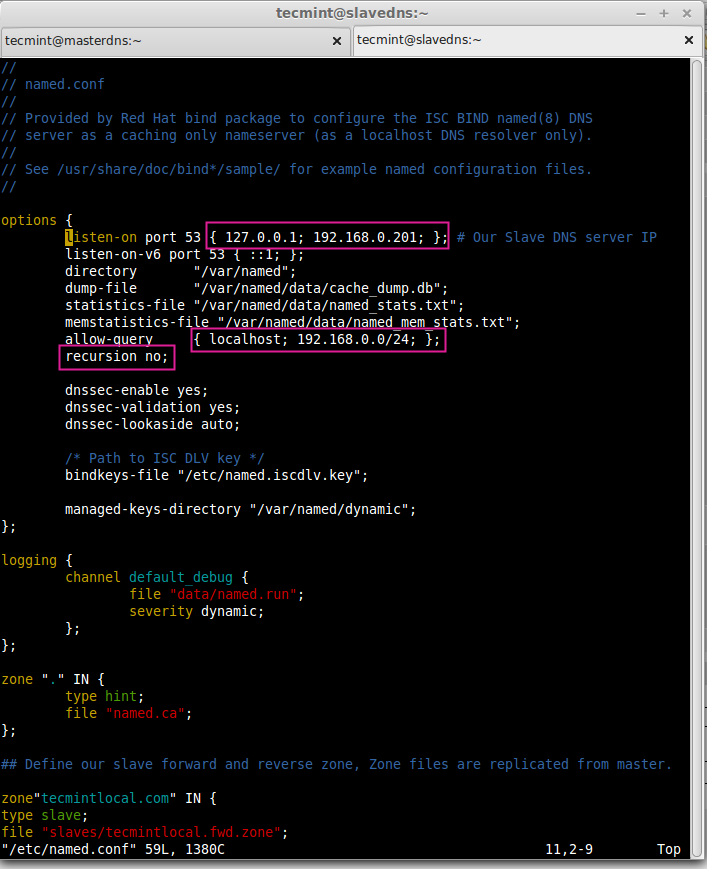
Make changes as shown, as per your requirements.
//
// named.conf
//
// Provided by Red Hat bind package to configure the ISC BIND named(8) DNS
// server as a caching only nameserver (as a localhost DNS resolver only).
//
// See /usr/share/doc/bind*/sample/ for example named configuration files.
//

options {
        listen-on port 53 { 127.0.0.1; 192.168.0.201}; # Our Slave DNS server IP
        listen-on-v6 port 53 { ::1; };
        directory       "/var/named";
        dump-file       "/var/named/data/cache_dump.db";
        statistics-file "/var/named/data/named_stats.txt";
        memstatistics-file "/var/named/data/named_mem_stats.txt";
        allow-query     { localhost; 192.168.0.0/24; };
        recursion no;

        dnssec-enable yes;
        dnssec-validation yes;
        dnssec-lookaside auto;

        /* Path to ISC DLV key */
        bindkeys-file "/etc/named.iscdlv.key";

        managed-keys-directory "/var/named/dynamic";
};

logging {
        channel default_debug {
                file "data/named.run";
                severity dynamic;
        };
};

zone "." IN {
        type hint;
        file "named.ca";
};

## Define our slave forward and reverse zone, Zone files are replicated from master.

zone"tecmintlocal.com" IN {
type slave;
file "slaves/tecmintlocal.fwd.zone";
masters { 192.168.0.200; };
};

zone"0.168.192.in-addr.arpa" IN {
type slave;
file "slaves/tecmintlocal.rev.zone";
masters { 192.168.0.200; };
};

#####
include "/etc/named.rfc1912.zones";
include "/etc/named.root.key";
Start the DNS service using.
$ sudo service named start
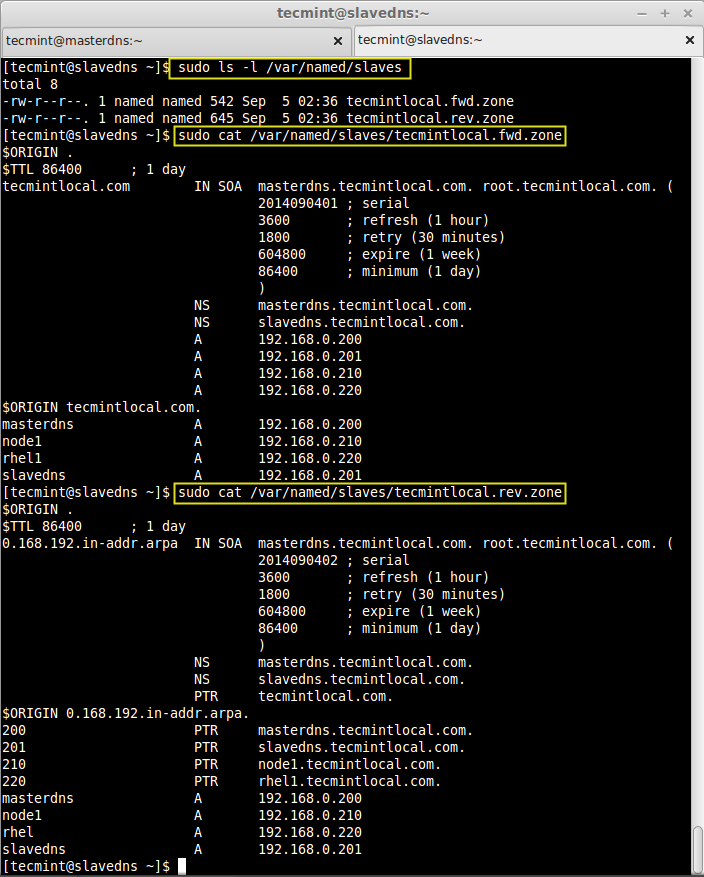
After restarting the bind service, we don’t have to define the zone information individually, as our allow-transfer will replicate the zone information from master server as shown in the image below.
$ sudo ls -l /var/named/slaves
Verify, the zone information using cat command.
$ sudo cat /var/named/slaves/tecmintlocal.fwd.zone
$ sudo cat /var/named/slaves/tecmintlocal.rev.zone
Next, open DNS port 53 on iptables to allow inbound connection.
$ sudo iptables -I INPUT -p udp --dport 53 -m state --state NEW -j ACCEPT
Save the iptables rules and restart the iptables service.
$ sudo service iptables save
$ sudo service iptables restart
Make the service persistent on system boot.
$ sudo chkconfig iptables on
Check whether persistent set for run-levels .
$ sudo chkconfig --list iptables
That’s it!. Now time to configure our client machines and check for the hostname.
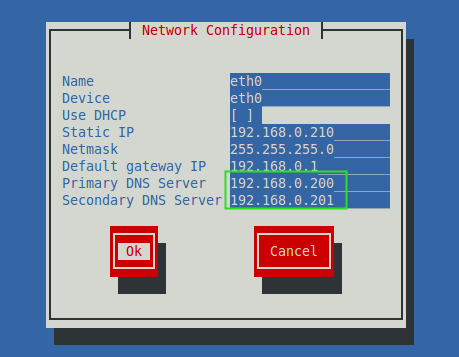
Configure Client Machine
In client side we need to assign the Primary (192.168.0.200) and Secondary DNS (192.168.0.201) entry in network settings to get assign a hostname. To do, run the setup command to define all these entries as shown in the picture.
$ setup
Else, edit the ‘/etc/reslov.conf‘ file and add the following entries.
$ vim /etc/resolv.conf
search tecmintlocal.com
nameserver 192.168.0.200
nameserver 192.168.0.201
Now, verify the ip, hostname and name server look-up.
$ ifconfig | grep inet
$ hostname
$ nslookup tecmintlocal.com

Now, check the forward & Reverse DNS look-up using.
$ dig masterdns.tecmintlocal.com
$ dig -x 192.168.0.200
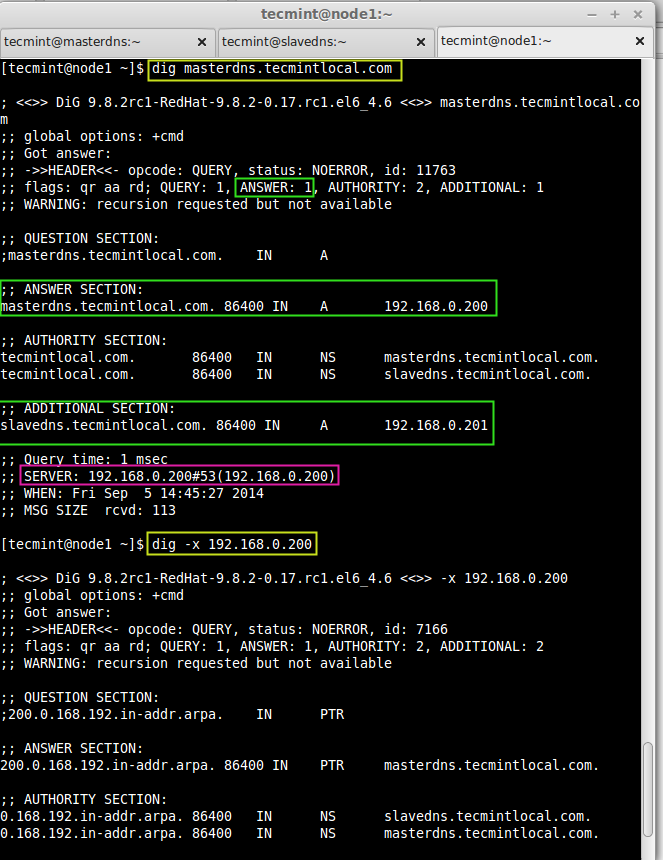
Understaing the dig Output:
- Header – This says everything what we have asked and how the result was.
- Status – Status was NO ERROR, that means which query request sent by us was successful without any ERROR.
- Question – The Query which was made by us, here my query was masterdns.tecmintlocal.com.
- Answer – The Query request resolved if there is available information.
- Authority – The name servers response for the domain and zone.
- Additional – Additional info’s regarding name-servers such as host-name and IP address.
- Query time – How long it took for resolving the names from the above servers.
Finally check for our node and make a ping.
$ dig node1.tecmintlocal.com
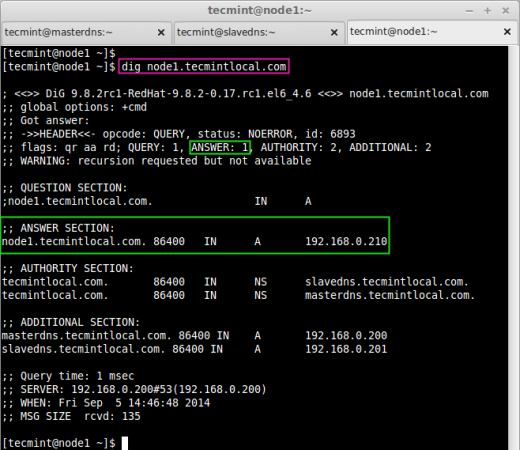
$ ping masterdns.tecmintlocal.com -c 2
$ ping slavedns.tecmintlocal.com -c 2
$ ping 192.168.0.200 -c 2
$ ping 192.168.0.201 -c 2
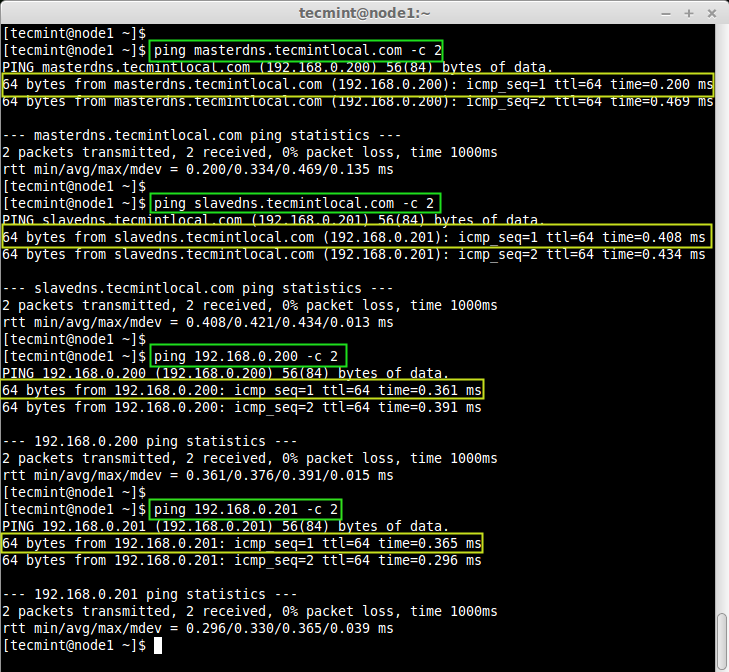
Finally, setup completed, here we have configured both Primary (Master) and Slave (Seconday) DNS server successfully, hope everyone have setup-ed without any issue, feel free to drop a comment if you face any issue while setup.


The slave DNS will not have the file if you even follow up all the article line by line, everything is fine except for one thing that is allowing port 53 as TCP in iptables / firewall.
DNS uses both TCP as well as UDP as a port.
In this article port 53 for UDP is allowed but we must allow port 53 as TCP as well in order for all the zone file to be seen in the /var/named/slaves folder and Slave DNS to receive all the zones and its data.
After I set up the slave server and ran the command
ls -l /var/named/slavesorls -l /var/named/slaves/local.fwd.zoneor for the reverse zone total number of files are zero why my allow transfer didn’t work from the master.I set up the master server correctly and getting the answer for forward and reverse lockups i define my domain as local.com.
Allow port 53 as TCP as well.
Hi,
Great article and easy to understand.
I would like to request if we can have a link to download packages from, as i downloaded the packages but many of the libraries are missing due to which a person ends us resolving the dependencies and adding libraries.
It will be a great help if we get the required lib and packages.
All this is very nice but for a newbie trying to set up the DNS it’s tough to get through. I only have one server and your comment doesn’t show how to do this. So, thanks for trying…
Hi, if any of you could help me with master-slave dns configuration where the master is using dynamic dns in rhel 7, it would be a great help
Hi Babin,
All tho this is a good tutorial, i need to point out that your configuration of reverse zone is wrong, and that the check for it doesn’t work.
And that is because reverse zones there is no need for any type of record beside PTR records, and that since we defined reverse zone as 0.168.192.in-addr.arpa we should check that when checking configuration.
The reverse zone file for this tutorial should be defined as:
$TTL 1D

@       IN SOA  masterdns.tecmintlocal.com root.tecmintlocal.com (

2017091402      ; serial

1D      ; refresh

1H      ; retry

1W      ; expire

3H )    ; minimum
; Name server's
@ IN NS masterdns.tecmintlocal.com
@ IN NS slavedns.tecmintlocal.com
;Hosts in Domain
200 IN PTR masterdns.tecmintlocal.com
201 IN PTR slavedns.tecmintlocal.com
And the check for zone should be:
named-checkzone 0.168.192.in-addr.arpa /var/named//var/named/tecmintlocal.rev.zone
I hope that my comment helps someone out.
Cheers.
Ninoslav.
Thank you for all of the above, very helpful. I only have one physical machine so is it O.K. if I don’t configure a slave machine configuration? Thanks
I didn’t understand the section for reverse zone file in /var/named.com zone”…..” that part
please explain me what to write there
Typo at “Real Also: Setup DNS Cache Server in Ubuntu”
Correct it to ‘Read’ :)
@Shrikant,
Thanks for notifying about that typo, corrected in the article.
Good illustration but things as Serial number where do they come from are they important If I leave 0, default
@IShmael,
You can’t leave it 0 instead you need to start from 00 which represent the date. If we are about to add new entry it’s good to increase the serial number by an incremental method.
has no address records (A or AAAA) , I had the same problem for this reason I added
8 @ IN NS ns1.domain.com.
9 @ IN NS ns2.domain.com.
10 @ IN PTR domain.com.
these following lines
11 @ IN A 192.168.1.140
12 @ IN A 192.168.1.150
if suddenly primary DNS fails what will happen?
can you please explain the other dns zones like stub zone
can we configure the stubzone in linux
@Krishna,
Slave will act as Primary it has all replicated information of Primary.
Hi Ravi,
Thanks! for such a informative article. I actually When i am checking reverse lookup zone file. i am getting below error …could you please help me out.
zone vxvm1.husain.net/IN: NS ‘vxvm1.husain.net’ has no address records (A or AAAA)
zone vxvm1.husain.net/IN: not loaded due to errors.
@Husain,
Provide us you configuration in any pastebin or screenshot.
1 $TTL 86400
2 @ IN SOA vxvm1.husain.net. root.husain.net. (
3 2014090402 ; serial
4 3600 ; refresh
5 1800 ; retry
6 604800 ; expire
7 86400 ) ; minimum
8 ; Name server’s
9
10 @ IN NS vxvm1.husain.net.
11 @ IN NS rhel7.husain.net.
12 @ IN PTR husain.net.
13 ; Name server hostname to IP resolve.
14
15 vxvm1 IN A 10.10.104.20
16 rhel7 IN A 10.10.104.115
17
18 ;Hosts in Domain
19 vxvm2 IN A 10.10.104.30
20 sarvar IN A 10.10.104.111
21 111 IN PTR sarvar.husain.net.
22 30 IN PTR vxvm2.husain.net.
1 $TTL 86400
2 @ IN SOA ns1.mailninja.io. root.mailninja.io. (
3 2016090101 ; serial
4 3600 ; refresh
5 1800 ; retry
6 604800 ; expire
7 86400 ) ; minimum
8 @ IN NS ns1.mailninja.io.
9 @ IN NS ns2.mailninja.io.
10 @ IN PTR mailninja.io.
11 ns1 IN A 192.168.1.126
12 ns2 IN A 192.168.1.121
13 ;Hosts in domain
14 126 IN PTR ns1.mailninja.io.
15 121 IN PTR ns2.mailninja.io.
named-checkzone ns1.mailninja.io /var/named/mailninja.rev.zone
zone ns1.mailninja.io/IN: NS ‘ns1.mailninja.io’ has no address records (A or AAAA)
zone ns1.mailninja.io/IN: not loaded due to errors.
Hi ravi can you plz ellaborate what did i miss here that i am getting errors for reverse zone file.
@raaz,
In line 14 and 15 again you are adding your DNS server as a host. Please post your forward zone.
14 126 IN PTR ns1.mailninja.io.
15 121 IN PTR ns2.mailninja.io.
named-checkzone ns1.mailninja.io /var/named/mailninja.rev.zone
zone ns1.mailninja.io/IN: NS ‘ns1.mailninja.io’ has no address records (A or AAAA)
zone ns1.mailninja.io/IN: not loaded due to errors.
cat -n 1 $TTL 86400
2 @ IN SOA ns1.mailninja.io. root.mailninja.io. (
3 2016090101 ; serial
4 3600 ; refresh
5 1800 ; retry
6 604800 ; expire
7 86400 ) ; minimum
8 @ IN NS ns1.mailninja.io.
9 @ IN NS ns2.mailninja.io.
10 @ IN PTR mailninja.io.
11 ns1 IN A 64.137.226.126
12 ns2 IN A 64.137.167.121
13 ;Hosts in domain
14 126 IN PTR ns1.mailninja.io.
15 121 IN PTR ns2.mailninja.io.
Starting named:
Error in named configuration:
dns_rdata_fromtext: forward:8: near ‘epsilon.jhilmil.com’: extra input text
zone jhilmil.com/IN: loading from master file forward failed: extra input text
zone jhilmil.com/IN: not loaded due to errors.
_default/jhilmil.com/IN: extra input text
zone localhost/IN: loaded serial 0
zone 1.0.0.0.0.0.0.0.0.0.0.0.0.0.0.0.0.0.0.0.0.0.0.0.0.0.0.0.0.0.0.0.ip6.arpa/IN: loaded serial 0
dns_rdata_fromtext: reverse:8: near ‘epsilon.jhilmil.com’: extra input text
zone 211.168.192.in-addr.arpa/IN: loading from master file reverse failed: extra input text
zone 211.168.192.in-addr.arpa/IN: not loaded due to errors.
_default/211.168.192.in-addr.arpa/IN: extra input text
zone 0.in-addr.arpa/IN: loaded serial 0
getting this error when starting dns service
help me out.
Hello Ravi,
FOR example I have typed dig facebook.com, ok.
It gives me some dns detials,
Queston: for ex : I don’t have facebook nameserver address in my local sysem /etc/resolv.conf,?
so how it gives me the some dns result.
and
one more question is very simple.
I have made one dns server how it goes to public they don’t have my dns server details. how they can see?
Please clarify my doughts as soon as possible.
@Mallikarjunn
First question:
When your machine(client) is connected to the Internet through an ISP, it initiates a query to find facebook.com and sends the query to the DNS server of the ISP.
Then, the DNS Server of the ISP first checks it’s own cache to determine if it already has a result for your machine’s query.
In the event that the result is negative(meaning nothing found), it generates another query, sends it to a hierarchy above it. Your machine’s query will keep moving up the up until it reaches the root DNS servers, and until when facebook.com is found.
After the ISP DNS Server finding out the authoritative name servers, it contacts the authoritative name servers to find out the IP address for http://www.facebook.com. i.e. the IP address of host www in the domain facebook.com.
facebook.com then responds to the ISP DNS Server by answering the query and providing the IP address of the web server i.e. www
The ISP DNS Server stores the answer in it’s cache for any future use and provides the result to your machine(client) by sending the IP address of the www server plus so many other details.
Second question:
All the magic happens through your ISP, when your are connected to the Internet, the ISP must gather information about your network setup including the DNS server setup. Then other networks can find your DNS server through your ISP servers(network).
hi, ravi,
I don’t understand, how dns works What you have disscussed somewhat tough to understand.
Please explain in one sentence
@Mallik,
We’ve tried and kept the information as simple as it, but I am afraid that you still finding it tough to understand, no problem here is the screencast that tells how exactly dns works, just go through it: https://howdns.works/
hi babin,
your post looks great with clear explanation and with color highlights.
when am configure only master DNS in my machine, facing issue with rev.zone file.
named.conf testing went fine
fwd.zone testing went fine.
rev.zone testing ended with following error.
[root@server ~]# named-checkzone server.example.com /var/named/example.rev.zone
zone server.example.com/IN: NS ‘server.example.com’ has no address records (A or AAAA)
zone server.example.com/IN: not loaded due to errors.
[root@server ~]#
this is my rev zone file.
[root@server ~]# cat /var/named/example.rev.zone
$TTL 86400
@ IN SOA server.example.com. root.example.com. (
0 ; serial
1D ; refresh
1H ; retry
1W ; expire
3H ) ; minimum
;name servers
@ IN NS server.example.com.
@ IN PTR example.com.
;name server hostname to ip resolver
server IN A 192.168.1.1
1 IN PTR server.example.com.
@Arun,
I think you should add ‘A’ record pointing to IP address like:
that entry is already there ravi…
FYR
[root@server named]# cat -n example.rev.zone
1 $TTL 86400
2 @ IN SOA server.example.com. root.example.com. (
3 200102 ; serial
4 3600 ; refresh
5 1800 ; retry
6 604800 ; expire
7 86400 ; minimum )
8 ;name servers
9
10 @ IN NS server.example.com.
11 @ IN PTR example.com.
12
13 ;name server hostname to ip resolver
14
15 server IN A 192.168.1.1
16 1 IN PTR server.example.com.
17
hi ravi,
i got the o/p now. thanks for your help and time.
all verification cmds are giving o/ps expect from below….when diagnosing with ip address
[root@server etc]# dig -x 192.168.1.1
; <> DiG 9.7.0-P2-RedHat-9.7.0-5.P2.el6 <> -x 192.168.1.1
;; global options: +cmd
;; Got answer:
;; ->>HEADER<<- opcode: QUERY, status: REFUSED, id: 48244
;; flags: qr rd; QUERY: 1, ANSWER: 0, AUTHORITY: 0, ADDITIONAL: 0
;; WARNING: recursion requested but not available
;; QUESTION SECTION:
;1.1.168.192.in-addr.arpa. IN PTR
;; Query time: 0 msec
;; SERVER: 192.168.1.1#53(192.168.1.1)
;; WHEN: Thu May 26 22:21:38 2016
;; MSG SIZE rcvd: 42
[root@server etc]#
hi ravi,
is it mandatory to configure slave dns when we need to test dns from client end ??
@Arun,
No need of client DNS for testing purpose, you can test DNS with dig or nslookup commands..
10 Commands to Check DNS Queries
hi arun i have same error how did you solve this
Error: bind97-libs conflicts with bind-libs
Error: bind97-devel conflicts with bind-libbind-devel
Error: bind97-chroot conflicts with bind-chroot
Error: bind97-utils conflicts with bind-utils
Error: bind97 conflicts with bind
Error: bind97-devel conflicts with bind-devel
How to resolve it this error
@Shasha,
Looks package conflict please remove the bind packages and reinstall it.
THANKS FOR YOUR QUICK RESPONSE, but my question is why we have to write A records in reverse lookup zone
node1 IN A 192.168.0.210
rhel IN A 192.168.0.220
in reverse lookup zone
masterdns IN A 192.168.0.200
slavedns IN A 192.168.0.201
why we required to make these statements in both zone files
@Krishna,
To define master , slave see it have different IP’s.
This was a great article. I succeeded in getting everything workiny correctly and with full understanding
Hi, I can’t do ÿum update on client machine after changed client DNS with master-slave DNS IP Address, but i can ping 8.8.8.8
@RikiS,
Check your /etc/resolv.conf file and add master-slave DNS or DNS 8.8.8.8, this will resolve your yum update issue..
Yes Ravi, it’s work once changed to 8.8.8.8 but i can’t reached the domain name on my DNS “ping: unknown host appdev.rqproject.com”. I want set it up both access local domain and public domain. please advise…
@Rikis,
Does your domain appdev.rqproject.com has proper DNS record in DNS Control panel of Domain hosting provider?
it’s solved, with modified named.conf :
dnssec-enable no;
dnssec-validation no;
zone “.” IN {
type forward;
forward first;
forwarders { 8.8.8.8;8.8.4.4;};
};
@RikiS,
That’s good to hear that you finally solved yourself and really thanks for sharing here, hope this will help other users who face similar problem.
hi when i am starting my slave server zone files are not transferring even i open 53 port in iptables when i stoping the iptables its working fine can u give me a solution for this
thanks in advance
@Vamsi,
That means your IPtables rules are not properly configured or added, you need to check properly or post here all your IPtables rules, so that I can check it.
Hello Babin Lonston
Very thanks your tutorial.
I got error with slave server
I created my own DNS server :
sale.dornbrachtkitchenfaucet.com –>master
server2.dornbrachtkitchenfaucet.com –> slave
There is error with slave server such as below :
dns_master_load: /var/named/slaves/dornbrachtkitchenfaucet.com.hosts:1: isc_lex_gettoken() failed: unexpected end of input
dns_master_load: /var/named/slaves/dornbrachtkitchenfaucet.com.hosts:1: unexpected end of input
/var/named/slaves/dornbrachtkitchenfaucet.com.hosts: file does not end with newline
zone dornbrachtkitchenfaucet.com/IN: loading from master file /var/named/slaves/dornbrachtkitchenfaucet.com.hosts failed: syntax error
zone dornbrachtkitchenfaucet.com/IN: not loaded due to errors.
A part Inside master : cat /etc/named.conf :
zone "dornbrachtkitchenfaucet.com" {
        type master;
        file "/var/named/dornbrachtkitchenfaucet.com.hosts";
        };


A part Inside slave : /etc/named.conf :
zone "dornbrachtkitchenfaucet.com" {
      type slave;
      file "slaves/dornbrachtkitchenfaucet.com.hosts";
      masters { 45.33.66.122; };
};
Can I know how to fix it ?
Thanks
Firstly, thanks to your post I was able to setup DNS in RHEL6.5 box. This was really detailed and easy after going through your article. I need some more help like if the master server got shutdown for some time then how to replace the slave server to master server position? Please let me know
Thanks in Advance!
Venkat
@Venkat
Replace
type slave; with master and reload bind.
Hi ,
First of all, thanks to your post I was able to setup DNS in RHEL6.5 box. This was really detailed and easy after going through your article. I need some more help from you. I need to setup DNS for resolving 2 Series of IP’s on a single RHEL box.
Say for eg. I have a series 1.1.x.x and another 10.0.x.x . The 10 series IP’s are NATted with 1 series IP’s also . the requirement if to setup a DNS in the 10 series IP , which will be able to resolve queries from both the IP series. Is that even Possible ?
Very informative and exceptionally detailed article. I have created almost same setup using virtualbox with client being windows XP. nslookup runs fine for example.com, ns1.example.com and ns2.example.com and similarly when I do nslookup for google.com, results are just fine.
Only problem I am facing is when I stop named service on ns1.example.com so that ns2 should handle stuf, nslookup from XP fails… any idea what I am doing wrong or missing anything?
Thanks.
@Nasir,
Have you checked DNS logs? or any error message you see?
@Amro,
I don’t get ( Just wondering how can i the zone files every week.)
Hello, Just wondering how can i the zone files every week. If the initial attempt fails, it will try again once per day until it succeeds or three weeks have passed i, talking about the slave server here .
I appreciate your help in this regard
Hi Sir,
I am configuring DNS Server ,Forwork lookup zone is configured and when i am trying to check reverse zone config file to named-checkzone then /var/named/abc.rev.zone:2: no current owner name
zone masterdns.ab.com/IN: loading from master file /var/named/abc.rev.zone failed: no owner
zone masterdns.abc.com/IN: not loaded due to errors.
@Pankaj Maurya
Can you please recheck your below configuration files?
/etc/named.conf
/var/named/slaves/tecmintlocal.rev.zone
And please check wether you have added rule in slave server.
# sudo iptables -I INPUT -p udp –dport 53 -m state –state NEW -j ACCEPT
Let us know how it went through
i configured master dns it is successful, but in slave when i restart named service the two files zones are changing there names and there are no replicatin from master server. as you shown above. plz help me regarding this.
@Imran
can you give the output? check the name defined in named.conf
Turn on the recursion in named.conf. This will be turned off only for dedicated masters which has many slaves.
recursion yes;
Cheers,
Prakash
Sir ,what is the meaning of $ sign in /etc/named.conf file ?
It means your or not in root.
While you are in root # will be there
normal users have $
hello!,
will it work as my outside facing DNS if I configure it inside my NAT router. (I mean, Will it be accessible from outside my network)?
@ Govinda,
We need to have a public IP
Thank you….
This site is really helpful….
Can understand all about dns master slave setup….
Thank you so much for building such a good and elaborate website.Its very useful for beginners like us…….
Most welcome
Fantastic Job!!!!! Awesome work sir!!!!! appreciated….
Hello, I am a fresh system engineer that working with Linux Distribution. I follow your guide, it is work well! thank you
@ Raksmey
Awesome, Happy to hear from you..
Hello,
I have configured the DNS in my test lab. Reverse lookup is working fine for me but facing issue with name(forward) lookup.
node1 : 192.168.111.160 (Master)
node2 : 192.168.111.161 (Slave)
node3 : 192.168.111.162 (client)
*****************Successful response for reverse lookup.
[root@Node3 ~]# dig -x 192.168.111.162 +noquestion
; <> DiG 9.8.2rc1-RedHat-9.8.2-0.17.rc1.el6_4.6 <> -x 192.168.111.162 +noquestion
;; global options: +cmd
;; Got answer:
;; ->>HEADER<<- opcode: QUERY, status: NOERROR, id: 2681
;; flags: qr aa rd; QUERY: 1, ANSWER: 1, AUTHORITY: 2, ADDITIONAL: 2
;; WARNING: recursion requested but not available
;; ANSWER SECTION:
162.111.168.192.in-addr.arpa. 259200 IN PTR node3.ganesh.com.
;; AUTHORITY SECTION:
111.168.192.in-addr.arpa. 259200 IN NS node1.ganesh.com.
111.168.192.in-addr.arpa. 259200 IN NS node2.ganesh.com.
;; ADDITIONAL SECTION:
node1.ganesh.com. 259200 IN A 192.168.111.160
node2.ganesh.com. 259200 IN A 192.168.111.161
;; Query time: 0 msec
;; SERVER: 192.168.111.160#53(192.168.111.160)
;; WHEN: Mon Mar 16 03:04:42 2015
;; MSG SIZE rcvd: 148
****************Unsuccessful response for forward lookup. This is happening on all nodes.
[root@Node3 ~]# dig -x node3 +noquestion
; <> DiG 9.8.2rc1-RedHat-9.8.2-0.17.rc1.el6_4.6 <> -x node3 +noquestion
;; global options: +cmd
;; Got answer:
;; ->>HEADER<<- opcode: QUERY, status: REFUSED, id: 2333
;; flags: qr rd; QUERY: 1, ANSWER: 0, AUTHORITY: 0, ADDITIONAL: 0
;; WARNING: recursion requested but not available
;; Query time: 1 msec
;; SERVER: 192.168.111.160#53(192.168.111.160)
;; WHEN: Mon Mar 16 03:05:30 2015
;; MSG SIZE rcvd: 36
****************************Master Forward lookup file
[root@Node1 ~]# cat /var/named/chroot/var/named/ganesh.com.zone
$TTL 3D
@ IN SOA node1.ganesh.com. root.ganesh.com. (
20021115413 ; serial#
1D ; refresh, seconds
1H ; retry, seconds
1W ; expire, seconds
3H ) ; minimum, seconds
; Name servers
@ IN NS node1.ganesh.com.
@ IN NS node2.ganesh.com.
;Hosts in the domain
@ IN A 192.168.111.160
@ IN A 192.168.111.161
@ IN A 192.168.111.162
node1 IN A 192.168.111.160
node2 IN A 192.168.111.161
node3 IN A 192.168.111.162
****************named.conf file from master node.
[root@Node1 ~]# cat /var/named/chroot/etc/named.conf
options{
directory "/var/named/";
listen-on port 53 { 127.0.0.1; 192.168.111.160; };
allow-transfer { localhost; 192.168.111.161; };
recursion no;
};
zone "ganesh.com" {
type master;
file "ganesh.com.zone";
allow-update {none;};
allow-query { any; };
};
zone "111.168.192.in-addr.arpa" {
type master;
file "192-168-111.zone";
allow-update {none;};
allow-query { any; };
};
Any help will be highly appreciated. Checked configuration couple of times not sure where I am doing the mistake.
Regards,
Vicky
hi,
it’s good writing. i want to implement it on my vps. i’ve only one vps, this is my scenario:
===
i have 3 domain names:
apple.com
grape.com
banana.com
i installed centos 7 minimal on my vps. i’ve only have one ip address (192.167.21.59). i have domain apple.com, and pointed it to my vps from domain panel
#######
HOST NAME IP ADDRESS/ URL RECORD TYPE MX PREF TTL
@ 192.167.21.59 A
www 192.167.21.59 A
#######
i installed apache web server and enabled vhost for apple.com. and it’s accessibled. i’ve also create vhost for grape.com and banana.com.
my question is how to setup name server on my vps, so another domain like grape.com and banana.com pointed to my vps using name server, example:
ns1.apple.com
ns2.apple.com
===
could it be possible? .i hope you’re willing to guide me?
thank you.
root@www ~]# vi /etc/named.conf
[root@www ~]# service named restart
Stopping named: [ OK ]
Starting named:
Error in named configuration:
/etc/named.conf:8: missing ‘;’ before ‘}’
[FAILED]
[root@www ~]#
Hello Sir,
I have configured DNS in my laptop, But facing issue while rerstarting the named service.
root@www ~]# vi /etc/named.conf
[root@www ~]# service named restart
Stopping named: [ OK ]
Starting named:
Error in named configuration:
/etc/named.conf:8: missing ‘;’ before ‘}’
[FAILED]
[root@www ~]#
sir i have configure dns but sir i have type dig -x 192.168.1.17(dns server ip) to i saw Answer secotion is 0 and i type dig @localhost server21.dns.com (domain name) then answer =1 but i type dig -x 192.168.1.17 so plese give me soluation and i type nslookup then my dns is not working
please suggest me
Yes you can keep number of reserves
Hi! Can I have more than one reverse zone in a single dns server?
Thank you very much for the guide man, much appreciated. Saved me lots of headache.
@ chris Guthrie Check your iptables in both master and slave. Please post more info about your setup. eg: IP, hostname, network range.
I ran across your article trying to solve a similar problem. However, when setting up my slave, it replicated my forward zone but not my reverse. Any idea why that would be?
Thanks a lotdude for this awesomepost, it resolved my biggest headache till now DNS.
Able tosetup master DNS without nay issues, facing issues while setting up slave DNS , it is not bale to replicate files from master and getting below errors in logs of slave;
Sep 11 19:19:51 puppetclient named[23733]: running
Sep 11 19:19:51 puppetclient named[23733]: zone 12.168.192.in-addr.arpa/IN: Transfer started.
Sep 11 19:19:51 puppetclient named[23733]: transfer of ‘12.168.192.in-addr.arpa/IN’ from 192.168.12.116#53: connected using 192.168.12.112#54419
Sep 11 19:19:51 puppetclient named[23733]: transfer of ‘12.168.192.in-addr.arpa/IN’ from 192.168.12.116#53: failed while receiving responses: NOTAUTH
Sep 11 19:19:51 puppetclient named[23733]: transfer of ‘12.168.192.in-addr.arpa/IN’ from 192.168.12.116#53: Transfer completed: 0 messages, 0 records, 0 bytes, 0.001 secs (0 bytes/sec)
Sep 11 19:19:52 puppetclient named[23733]: zone learning.com/IN: Transfer started.
Sep 11 19:19:52 puppetclient named[23733]: transfer of ‘learning.com/IN’ from 192.168.12.116#53: connected using 192.168.12.112#55252
Sep 11 19:19:52 puppetclient named[23733]: transfer of ‘learning.com/IN’ from 192.168.12.116#53: failed while receiving responses: NOTAUTH
Sep 11 19:19:52 puppetclient named[23733]: transfer of ‘learning.com/IN’ from 192.168.12.116#53: Transfer completed: 0 messages, 0 records, 0 bytes, 0.001 secs (0 bytes/sec)
It’s something connection issue between two nodes, please check your network and open respective ports on both mysql instance to communicate.
Hemant,
I recently completed a “hidden” master and 4 slave DNS server deployment in CentOS7. I ran into the same error. The problem was that a slave server will periodically query the master server zones. This is to ensure there are no changes. The slave only queries the serial number of the zone and compares it to its own. If the master DNS has a bigger serial the slave will initiate a zone transfer. I fixed that by adjusting the allow-query {} to include my slave DNS.
Another reason I saw this was a misconfigured TSIG on the slave was causing NOTAUTH messages.
If you run the following command from the slave server what do you get?
#dig @MASTER_IP learning.com axfr
Expected result is to see a zone transfer output on screen.
Nice,
I am trying lot of time but now i am configure own dns server
lots of Thanks