If you look at IT-related job postings anywhere, you will notice a steady demand for security pros. This does not only mean that cybersecurity is an interesting field of study, but also a very lucrative one.
With that in mind, in this article we will explain how to install and configure ConfigServer Security & Firewall (also known as CSF for short), a full-blown security suite for Linux, and share a couple of typical use cases. You will then be able to use CSF as a firewall and intrusion/login failure detection system to harden the servers you’re responsible for.
Without further adieu, let’s get started.
Installing and Configuring CSF in Linux
To begin, please note that Perl and libwww is a prerequisite to install CSF on any of the supported distributions (RHEL and CentOS, openSUSE, Debian, and Ubuntu). Since it should be available by default, there is no action required on your part unless one of the following steps returns a fatal error (in that case, use the package management system to install the missing dependencies).
# yum install perl-libwww-perl
# apt install libwww-perl
Step 1 – Download CSF
# cd /usr/src
# wget https://download.configserver.com/csf.tgz
Step 2 – Extract the CSF tarball
# tar xzf csf.tgz
# cd csf
Step 3 – Run the CSF Installation Script
This part of the process will check that all dependencies are installed, create the necessary directory structures and files for the web interface, detect currently open ports, and remind you to restart the csf and lfd daemons after you’re done with the initial configuration.
# sh install.sh
# perl /usr/local/csf/bin/csftest.pl
The expected output of the above command is as follows:
Testing ip_tables/iptable_filter...OK
Testing ipt_LOG...OK
Testing ipt_multiport/xt_multiport...OK
Testing ipt_REJECT...OK
Testing ipt_state/xt_state...OK
Testing ipt_limit/xt_limit...OK
Testing ipt_recent...OK
Testing xt_connlimit...OK
Testing ipt_owner/xt_owner...OK
Testing iptable_nat/ipt_REDIRECT...OK
Testing iptable_nat/ipt_DNAT...OK

RESULT: csf should function on this server
Step 4: Disable Firewall and Configure CSF
Disable firewalld if running and configure CSF.
# systemctl stop firewalld
# systemctl disable firewalld
Change TESTING = "1" to TESTING = "0" (otherwise, the lfd daemon will fail to start) and list allowed incoming and outgoing ports as a comma-separated list (TCP_IN and TCP_OUT, respectively) in /etc/csf/csf.conf as shown in the below output:
# Testing flag - enables a CRON job that clears iptables incase of
# configuration problems when you start csf. This should be enabled until you
# are sure that the firewall works - i.e. incase you get locked out of your
# server! Then do remember to set it to 0 and restart csf when you're sure
# everything is OK. Stopping csf will remove the line from /etc/crontab
#
# lfd will not start while this is enabled
TESTING = "0"

# Allow incoming TCP ports
TCP_IN = "20,21,22,25,53,80,110,143,443,465,587,993,995"

# Allow outgoing TCP ports
TCP_OUT = "20,21,22,25,53,80,110,113,443,587,993,995"
Once you are happy with the configuration, save the changes and return to the command line.
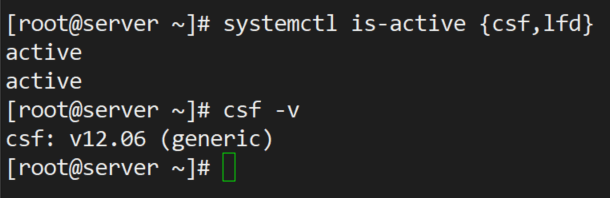
Step 5 – Restart and Test CSF
# systemctl restart {csf,lfd}
# systemctl enable {csf,lfd}
# systemctl is-active {csf,lfd}
# csf -v
At this point we are ready to start setting up firewall and intrusion detection rules as discussed next.
Setting up CSF and Intrusion Detection Rules
First off, you will want to inspect the current firewall rules as follows:
# csf -l
You can also stop them or reload them with:
# csf -f
# csf -r
respectively. Make sure to memorize these options – you will need them as you go along, particularly to check after making changes and restarting csf and lfd.
Example 1 – Allowing and Forbidding IP Addresses
To allow incoming connections from 192.168.0.10.
# csf -a 192.168.0.10
Similarly, you can deny connections originating from 192.168.0.11.
# csf -d 192.168.0.11
You can remove each of the above rules if you wish to do so.
# csf -ar 192.168.0.10
# csf -dr 192.168.0.11
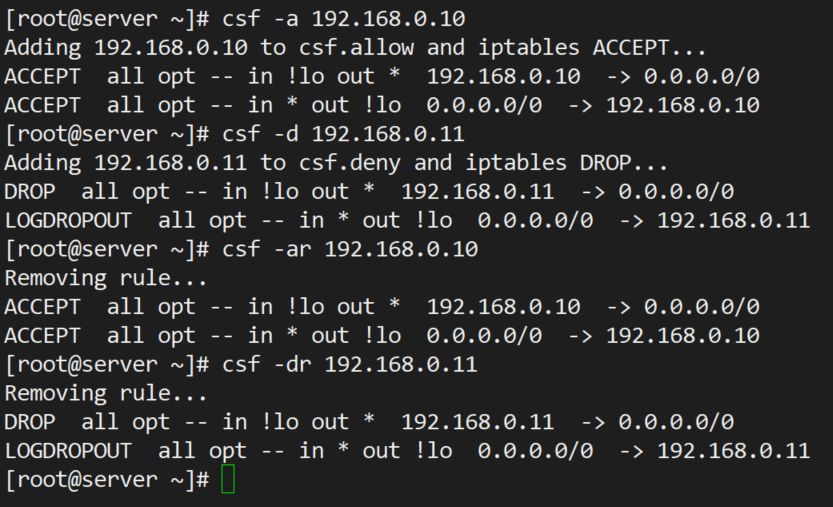
Note how the use of -ar or -dr above removes existing allow and deny rules associated with a given IP address.
Example 2 – Limiting Incoming Connections by Source
Depending on the intended use of your server, you may want to limit incoming connections to a safe number on a port basis. To do so, open /etc/csf/csf.conf and search for CONNLIMIT. You can specify multiple port; connections pairs separated by commas. For example,
CONNLIMIT = "22;2,80;10"
will only allow 2 and 10 incoming connections from the same source to TCP ports 22 and 80, respectively.
Example 3 – Sending Alerts via Email
There are several alert types that you can choose. Look for EMAIL_ALERT settings in /etc/csf/csf.conf and make sure they are set to "1" to receive the associated alert. For example,
LF_SSH_EMAIL_ALERT = "1"
LF_SU_EMAIL_ALERT = "1"
will cause an alert to be sent to the address specified in LF_ALERT_TO each time someone successfully logs in via SSH or switches to another account using su command.
CSF Configuration Options and Usage
These following options are used to modify and control csf configuration. All the configuration files of csf are located under /etc/csf directory. If you modify any of the following files you will need to restart the csf daemon to take changes.
- csf.conf : The main configuration file for controlling CSF.
- csf.allow : The list of allowed IP’s and CIDR addresses on the firewall.
- csf.deny : The list of denied IP’s and CIDR addresses on the firewall.
- csf.ignore : The list of ignored IP’s and CIDR addresses on the firewall.
- csf.*ignore : The list of various ignore files of users, IP’s.
Remove CSF Firewall
If you would like to remove CSF firewall completely, just run the following script located under /etc/csf/uninstall.sh directory.
# /etc/csf/uninstall.sh
The above command will erase CSF firewall completely with all the files and folders.
Summary
In this article we have explained how to install, configure, and use CSF as a firewall and intrusion detection system. Please note that more features are outlined in csf.conf.
For example, If you are in the web hosting business, you can integrate CSF with management solutions such as Cpanel, WHM, or the well-known Webmin.
Do you have any questions or comments about this article? Feel free to send us a message using the form below. We look forward to hearing from you!


What can I do? csf do not let OpenVPN go outside,?
“The critical problem is caused by some packet filtering tool blocking UDP or OpenVPN:
. 2022.12.06 19:19:06 - OpenVPN > write UDPv4 [ECONNREFUSED]: Operation not permitted (fd=7,code=1). 2022.12.06 19:19:07 - OpenVPN > write UDPv4 [ECONNREFUSED]: Operation not permitted (fd=7,code=1)
. 2022.12.06 19:19:12 - OpenVPN > write UDPv4 [ECONNREFUSED]: Operation not permitted (fd=7,code=1)"
Hi,
I just to inform you that I installed it on my mobile PinephonePro with Mobian (Debian adapted) and installed it very well. Neither UFW nor the other one you mention to stop could be installed.
I would like to know if my mobile phone is quiet enough as installed by default or if should I modify something. I can send you any log you need for you to see how was installed…
Hi,
I am getting (Testing ip_tables/iptable_filter…open3: exec of /sbin/iptables -I OUTPUT -p tcp –dport 9999 -j ACCEPT failed at /usr/local/csf/bin/csftest.pl line 144.) this error when i put this command (perl /usr/local/csf/bin/csftest.pl)
If you are running FirewallD already, why install CSF unless you want to replace FirewallD? In the article you never uninstall FirewallD. Please explain your reasoning.
@Dragonmouth,
I stopped and disabled firewalld on the system, as CSF is more powerful than default firewalld, as it provides better Login/Intrusion Detection and Security feature with easy to use interface for managing firewall settings on your Linux server.
It’s up to you, whether you want to remove or disable..
how to block webmail upload attachments in firewall . plz help . i donot want my users uploding files to internet. https gmail uploads i want block . plz help .
CSF is NOT open source!
Kindly give me some suggestions regarding my problem. I ll be thankful.
Sorry for delay in replaying, you need to define your network range to enable access to your server.
kindly explain it a bit. How can I define network range. As a webserver the server is going to be accessed from all over the world. So, I think it would be impossible for me to define any range.
If I am wrong, Kindly correct me.
Please add the ports that you want to accessible from public to the below line.
# Allow incoming TCP ports
TCP_IN = “20,21,22,25,53,80,110,143,443,465,587,993,995”
These ports have already been added. But still not working.
Anyways thanks alot for your response.
First of all I would like to congratulate you on running such a brilliant web site. I have never come across such a useful website.
Kindly help me regarding one of my problems using csf:
In csf.allow I have added 0.0.0.0/0 (for allow all)
When I remove this line my server becomes inaccessible. When I enable it any ip address is allowed whether it is suspicious or not.
Thanks
[root@localhost /]# rpm –import public.gpg.key
error: public.gpg.key: key 1 import failed.
[root@localhost /]# rpm –import public.gpg.key
error: public.gpg.key: key 1 import failed.
[root@localhost /]# yum install webmin
Loaded plugins: fastestmirror
Loading mirror speeds from cached hostfile
* base: http://ftp.cc.uoc.gr
* extras: http://ftp.cc.uoc.gr
* updates: http://ftp.cc.uoc.gr
Setting up Install Process
No package webmin available.
Error: Nothing to do
So thanks for CSF post.I hope next nice posts also. :)
Hello,
I have install ZPanel with your configuration but after, i can’t use mail. How i must configure CSF, Fail2ban and rkhunter with Roundcube 0.8.1 ?
Thanks to your help !
Friendly,
Florian
Hi All,
Can any one guide me how can i configure CSF for preventing the Brute force attack on the servers.
I have installed CSF on centos5.8 64 bit and accessing it through the webmin.
Please assist as completely new to the firewall thing.
—
Thanks
Svisen
@Svisen,
We will soon provide you how to integrate CSF with Webmin in our upcoming article.
Hi can u please guide me how to configure the CSF to prevent the RDP brute force on my windows servers.
I cannot add or restrict the Ip range as my client has requirement to access it it from any where i just want to prevent the Brute force attack happening on my servers so that if any ip makes request to frequent it block it up.
need assistance ….
how about Debian based?
@Aris – We will soon introduce Debian based articles..
Hi:
ufw – program for managing a Netfilter firewall
Provides easy to setup method through templates. There are also many templates available for the net for it.
Regards:
norbert79