Samba is a free Open Source software which provides a standard interoperability between Windows OS and Linux/Unix Operating Systems.
Samba can operate as a standalone file and print server for Windows and Linux clients through the SMB/CIFS protocol suite or can act as an Active Directory Domain Controller or joined into a Realm as a Domain Member. The highest AD DC domain and forest level that currently Samba4 can emulate is Windows 2008 R2.
The series will be titled Setting Up Samba4 Active Directory Domain Controller, which covers following topics for Ubuntu, CentOS, and Windows:
This tutorial will start by explaining all the steps you need to take care off in order to install and configure Samba4 as a Domain Controller on Ubuntu 16.04 and Ubuntu 14.04.
This configuration will provide a central management point for users, machines, volume shares, permissions and other resources in a mixed-up Windows – Linux infrastructure.
Requirements:
- Ubuntu 16.04 Server Installation.
- Ubuntu 14.04 Server Installation.
- A static IP Address configured for your AD DC server.
Step 1: Initial Configuration for Samba4
1. Before proceeding your Samba4 AD DC installation first let’s run a few pre-required steps. First make sure the system is up to date with the last security features, kernels and packages by issuing the below command:
$ sudo apt-get update
$ sudo apt-get upgrade
$ sudo apt-get dist-upgrade
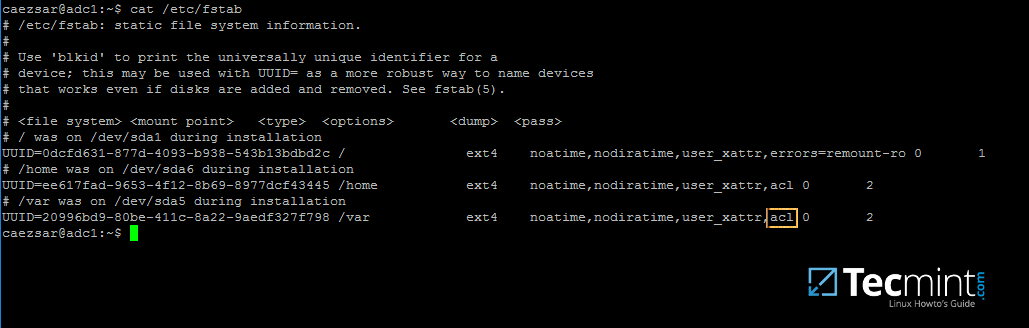
2. Next, open machine /etc/fstab file and assure that your partitions file system has ACLs enabled as illustrated on the below screenshot.
Usually, common modern Linux file systems such as ext3, ext4, xfs or btrfs support and have ACLs enabled by default. If that’s not the case with your file system just open /etc/fstab file for editing and add acl string at the end of third column and reboot the machine in order to apply changes.
3. Finally setup your machine hostname with a descriptive name, such as adc1 used in this example, by editing /etc/hostname file or by issuing.
$ sudo hostnamectl set-hostname adc1
A reboot is necessary after you’ve changed your machine name in order to apply changes.
Step 2: Install Required Packages for Samba4 AD DC
4. In order to transform your server into an Active Directory Domain Controller, install Samba and all the required packages on your machine by issuing the below command with root privileges in a console.
$ sudo apt-get install samba krb5-user krb5-config winbind libpam-winbind libnss-winbind

5. While the installation is running a series of questions will be asked by the installer in order to configure the domain controller.
On the first screen you will need to add a name for Kerberos default REALM in uppercase. Enter the name you will be using for your domain in uppercase and hit Enter to continue..

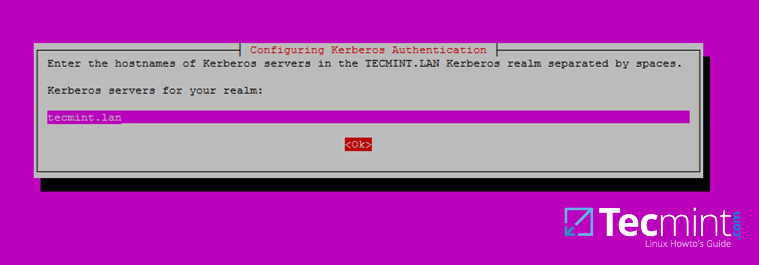
6. Next, enter the hostname of Kerberos server for your domain. Use the same name as for your domain, with lowercases this time and hit Enter to continue.
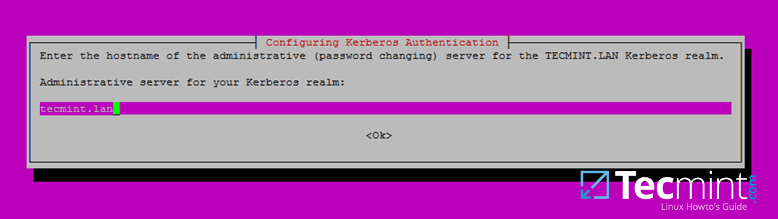
7. Finally, specify the hostname for the administrative server of your Kerberos realm. Use the same as your domain and hit Enter to finish the installation.
Step 3: Provision Samba AD DC for Your Domain
8. Before starting to configure Samba for your domain, first run the below commands in order to stop and disable all samba daemons.
$ sudo systemctl stop samba-ad-dc.service smbd.service nmbd.service winbind.service
$ sudo systemctl disable samba-ad-dc.service smbd.service nmbd.service winbind.service
9. Next, rename or remove samba original configuration. This step is absolutely required before provisioning Samba AD because at the provision time Samba will create a new configuration file from scratch and will throw up some errors in case it finds an old smb.conf file.
$ sudo mv /etc/samba/smb.conf /etc/samba/smb.conf.initial
10. Now, start the domain provisioning interactively by issuing the below command with root privileges and accept the default options that Samba provides you.
Also, make sure you supply the IP address for a DNS forwarder at your premises (or external) and choose a strong password for Administrator account. If you choose a week password for Administrator account the domain provision will fail.
$ sudo samba-tool domain provision --use-rfc2307 --interactive

11. Finally, rename or remove Kerberos main configuration file from /etc directory and replace it using a symlink with Samba newly generated Kerberos file located in /var/lib/samba/private path by issuing the below commands:
$ sudo mv /etc/krb5.conf /etc/krb5.conf.initial
$ sudo ln -s /var/lib/samba/private/krb5.conf /etc/

12. Start and enable Samba Active Directory Domain Controller daemons.
$ sudo systemctl start samba-ad-dc.service
$ sudo systemctl status samba-ad-dc.service
$ sudo systemctl enable samba-ad-dc.service

13. Next, use netstat command in order to verify the list of all services required by an Active Directory to run properly.
$ sudo netstat –tulpn| egrep ‘smbd|samba’

Step 4: Final Samba Configurations
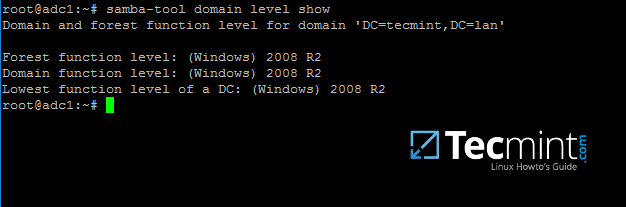
14. At this moment Samba should be fully operational at your premises. The highest domain level Samba is emulating should be Windows AD DC 2008 R2.
It can be verified with the help of samba-tool utility.
$ sudo samba-tool domain level show
15. In order for DNS resolution to work locally, you need to open end edit network interface settings and point the DNS resolution by modifying dns-nameservers statement to the IP Address of your Domain Controller (use 127.0.0.1 for local DNS resolution) and dns-search statement to point to your realm.
$ sudo cat /etc/network/interfaces
$ sudo cat /etc/resolv.conf
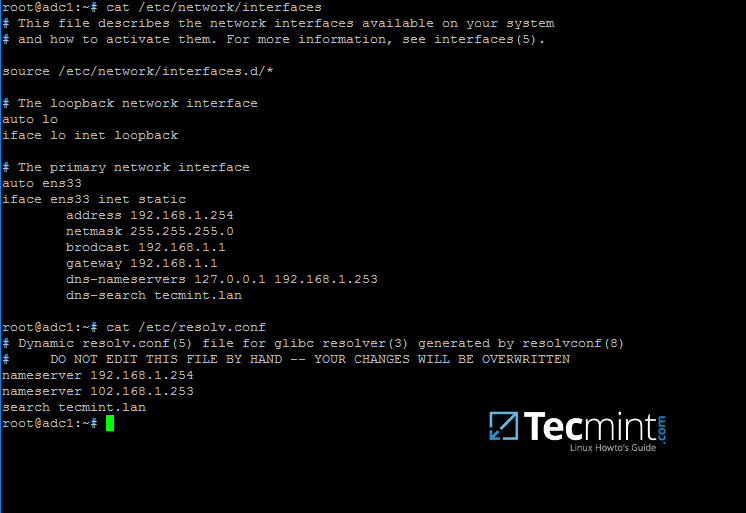
When finished, reboot your server and take a look at your resolver file to make sure it points back to the right DNS name servers.
16. Finally, test the DNS resolver by issuing queries and pings against some AD DC crucial records, as in the below excerpt. Replace the domain name accordingly.
$ ping -c3 tecmint.lan         #Domain Name
$ ping -c3 adc1.tecmint.lan   #FQDN
$ ping -c3 adc1               #Host

Run following few queries against Samba Active Directory Domain Controller..
$ host -t A tecmint.lan
$ host -t A adc1.tecmint.lan
$ host -t SRV _kerberos._udp.tecmint.lan  # UDP Kerberos SRV record
$ host -t SRV _ldap._tcp.tecmint.lan # TCP LDAP SRV record
17. Also, verify Kerberos authentication by requesting a ticket for the domain administrator account and list the cached ticket. Write the domain name portion with uppercase.
$ kinit [email protected]
$ klist

That’s all! Now you have a fully operational AD Domain Controller installed in your network and you can start integrate Windows or Linux machines into Samba AD.
On the next series we’ll cover other Samba AD topics, such as how to manage you’re the domain controller from Samba command line, how to integrate Windows 10 into the domain name and manage Samba AD remotely using RSAT and other important topics.


Hi,
Can you please describe a process of backing up existing Samba DC and restoring that backup to a new server installation?
@Nikola,
Backing Up the Samba DC:
Here is a step-by-step process for backing up an existing Samba Domain Controller (DC) and restoring that backup to a new server installation:
1. To prevent data corruption during the backup, stop Samba services on the existing DC.
2. Copy the Samba configuration file and any other relevant configuration files to your backup location.
3. Next, use the samba-tool utility to back up the Samba Active Directory database:
4. If you have specific files and shares you want to back up, make copies of those files and directories to your backup location.
Restoring the Backup to a New Server:
1. Install Samba on the new server.
2. Copy the Samba configuration file (smb.conf) from your backup to the new server’s /etc/samba/ directory.
3. Use the samba-tool utility to restore the Samba database on the new server:
4. Start the Samba services on the new server:
By following these steps, you should be able to successfully back up your existing Samba DC and restore it to a new server installation while preserving your Active Directory domain and file shares. Remember to adapt these instructions based on your specific environment and requirements.
Hi, can you post an article on how to connect Ubuntu 22.04 LTS Desktop samba server with an existing Windows Server 2016 R2 standard Active Directory Service.?
I have tried and it didn’t work below was a detailed query on askubuntu website.
https://askubuntu.com/questions/1415706/how-to-use-my-existing-windows-server-2016-r2-standard-active-directory-to-authe
Thanks this Tutorial is very helpful.
It would be very helpful to explain how it works with a systemd Networking configuration.
With krb5.conf there are a lot of workorounds to make because Samba got some bugs to handle.
Step 15 does not apply to Ubuntu 20.04 which is the latest version. After a lot of search, I found the solution here – https://www.techrepublic.com/article/how-to-deploy-samba-on-linux-as-an-active-directory-domain-controller/
Scroll down to How to test the DC configuration
I’m a newbie.
I like this website and the above article is very helpful for me.
After building the Samba AD-DC on Centos 7, I cannot alter the ownership of the profile share I created. I try
# chgrp -R "Domain Users" /path/to/profile, and I get Domain Users invalid group.Pretty straightforward! Thanks
Hi.
I need to integrate the squid to authenticate to the samba LDAP, I followed this tutorial for configuring the samba. Do you have any tutorials that can help me?
Hi! Did you find anything with LDAP auth?
Hello,
I have some questions about SambaAD.
Here they are :
Sincerely,
Maximilien Molet.
thanks Ravi
Hi,
I could ask the same can I setup Samba AD on ubuntu 20.04? because Peter Galgano said there is a difference between 18.04 and 16.xx and hope to have an answer from the author or from Peter.
thanks a lot
Raouf
@Raouf,
You can set up Samba AD on Ubuntu 20.04 by following this guide, but may some little changes in the commands and configuration.
I’m having issues with the:
They return Host _kerberos._udp.locahost not found: 3(NXDOMAIN) and Host _ldap._tcp.localhost respectively.
Just FYI, I used my domain name in the commands and the errors reflected it accordingly. Just didn’t feel like my domain name was relevant here. Can you point me in the right direction here?
Other than that, fantastic tutorial!
So which part of this is DNS? Because I can’t view the Ubuntu server’s forward lookup zones, I get an error that the server encountered a problem while attempting to load the zone in the RSAT DNS tool. This is an Ubuntu server added to an existing domain.
Following this guide can I setup Samba AD on ubuntu 20.04?
Like nearly everyone else, the
Do not resolve, although I’m able to issue tickets using kinit.
Ping works for both hostname but not FQDN
returns
host -t A localhost works, obviously, but
host -t SRV _kerberos._udp.localhost does not, obviously.
This helped me a lot! I got stuck with this new netplan think and an obscure systemd resolved conf that I did… but anyway I’ve fixed this and now there are two nicely running.
Hi, I am stuck in this part.
My server shows:
Host dominio.local not found: 3(NXDOMAIN)Hi did you resolve the problem? I am stuck in this part
open pico /etc/krb5.conf file.
[realms] DOMINIO.LOCAL = { kdc = 192.168.1.1 #IP da sua máquina samba4 admin_server = 192.168.1.1 #IP da sua máquina samba4 } DOMINIO = { kdc = 192.168.1.1 #IP da sua máquina samba4 admin_server = 192.168.1.1 #IP da sua máquina samba4 }On step 11 when I go to do the symlink using
sudo ln -s /var/lib/samba/private/krb5.conf /etc/I get this back:
ln: failed to access '–s': No such file or directoryPlease advise?
Thanks!
@Juston,
There is typo in the command, the correct command syntax is:
Great tutorial. A few things that are different for the installation on Ubuntu 18.04:
Helpful source: https://www.server-world.info/en/note?os=Ubuntu_18.04&p=samba&f=4
Thanks for the excellent Tutorial.
I was able to get a fully functional test server together on 18.04, and expect we will be making a final build for our production server in the next 60 or so days. We have quite a few years of experience in using Samba 4 to host our domain in a production setting.
There are a number of areas where the 18.04 build is different from the 16.x build, and a few areas where Samba’s best practices differ. I do have somewhat of a bias to creating a standalone instance of SambaAD to ease install, maintenance and upgrading compared to attempting to have AD services mixed in with other services in an all-in-one server.
I would be happy to work with the author to document those differences. Please feel free to comment here or DM me, and when I have time to undertake this, I’ll be happy to share my documentation.
Thanks again
@Peter,
You can share your documentation at [email protected].
OK I will…
Can you kindly share your documentation at createoppurtuinities(at)gmail.com
Hi,
I am also struggling with 18.04, so I would very much appreciate if you shared your updates. Thank you in advance!
There is an error in this piece if you use
ctrl+candctrl-v.It’s written with a
"–"instead of a"-".@Edson,
Corrected in the article..
Thanks for pointing out those typos..
Hi, so, it all works fine on the server, though i cannot ping the domain on the client, how is that?
(And yes i set the only dns server the the samba dc server)
oh and the administrator account at the last step doesnt seem to exist
Check the dns network settings of your client, maybe it doesn’t address the IP of the AD server. Set the first dns server and/or gateway address on the clients IP4 settings to address of the AD server. You may need to change your dhcp settings for the clients.
Oh, and it is common that the Administrator password doesn’t seem to be set by provisioning. Use samba-tool to set a new password.
Thanks for this really great tutorial. It’s by far the most comprehensive I could find on the web.
Still it leaves one unanswered question to me:
Is this a Ubuntu/Samba only solution or can we go a mixed way with one Windows Server based DC and an additional Ubuntu DC?
Suppose you wanted to replace an existing Windows Server 2012 R2 based DC with an Ubuntu based DC, can we still follow the steps described in “Part 5: Join an Additional Ubuntu DC to Samba4 AD DC” and join the additional Ubuntu DC to the AD and later remove the Windows based DC from the domain?
Or should we start from scratch? Too scared to try this out myself.
@Kai,
Yes its Ubuntu/Samba solution only, but you can join additional Ubuntu DC to existing Samba4 AD DC as explained in Part 5.
Thank you for the clarification.
Has anyone done this on Ubuntu 18.04? Are any of the steps different?
I tried it some time ago. You have to use netplan (https://www.tecmint.com/configure-network-static-ip-address-in-ubuntu/) instead of /etc/network/insterfaces. If i remember well, I could not get the ping to work because you cannot use resolv.conf and i didn’t get much further after that.
What I’ve done and am doing again now, is install and get everything running on 16.04 and then upgrade to 18.04. That seems to work. I’ve done it on two domain controllers without issue.
If you are using netplan, you can do this to get the dns servers set in the netplan config file.
I had a further problem related to netplan, that took a while to find.
By default, systemd.resolved (a local dns caching service) takes port 53, so the internal dns in samba can’t start.
I think it will be necessary to disable systemd.resolved from starting
Thank you for the perfect tutorial! I had the same problems with DNS where I could not ping the server. I found out after a second installation attempt, that I should follow the steps exactly as mentioned here and at the Ubuntu server installation instructions https://www.tecmint.com/installation-of-ubuntu-16-04-server-edition/ and after that everything worked fine.
On my first attempt I installed the Linux server without looking the installation instructions and I installed the system as per usual. So I pre-installed DNS and other features, encrypted my home folder, and did not interrupt the network detection process to enter the settings manually.
I also skipped step 3 from this page. On the second attempt I just entered the same hostname as on the installation process. I think this, or the pre-installed DNS server caused the problem.
I also found two typos:
At step 11
sudo mv /etc/krb6.conf /etc/krb5.conf.initialshould besudo mv /etc/krb5.conf /etc/krb5.conf.initialand at step 11, it should be broadcast.@Antonis,
Thanks for pointing out typos, corrected in the article..
Great tutorial,
I did this on a Debian 9.6. Most things worked fine.
I had to systemctl unmask samba-ad-dc, and install net-tools.
I checked with smbclient -L localhost %U – It puzzles me why does Workgroup always return WORKGROUP?
Hello!
Great Document, however, everything works for up to Step 16, when I do the command:
I get the error
Here is my /etc/network/interfaces and my /etc/resolv.conf.
iface eth0 inet static address 10.16.24.50 netmask 255.255.255.0 broadcast 10.16.24.255 gateway 10.16.24.1 dns-nameservers 127.0.0.1 10.16.24.50 dns-search goneoweb.localI’m kind of at a standstill. I’m in the process of setting this up for use with my small business, 3 computers, and 6 users. So any help would be greatly appreciated! Again, great article! Thanks
Add 127…. to resolv.conf file. why you use the second nameserver. Is that a dc also? If not, leave only 127…8n both files.
The machine Im setting all this up on has a static of 10.16.24.50, so I dont need to reference that in the resolv.conf?
Very good guide but still have a problem with step 16. I tried many things, but when using Ubuntu Server 18.04.2 (with alternative installer that is probably same as with standard 16.04), and configuring netplan, etc., i can’t ping domain.
krb5.conf:
[libdefaults]
        default_realm = SPBYCHLEW.LAN
        dns_lookup_realm = false
        dns_lookup_kdc = true
--------------------------------------------------------
/etc/hosts:
resolv.conf:
netplan:
# This file describes the network interfaces available on your system # For more information, see netplan(5). network: version: 2 renderer: networkd ethernets: eno1: dhcp4: no addresses: [192.168.0.77/24] gateway4: 192.168.0.1 nameservers: search: [jakis, jakis.lan] addresses: [127.0.0.1, 192.168.0.77]It’s a very nice to read guide, thank you for that. Still i have one issue i can not figure out:
The DNS.
I can ping rowdyserver
I can ping rowdyserver.lindelaan.lan
but i dont get any anwer when i just ping lindelaan.lan
my resolv.conf looks like this
nameserver 127.0.0.1
nameserver 192.168.2.7
nameserver 8.8.8.8
search feuer.lan
and i have no idea where to look to fix that.
Thanks for this interesting tutorial. I have configured samba server in my system. But after the setup, the internet is not working. I getting the below-mentioned error. Please guide me to resolve the issues.
FYI The error which gets is “Failed to start Raise network interfaces.” when restarting networking service
I am a newbie on Ubuntu as AD Server. I was going through the steps on this article on osx-virtualbox-ubuntu16 (host-only + nat). The same VM also has DNS (bind9), will be adding DHCP here as well if all goes well. :)
For the DNS to be able to work for “host -t A tecmint.lan” what kind of record should be there in the DNS?
The guide is really great, congratulations. But I would have a little problem… after changing the DNS (Nameserver) so that it is local, copying the configuration file that you entered in the article, if I enter the command.
the output is “Unknown host “.
How can I fix? I attach my configuration files resolv.conf:
interfaces:
Worked until this point:11. Finally, rename or remove Kerberos main configuration file from /etc directory and replace it using a symlink with Samba newly generated Kerberos file located in /var/lib/samba/private path by issuing the below commands:
Then i received:
It’s krb5.conf, not krb6.conf in the first command.
Thanks
Hi Matei,
Very nice article, full understand samba connectivity with Windows and Ubuntu.
Now my Question is here I am connected Win-7 Desktop with Ubuntu Samba AD Controller. (I am using Administrator Login/Password ) which I created using kinit command. but I want to connect with normal user. if you have any further steps please help me.
My connectivity is successfully done but I want to login with normal user.
Thanking you,
Anand.
Create a normal user in AD and authenticate on the client with that username.
Many thanks. This tutorial so helpfully for me to create AD server under ubuntu.
I will continue, using samba as sharing file/directory.
Hi,
It was the best doc for Samba AD DC!
I tried to this description in my notebook with LXD containers, so not everything was trivial. (xattr + LXD!)
I followed step-by-step and some things are not clear:
0. The Kerberos example screenshots are almost unreadable (and that was the most problematic part of the setup for me). I haven’t used Kerberos, yet.
1. Why do I need A record for domain itself? I don’t have.
2. Where are these records? In my DNS server or AD?
    $ host –t SRV _kerberos._udp.tecmint.lan  # UDP Kerberos SRV record
    $ host -t SRV _ldap._tcp.tecmint.lan # TCP LDAP SRV record
Are those a must? They don’t have,too.
With this Samba AD DC I want to setup a user auth system for Win10 and Squid+SquidGuard using NTLM with SSO. I found squid normal plain text auth system – htpasswd – not accept UTF-8 characters, so the Win “long” (or full) name login ID not working and I don’t want two different ids for login and squid. I very hope it will work shortly.
Great guide! I did have a question: I currently run DHCP on my Windows AD controller too. Could I also run DHCP on an Ubuntu using the documentation on https://help.ubuntu.com/lts/serverguide/dhcp.html AND still manage it with the RSAT tools in Windows?
You cannot control in any a Linux dhcp server via RSAT. They have different inplementations in Linux and Windows, altough they offer the same services. In linux you can manage the server from cli and through its config files. However, you can setup both dhcp servers to assign ip addresses for your network, but use different network ranges and setup only one server as authorative.
It doesn’t work.
I think and I can see from the log the problem is in DNS. Because of dnsmasq is a very simple server and I don’t know which records need.
Congratulations!! Thanks a lot!!!
What a great article! Quick question. I had this running nicely for a while, but all of a sudden, my Windows 7 hosts cannot connect to shares in the AD anymore. I haven’t touched anything on the settings side of things.
Are you aware of an update that might have broken things? My Mac hosts are still happily connecting with their domain accounts, but any windows 7 hosts just keep prompting for the password without allowing connection.
It can be some update issues with windows file sharing clients. Consult Microsoft docs and verify if samba SMBv1 has been disabled in Windows client, after applying wannacry updates.
Thanks for the reply Matei. It turns out it was user error.
The servers I was trying to connect to had been reconfigured in the DNS and there was a mistake with the CNAME and A Record being inverted. Simply fixing the DNS resolved the issue.
I’m surprised it worked for so long after changing the DNS, I assume the entries were cached.
“kinit [email protected]”
Everything worked all the way up until that point. That command doesn’t work for me. It rejects the password. This is a fresh install. I’ve put one, and only one, password on this computer, and that doesn’t work, so I have no idea what its asking for here.
I’ve tried the one password that I’ve actually set; I’ve tried leaving it blank; I’ve tried “password,” “administrator,” and “admin.” I’m out of ideas. What is this default password? More importantly, how do I root change the password.
Kpassword demands the old password, which I obviously don’t have.
I had the same issue and think that the administrator password that Kerberos uses is not set up during the domain provision. I was able to reset it using.
Hi Matei,
Yet again a great manual. You make admin life a lot easier!
I have a question. Do you know when Ubuntu will release a more up to date samba4 version. The version which is installed with Ubuntu 16.04.3 LTS is version 4.3.11-Ubuntu. Samba 4 version 4.3.11 is already EOL since 2017-03-07.
Or does Ubuntu maintain this version till the EOL of Ubuntu 16.04?
You should check out on Ubuntu launchpad. I don’t know what Ubuntu is planning with maintaining their versions of the samba project.
Hello Mr/Mrs,
I am trying to integrate Samba4 and OpenLdap as backend database for samba ADDC. I have followed the procedures that you provided in in this page and it work properly on Ubuntu 16.04, now I want to configure OpenLdap as backend database for samba so how can do it?
I have to integrate them on Ubuntu 16.04 and this is part of my Bachelor Theses.
Please help me …..
Samba4 has its own builtin ldap support. No need to use ldap as backend.
Hi Cezar. Congratulations on your article. I have the same problem reported by Wasiq. But I have an existing ldap with users of other services. Is it possible to use it integrated with samba4?
Hi all,
I tried to configure Samba to authenticate the user using two domain controller for fault tolerance.
How to configure smb.conf and krb5.conf thank you very much.
As far as I know you cannot integrate Samba against two separate domain controllers ( aka two different realms). You should check Samba docs.
what’s the acl and xattr syntax for LVM partitioned machines?
The syntax is the same as for any ext4 file system. It doesn’t matter if the underlying storage unit is a pure HDD partition or a LVM logical volume. As long as the file system supports ACL, the syntax is the same.
First of all thanks for your guide and I need your help more…
I am new in samba therefore I have no enough understanding of samba. if my question is not clear or understandable, please forgive me.
The supervisor asked me to configure samba ADDC in a manner that the users accounts that we have added with phpLdapAdmin in Ldap database can authenticate against samba DC. it means that users must can login to any windows client with credentials stored in ldap data base.
If samba4 has its own built-in ldap support, so where does the user profile will be stored? and in what format they will be stored (ldif or other)? I have HDD storage unit.
Hi,
Its working fine for me but, when I do access from windows RSAT tools its picked up all the DNS information but when I try to create forward zone i am getting local security database in internal inconsistency error.
Hi! My Ubuntu 16.04 server also acts as a BIND 9 DNS and ISC DHCP server. There is st that i need to change to use it also as a Samba 4 AD domain controller with this guide?
I know broad question, all the eggs in the same basket…sorry
$ sudo mv /etc/krb6.conf /etc/krb5.conf.initial
should read:
$ sudo mv /etc/krb5.conf /etc/krb5.conf.initial
Really nice blog saved lot of my RnD time.
Thanks
There is no krb6.conf for me. I did:
mv /etc/krb5.conf /etc/krb5.conf.initial
I’ve tried the process out twice already with no success. I found that the conflicting item was dnsmasq using the same port as the Samba Internal DNS Resolver. Comment out dns=dnsmasq by putting
#in /etc/NetworkManager/NetworkManager.conf. All fixed.Step 10: is wrong you need to use double “–“, -interactive doesnt work :b
@Manuel,
Thanks for pointing out, we’ve corrected the article by adding
--interactiveto the command as suggested.@Ravi
Thank you for the improvement of the error but I was too stupid to read this guide.
@Marcel Hrnjica
its ok, i guess everybody isn’t that smart like me..
Eagerly awaiting your article Part 14: Integrate Ubuntu 16.04 to Samba4 AD DC with SSSD and Realm & Part 16: Integrate VMware ESXI Host to Samba4 AD DC Infrastructure.
Excellent piece of writing.
I just had to take time to comment and tell you thanks. This helped me much. And I’m using much of this verbatim in a production environment. Super thanks for taking the time to detail this!
I have tried your toturial about samba AD DC. Please Explain, how to upgrade the latest version of samba ?
In case you’ve installed Samba from distribution repositories, just upgrade your system. In case you want the latest Samba version you need to download the archives from https://www.samba.org/samba/download/ and compile samba from sources.
Hello everyone !
I have passed the all the procedure to setup the Samba as ADDC and it was successful. now I am trying to integrate the Samba with OpenLdap, I’ve searched a lot in google but have found no any guide or documentation about setting up OpenLDAP with Samba backed on Ubuntu 16.04.
could you please help to setup that or reference any resource?
That’s because Samba4 has LDAP ad schema integrated. If you can’t find it in official samba docs, than it’s not officially supported.
This works super.
Windows server upon Linux stability what else to say and you “bonus” possibilities here, mdadm, rsync.
Excellent guide!!! Congratulations. I really need part 14. and also 13. When
will be your publication? Thank you.
I’m running to an issue with resolving my domain name. I can ping the FQDN and Host, but not the domain name. Here is my setup:
Hostname:
adc1
Hosts file:
127.0.0.1 localhost
127.0.1.1 adc1.tirnanog.local adc1
# The following lines are desirable for IPv6 capable hosts
::1 localhost ip6-localhost ip6-loopback
ff02::1 ip6-allnodes
ff02::2 ip6-allrouters
/etc/network/interfaces
# This file describes the network interfaces available on your system
# and how to activate them. For more information, see interfaces(5).
source /etc/network/interfaces.d/*
# The loopback network interface
auto lo
iface lo inet loopback
# Wired network connection
auto eno1
iface eno1 inet static
address 192.168.1.200
netmask 255.255.255.0
broadcast 192.168.1.254
gateway 192.168.1.1
dns-nameservers 127.0.0.1 192.168.1.200 192.168.1.1
dns-search tirnanog.local
/etc/resolv.conf
# Dynamic resolv.conf(5) file for glibc resolver(3) generated by resolvconf(8)
# DO NOT EDIT THIS FILE BY HAND — YOUR CHANGES WILL BE OVERWRITTEN
nameserver 127.0.0.1
search tirnanog.local
When I try to ping, these are the results that I get:
root@adc1:/# ping -c3 tirnanog.local
ping: unknown host tirnanog.local
root@adc1:/# ping -c3 adc1.tirnanog.local
PING adc1.tirnanog.local (127.0.1.1) 56(84) bytes of data.
64 bytes from adc1.tirnanog.local (127.0.1.1): icmp_seq=1 ttl=64 time=0.049 ms
64 bytes from adc1.tirnanog.local (127.0.1.1): icmp_seq=2 ttl=64 time=0.060 ms
64 bytes from adc1.tirnanog.local (127.0.1.1): icmp_seq=3 ttl=64 time=0.061 ms
— adc1.tirnanog.local ping statistics —
3 packets transmitted, 3 received, 0% packet loss, time 1998ms
rtt min/avg/max/mdev = 0.049/0.056/0.061/0.010 ms
root@adc1:/# ping -c3 adc1.tirnanog.local
PING adc1.tirnanog.local (127.0.1.1) 56(84) bytes of data.
64 bytes from adc1.tirnanog.local (127.0.1.1): icmp_seq=1 ttl=64 time=0.052 ms
64 bytes from adc1.tirnanog.local (127.0.1.1): icmp_seq=2 ttl=64 time=0.061 ms
64 bytes from adc1.tirnanog.local (127.0.1.1): icmp_seq=3 ttl=64 time=0.062 ms
— adc1.tirnanog.local ping statistics —
3 packets transmitted, 3 received, 0% packet loss, time 1998ms
rtt min/avg/max/mdev = 0.052/0.058/0.062/0.007 ms
Can anyone give me a hand and let me know what I’m doing wrong? I have a good feeling it is something to do with the dns-nameservers, but I’ve tried changing them a few time in /etc/network/interfaces and I can’t seem to get anything to work.
By the way, this is what I’m running:
Distributor ID: Ubuntu
Description: Ubuntu 16.04.2 LTS
Release: 16.04
Codename: xenial
Please, let me know if there is any other info needed. Thanks!
Well! It seems I didn’t install/configure DNS before starting this tutorial.. that would have helped :)
If your machine is a Samba4 DC then remove 127.0.1.1 adc1.tirnanog.local from hosts file and point to adc1 only before provisioning the domain.
I see you have three DNS entries on interfaces file, use only dns-nameservers 127.0.0.1 and other DNS server provisioned on your domain if that’s the case after you’ve provisioned the samba domain.
Thanks a lot for this article! After going through the domain provision process a few times this seems to me the most solid article about the process. There is plenty of outdated information around the net, and Samba wiki is often confusing (if not outright down on a given day).
Hello,
I have reached to the step below and I have encountered one failure! any idea, please?
Usage: samba-tool domain provision [options]
samba-tool domain provision: error: no such option: -i
Use –interactive. While editing with microsoft word a ‘ – ‘ has been suppressed.
Double hyphen.
–interactive
Hi guys.
After running through the guide in the office, I took the server on site to a client with a different network.
When changing the IP address and DNS entries the lookup of domain.local returns the IP address the box had in our office.
Tried flushing the DNS and a bunch of things and nothing has worked so far.
How would I get around this?
You must manually update all IP’s addresses on your machine (hosts, network interfaces, samba IP forwarders, resolvers ) and samba DNS records to fit new IP range.
Where do I edit the samba dns records and IP forwarders? In the smb.conf file?
Where do i edit the resolvers as well. I have set the rest, I have also set the IP’s in the smb.conf file.
Hi Matei
Where would I update the samba IP forwarders?
Currently, only one forwarder per sabamba server can be implemented. Edit smb.conf file.
Hi there,
I have set up an active directory domain controller according to your guide in a test environment in our office.
When I took it on site to a different IP range, I changed the IP address. Changed the DNS according to the site. When i ping the domain name it returns the old IP address. When I do an NSlookup it also returns the IP address I had set up the machine on in the office.
I have set it up on Ubuntu 16.10
You need to update the link to the Part6
@Sedlav,
Part 6 of Samba4 AD series not yet published, when publish will add the links…
how to add acl at /etc/fstab as mine was so totally different with what is on your tutorial, if there’s a way to verify that ACL is on at your system that would be very helpful. I am using Ubuntu Server 16.04 and I follow the tutorial and everything is fine but I am not sure whether ACL is on at my ADC.
thanks
No worries, if you’re using Ubuntu 16.04, acl should be enabled by default on ext4 file system.
Use this command to verify is ACL are enabled on fs: sudo tune2fs -l /dev/sdaX |grep acl
you forgot a – in sudo samba-tool domain provision –use-rfc2307 -interactive it should be sudo samba-tool domain provision –use-rfc2307 –interactive
No, I didn’nt forget. I was edited in microsoft word, and it seems like word suppresses double hyphens.
There is a LITTLE mistake in the code for installation of winbind…
sudo apt-get install samba krb5-user krb5-config winbind libpam-winbind libnss-windbind
If you have problems installing libnss-winbind, try to write it without “d” in mid ;)
Beside this little thing: Awesome tut! Thx a lot!
Yes, there’s a typo in the code you’ve mentioned. The correct misspelling of the package is
libnss-winbind. It error will be fixed.There is type there! I’ve noticed and took the screenshot before correcting the error. Anyway the second nameserver belongs to second AD DC, which is offline most of the time. You should be probably safe as long as local DNS resolution or first AD DC is online.
Is this series applicable to CentOS 7 also (with all the equivalent CentOS 7 commands)? Thanks..looking forward to next parts!!
@Rahul,
The series is specially based on Ubuntu distribution, but it will also work on all Linux distributions with slight changes in command installation.
Why so many reboots?
There are two reboots. First to apply system-wide hostname correctly and second to apply network interface changes accurately. You can choose to modify both files and then issue one reboot after you’ve modified the last file.
There’s another reboot after you modify /etc/fstab do add acl.
The first restart is not necessary because on latest Ubuntu releases ACLs are enabled by default on file system.
edit file /etc/nsswitch.conf
hosts: files mdns4_minimal [NOTFOUND=return] dns
#new line
hosts: dns files mdns4_minimal [NOTFOUND=return]
It is near the end of Point 15.
Anyone notice the line
nameserver 102.168.1.253 ?