Netplan is a new command-line network configuration utility introduced in Ubuntu 17.10 to manage and configure network settings easily in Ubuntu systems. It allows you to configure a network interface using YAML abstraction. It works in conjunction with the NetworkManager and systemd-networkd networking daemons (referred to as renderers, you can choose which one of these to use) as interfaces to the kernel.
It reads network configuration described in /etc/netplan/*.yaml and you can store configurations for all your network interfaces in these files.
In this article, we will explain how to configure a network static or dynamic IP address for a network interface in Ubuntu 18.04 using Netplan utility.
List All Active Network Interfaces on Ubuntu
First, you need to identify the network interface you are going to configure. You can list all attached network interfaces on your system using the ifconfig command as shown.
$ ifconfig -a
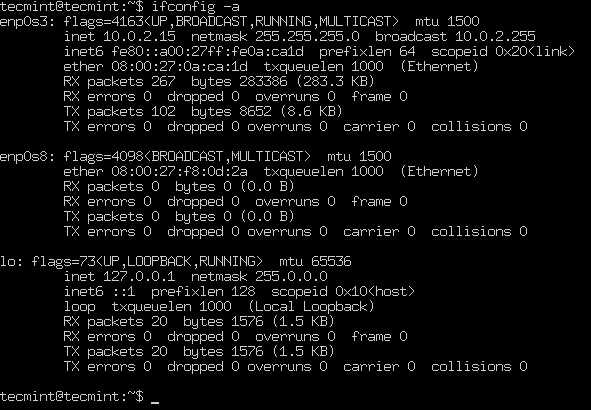
From the output of the above command, we have 3 interfaces attached to the Ubuntu system: 2 ethernet interfaces and the loop back interface. However, the enp0s8 ethernet interface has not been configured and has no static IP address.
Set Static IP Address in Ubuntu 18.04
In this example, we will configure a static IP for the enp0s8 ethernet network interface. Open the netplan configuration file using your text editor as shown.
Important: In case a YAML file is not created by the distribution installer, you can generate the required configuration for the renderers with this command.
$ sudo netplan generate
In addition, auto generated files may have different filenames on desktop, servers, cloud instantiations etc (for example 01-network-manager-all.yaml or 01-netcfg.yaml), but all files under /etc/netplan/*.yaml will be read by netplan.
$ sudo vim /etc/netplan/01-netcfg.yaml
Then add the following configuration under the ethernet section.
enp0s8:
      dhcp4: no
      dhcp6: no
      addresses: [192.168.56.110/24, ]
      gateway4:  192.168.56.1
      nameservers:
              addresses: [8.8.8.8, 8.8.4.4]
Where:
- enp0s8 – network interface name.
- dhcp4 and dhcp6 – dhcp properties of an interface for IPv4 and IPv6 receptively.
- addresses – sequence of static addresses to the interface.
- gateway4 – IPv4 address for default gateway.
- nameservers – sequence of IP addresses for nameserver.
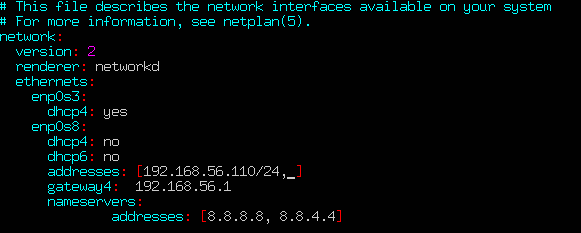
Once you have added, your configuration file should now have the following content, as shown in the following screenshot. The first interface enp0s3 is configured to use DHCP and enp0s8 will use a static IP address.
The addresses property of an interface expects a sequence entry for example [192.168.14.2/24, “2001:1::1/64”] or [192.168.56.110/24, ] (see netplan man page for more information).
# This file describes the network interfaces available on your system
# For more information, see netplan(5).
network:
  version: 2
  renderer: networkd
  ethernets:
    enp0s3:
      dhcp4: yes
    enp0s8:
      dhcp4: no
      dhcp6: no
      addresses: [192.168.56.110/24, ]
      gateway4:  192.168.56.1
      nameservers:
              addresses: [8.8.8.8, 8.8.4.4]
Save the file and exit. Then apply the recent network changes using following netplan command.
$ sudo netplan apply
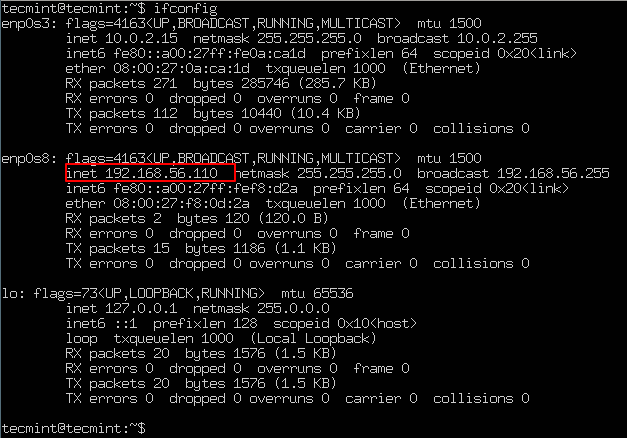
Now verify all the available network interfaces once more time, the enp0s8 ethernet interface should now be connected to the local network, and have an IP addresses as shown in the following screenshot.
$ ifconfig -a
Set Dynamic DHCP IP Address in Ubuntu
To configure the enp0s8 ethernet interface to receive an IP address dynamically through DHCP, simply use the following configuration.
# This file describes the network interfaces available on your system
# For more information, see netplan(5).
network:
 version: 2
 renderer: networkd
 ethernets:
   enp0s8:
     dhcp4: yes
     dhcp6: yes
Save the file and exit. Then apply the recent network changes and verify the IP address using following commands.
$ sudo netplan apply
$ ifconfig -a
From now on your system will get an IP address dynamically from a router.
You can find more information and configuration options by consulting the netplan man page.
$ man netplan
Congratulations! You’ve successfully configured a network static IP addresses to your Ubuntu servers. If you have any queries, share them with us via the comment form below.


There is a .yaml file for configuration. The syntax of it is horrible! I didn’t understand at all – HOW can I write wireless networks, WHERE, and HOW MUCH spices can be there.
yaml language is very structured. Notice that each indent is two spaces. In order to use your wireless network, you need to discover what the OS thinks the name of the device is. For most OSs, you can simply type:
ip a– That should return a list of all available adapters in your system.From there you have a working example from the article above. Just plug in your wireless device name instead of eth0. Also, you haven’t stated if your wireless is acting in AP mode or as a client. Good luck!
sudo apt update not working anymore.
Ubuntu loves play with us, its like when we was kids and played the touch and go :)
First it changes /etc/network/interfaces to /etc/netplan/50-cloud-init.yaml as you can see when do:
# ifupdown has been replaced by netplan(5) on this system. See
# /etc/netplan for current configuration.
# To re-enable ifupdown on this system, you can run:
# sudo apt install ifupdown
Second it changes /etc/netplan/50-cloud-init.yaml to /etc/cloud/cloud.cfg.d/50-curtin-networking.cfg as you can see when do:
$ cat /etc/netplan/50-cloud-init.yaml

# This file is generated from information provided by the datasource.  Changes
# to it will not persist across an instance reboot.  To disable cloud-init's
# network configuration capabilities, write a file
# /etc/cloud/cloud.cfg.d/99-disable-network-config.cfg with the following:
# network: {config: disabled}
Then even after running [ cloud-init clean -r ] sometimes changes in /etc/cloud/cloud.cfg.d/50-curtin-networking.cfg arent applied
$ cat /etc/cloud/cloud.cfg.d/50-curtin-networking.cfg network: version: 2 ethernets: eth0: dhcp4: false addresses: [192.168.1.576/24] gateway4: 127.0.0.53Thanks! you save my day!
Really well explained
@Roc
This is great! Many thanks for the feedback.
Hello I’m trying to set up my computer with GPU to be accessed from my laptop and from my friends laptop through putty, for this the solution i thought it would work was set up a static IP and open port 22 so that we can access the GPU machine through putty from other laptop.
After i set up the static IP my internet connection in Gpu machine is not working also i don’t have an idea how to proceed further in port forwarding .
1. My questions are is my solution to set up static IP and open port 22 will work for my above requirement.
2. Any suggestions to solve my internet connectivity issue.
@Dwarakanath,
First check your static IP is reachable from other laptop by doing a ping request to IP.
Secondly, make sure the opened port 22 is listening on the system using netstat command.
@Ravi save thanks for replying ping from my laptop to connect my static ip machine gets timeout, I see that you ask me to check the port 22 is listening using netstat to make it more clear I am yet to open port 22 for which any help will be highly appreciated
@Dwarakanath,
Your static IP must be reachable from your laptop, and to open port 22 on ufw firewall, run:
I think you have a mistake with regards to what “netplan generate” does, you have a notice saying “Important: In case a YAML file is not created by the distribution installer, you can generate the required configuration for the renderers with this command.”, this is incorrect. On the man page (http://manpages.ubuntu.com/manpages/cosmic/man8/netplan-generate.8.html) it says “netplan-generate – generate backend configuration from netplan YAML files”
“netplan generate” *reads* the YAML files it can’t create the yaml file for you, ie it won’t touch any of the yaml files in the “/etc/netplan/” directory.
I have noticed when I run “netplan generate” it creates the configuration files in “/run/systemd/network/” on Ubuntu 18.04
The man page also says: “You will not normally need to run this directly as it is run by netplan apply, netplan try, or at boot.”
So I think you should remove the reference to “netplan generate” as it’s just a red herring. If there is nothing in “/etc/netplan” then that command isn’t going to help you out.
@Joel
Many thanks for the heads up, we will look into this.
Those linux devs who made this decision are absolutely bunch of very strong and bad words. You have no idea what did you do to a mindset of administrator who expect that nobody, really nobody mess with sys admin networking stuff.
Specially developers. Do you have ANY idea what did you just do by switching to this netplan? This is unbelievable stupid. Unbelievable. Sys Admin really have other things to do besides watching which developer had some stupid inspiration and decide to change stable thing that work flawlessly.
Unbelievable. Have no nice word for this move. You should really go and destroy your head with hammer.
@Zoran
Many thanks for sharing your thoughts with us.
Interesting tutorial but at the netplan part you are going to fast for me. I don’t have that file, i do have a 50cloudminitmyaml does this mean i need to add my ipaddress in the 5-cloud file?
@johan
You can generate a file for you system, using this command:
Read it in your article, but was afraid because I got a different file by default.
After adding ens7 to
network
     version:  2
     rendereder: networkd
     ethernets:
          ens3:
               dhcp4: yes
               dhcp6: yes
          ens7:
               dhcp4: no
               dhcp6: no
               addresses:
               - 10.0.0.2/8
               gateway4: 10.0.0.1
and checking with:
all seemed well, but I can no longer ssh into my box now. Why?
Can you try this >>
that should tell you if open or available, also change the yes and no to true and false.
How is it, that in 2018 the configuration of your networks is decades behind Redhat 6?? Since when have we been reduced to config file editing, when the old classic blue and red config menu’s were fantastic. I dunno, even Raspberry Pi has better tools out of the box…..
Hi,
Looking to set up a static IP address in preparation for setting up a personal VPN via raspberry Pi
Cannot find not generate a netplan file at all
Configuration of ethernet looks as follows:
ton@ton-GL752VW:~$ ifconfig -a
enp3s0f1: flags=4163  mtu 1500
        inet 192.168.1.102  netmask 255.255.255.0  broadcast 192.168.1.255
        inet6 fd80:1382:3798:a000:6868:a0df:eda4:255f  prefixlen 64  scopeid 0x0
        inet6 fe80::8947:42e1:8a88:66c9  prefixlen 64  scopeid 0x20
        inet6 fd80:1382:3798:a000:2dfb:4728:37a3:42a9  prefixlen 64  scopeid 0x0
        ether 88:d7:f6:2f:a1:2b  txqueuelen 1000  (Ethernet)
        RX packets 593  bytes 359039 (359.0 KB)
        RX errors 0  dropped 0  overruns 0  frame 0
        TX packets 642  bytes 87846 (87.8 KB)
        TX errors 0  dropped 0 overruns 0  carrier 0  collisions 0

lo: flags=73  mtu 65536
        inet 127.0.0.1  netmask 255.0.0.0
        inet6 ::1  prefixlen 128  scopeid 0x10
        loop  txqueuelen 1000  (Local Loopback)
        RX packets 298  bytes 22474 (22.4 KB)
        RX errors 0  dropped 0  overruns 0  frame 0
        TX packets 298  bytes 22474 (22.4 KB)
        TX errors 0  dropped 0 overruns 0  carrier 0  collisions 0

wlp2s0: flags=4098  mtu 1500
        ether dc:53:60:f0:13:3d  txqueuelen 1000  (Ethernet)
        RX packets 0  bytes 0 (0.0 B)
        RX errors 0  dropped 0  overruns 0  frame 0
        TX packets 0  bytes 0 (0.0 B)
        TX errors 0  dropped 0 overruns 0  carrier 0  collisions 0
Just a “Rank-Pensioner” amateur who can copy & past but does not understand much about Linux!
Cheers,
Ton
@Ton
If there is no default netplan config file, try to generate one as shown in the article, then put your config in there. For more information, read the netplan man page.
dhcp4: yes
dhcp6: yes
dhcp4: no
dhcp6: no
has to be changed to
dhcp4: true
dhcp6: true
dhcp4: false
dhcp6: false
@Pabs
Yes, this is correct but yes or no values also work. After i installed Ubuntu 18.04, one of the default interfaces using dhcp4 had a value of yes(see the screenshot in article).
I didn’t work for me :(
Had to go to the man page and other examples and change it to true false, it it works for you and others then all gravy, just sharing the heads up
@Pabs
Practically, the best option would be to use true or false.