In the year 2016, Microsoft surprised the IT world with the announcement of their plans to bring MS SQL Server to Linux.
Under Satya Nadella’s leadership, the Redmond giant has made significant progress towards taking advantage of the areas where Linux dominates the industry (such as the technologies that power the cloud). The move to make SQL Server available in Linux is yet another indicative of this approach.
Whatever the company’s motivations behind this initiative, Linux system administrators are likely to need to learn how to install, maintain, and use MS SQL Server – especially considering that the preview version packages are already available for Red Hat Enterprise Linux 7.3+ (includes CentOS 7.3+ as well) and Ubuntu Server 16.04 bits (sorry – no 32-bit version available!).
The only “fancy” system requirement of the preview version is that the system where it is installed must have at least 2 GB of RAM.
Installing MS SQL Server on Linux
In this quickstart article, we will explain how to install SQL Server 2019 preview on RHEL/CentOS 7.3+ releases and Ubuntu 16.04.
Installing MS SQL Server on RHEL/CentOS 7.3+
1. To install SQL Server on RHEL/CentOS 7.3+ releases, download the Microsoft SQL Server 2019 preview Red Hat repository configuration files, which will install the mssql-server package and mssql-tools using the following curl commands.
# curl -o /etc/yum.repos.d/mssql-server.repo https://packages.microsoft.com/config/rhel/7/mssql-server-preview.repo
# curl -o /etc/yum.repos.d/msprod.repo https://packages.microsoft.com/config/rhel/7/prod.repo
2. Then install the SQL Server and mssql-tools with the unixODBC developer package using yum package manager, as shown.
# yum install -y mssql-server mssql-tools unixODBC-devel
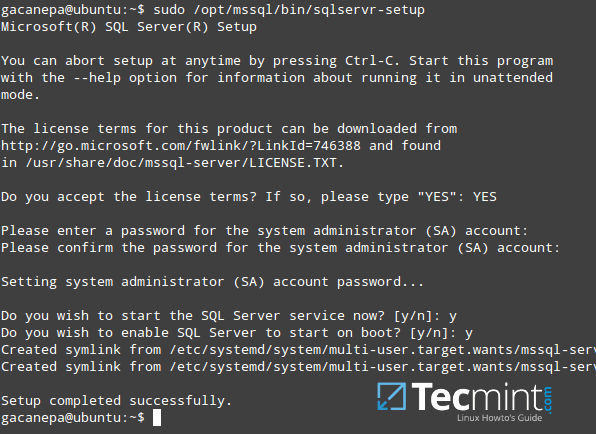
3. When the installation is complete, you will be reminded to run the configuration script (/opt/mssql/bin/mssql-conf) to accept the license terms, set the password for the SA user, and choose your edition.
# /opt/mssql/bin/mssql-conf setup
4. Once the configuration is done, verify that the SQL Server service is running.
# systemctl status mssql-server
5. Open port 1433/tcp on your firewall in order to allow external clients to communicate with the database server:
If you’re using firewalld:
# firewall-cmd --add-port=1433/tcp --permanent
# firewall-cmd --reload
Otherwise (using iptables):
# iptables -A INPUT -p tcp --dport 1433 -j ACCEPT
# iptables-save > /etc/sysconfig/iptables
Installing MS SQL Server on Ubuntu 16.04
1. In order for Ubuntu to trust the packages from the MS SQL Server repositories, import the GPG keys using the following wget command.
$ wget -qO- https://packages.microsoft.com/keys/microsoft.asc | sudo apt-key add -
2. Add the Microsoft SQL Server Ubuntu repository for SQL Server 2019 preview.
$ sudo add-apt-repository "$(wget -qO- https://packages.microsoft.com/config/ubuntu/16.04/mssql-server-preview.list)"
$ curl https://packages.microsoft.com/config/ubuntu/16.04/prod.list | sudo tee /etc/apt/sources.list.d/msprod.list
3. Resynchronize the package index files and update the core package and additional tools:
$ sudo apt-get update
$ sudo apt-get install mssql-server mssql-tools unixodbc-dev -y
4. Run the configuration script as in the previous case:
$ sudo /opt/mssql/bin/mssql-conf setup
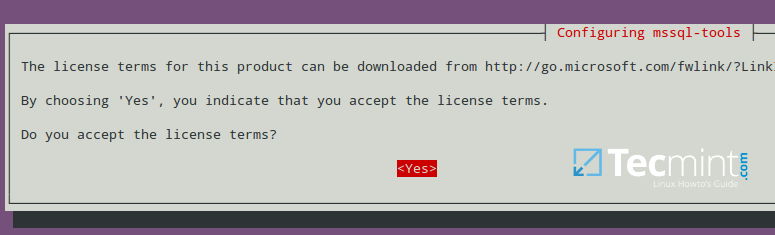
5. Choose “Yes” when prompted to accept the license terms for MS SQL Tools:
Testing MS SQL Server on Linux
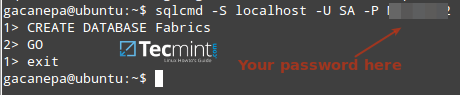
We will login to the server and create a database named Fabrics. The -P switch must be followed by the password you chose when you installed the package previously:
$ sqlcmd -S localhost -U SA -P 'YourPasswordHere'
CREATE DATABASE Fabrics
exit
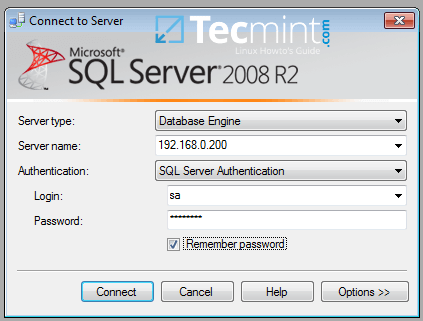
If you’re using Linux, you can continue using the command-line as shown above. Otherwise, install SQL Server Management Studio Express if you’re on Windows.
Once done, enter the IP of the database server (192.168.0.200 in this case) and the login credentials (username=sa, password=YourPasswordHere):
Upon successful login, the Fabrics database should appear at the left-hand side:

Next, click New Query to open a new query window where you’ll insert the contents of the Fabrics script from Codeproject.com, then click Execute.
If successful, you will see the script created 5 tables and the number of records in each:

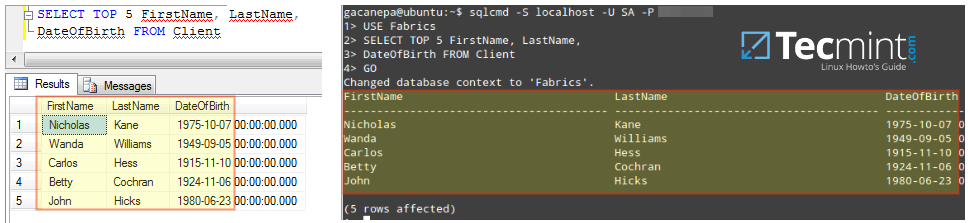
To wrap up, run the following query to retrieve the first 5 records from the Clients table:
USE Fabrics
SELECT TOP 5 FirstName, LastName,
DateOfBirth FROM Client
GO
The results should be identical to the output in the following image:
Congratulations! You have successfully installed and tested MS SQL Server on Linux!
Summary
In this article, we have explained how to install MS SQL Server on RHEL / CentOS and Ubuntu Server.
Due to the newfound closeness of Microsoft and Linux, Linux system administrators will need to be knowledgeable on MS SQL Server if they want to stay at the top of their game.
By mid-2017, the same SQL Server editions will be offered on Linux as today on Windows: Enterprise, Standard, Web, Express, and Developer. The last two are free but only the Express edition will be licensed for production use (but with resource limits).
As always, feel free to use the comment form below to drop us a note if you have any questions. We look forward to hearing from you!


When I installed I chose the Developer Edition and Language English. After entering the Administrator password I got the error messages
Configuring SQL Server…
Error: The evaluation period has expired.
This program has encountered a fatal error and cannot continue running on Thu Oct 7 11:12:52 2021
The following diagnostic information is available:
Reason: 0x00000003
Status: 0x00000000
Message: Unexpected call to legacy ABI.
Stack:
IP Function
—————- ————————————–
000055a99694eada std::__1::basic_string<char, std::__1::char_traits,
std::__1::allocator > std::__1::operator+<char, std::__1::char_traits, std::__1::allocator
>(std::__1::basic_string<char, std::__1::char_traits, std::__1::allocator > c
000055a99694e5d9 std::__1::basic_string<char, std::__1::char_traits, std::__1
::allocator > std::__1::operator+<char, std::__1::char_traits, std::__1::allocator >
(std::__1::basic_string<char, std::__1::char_traits, std::__1::allocator > c
000055a9968969ae std::__1::basic_string<char, std::__1::char_traits,
std::__1::allocator > std::__1::operator+<char, std::__1::char_traits, std::__1::allocator
>(std::__1::basic_string<char, std::__1::char_traits, std::__1::allocator > c�y
6_
000055a9968f4717 std::__1::basic_string<char, std::__1::char_traits,
std::__1::allocator > std::__1::operator+<char, std::__1::char_traits, std::__1::allocator
>(std::__1::basic_string<char, std::__1::char_traits, std::__1::allocator > c
Process: 13846 – sqlservr
Thread: 13847
Instance Id: 421eda95-6869-4038-8947-96dbb654717b
Crash Id:
Build stamp: 79eb721ef02d0426160fe0ad320e7425f9d012fbe368753d2655c5bce25b1b3c
Distribution: Linux Mint 18.3
Processors: 8
Total Memory: 16695734272 bytes
Timestamp: Thu Oct 7 11:12:52 2021
/opt/mssql/lib/mssql-conf/invokesqlservr.sh: line 15: 13845 Aborted
(core dumped) sudo -EH -u mssql /bin/bash -c “$CMDLINE”
Created symlink from /etc/systemd/system/multi-user.target.wants/mssql-server.service to /lib/systemd/system/mssql-server.service.
Setup has been completed successfully. SQL Server is now starting.
When I then run the mssql command I get another error:
Sqlcmd: Error: Microsoft ODBC Driver 17 for SQL Server : Login timeout expired.
Sqlcmd: Error: Microsoft ODBC Driver 17 for SQL Server : TCP Provider: Error code 0x2749.
Sqlcmd: Error: Microsoft ODBC Driver 17 for SQL Server : A network-related or instance-specific error has occurred while establishing a connection to SQL Server. The server is not found or not accessible. Check if instance name is correct and if SQL Server is configured to allow remote connections. For more information see SQL Server Books Online.
I chose this Ubuntu installation instruction but I have actually got Linux Mint. Is that the reason for the problems? Do you have another set of instructions for Mint?
There is no repo https://packages.microsoft.com/ubuntu/16.04/mssql-server
instead of this, there is https://packages.microsoft.com/ubuntu/16.04/mssql-server-2017
@Oder,
I have updated the article and included instructions for installing MS SQL Server 2019 preview on Linux.
The RSQL project may interest you. RSQL is a simplified clone of MS SQL Server running on Linux or Windows.
It can execute basic TSQL scripts. It is still beta and many features must be added yet, but may be good enough for simple C# applications.
It is also free (GPL license).
I have installed Oracle VM and Then installed Red Hat Linux 7 evaluation version from Red Hat Website.
But after that how to copy the sql server 2017 installation files onto Linux machine. I have installed winscp to copy from Windows to Linux.
But how do i connect to Linux using winscp.
@Sandeep,
In Winscp enter the IP address of Linux Server, Select SSH Server Port as “22” and enter user credentials to connect to remote Linux.
is the express version now available?
I am getting this error
=====================================
This program has encountered a fatal error and cannot continue running.
The following diagnostic information is available:
Reason: 0x00000001
Signal: SIGILL – Illegal instruction (4)
Stacktrace: 00005562a2bd48b9 00007fb90827d390
Process: 8484 – sqlservr
Thread: 8564 (application thread 0x1130)
Instance Id: 52cd4f85-2293-40f8-ad20-ac08754bbd74
Crash Id: c2813c22-5e0e-4701-acd9-b48a2694eb8c
Build stamp: 94eba6a4633ca4c0df02f5ac93a5ec71d5e614105861a7140bd16aa838f6b2d7
Capturing core dump and information…
Attempting to capture a dump with paldumper
Core dump and information are being compressed in the background. When complete,
they can be found in the following location:
/var/opt/mssql/log/core.sqlservr.05_25_2017_06_54_36.8484.tbz2
========================
Amy pointer will be helpful
At what point are you getting this error? What distribution are you using? Did you check the dump?
This is the error while I trying to run the following command after installing the MySQL server:
Hello Sir please help me i’m not getting it right, using linux mint 18 after the first 2 code when i try sudo /opt/mssql/bin/sqlservr-setup it gives me this sudo: /opt/mssql/bin/sqlservr-setup: command not found
I would advise you to make you’ve followed all of the installation steps. If so, make sure your Linux Mint 18 is based off Ubuntu 16.04 which is the version the SQL server repositories are configured for.
had same problem, make sure there is a space between sqlservr and the dash.
Hello, I can connect to my server using the CLI.
However whenever I try to use mssql in php my login gets denied with the same login details.
I’m on a Ubuntu server using Apache
I’m trying to install SQL Server on Mint.
when i run setup, I get the following error. any help would be highly appreciated.
Failed to issue method call: No such interface ‘org.freedesktop.DBus.Properties’ on object at path /org/freedesktop/systemd1/unit/mssql_2dserver_2eservice
What Mint version are you using? In theory this should work in Linux Mint 18.1 and newer. Two constraints here are: 1) Does your Mint version use systemd?, and 2) Is it based on Ubuntu 16.04 LTS, which is the distribution the Microsoft repositories are available for?
I think I’m using version 17.1 (rebecca) I will try to figure out how to upgrade it and let you know if it works afterwards. thanks
worked perfect after upgrading. thank you very much.
Please put on a MS SQL licence registration process details
Nice Article. Require once more step to make sqlcmd work.
Before testing the mssql, make sure to run the following commands
After the above commands sqlcmd will work on terminal
really help
Can’t imagine MIcrosoft product and repository on my GNU system. But I will give a try in order to compare it with postgres or mariadb.
Thanks for the article
Hello, great article. I installed MS SQL on Ubuntu server, everything works fine. I have one problem, How to activate this instance? I want run my production sql server on Linux, but when i restart a instance i got massage that this only 143 days to activate..
I cant find information on websites how do this… To get help from Microsoft i must have subscription..
Please help :-)
Yes MS SQL Server is not free nor open source. The evaluation lisence is for testing purposes. You should get a license for production service.
How would you apply a licence to it?
Contact your Microsoft Sales Representative.
This is NOT an evaluation license. It is a SQL Express product, which does not require a license. It is my understanding that other versions of SQL server are not currently available – they will be by mid 2017.
Are you sure ? I’ve got almost the same message about the days remaining to activate.
First of all, many thanks to Gabriel for providing this important resource. I have been unable to obtain any help in the Microsoft forums OR in the Linux forums. This situation is like the Capulets vs. the Montagues, or the Hatfields vs. the McCoys. :-)
This has been quite an ordeal, not easy by any stretch. The installation was the only part that worked flawlessly. The server does not seem to be running and I cannot locate a proper version of the client (SSMS: SQL Server Management Studio Express).
Excellent article, very clear installation instructions..
i am not able to create table from SSMS 2016 it gives error about “the backend version is not supported to design database diagram or table” which is correct version of SSMS to use with Linux
i repeat similar scene to open table in edit mode from SSMS 2016 and when i want view logs of the Agent. Do you have any solution for our problems?
use tsql scripts
Please don’t get me wrong. It’s pointless imho. It’s like using a Toyota engine in a Lamborghini, when the default engine is already available.
Does it support installation for multiple instances. I tried installing second instance but its showing me
Is this a limitation of having one instance per Linux Server?
I have a comment and question. I have never used MS SQL Server (or client, nothing). However, I became enthusiastic with the possibility of running a Linux version.
I downloaded “SQL Server Management Studio Express 2016” but it is too new! It filled my hard disk with too many packages. The SSMS version shown on the picture (2008 R2) seems perfect for me.
“I will not promote Microsoft product to Linux users”
================
That is because you are not a professional. You MUST take into account the needs of the users, not YOURS.
Sqlcmd: Error: Microsoft ODBC Driver 13 for SQL Server : Login timeout expired.
Sqlcmd: Error: Microsoft ODBC Driver 13 for SQL Server : TCP Provider: Error code 0x102.
Sqlcmd: Error: Microsoft ODBC Driver 13 for SQL Server : A network-related or instance-specific error has occurred while e
stablishing a connection to SQL Server. Server is not found or not accessible. Check if instance name is correct and if SQ
L Server is configured to allow remote connections. For more information see SQL Server Books Online..
I would like to make an important comment about my post. I found the reason for the ODBC Driver errors, and they have nothing to do with Microsoft. I rented a CentOS 7 server with the main purpose of experimenting and learning SQL Server on Linux. It turns out that a lot of ports are blocked. BTW: This was a way to learn that every time the sqlcmd program runs, it attempts to “call home”.
Ramon,
CentOS 7 comes with firewalld installed and running out of the box. That is why I advised to open port 1433/tcp in that case. Thank you for your comments!
i turn off my firewall a the issue still the same. can you provide me some solution please?
“1. Insert the following lines into /etc/yum.repos.d/sql-server.repo”
============================
Gabriel: it is not clear whether the user should CREATE an inexistent file or MODIFY an existent one.
What difference does it make? Either way, invoking a text editor with the filename as argument will bring up the file – regardless of whether it exists or not.
I will not promote Microsoft product to Linux users