In simple words, a firewall is a security system that controls the incoming and outgoing traffic in a network based on a set of predefined rules (such as the packet destination / source or type of traffic, for example).
In this article we will review the basics of firewalld, the default dynamic firewall daemon in Red Hat Enterprise Linux 7, and iptables service, the legacy firewall service for Linux, with which most system and network administrators are well acquainted, and which is also available in RHEL 7.
A Comparison Between FirewallD and Iptables
Under the hood, both firewalld and the iptables service talk to the netfilter framework in the kernel through the same interface, not surprisingly, the iptables command. However, as opposed to the iptables service, firewalld can change the settings during normal system operation without existing connections being lost.
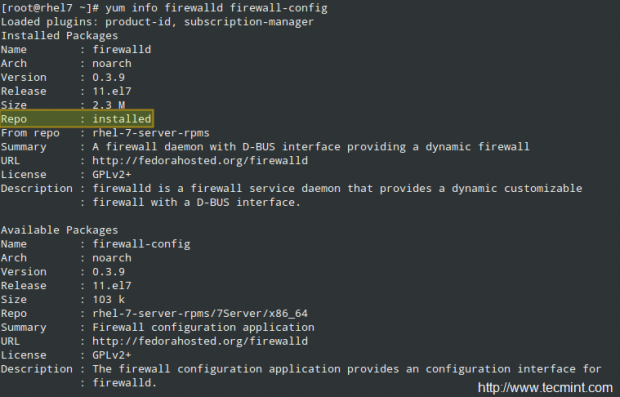
Firewalld should be installed by default in your RHEL system, though it may not be running. You can verify with the following commands (firewall-config is the user interface configuration tool):
# yum info firewalld firewall-config
and,
# systemctl status -l firewalld.service

On the other hand, the iptables service is not included by default, but can be installed through.
# yum update && yum install iptables-services
Both daemons can be started and enabled to start on boot with the usual systemd commands:
# systemctl start firewalld.service | iptables-service.service
# systemctl enable firewalld.service | iptables-service.service
Read Also: Useful Commands to Manage Systemd Services
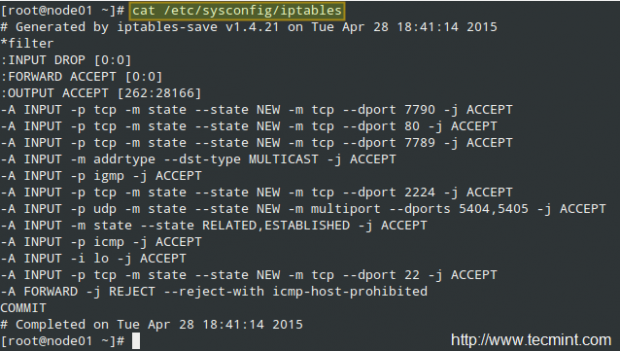
As for the configuration files, the iptables service uses /etc/sysconfig/iptables (which will not exist if the package is not installed in your system). On a RHEL 7 box used as a cluster node, this file looks as follows:
Whereas firewalld store its configuration across two directories, /usr/lib/firewalld and /etc/firewalld:
# ls /usr/lib/firewalld /etc/firewalld

We will examine these configuration files further later in this article, after we add a few rules here and there. By now it will suffice to remind you that you can always find more information about both tools with.
# man firewalld.conf
# man firewall-cmd
# man iptables
Other than that, remember to take a look at Reviewing Essential Commands & System Documentation – Part 1 of the current series, where I described several sources where you can get information about the packages installed on your RHEL 7 system.
Using Iptables to Control Network Traffic
You may want to refer to Configure Iptables Firewall – Part 8 of the Linux Foundation Certified Engineer (LFCE) series to refresh your memory about iptables internals before proceeding further. Thus, we will be able to jump in right into the examples.
Example 1: Allowing both incoming and outgoing web traffic
TCP ports 80 and 443 are the default ports used by the Apache web server to handle normal (HTTP) and secure (HTTPS) web traffic. You can allow incoming and outgoing web traffic through both ports on the enp0s3 interface as follows:
# iptables -A INPUT -i enp0s3 -p tcp --dport 80 -m state --state NEW,ESTABLISHED -j ACCEPT
# iptables -A OUTPUT -o enp0s3 -p tcp --sport 80 -m state --state ESTABLISHED -j ACCEPT
# iptables -A INPUT -i enp0s3 -p tcp --dport 443 -m state --state NEW,ESTABLISHED -j ACCEPT
# iptables -A OUTPUT -o enp0s3 -p tcp --sport 443 -m state --state ESTABLISHED -j ACCEPT
Example 2: Block all (or some) incoming connections from a specific network
There may be times when you need to block all (or some) type of traffic originating from a specific network, say 192.168.1.0/24 for example:
# iptables -I INPUT -s 192.168.1.0/24 -j DROP
will drop all packages coming from the 192.168.1.0/24 network, whereas,
# iptables -A INPUT -s 192.168.1.0/24 --dport 22 -j ACCEPT
will only allow incoming traffic through port 22.
Example 3: Redirect incoming traffic to another destination
If you use your RHEL 7 box not only as a software firewall, but also as the actual hardware-based one, so that it sits between two distinct networks, IP forwarding must have been already enabled in your system. If not, you need to edit /etc/sysctl.conf and set the value of net.ipv4.ip_forward to 1, as follows:
net.ipv4.ip_forward = 1
then save the change, close your text editor and finally run the following command to apply the change:
# sysctl -p /etc/sysctl.conf
For example, you may have a printer installed at an internal box with IP 192.168.0.10, with the CUPS service listening on port 631 (both on the print server and on your firewall). In order to forward print requests from clients on the other side of the firewall, you should add the following iptables rule:
# iptables -t nat -A PREROUTING -i enp0s3 -p tcp --dport 631 -j DNAT --to 192.168.0.10:631
Please keep in mind that iptables reads its rules sequentially, so make sure the default policies or later rules do not override those outlined in the examples above.
Getting Started with FirewallD
One of the changes introduced with firewalld are zones. This concept allows to separate networks into different zones level of trust the user has decided to place on the devices and traffic within that network.
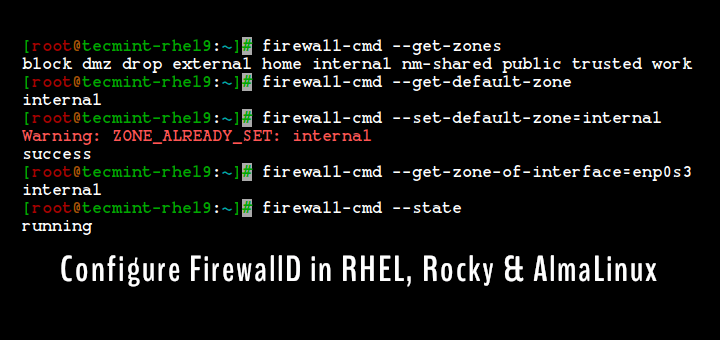
To list the active zones:
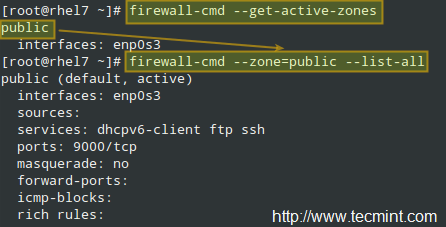
# firewall-cmd --get-active-zones
In the example below, the public zone is active, and the enp0s3 interface has been assigned to it automatically. To view all the information about a particular zone:
# firewall-cmd --zone=public --list-all
Since you can read more about zones in the RHEL 7 Security guide, we will only list some specific examples here.
Example 4: Allowing services through the firewall
To get a list of the supported services, use.
# firewall-cmd --get-services

To allow http and https web traffic through the firewall, effective immediately and on subsequent boots:
# firewall-cmd --zone=MyZone --add-service=http
# firewall-cmd --zone=MyZone --permanent --add-service=http
# firewall-cmd --zone=MyZone --add-service=https
# firewall-cmd --zone=MyZone --permanent --add-service=https
# firewall-cmd --reload
If code>–zone is omitted, the default zone (you can check with firewall-cmd –get-default-zone) is used.
To remove the rule, replace the word add with remove in the above commands.
Example 5: IP / Port forwarding
First off, you need to find out if masquerading is enabled for the desired zone:
# firewall-cmd --zone=MyZone --query-masquerade
In the image below, we can see that masquerading is enabled for the external zone, but not for public:

You can either enable masquerading for public:
# firewall-cmd --zone=public --add-masquerade
or use masquerading in external. Here’s what we would do to replicate Example 3 with firewalld:
# firewall-cmd --zone=external --add-forward-port=port=631:proto=tcp:toport=631:toaddr=192.168.0.10
And don’t forget to reload the firewall.
You can find further examples on Part 9 of the RHCSA series, where we explained how to allow or disable the ports that are usually used by a web server and a ftp server, and how to change the corresponding rule when the default port for those services are changed. In addition, you may want to refer to the firewalld wiki for further examples.
Read Also: Useful FirewallD Examples to Configure Firewall in RHEL 7
Conclusion
In this article we have explained what a firewall is, what are the available services to implement one in RHEL 7, and provided a few examples that can help you get started with this task. If you have any comments, suggestions, or questions, feel free to let us know using the form below. Thank you in advance!


@Rizal,
Yes, firewalld is an independent service but just like the iptables service, both are a front-end to the netfilter packet filtering framework inside the Linux kernel. You should NOT have both iptables and firewalld active, because that’s going to be a mess to manage. Choose either one, and stick with it.
Is firewalld an independent service? Or it just a tool for configuring iptables? Because in my fedora, when i add permanent ports for http and ssh with firewalld, in my iptables show these rules when i execute iptables -L :
Chain IN_public_allow (1 references)
target prot opt source destination
ACCEPT tcp — anywhere anywhere tcp dpt:http ctstate NEW
ACCEPT tcp — anywhere anywhere tcp dpt:ssh ctstate NEW
And if firewalld is an independent service, when i have rules in both of them (firewalld and iptables), which will be executed first ? whereas iptables is executing rules from top to bottom. I think i still can’t see their differences clearly.