Although some people use the word Linux to represent the operating system as a whole, it is important to note that, strictly speaking, Linux is only the kernel. On the other hand, a distribution is a fully-functional system built on top of the kernel with a wide variety of application tools and libraries.
During normal operations, the kernel is responsible for performing two important tasks:
- Acting as an interface between the hardware and the software running on the system.
- Managing system resources as efficiently as possible.
To do this, the kernel communicates with the hardware through the drivers that are built into it or those that can be later installed as a module.
For example, when an application running on your machine wants to connect to a wireless network, it submits that request to the kernel, which in turns uses the right driver to connect to the network.
Suggested Read: How to Upgrade Kernel in Ubuntu
With new devices and technology coming out periodically, it is important to keep our kernel up to date if we want to make the most of out them. Additionally, updating our kernel will help us to leverage new kernel functions and to protect ourselves from vulnerabilities that have been discovered in previous versions.
Ready to update your kernel on CentOS 7 or one of their derivatives such as RHEL 7 and Fedora? If so, keep reading!
Step 1: Checking Installed Kernel Version
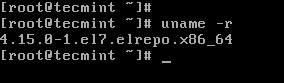
When we install a distribution it includes a certain version of the Linux kernel. To show the current version installed on our system we can do:
# uname -sr
The following image shows the output of the above command in a CentOS 7 server:
If we now go to https://www.kernel.org/, we will see that the latest kernel version is 5.0 at the time of this writing (other versions are available from the same site).
This new Kernel 5.0 version is a long-term release and will be supported for 6 years, earlier all Linux Kernel versions were supported for 2 years only.
One important thing to consider is the life cycle of a kernel version – if the version you are currently using is approaching its end of life, no more bug fixes will be provided after that date. For more info, refer to the kernel Releases page.
Step 2: Upgrading Kernel in CentOS 7
Most modern distributions provide a way to upgrade the kernel using a package management system such as yum and an officially-supported repository.
Important: If you looking to run custom compiled Kernel, then you should read our article that explains How to Compile Linux Kernel on CentOS 7 from sources.
However, this will only perform the upgrade to the most recent version available from the distribution’s repositories – not the latest one available in the https://www.kernel.org/. Unfortunately, Red Hat only allows to upgrade the kernel using the former option.
As opposed to Red Hat, CentOS allows the use of ELRepo, a third-party repository that makes the upgrade to a recent version a kernel.
To enable the ELRepo repository on CentOS 7, do:
# rpm --import https://www.elrepo.org/RPM-GPG-KEY-elrepo.org
# rpm -Uvh http://www.elrepo.org/elrepo-release-7.0-3.el7.elrepo.noarch.rpm

Once the repository has been enabled, you can use the following command to list the available kernel.related packages:
# yum --disablerepo="*" --enablerepo="elrepo-kernel" list available
Loaded plugins: fastestmirror, langpacks
Loading mirror speeds from cached hostfile
 * elrepo-kernel: mirror-hk.koddos.net
Available Packages
kernel-lt.x86_64                        4.4.176-1.el7.elrepo        elrepo-kernel
kernel-lt-devel.x86_64                  4.4.176-1.el7.elrepo        elrepo-kernel
kernel-lt-doc.noarch                    4.4.176-1.el7.elrepo        elrepo-kernel
kernel-lt-headers.x86_64                4.4.176-1.el7.elrepo        elrepo-kernel
kernel-lt-tools.x86_64                  4.4.176-1.el7.elrepo        elrepo-kernel
kernel-lt-tools-libs.x86_64             4.4.176-1.el7.elrepo        elrepo-kernel
kernel-lt-tools-libs-devel.x86_64       4.4.176-1.el7.elrepo        elrepo-kernel
kernel-ml.x86_64                        5.0.0-1.el7.elrepo          elrepo-kernel
kernel-ml-devel.x86_64                  5.0.0-1.el7.elrepo          elrepo-kernel
kernel-ml-doc.noarch                    5.0.0-1.el7.elrepo          elrepo-kernel
kernel-ml-headers.x86_64                5.0.0-1.el7.elrepo          elrepo-kernel
kernel-ml-tools.x86_64                  5.0.0-1.el7.elrepo          elrepo-kernel
kernel-ml-tools-libs.x86_64             5.0.0-1.el7.elrepo          elrepo-kernel
kernel-ml-tools-libs-devel.x86_64       5.0.0-1.el7.elrepo          elrepo-kernel
perf.x86_64                             5.0.0-1.el7.elrepo          elrepo-kernel
python-perf.x86_64                      5.0.0-1.el7.elrepo          elrepo-kernel
Next, install the latest mainline stable kernel:
# yum --enablerepo=elrepo-kernel install kernel-ml
Loaded plugins: fastestmirror, langpacks
Loading mirror speeds from cached hostfile
 * base: centos.mirror.net.in
 * elrepo: mirror-hk.koddos.net
 * elrepo-kernel: mirror-hk.koddos.net
 * epel: repos.del.extreme-ix.org
 * extras: centos.mirror.net.in
 * updates: centos.mirror.net.in
Resolving Dependencies
--> Running transaction check
---> Package kernel-ml.x86_64 0:5.0.0-1.el7.elrepo will be installed
--> Finished Dependency Resolution

Dependencies Resolved

====================================================================================
 Package                Arch        Version                 Repository        Size
====================================================================================
Installing:
 kernel-ml              x86_64      5.0.0-1.el7.elrepo      elrepo-kernel     47 M

Transaction Summary
====================================================================================
Install  1 Package

Total download size: 47 M
Installed size: 215 M
Is this ok [y/d/N]: y
Downloading packages:
kernel-ml-5.0.0-1.el7.elrepo.x86_64.rpm                           |  47 MB  00:01:21
Running transaction check
Running transaction test
Transaction test succeeded
Running transaction
  Installing : kernel-ml-5.0.0-1.el7.elrepo.x86_64                1/1
  Verifying  : kernel-ml-5.0.0-1.el7.elrepo.x86_64                1/1

Installed:
  kernel-ml.x86_64 0:5.0.0-1.el7.elrepo

Complete!
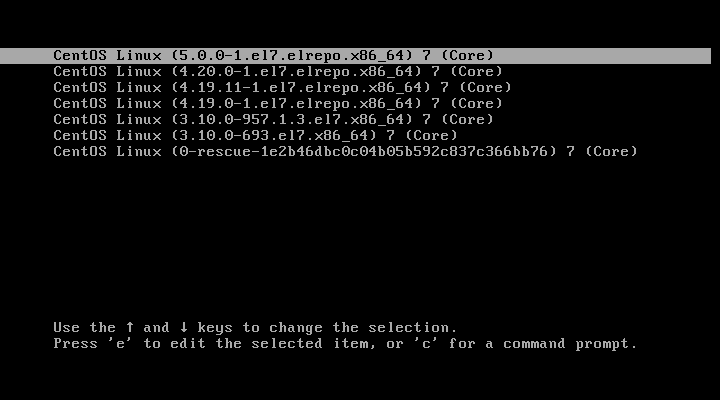
Finally, reboot your machine to apply the latest kernel, and then select latest kernel from the menu as shown.
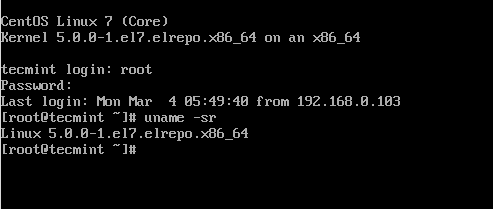
Login as root, and run following command to check the kernel version:
# uname -sr
Step 3: Set Default Kernel Version in GRUB
To make the newly-installed version the default boot option, you will have to modify the GRUB configuration as follows:
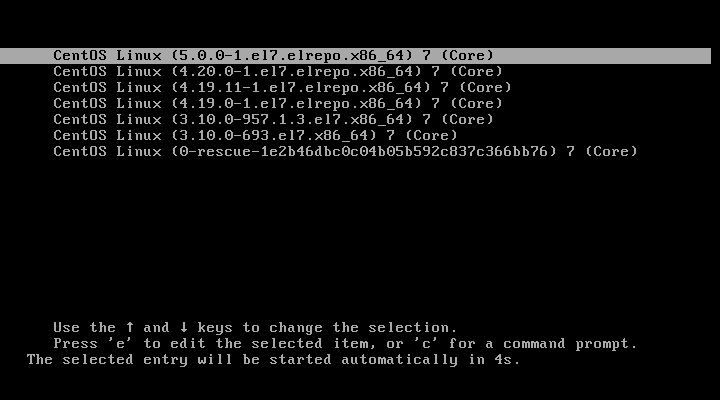
Open and edit the file /etc/default/grub and set GRUB_DEFAULT=0. This means that the first kernel in the GRUB initial screen will be used as default.
GRUB_TIMEOUT=5
GRUB_DEFAULT=0
GRUB_DISABLE_SUBMENU=true
GRUB_TERMINAL_OUTPUT="console"
GRUB_CMDLINE_LINUX="rd.lvm.lv=centos/root rd.lvm.lv=centos/swap crashkernel=auto rhgb quiet"
GRUB_DISABLE_RECOVERY="true"
Next, run the following command to recreate the kernel configuration.
# grub2-mkconfig -o /boot/grub2/grub.cfg
Generating grub configuration file ...
Found linux image: /boot/vmlinuz-5.0.0-1.el7.elrepo.x86_64
Found initrd image: /boot/initramfs-5.0.0-1.el7.elrepo.x86_64.img
Found linux image: /boot/vmlinuz-4.20.0-1.el7.elrepo.x86_64
Found initrd image: /boot/initramfs-4.20.0-1.el7.elrepo.x86_64.img
Found linux image: /boot/vmlinuz-4.19.11-1.el7.elrepo.x86_64
Found initrd image: /boot/initramfs-4.19.11-1.el7.elrepo.x86_64.img
Found linux image: /boot/vmlinuz-4.19.0-1.el7.elrepo.x86_64
Found initrd image: /boot/initramfs-4.19.0-1.el7.elrepo.x86_64.img
Found linux image: /boot/vmlinuz-3.10.0-957.1.3.el7.x86_64
Found initrd image: /boot/initramfs-3.10.0-957.1.3.el7.x86_64.img
Found linux image: /boot/vmlinuz-3.10.0-693.el7.x86_64
Found initrd image: /boot/initramfs-3.10.0-693.el7.x86_64.img
Found linux image: /boot/vmlinuz-0-rescue-1e2b46dbc0c04b05b592c837c366bb76
Found initrd image: /boot/initramfs-0-rescue-1e2b46dbc0c04b05b592c837c366bb76.img
done
Reboot and verify that the latest kernel is now being used by default.
Congratulations! You have upgraded your kernel in CentOS 7!
Summary
In this article we have explained how to easily upgrade the Linux kernel on your system. There is yet another method which we haven’t covered as it involves compiling the kernel from source, which would deserve an entire book and is not recommended on production systems.
Although it represents one of the best learning experiences and allows for a fine-grained configuration of the kernel, you may render your system unusable and may have to reinstall it from scratch.
If you are still interested in building the kernel as a learning experience, you will find instructions on how to do it at the Kernel Newbies page.
As always, feel free to use the form below if you have any questions or comments about this article.


If I want to upgrade to a specific kernel version? how the step?
@Dedi,
To install a specific kernel version, use the following:
# yum install kernel-{version}You can list the kernel version using the following command.
Then install the specifi kernel version a shown.
After running command:
no kernel version 4.18, and just view version 5.4.
and running command:
Output:
Nothing to do.
@Dedi,
Then you need to manually install the Kernel…
Can you share the step? and where I can download the kernel?
Thanks.
Check this artice – How to Compile Linux Kernel on CentOS 7
After performing the above steps at the reboot stage got:
grub issue on centos7 (3 to 5 kernel). Request you to please upload proper content.
grub>
After installing the kernel on CentOS 7, I got below output at the end, so the kernel is installed or not?
Error! echo
Your kernel headers for kernel 5.6.4-1.el7.elrepo.x86_64 cannot be found at
/lib/modules/5.6.4-1.el7.elrepo.x86_64/build or /lib/modules/5.6.4-1.el7.elrepo.x86_64/source.
Verifying : kernel-ml-5.6.4-1.el7.elrepo.x86_64 1/1
Installed:
kernel-ml.x86_64 0:5.6.4-1.el7.elrepo
Hello, I tried to set grub default 0, and rebuild the grub.conf but the problem when boot it doesn’t choose the version 5 but still default check version 3. Is there any other ways to force it to 5? Thanks
@Benyamin,
Better to remove old unused kernels with the help of this guide – How to Delete Old Unused Kernels in Debian and Ubuntu
Anyway I manage to use this https://askubuntu.com/a/149572/784420
It’s much simpler, because the kernel from elrepo isn’t indexed by rpm -q kernel
The whole update process via YUM works fine, however the new Kernel did not fix the mouse bug. Does anyone else have a fix for this?
Please notice you forgot to replace the last two 4.20 screen shots.
@Sorin,
I replaced them, but I think its due to caching, I cleared cache at server end, so that new images will appear properly..
After run this scripts my system doesn’t boot from the latest one i mean to say “4.20 kernel” it was booted from my last one which is “3.10 kernel”
@Bile,
Which script? please follow the instructions carefully, you will have latest Kernel version for sure..
How to revert to old kernel?
@Dima,
If you’ve installed new Kernel using Elrepo, you can easily revert back to previous Kernel using following command.
Its is great that free ebooks are being offered – it certainly is good for people who want to learn more but the one thing that is so so annoying is the hundreds of fields one has to complete and actually forced to complete in order to download a book – why on earth do they need all your contact details? what do they plan on doing with it? surely once is enough? but the same details over and over again how many fields is pathetic!
Resolved by following this link
https://wiki.centos.org/HowTos/Grub2
Kind of works, but then “pstore: No deflate compression” halts the boot process. Anyone else had this? What pstore…?
It doesnt work, I tried it step by step without any erros, but after system reboot, my Centos 7 kde only boots with 3.10, and in advanced options, only has 3.10 kernel.
To avoid messing with grub configurations use “grubby” tool which provides nice interface for dealing with grub configurations.
https://docs.fedoraproject.org/en-US/Fedora/23/html/System_Administrators_Guide/sec-Configuring_GRUB_2_Using_the_grubby_Tool.html
uname -rreturns the correct kernel version. ‘rpm -qa kernel‘ only returns the old versions.The tests that I am running from AWS are picking up the old versions. Any suggestions whats going on?
@Adam,
The command
rpm -qa kernelwill show only old installed kernels, to get newer version use:I followed these instructions. After rebooting and running ‘uname -sr’ it returns: Linux 4.17.5-1.el7.elrepo.x86_64
If I run ‘rpm -qa kernel’ it does not show the version above. It only shows the old versions.
I am running some tests and they do not see the 4.17 kernel only the old 3.10 kernel.
It does not seem like these instructions actually install a new kernel.
Any suggestions?
@Adam,
What I understand is, that rpm will only list old kernels, whereas uname -r will list current kernel.
Hi,
I have successfully upgraded my kernel version from 3.10 to 4.14 using your instructions but the problem is now I get these errors every-time I boot my centos 7 server.
Any idea how to fix this?.
14:05
wdat_wdt wdat_wdt: can’t request region for resource [mem 0x8d6c4b98-0x8d6c4b9c] kernel
14:05
ACPI Exception: AE_NOT_EXIST, Evaluating _PMC (20170728/power_meter-755) kernel
14:05
ACPI Error: Method parse/execution failed \_SB.PMI0._PMC, AE_NOT_EXIST (20170728/psparse-550) kernel
14:05
ACPI Error: Method parse/execution failed \_SB.PMI0._GHL, AE_NOT_EXIST (20170728/psparse-550) kernel
14:05
ACPI Error: Region IPMI (ID=7) has no handler (20170728/exfldio-299) kernel
14:05
ACPI Error: No handler for Region [SYSI] (ffff88016b161048) [IPMI] (20170728/evregion-166) kernel
@Phil,
Check in /var/log/messages for these errors, and it’s related to ACPI buffer size. The solution is to blacklist the acpi_power_meter kernel module. The driver doesn’t work due to the incorrect buffer size.
This is also caused by a missing kernel module, which was not supported by kernel package version 3.0.x before. After updating the Kernel, the required modules will not be loaded automatically, so you need to load it manually using the following commands:
@Ravi
Thank you very much for your help. the error was gone but now it got replace by this error:
i2c i2c-0: sendbytes: NAK bailout.
any idea how to fix that?
@Phil,
It seems your hardware isn’t supported by new kernel module or seems a bug in kernel version you have.
At first, I must say this is a wonderful tutorial! I followed those steps and then successfully upgraded my CentOS 7.4 kernel to 4.15.12.
However, I met new issue now:
After I run “yum update -y” , I noticed that the old kernel 3.3.10 was also updated and now it is moved to the top one position on the list of booting options on the first screen when I rebooting my server, and that option is selected by default.
That is to say, now my server will reboot with updated kernel 3.3.10 instead of the new one 4.15.12 if I don’t do anything.
Why the sequence of boot options will change after “yum update” ?
How can I configure to “always boot with Kernel 4.15.12 no matter which position it is placed on the list”?
Thank you.
@Baijanpeng,
You can change the default boot option and set the new kernel as default, just follow the Step 3: Set Default Kernel Version in GRUB in the article.
I surely had done that step. My point is: the “yum update” command will CHANGE the sequence of boot options. So you don’t know which option will be selected by default after next “update” command.
How can we configure the “grub” to ALWAYS boot with specific version of Kernel?
Thank you.
@Baijianpeng,
Yes, once kernel update the boot sequence change automatically, so to boot into default kernel you need to configure grub as explained in the article.
Did you really understand my question?
In your article, you said: ” GRUB_DEFAULT=0. This means that the first kernel in the GRUB initial screen will be used as default.” , so, which “value” should I use to let certain kernel version will be selected by default no matter it is the first or not?
@Baiianpeng,
Yeah go it, you want to set certain kernel version permanently. For this first you need to list all available kernel images added to GRUB2 by running the following command.
Now verify the GRUB menu entry for the kernel that you want to use. Every menu entry is allocated by GRUB2 a numeric value starting from 0 in an increasing order. That means, the first menu entry allocated 0, the second entry allocated 1, etc.
To set different kernel version, open /etc/default/grub file and set GRUB_DEFAULT to the numeric entry value for the kernel that you want to use as default.
Thanks a lot, is there a way for installing it without needing to network ?
There is need to update kernel headers as well to same version as kernel.
Now what to do if this does not work, followed your instructions and the system would not boot with the new kernel
Hi, what is difference between rpm -Uvh & rpm -ivh for kernel upgrade?
@Taryel,
The option
-Uis used to upgrade any RPM package, whereas-iused to install any RPM package.Who supports this if you upgrade rehl or centos to 4.14?
@Mario,
If you’re on RHEL, you can always go to Red Hat for support – although it would be a pretty good idea to engage them right from the start. As for CentOS, you’re basically on your own – except for the support you may get from the community.
Hello,
Kindly help me have situations, I have an dedicated server with CentOS 7 x64 bit. Last day I have updated the both OS and kernel ( CentOS 7 to 7.4 x64 bit.
Situation 1: OS not booting from new kernel 3.10.0-693.5.2.e17.x86_64 (Getting black dead screen) but working fine on old kernel 3.10.0-229.e17.x86_64 .
situation 2: I have downloaded the latest CentOS 7.4 x64 bit and tried to fresh installation on the server but this also not working (Getting black dead screen).
Screenshot : http://prntscr.com/ha0qgo
Hi, then i have installed new kernel and reboot the server, the command “uname -sr” says me even the old kernel and on the machine i don’t find the file /etc/default/grub.
How can i do to resolve?
Thank you
Hi, I had upgrade from centos 7.2 to centos 7.3, but its got upgraded to centos 7.4.
Please suggest me how i have to degrade from centos 7.4 to centos 7.3
Thanks: satya
@satya,
I am not sure if you’re talking about upgrading the kernel or the OS here. Either way, why would you want to downgrade?
It would be great if you can show us how would you upgrade Kernel Version in RHEL7 (in Production Environment). Would you?
@Vinay,
If you can get us access to a Production RHEL 7 server, we can certainly give it a try.
Ok then production might be issue here but let’s say on RHEL7 in generic.
@Vinay – if by RHEL7 in generic you mean any Enterprise Linux 7-like distribution, you have your answer in this post, as it demonstrates how to upgrade the kernel in CentOS 7. Otherwise, please clarify.
You have mentioned, “As opposed to Red Hat, CentOS allows the use of ELRepo, a third-party repository that makes the upgrade to a recent version a kernel.”.
How can we make up for this in RHEL7 as we won’t be able to use ELRepo according to you?
Also, you have mentioned, “As opposed to Red Hat, CentOS allows the use of ELRepo, a third-party repository that makes the upgrade to a recent version a kernel.”.
How can we make up for this in RHEL7?
if /etc/default/grub = “GRUB_DEFAULT=saved” then you have to update the env file by looking at the possible menu items
awk -F\’ ‘$1==”menuentry ” {print i++ ” : ” $2}’ /etc/grub2.cfg
then update the default with
grub2-set-default “option number”
validate the update
grub2-editenv list
and reboot
Can do the same if I am operating centos 6.8 version?
Absolutely. Just make sure you add the right ElRepo version.
Can I only pick the latest kernel or a LTS like 4.4?
Hi,
Great tutorial,
I have one question before updating my kernel, how should I pick kernel 4.4 if I choose to want that one? (4.4 is an LTS if I’m correct)
Regards.
@Ries – to be honest I wrote this article with updating to the latest kernel available in mind. But in theory, you should be perfectly fine with choosing another one. It goes without saying that you may want to test on a non-production machine first to be sure.
And now, how to update kernel headers, etc.
I got this error
what to do?
@Pajafumo
The installed kernel-ml-headers already provides all the needed modules for building kernel, but if you really need kernel-headers, you can remove he kernel-ml-headers package forcibly with rpm:
Then you can able to install the kernel-headers package using yum tool:
You will get some error warning, but you can ignore those warnings: those dependencies will be installed again once the kernel-headers package is installed.
Thank u for posting …This method used for production environment or lab setup
@Prem,
Is that a question or a statement?
This is not one of the best tutorial explaining what the Kernel is and how to upgrade it.
**THIS IS THE BEST TUTORIAL**
Is concise.
To the point.
Without the boring start story.
Commands executed without errors.
Everything you need to GET YOUR KERNEL UPGRADED!
Thanks a lot!
Let’s tweet this!
Chris – thank you for your kind words! We’re glad that you liked this article and were able to follow the steps successfully!