There are several reasons to restrict an SSH user session to a particular directory, especially on web servers, but the obvious one is system security. In order to lock SSH users in a certain directory, we can use chroot mechanism.
change root (chroot) in Unix-like systems such as Linux, is a means of separating specific user operations from the rest of the Linux system; changes the apparent root directory for the currently running user process and its child (parent) process with a new root directory called a chrooted jail.
In this tutorial, we’ll show you how to restrict SSH user access to a given directory in Linux. Note that we’ll run all the commands as root, use the sudo command if you are logged into the server as a normal user.
Table of Contents
Step 1: Create SSH Chroot Jail
1. Start by creating the chroot jail using the mkdir command below:
# mkdir -p /home/test
2. Next, identify required files, according to the sshd_config man page, the ChrootDirectory option specifies the pathname of the directory to chroot to after authentication. The directory must contain the necessary files and directories to support a user’s session.
For an interactive session, this requires at least a shell, commonly sh, and basic /dev nodes such as null, zero, stdin, stdout, stderr, and tty devices:
# ls -l /dev/{null,zero,stdin,stdout,stderr,random,tty}

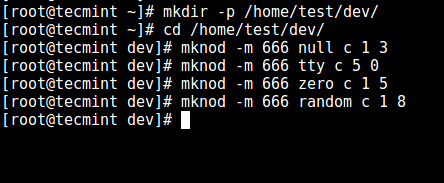
3. Now, create the /dev files as follows using the mknod command. In the command below, the -m flag is used to specify the file permissions bits, c means character file and the two numbers are major and minor numbers that the files point to.
# mkdir -p /home/test/dev/
# cd /home/test/dev/
# mknod -m 666 null c 1 3
# mknod -m 666 tty c 5 0
# mknod -m 666 zero c 1 5
# mknod -m 666 random c 1 8
4. Afterwards, set the appropriate permission on the chroot jail. Note that the chroot jail and its subdirectories and subfiles must be owned by the root user, and not writable by any normal user or group:
# chown root:root /home/test
# chmod 0755 /home/test
# ls -ld /home/test

Step 2: Setup Interactive Shell for SSH Chroot Jail
5. First, create the bin directory and then copy the /bin/bash files into the bin directory using the cp command as follows:
# mkdir -p /home/test/bin
# cp -v /bin/bash /home/test/bin/

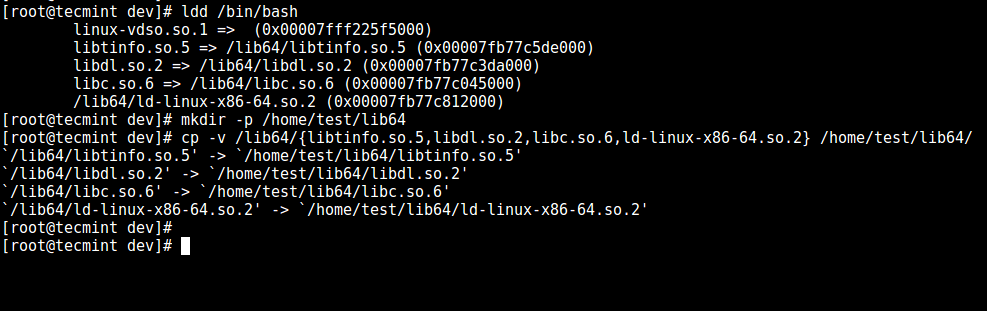
6. Now, identify the bash required for shared libs, as below, and copy them into the lib directory:
# ldd /bin/bash
# mkdir -p /home/test/lib64
# cp -v /lib64/{libtinfo.so.5,libdl.so.2,libc.so.6,ld-linux-x86-64.so.2} /home/test/lib64/
Step 3: Create and Configure SSH User
7. Now, create the SSH user with the useradd command and set a secure password for the user:
# useradd tecmint
# passwd tecmint
8. Create the chroot jail general configurations directory, /home/test/etc and copy the updated account files (/etc/passwd and /etc/group) into this directory as follows:
# mkdir /home/test/etc
# cp -vf /etc/{passwd,group} /home/test/etc/

/home/test/etc directory.Step 4: Configure SSH to Use Chroot Jail
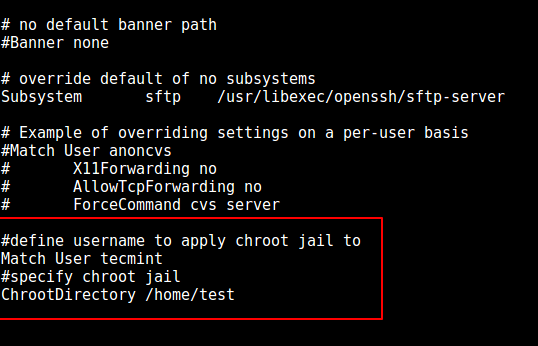
9. Now, open the sshd_config file.
# vi /etc/ssh/sshd_config
and add/modify the lines below in the file.
#define username to apply chroot jail to
Match User tecmint
#specify chroot jail
ChrootDirectory /home/test
Save the file and exit, and restart the SSHD services:
# systemctl restart sshd
OR
# service sshd restart
Step 5: Testing SSH with Chroot Jail
10. At this point, test if the chroot jail setup is working as expected:
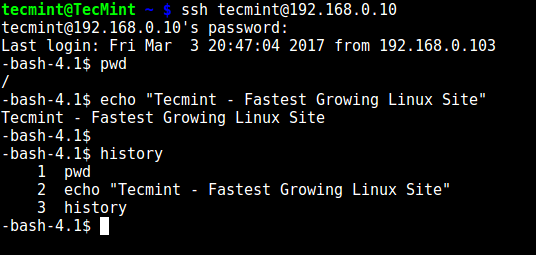
# ssh [email protected]
-bash-4.1$ ls
-bash-4.1$ date
-bash-4.1$ uname
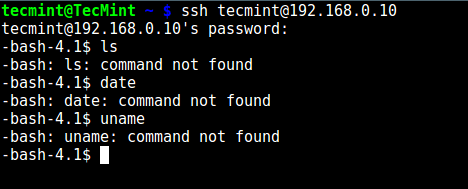
From the screenshot above, we can see that the SSH user is locked in the chrooted jail, and can’t run any external commands (ls, date, uname, etc).
The user can only execute bash and its builtin commands such as (pwd, history, echo, etc) as seen below:
# ssh [email protected]
-bash-4.1$ pwd
-bash-4.1$ echo "Tecmint - Fastest Growing Linux Site"
-bash-4.1$ history
Step 6. Create SSH User’s Home Directory and Add Linux Commands
11. From the previous step, we can notice that the user is locked in the root directory, we can create a home directory for the SSH user like so (do this for all future users):
# mkdir -p /home/test/home/tecmint
# chown -R tecmint:tecmint /home/test/home/tecmint
# chmod -R 0700 /home/test/home/tecmint

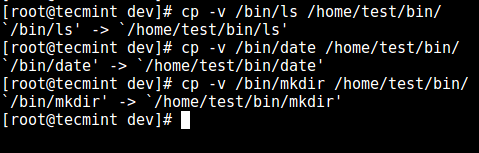
12. Next, install a few user commands such as ls, date, and mkdir in the bin directory:
# cp -v /bin/ls /home/test/bin/
# cp -v /bin/date /home/test/bin/
# cp -v /bin/mkdir /home/test/bin/
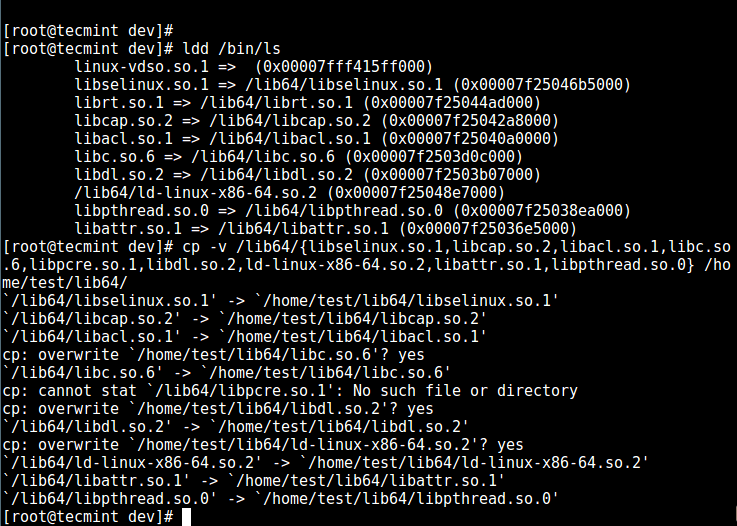
13. Next, check the shared libraries for the commands above and move them into the chrooted jail libraries directory:
# ldd /bin/ls
# cp -v /lib64/{libselinux.so.1,libcap.so.2,libacl.so.1,libc.so.6,libpcre.so.1,libdl.so.2,ld-linux-x86-64.so.2,libattr.so.1,libpthread.so.0} /home/test/lib64/
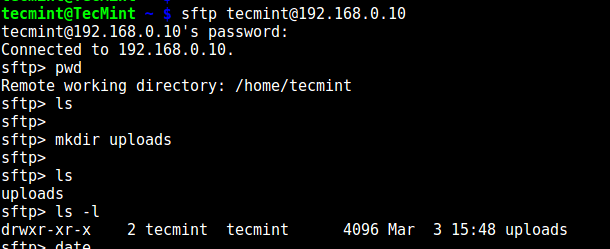
Step 7. Testing SFTP with Chroot Jail
14. Do a final test using sftp; check if the commands you have just installed are working.
Add the line below in the /etc/ssh/sshd_config file:
#Enable sftp to chrooted jail
ForceCommand internal-sftp
Save the file and exit. Then restart the SSHD services:
# systemctl restart sshd
OR
# service sshd restart
15. Now, test using SSH, and you’ll get the following error:
# ssh [email protected]

Try using SFTP as follows:
# sftp [email protected]
That’s it for now! In this article, we showed you how to restrict an SSH user in a given directory (chrooted jail) in Linux. Use the comment section below to offer us your thoughts about this guide.


Hello Experts,
I would need experts to let me know. I am making this interactive chroot directory jail for external users and I don’t want to disclose my information like /bin, /etc, /lib64, and /dev.
How can I protect from external interference?
Regards,
Manvir Singh”
Hello, I want to ask, I want a user with a chroot jail to be able to run the mysql service. I have moved several binary files. however, I get an error like cannot open ‘/var/run/mysqld/mysqld.sock‘ for reading: No such device or address (2) . Please help
Hello Aaron,
What measures are done to prevent the user from adding their own binaries (+ libraries they depend upon) to the chrooted jail to evade the chroot restrictions? They don’t need to put their uploaded libs to {,/usr}/lib64 in order to use them (they can ask the linker to perform the linking explicitly).
Dear Aaron,
I’ve performed your document steps twice along with the suggestion made by sizeur, but still I’m unable to execute all commands that we’ve added for the particular user.
Upon successful login, I can’t see anything inside /home/.
Please Guide
Hi Aaron, thanks for this valuable write-up and you made it so structured to follow.
I had to change the shell of chroot user to bash by “chsh -s /bin/bash chroot-user“. However Backspace, Tab, Del, and arrow keys not working in the terminal (using ssh). Delete throws a space. Moreover, nano throws “Error opening terminal: xterm-256color.” Please let me if I miss something. Looking for your help. Thanks in advance.
As many other users, the ls or date did not worked for me (command not found). I solved the problem easily by correcting the system PATH variable (add /bin/):
-bash-4.4$ ls
-bash: ls: command not found
-bash-4.4$ echo $PATH
/usr/local/bin:/usr/bin:/usr/local/sbin:/usr/sbin
-bash-4.4$ export PATH=/usr/local/bin:/usr/bin:/usr/local/sbin:/usr/sbin:/bin
-bash-4.4$ ls
bin dev etc home lib lib64
PS: Don’t forget to add the export in your .bashrc to make it permanent
I already did:
# ldd /bin/ls
# cp -v /lib64/{libselinux.so.1,libcap.so.2,libacl.so.1,libc.so.6,libpcre.so.1,libdl.so.2,ld-linux-x86-64.so.2,libattr.so.1,libpthread.so.0} /home/test/lib64/
but ls still not working…
I’m unable to get
lsto work for the new user after following the directions. Below is the comparison between the bin directories for each showing they have the same library entries13:58:12 # ldd /bin/ls linux-vdso.so.1 libselinux.so.1 libcap.so.2 libacl.so.1 libc.so.6 libpcre.so.1 libdl.so.2 /lib64/ld-linux-x86-64.so.2 libattr.so.1 libpthread.so.013:58:53 # ldd /home/chrootjail/bin/ls linux-vdso.so.1 libselinux.so.1 libcap.so.2 libacl.so.1 libc.so.6 libpcre.so.1 libdl.so.2 /lib64/ld-linux-x86-64.so.2 libattr.so.1 => /lib64/libattr.so.1 (0x00007f0c6f7e2000) libpthread.so.0 => /lib64/libpthread.so.0 (0x00007f0c6f5c6000)I m getting error ls command not found when login with ssh in chroot jail environment.
Please help me…
@Bharat
Did you copy the commands to the chrooted jail directory and perform step 13, to check the shared libraries for the commands you copied and move them into the chrooted jail libraries directory?
Hi,
[root@localhost bin]# ls
bash date ls mkdir
[root@localhost bin]# pwd
/home/backup/bin
–
[root@localhost lib64]# ls
ld-linux-x86-64.so.2 libattr.so.1 libc.so.6 libpcre.so.1 libselinux.so.1
libacl.so.1 libcap.so.2 libdl.so.2 libpthread.so.0 libtinfo.so.5
[root@localhost lib64]# pwd
/home/backup/lib64
–
Last login: Fri Nov 27 11:35:54 2020 from 1XX.XXX.XXX.XXX
-bash-4.2$ ls
-bash: ls: command not found
–
still not working…
Hi! Very nice theme and article! Thanks
There is a problem when I try to use mkdir or ls by with user-created with your scheme, I get restriction message
but I was execute
# cp -v /bin/{bash,ls,date,mkdir} /home/USER_NAME/bin/where I make wrong?
(CentOS 7)
# mkdir -p /home/USER_NAME/dev/ # cd /home/USER_NAME/dev/ # mknod -m 666 null c 1 3 # mknod -m 666 tty c 5 0 # mknod -m 666 zero c 1 5 # mknod -m 666 random c 1 8 # chown root:root /home/USER_NAME # chmod 0755 /home/USER_NAME # ls -ld /home/USER_NAME # mkdir -p /home/USER_NAME/bin # cp -v /bin/{bash,ls,date,mkdir} /home/USER_NAME/bin/ # ldd /bin/bash # mkdir -p /home/USER_NAME/lib64 # cp -v /lib64/{libtinfo.so.5,libselinux.so.1,libcap.so.2, libacl.so.1,libc.so.6,libpcre.so.1,libdl.so.2,ld-linux-x86-64.so.2, libattr.so.1,libpthread.so.0} /home/USER_NAME/lib64/ # mkdir /home/USER_NAME/etc # cp -vf /etc/{passwd,group} /home/USER_NAME/etc/ # mkdir -p /home/USER_NAME/www # chmod -R 0755 /home/USER_NAME/www # ldd /bin/ls # useradd -d /home/USER_NAME -s /bin/bash USER_NAME # usermod -a -G ssh USER_NAME # usermod -a -G www USER_NAME # passwd USER_NAME@Yuriy
Did you run this command to check the shared libraries for the ls command?
And did you copy shared libraries into the chrooted jail libraries directory?
Thank you.
Help me a lot off.
Hi,
I add ssh along with the libs and id as well. When using ssh I am getting.
This article has interesting concepts and worked partially, complemented with this other one, OK for CentOS 7.5.
https://serverfault.com/questions/699346/a-proper-way-to-create-a-chrooted-ssh-on-centos-7@Fernando
Based on your comment and those from the other readers, we will review the article soon. Thanks for the feedback.
@chris One thing that isn’t explained in this is once you add the ForceCommand, it will only allow sftp connections with that user.
Yes, from my understanding and how I’ve been using ssh and sftp it does only force sftp for the users that have the “ForceCommand internal-sftp” in their “Match User” segment.
In my example I have 3 users, one regular, root, and one sftp user:
The regular user can use sftp, ssh, X11Forwarding, but is only allowed to use key auth.
root, can’t do X11 but otherwise is set up like the regular user (except the key is on the same network)
while the sftp user can only log in to sftp with passwords (I’d love to have key auth but one software isn’t compatible with them).
Match User root X11Forwarding no Match User invalid PasswordAuthentication yes ChrootDirectory /remote/Disk/Jail ForceCommand internal-sftp AllowTcpForwarding no X11Forwarding noIt seems this page might be a bit out of date. I Was struggling but found https://www.digitalocean.com/community/questions/sftp-connection-error-received-unexpected-end-of-file-from-sftp-server
Then scroll down until you see this line:
Leave that line commented out, but underneath it write this:
Launched another putty instance and tried to log in using “tecmint” user but SSH terminal closes after supplying the password.
Please help..
As many people have pointed out ls (or date) doesn’t seem to work when you connect through ssh, and yeah I’ve used ldd and made sure every library was in place. (tested with Manjaro and OpenSUSE)
I haven’t tried other programs, what I’ve tried is to remove/don’t add ls to the bin directory and connect through sftp. I was able to use ls, so for me, that isn’t a problem as this jail was meant to an sftp user.
As for Step 8. I do not understand why it’s needed?
When I connect to sftp I don̈́’t really want that user to see ALL of the available users on my system or group for that matter. Again I didn’t do that step and everything (ssh and sftp) works just fine, there’s no need to copy this file to the chroot jail… or am I missing something?
I honestly do not have enough Linux experience to justify my reasoning except that I can still login through ssh and sftp without adding passwd or group.
It’s my understanding that you’d want to add as little as possible into the jail to prevent them from having access to anything that they (user or app) don’t need to use or see.
Followed and tested the procedure but when I get to Step 5: Testing SSH with Chroot Jail and use my installed putty on my laptop, the SSH screen goes out or closes after I supplied the password. But when I tried commenting out the ChrootDirectory /home/test I was able to login using the user “tecmint”
#define username to apply chroot jail to
Match User tecmint
#specify chroot jail
#ChrootDirectory /home/test <——————— this one!
Newbie here not really a Linux guy.. any help is appreciated.
@Chris
What error are you getting?
No error message, just after I pressed enter just right after supplying the password for “tecmint” the SSH or Putty window terminal abruptly closes.
Just close then nothing.
Hi, I’m not being able to go past the broken pipe problem.
I noticed that in point Step1.3 stdin/stdout/stderr are not create, is that correct?
Also in Step2.6 linux-vdso.so.1 is not copied
Maybe these the cause of my problems?
Thanks
# Users/Groups mkdir -p /home/jail/etc ; rm -rf /home/jail/etc/* ; /bin/cp -nvp /etc/{passwd,group} /home/jail/etc/ ; cat > /home/jail/etc/profile < ~/.bash_history ; EOF chmod +x /home/jail/etc/profile ; # Install Apps mkdir -p /home/jail/bin ; mkdir -p /home/jail/lib64 ; app_paths=( "/bin/bash" "/bin/date" "/bin/ls" "/bin/mkdir" "/bin/rm" "/bin/cp" "/bin/mv" "/bin/cat" "/bin/unlink" ); for app_path in "${app_paths[@]}"; do echo "App: $app_path" ; /bin/cp -nvp $app_path /home/jail/bin/ ; for lib_path in $(ldd $app_path | awk '{print $1}'); do echo " Lib: $lib_path" ; if [ ! -f "/home/jail/lib64/$lib_path" ] && [ -f "$lib_path" ]; then /bin/cp -nvp $lib_path /home/jail/$lib_path ; fi if [ ! -f "/home/jail/lib64/$lib_path" ] && [ -f "/lib64/$lib_path" ]; then /bin/cp -nvp /lib64/$lib_path /home/jail/lib64/$lib_path ; fi done doneThanks for the script
created profile under /home/test/etc with contents below.
I followed your tutorial but I cannot connect with the user I chrooted. The error message is client_loop: send disconnect: Broken pipe.
@Mauricio
This could be bad ownership or modes for chroot directory. Ensure that the ssh user is allowed to access the chrooted directory. For this guide, we used the root account which can access any directory on the system.
To make SSH works, you should add urandom under dev, all libnss and nsswitch.conf:
Hi there,
I followed all steps in this article and works just fine, but I got a problem, I need that the jailed user runs certain commands as sudoer. In order to achieve that I edit /etc/sudoers but when I execute sudo in jailed session I got this error.
Excellent post! Please how can i use SSH client from jailed user to connect to to other server?
I want to set up only one server whit ssh open port with a jailed user and from here can connect to others servers on my LAN.
Thanks.
Above commands should be accessible to the user when they SSH to the server. That is my requirement. But it isn’t working in this process. could you help to achieve that??
@Zodiac
Just follow the instructions in the guide, everything should work fine.
I have some issue making SFTP work at the same time.
The answer is to have the following line in sshd_config :
@Infrarchitect
We have taken note of this, thanks for sharing.
AWESOME write-up. Combining this with AD is a huge step in maintaining good security controls that mitigate many risks inherent in FOSS. I’ve been doing this stuff for many years and always appreciate concise and accurate write-ups like these. For file servers things like getfacl, setfacl and id [email protected] come to mind…
@Alex
Thanks for the kind words or appreciation and encouragement. Always feel free to share you expertise with us, we will be grateful. Thanks once more.
I’m getting “Permission denied (publickey).”
I solved my problem by authorizedkeysfile (path/to/authrized_keys) in sshd_config just after usermatch lines.
@Ravi
Try to use sudo command to run ssh. I sometimes get this error when using SSH, and when i use sudo, everything works fine.
I followed the all steps. Howerver when I was doing :
#ssh [email protected]
it shows .
/bin/bash permission denied.
Connection 10.61.247.41 closed.
I saw in /home/test/bin
bash has root permission.
@Krunal
Use the same username on the local and remote machine, or change the permissions on the /bin directory if you are using a different username:
#chmod -R 0755 /path/to/chrooted-jail/
I saw file /var/log/secure
there are 2 errors:
error :/dev/pts/2 : no such file or directory
error : open /dev/tty failed -could not set controlling tty permission denied.
@Krunal
Try to use this guide, which provides a solution to the error logs above: http://sunlnx.blogspot.ug/2014/01/jail-ssh-access-to-limit-commands-to.html
Hello, thanks for this tutorial. However I have an issue when i want to test the /home/test with user via ssh.
-sh: error while loading shared libraries: libc.so.6: cannot open shared object file: No such file or directory
I tried to find a solution, but all issues on Google are on x86 Ubuntu. I’m on x64 16.04.
Any suggestion ?
regards
Got the error : /bin/sh: No such file or directory
Fix it with that : cp -v /bin/sh /home/test/bin/
@Alex
Many thanks for sharing the solution to the error, i hope this will be useful to people who encounter the same error.
same error on 16.04 ubuntu. this fix helps. thanks.
Hello John,
I can not say for sure it is possible (because I do not has a such case), but I guess, that is possible, because scponly is only a shell like bash. But if you can describe your test case I will try to give more help.
Can cronjobs or scripts run for the user configured to use scp only. The user is configured to use sftp/scp only and ssh is not allowed.
Thank you.
@John
As @lulian has mentioned, try to describe your use case, it could be possible to find a solution for it.
Thx. @Aaron, I appreciate your remarks!
The link shared by you for Ahmed could be not useful in these days. At least me, I can not find likewise-open in the default repos for Linux-mint (last version). Maybe I am wrong ;) But for sure Ahmed can use SSSD: “The System Security Services Daemon (SSSD) provides access to different identity and authentication providers”:
After that he can integrate any LINUX desktop/server, in any LDAP/AD(ldap)/IPA(ldap), and maybe more others …. ! Then the rest of the tutorial(without the likewise-open part) can be used. And with SSSD, you can also have cache credential for any authenticated user, even if the AD/LDAP server is DOWN for some time. As a final word, I think that likewise-open is discontinued (if I remember correctly). In my case likewise-open has fail many years ago!
@lulian
Many thanks man for the heads up, will surely try this out.
No problem, you can try it, sssd is very simple to setup and it is KISS(keep it simple stupid – sorry, no offence to anyone)
@lulian
Sure, thanks for always following us.
Hello, this tutorial is ok to show how a chroot can be use. But from practical point of view is complicated, and does not scale.
For a scp run in a jail, is more simple to use scponly. For your test case, a webserver, we can use any container technology (lxc is one possibility ), or even better kvm. But you know, each solution have good points, and bad points.
Any Linux admin must think what is the best for his particular case. This is the most important for me is ok the solution A or B? How I can reduce the risk for A and for B? I have the skills for A/B? I have the proper resources for A/B (time, servers, storage, and so on)?
@lulian
Your are right, from a practical point of view, implementing this may by be complicated especially when used with ssh, scp and other related commands. And also when you need to install additional commands for users and create a PATH for them to run commands without specifying the absolute path to the commands.
Therefore, it would effectively and reliably work in test cases for testing certain programs in an isolated environment on the system. Thanks for sharing your thoughts with us.
When I test SFTP connection.
logs – /var/log/secure:
When I change sshd_config: ( https://www.tecmint.com/restrict-sftp-user-home-directories-using-chroot/ )
It’s work for me. But, why user see all folder/files from jail ? ex: bin/etc/dev ?
“cd /” move him to /home/test.
And How Can I run this Jail with LDAP/geten passwd user from LDAP ?
@Ahmed
Remember in this guide, we didn’t block user from viewing files in the chrooted jail(which is the apparent root directory), but it is possible to configure this.
This guide can give you a fair start to using LDAP with Chrooted jail: https://heitorlessa.com/sftp-jail-chroot-with-active-directory-authentication-832ebf93dfa8#.duimrfrmr
And we will create a guide for this soon.
Can I please auth with ldap ?
@Ldap
This guide should give you a fair start to using LDAP with Chrooted jail: https://heitorlessa.com/sftp-jail-chroot-with-active-directory-authentication-832ebf93dfa8#.duimrfrmr
We don’t have a guide for this yet, however, we’ll create one in the near future.
Hello Ahmed,
Basically a chroot jail is useful only for simple application (read like with few dependencies) For your test case (ldap) is more simple to setup a RO (read-only) ldap server in a container or in a kvm guest.
This is my opinion, and it was working in my case for many years. ldap has many dependencies / libraries and is hard to make a chroot for this.
@lulian
Many thanks for sharing your experience with us, we’ll look into this as you have suggested and i hope @Ahmed will as well.