The Linux Foundation announced the LFCS (Linux Foundation Certified Sysadmin) certification, a new program that aims at helping individuals all over the world to get certified in basic to intermediate system administration tasks for Linux systems.
This includes supporting running systems and services, along with first-hand troubleshooting and analysis, and smart decision-making to escalate issues to engineering teams.
The series will be titled Preparation for the LFCS (Linux Foundation Certified Sysadmin) Parts 1 through 33 and cover the following topics:
This post is Part 1 of a 33-tutorial series, which will cover the necessary domains and competencies that are required for the LFCS certification exam. That being said, fire up your terminal, and let’s start.
Processing Text Streams in Linux
Linux treats the input to and the output from programs as streams (or sequences) of characters. To begin understanding redirection and pipes, we must first understand the three most important types of I/O (Input and Output) streams, which are in fact special files (by convention in UNIX and Linux, data streams and peripherals, or device files, are also treated as ordinary files).
The difference between > (redirection operator) and | (pipeline operator) is that while the first connects a command with a file, the latter connects the output of a command with another command.
# command > file
# command1 | command2
Since the redirection operator creates or overwrites files silently, we must use it with extreme caution, and never mistake it with a pipeline.
One advantage of pipes on Linux and UNIX systems is that there is no intermediate file involved with a pipe – the stdout of the first command is not written to a file and then read by the second command.
For the following practice exercises, we will use the poem “A happy child” (anonymous author).

Using sed Command
The name sed is short for stream editor. For those unfamiliar with the term, a stream editor is used to perform basic text transformations on an input stream (a file or input from a pipeline).
Change Lowercase to Uppercase in File
The most basic (and popular) usage of sed is the substitution of characters. We will begin by changing every occurrence of the lowercase y to UPPERCASE Y and redirecting the output to ahappychild2.txt.
The g flag indicates that sed should perform the substitution for all instances of term on every line of the file. If this flag is omitted, sed will replace only the first occurrence of the term on each line.
Sed Basic Syntax:
# sed ‘s/term/replacement/flag’ file
Our Example:
# sed ‘s/y/Y/g’ ahappychild.txt > ahappychild2.txt

Search and Replace Word in File
Should you want to search for or replace a special character (such as /, \, &) you need to escape it, in the term or replacement strings, with a backward slash.
For example, we will substitute the word and for an ampersand. At the same time, we will replace the word I with You when the first one is found at the beginning of a line.
# sed 's/and/\&/g;s/^I/You/g' ahappychild.txt
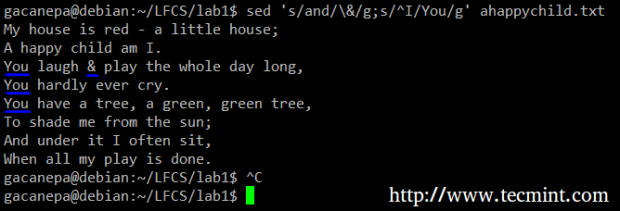
In the above command, a ^ (caret sign) is a well-known regular expression that is used to represent the beginning of a line.
As you can see, we can combine two or more substitution commands (and use regular expressions inside them) by separating them with a semicolon and enclosing the set inside single quotes.
Print Selected Lines from a File
Another use of sed is showing (or deleting) a chosen portion of a file. In the following example, we will display the first 5 lines of /var/log/messages from Jun 8.
# sed -n '/^Jun 8/ p' /var/log/messages | sed -n 1,5p
Note that by default, sed prints every line. We can override this behavior with the -n option and then tell sed to print (indicated by p) only the part of the file (or the pipe) that matches the pattern (Jun 8 at the beginning of the line in the first case and lines 1 through 5 inclusive in the second case).
Finally, it can be useful while inspecting scripts or configuration files to inspect the code itself and leave out comments. The following sed one-liner deletes (d) blank lines or those starting with # (the | character indicates a boolean OR between the two regular expressions).
# sed '/^#\|^$/d' apache2.conf

uniq Command
The uniq command allows us to report or remove duplicate lines in a file, writing to stdout by default. We must note that uniq does not detect repeated lines unless they are adjacent.
Thus, uniq is commonly used along with a preceding sort (which is used to sort lines of text files). By default, sort takes the first field (separated by spaces) as a key field. To specify a different key field, we need to use the -k option.
Uniq Command Examples
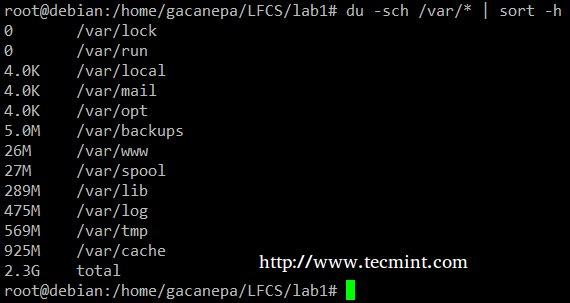
The du -sch /path/to/directory/* command returns the disk space usage per subdirectories and files within the specified directory in human-readable format (also shows a total per directory), and does not order the output by size, but by subdirectory and file name.
We can use the following command to sort by size.
# du -sch /var/* | sort –h
You can count the number of events in a log by date by telling uniq to perform the comparison using the first 6 characters (-w 6) of each line (where the date is specified), and prefixing each output line by the number of occurrences (-c) with the following command.
# cat /var/log/mail.log | uniq -c -w 6

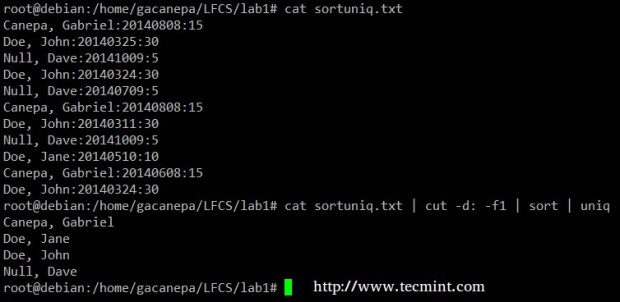
Finally, you can combine sort and uniq (as they usually are). Consider the following file with a list of donors, donation date, and amount. Suppose we want to know how many unique donors there are.
We will use the following cat command to cut the first field (fields are delimited by a colon), sort by name, and remove duplicate lines.
# cat sortuniq.txt | cut -d: -f1 | sort | uniq
grep Command
The grep command searches text files or (command output) for the occurrence of a specified regular expression and outputs any line containing a match to standard output.
Grep Command Examples
Display the information from /etc/passwd for user gacanepa, ignoring case.
# grep -i gacanepa /etc/passwd

Show all the contents of /etc whose name begins with rc followed by any single number.
# ls -l /etc | grep rc[0-9]

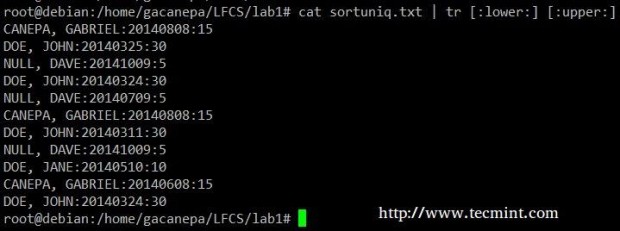
tr Command Usage
The tr command can be used to translate (change) or delete characters from stdin, and write the result to stdout.
Change all lowercase to uppercase in the sortuniq.txt file.
# cat sortuniq.txt | tr [:lower:] [:upper:]
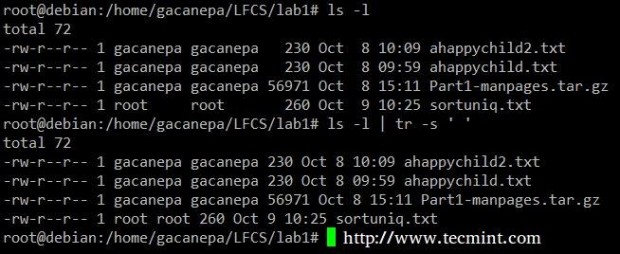
Squeeze the delimiter in the output of ls –l to only one space.
# ls -l | tr -s ' '
Cut Command Usage
The cut command extracts portions of input lines (from stdin or files) and displays the result on standard output, based on the number of bytes (-b option), characters (-c), or fields (-f).
In this last case (based on fields), the default field separator is a tab, but a different delimiter can be specified by using the -d option.
Cut Command Examples
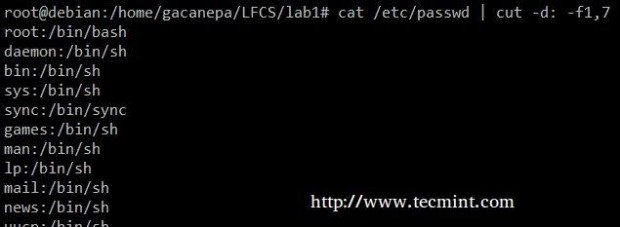
Extract the user accounts and the default shells assigned to them from /etc/passwd (the –d option allows us to specify the field delimiter and the –f switch indicates which field(s) will be extracted.
# cat /etc/passwd | cut -d: -f1,7
Summing up, we will create a text stream consisting of the first and third non-blank files of the output of the last command. We will use grep as a first filter to check for sessions of user gacanepa, then squeeze delimiters to only one space (tr -s ‘ ‘).
Next, we’ll extract the first and third fields with cut, and finally sort by the second field (IP addresses in this case) showing unique.
# last | grep gacanepa | tr -s ' ' | cut -d' ' -f1,3 | sort -k2 | uniq
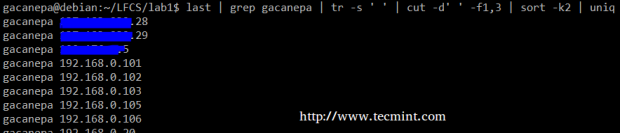
The above command shows how multiple commands and pipes can be combined so as to obtain filtered data according to our desires. Feel free to also run it by parts, to help you see the output that is pipelined from one command to the next (this can be a great learning experience, by the way!).
Summary
Although this example (along with the rest of the examples in the current tutorial) may not seem very useful at first sight, they are a nice starting point to begin experimenting with commands that are used to create, edit, and manipulate files from the Linux command line.
Feel free to leave your questions and comments below – they will be much appreciated!
The LFCS eBook is available now for purchase. Order your copy today and start your journey to becoming a certified Linux system administrator!
| Product Name | Price | Buy |
|---|---|---|
| The Linux Foundation’s LFCS Certification Preparation Guide | $19.99 | [Buy Now] |
Last, but not least, please consider buying your exam voucher using the following links to earn us a small commission, which will help us keep this book updated.


Hi , I am planning for LFCS exam, please advise what need to be done to crack this exam?
Hello,
I know there was a refresh for the LFCS 2018 exam.
I’m wondering if anyone has taken it or used tecmint to study for it via this guide? It looks pretty good to me overall, but i’m wondering if there’s some things that are updated that weren’t on the guide?
@Saqib,
Yes, LFCS and LFCE both are updated to new exam objectives effective from April 10, 2018. It’s not possible to update each article with latest exam updates, so we have put all together with updates on our book that you can find here – https://www.tecmint.com/linux-foundation-lfcs-lfce-certification-exam-book/
Thank you for your help, and for this great series created for the LFCS exam! I just passed the exam and all of the information found here is valuable and extremely helpful. Great job !!
Thank you for your comment! Would you mind sharing your certificate id?
Hi ,
What is the nature of the exam. I do not want dumps, just asking about the type of questions?
Moh
Traian Sandu, can you please recommend me any other free material for the the LFCS exam. congrats for your goal
Hi Gabriel,
First of all, thank you for such a wonderful guide on LFCS. I’m brushing up on my Linux and will probably go through your LFCE series as well, and perhaps go for the cert someday.
Question: Since the exam lets you choose the distribution you test with, can we simply focus on the specific ways of doing things? Let’s say I will plan to test on Centos, can I simply skip the Debian and OpenSUSE commands to cut on reading time?
Ian,
Thanks for your kind words about this guide! Yes, if you’re planning on taking the exam using a specific distro, you can skip the commands of the others to cut on reading time. Please let us know if you decide to take the exam!
Hi Gabriel, is the information in these tutorials the same in the ebook that is offered here or does the ebook cover more information.
Oliver,
The PDF version contains several corrections that were pointed out by the readers of these tutorials. Other than that, it’s exactly the same material.
Hi Gabriel,
Today I passed my exam and I’d like to say thank you for such a great series! It was my main source for learning. Awesome work.
@Piotr,
Congratulations for cracking the LFCS exam and thanks for finding the series helpful…
Congratulations! Please help us spread the word by sharing this series via your social network profiles!
Thank you for Greet work .
Hello Gabriel,
thanks for this article series. Are the lab files available somewhere?
Steffen
@Steffen,
Thank you for your comment. No, the lab files are not available. To be honest, I didn’t think of saving them. Will keep the idea in mind for future tutorials, though.
A thank you from my side. I am doing the LFCS course and preparing the certification next year.
The tutorial is a good complement.
@Elyasin,
I am glad to hear that this series is a good complement to prepare for the certification. Did you already take the exam? If so, would you be as kind as to share your experience with us?
Thanks for this great job!!
I only used this material to prepare the LFCS exam and it helped me a lot. Exam passed!!
Only is missing the LVM section which I learned from the Ubuntu page. But I will definitely recommend this training series!
Thanks again.
@Aly,
I am so glad to hear that you used the LFCS series to prepare for the exam. Yes, LVM is not included because when I first wrote the series that topic was not in the domain and competencies required for the exam. Eventually, LVM replaced RAID so when I review these articles here soon I’ll make sure to make the change.
Please help us by spreading the word. That is the best thank you! you can give us :).
# last | grep gacanepa | tr -s ‘ ‘ | cut -d’ ‘ -f1,3 | sort -k2 | uniq
While I was learning, I found out that `backticks` do not work as shown in the example, but single ticks do. I found this true on Ubuntu/Linux Mint so I guess also on Debian. Is this a “distro difference issue” or is the example just wrong? I mean, in the other examples with TR single ticks are used. Please make sure you correct this as these ticks or back quotes can confuse Linux beginners.
@Rpn,
Thank you for pointing that out. In this article, there should be single quotes wherever backticks appear. It is an edition typo.
@Ravi,
Please correct.
@Rpn and @Gabriel
Thanks for pointing out, corrected in the write-up..
I am excited, and take the first lesson !!
Here I come…!
I passed the LFCS .
I used LF material for my first test and found the LF study material to be lacking…
I got a free retake so my first attempt was really to see what I was in for..
2nd attempt, passed with help from this guide.
thanks to the author.
@justin,
Thank you for letting us know that you used this series to prepare for the LFCS exam! Congratulations for passing it!
>In the above command, a ^ (carrot sign) is a well-known regular expression that is used to represent the beginning of a line.
It’s a “caret” not a carrot.
My sides are in orbit!
@Matt,
Sorry for that typo..fixed in the writeup..thanks
One more thing….
du -sch /var/* | sort -h
sort in Ubuntu doesn’t have -h parameter
But CentOS has it.
@lvin,
I just checked in 12.04 LTS and the -h option is there. Please note that sort, as installed by default on most distributions, is part of the GNU coreutils package. What does the output of ‘info sort’ return for you?
I have a question.
# sed -n ‘/^Jun 8/ p’ /var/log/messages | sed -n 1,5p
I understand the first parameter s is for substitute.
What is the meaning without any parameter?
Thanks!
@lvin,
Please refer to the paragraphs immediately above and below the code line that you quoted. Sed, without s, is used to print to standard output, a portion of a file that begins with the pattern that is passed to it as argument.
I passed LFCS exam. A big thanks to TECMINT team.
LFCS is a fun because it’s hands on exam and we have access to man pages. LFCS syllabus is a big thumbs down as they don’t give out any specifics. I was often confused on how much to study or what exactly to study.
These articles provided me a rough specifics of syllabus (what I needed to look into). They are a good starting point and also a quick revising place when I was done preparing.
Just a heads up to all the aspiring candidates, these articles are not the everything we need to know of LFCS. I had referred many other video tutorials and websites as well.
I would definitely recommend all to have 3 things at disposal : Any reference book (tldp.org) , a good video series (Professor Messer / CBT Nuggets/udemy ) and Techmint articles.
Lastly and most importantly, all of you MUST have access to Linux machine to play around.
To utilize these articles fully, I navigated to all the external links listed in the articles. Played around googling the complex things. Came back later when I was comfortable enough and resumed my study. Muscle memory is very important in this exam.
I studied for 2 weeks. I have no professional experience. I have linux as my main desktop for last 4 years. However, I hadn’t used more than 25 commands in normal usage. LFCS raised my bar.
@Ashish,
Congrats bro…and thanks for appreciating our articles. The Big thank goes to our author “Gabriel Cánepa” for writing such useful out-of-the-box articles on LFCS series… I hope others too get benefit out of it..
Thank you. Gabriel Canepa is awesome. I can see his articles everywhere (such as xmodulo.com). I have registered for LFCE exam for 25th Jan. I can see that Gabriel has already finished part 6 of 12 for LFCE preparation. I am looking forward to it.
@Ashish,
I appreciate your kind comment about my work in this series and also about the LFCE series. Part 7 should be published during the next ~12 hours so stay tuned!
Thanks for following me in xmodulo as well! You can always find my latest articles there at xmodulo/author/gabriel, and please note that I write for DigitalOcean as well (not as frequent as for Tecmint or Xmodulo, though). You can check my articles at DO here: https://www.digitalocean.com/community/users/gacanepa.
@Ashish,
I am glad that this series helped you as a starting point in your preparation for the exam. You have pointed out a true point – one could not realistically expect that 10 articles cover all the contents of the certification, and even if we could, we would violate a confidentiality agreement with the Linux Foundation. I even consulted with them about the series and they said it was OK as long as I didn’t suggest what could be included, and what not, in the actual exam.
That being said, we have also tried to emphasize on each article that readers should take the same approach as you did – start with what we give you but don’t think that it is everything that there is to know in order to pass the exam.
Thanks for your enlightening comment and good luck in all your endeavors!
@Emanuel,
Thanks for your comment.
Covering ALL file-related tools would take a complete series of its own. Trying to decide what to include and what to leave out, specially on this article, was a difficult decision. However, please note that since the exam is performance-based, you’re free to choose what tools to use, and in this article we have covered enough tools to create, edit, and manipulate files.
That being said, I believe your comment is very appropriate as it points out further tools that can be used to sharpen your file management skills in preparation for the exam.
Thank you for the help.
I don’t see the basic manipulate text files commands like cat, head, tail, touch…
Do you already passed the LFCS exam?
cud -t’ ‘ -f1,3
This is not correct in the
# last | grep gacanepa | tr -s ‘ ‘ | cud -t’ ‘ -f1,3 | sort -k2 | uniq.
Any suggested book for LFCS? Thanks
@lvin – thanks for bringing that to our attention. That was a typo.
That one-liner should read as follows:
# last | grep gacanepa | tr -s ‘ ‘ | cut -d’ ‘ -f1,3 | sort -k2 | uniq
As for a suggested book that covers the competencies for the LFCS exam, there isn’t any as of yet, since this is a brand new certification. We hope to cover in this 10-article series all the necessary domains and topics that are required as per the Linux Foundation. Feel free to check out the other parts here in TecMint.com and provide us with your valuable feedback and further questions, if you have any.
In addition, do not hesitate to contact me at my social network profiles if you need further clarifications.
@lvin – thanks for pointing out. Yes, that was a typo and we’ve corrected in the writeup.