strongSwan is an open-source, multi-platform, modern and complete IPsec-based VPN solution for Linux that provides full support for Internet Key Exchange (both IKEv1 and IKEv2) to establish security associations (SA) between two peers. It is full-featured, modular by design and offers dozens of plugins that enhance the core functionality.
Related Article: How to Set Up IPsec-based VPN with Strongswan on Debian and Ubuntu
In this article, you will learn how to set up site-to-site IPsec VPN gateways using strongSwan on CentOS/RHEL 8 servers. This enables peers to authenticate each other using a strong pre-shared key (PSK). A site-to-site setup means each security gateway has a sub-net behind it.
Testing Environment
Do not forget to use your real-world IP addresses during the configurations while following the guide.
Site 1 Gateway
Public IP: 192.168.56.7
Private IP: 10.10.1.1/24
Private Subnet: 10.10.1.0/24
Site 2 Gateway
Public IP:  192.168.56.6
Private IP: 10.20.1.1/24
Private Subnet: 10.20.1.0/24
Step 1: Enabling Kernel IP Forwarding in CentOS 8
1. Start by enabling kernel IP forwarding functionality in /etc/sysctl.conf configuration file on both VPN gateways.
# vi /etc/sysctl.conf
Add these lines in the file.
net.ipv4.ip_forward = 1
net.ipv6.conf.all.forwarding = 1
net.ipv4.conf.all.accept_redirects = 0
net.ipv4.conf.all.send_redirects = 0
2. After saving the changes in the file, run the following command to load the new kernel parameters in runtime.
# sysctl -p
3. Next, create a permanent static route in the file /etc/sysconfig/network-scripts/route-eth0 on both security gateways.
# vi /etc/sysconfig/network-scripts/route-eth0
Add the following line in the file.
#Site 1 Gateway
10.20.1.0/24  via 192.168.56.7

#Site 2 Gateway
10.10.1.0/24 via 192.168.56.6
4. Then restart the network manager to apply the new changes.
# systemctl restart NetworkManager
Step 2: Installing strongSwan in CentOS 8
5. The strongswan package is provided in the EPEL repository. To install it, you need to enable the EPEL repository, then install strongwan on both security gateways.
# dnf install epel-release
# dnf install strongswan
6. To check the version of strongswan installed on both gateways, run the following command.
# strongswan version
7. Next, start the strongswan service and enable it to automatically start at system boot. Then verify the status on both security gateways.
# systemctl start strongswan
# systemctl enable strongswan
# systemctl status strongswan
Note: The latest version of strongswan in CentOS/REHL 8 comes with support for both swanctl (a new, portable command-line utility introduced with strongSwan 5.2.0, used to configure, control and monitor the IKE daemon Charon using the vici plugin) and starter (or ipsec) utility using the deprecated stroke plugin.
8. The main configuration directory is /etc/strongswan/ which contains configuration files for both plugins:
# ls /etc/strongswan/

For this guide, we will use IPsec utility which is invoked using the strongswan command and the stroke interface. So we will use the following configuration files:
- /etc/strongswan/ipsec.conf – configuration file for the strongSwan IPsec subsystem.
- /etc/strongswan/ipsec.secrets – secrets file.
Step 3: Configuring Security Gateways
9. In this step, you need to configure the connection profiles on each security gateways for each site using the /etc/strongswan/ipsec.conf strongswan configuration file.
Configuring Site 1 Connection Profile
# cp /etc/strongswan/ipsec.conf /etc/strongswan/ipsec.conf.orig
# vi /etc/strongswan/ipsec.conf
Copy and paste the following configuration in the file.
config setup
        charondebug="all"
        uniqueids=yes
conn ateway1-to-gateway2
        type=tunnel
        auto=start
        keyexchange=ikev2
        authby=secret
        left=192.168.56.7
        leftsubnet=10.10.1.1/24
        right=192.168.56.6
        rightsubnet=10.20.1.1/24
        ike=aes256-sha1-modp1024!
        esp=aes256-sha1!
        aggressive=no
        keyingtries=%forever
        ikelifetime=28800s
        lifetime=3600s
        dpddelay=30s
        dpdtimeout=120s
        dpdaction=restart
Configuring Site 2 Connection Profile
# cp /etc/strongswan/ipsec.conf /etc/strongswan/ipsec.conf.orig
# vi /etc/strongswan/ipsec.conf
Copy and paste the following configuration in the file:
config setup
        charondebug="all"
        uniqueids=yes
conn 2gateway-to-gateway1
        type=tunnel
        auto=start
        keyexchange=ikev2
        authby=secret
        left=192.168.56.6
        leftsubnet=10.20.1.1/24
        right=192.168.56.7
        rightsubnet=10.10.1.1/24
        ike=aes256-sha1-modp1024!
        esp=aes256-sha1!
        aggressive=no
        keyingtries=%forever
        ikelifetime=28800s
        lifetime=3600s
        dpddelay=30s
        dpdtimeout=120s
        dpdaction=restart
Let’s briefly describe each of the configuration parameters above:
- config setup – defines the general configuration information for IPSec which applies to all connections.
- charondebug – specifies how much Charon debugging output should be logged.
- uniqueids – defines whether a particular participant ID should be kept unique.
- conn gateway1-to-gateway2 – used to set the connection name.
- type – defines connection type.
- Auto – used to declare how to handle connection when IPSec is started or restarted.
- keyexchange – declares the version of the IKE protocol to use.
- authby – specifies how peers should authenticate each other.
- left – declares the IP address of the left participant’s public-network interface.
- leftsubnet – declares the private subnet behind the left participant.
- right – declares the IP address of the right participant’s public-network interface.
- rightsubnet – declares the private subnet behind the left participant.
- ike – used to declare a list of IKE/ISAKMP SA encryption/authentication algorithms to be used. Note that this can be a comma-separated list.
- esp – specifies a list of ESP encryption/authentication algorithms to be used for the connection.
- aggressive – declares whether to use Aggressive or Main Mode.
- keyingtries – declares the number of attempts that should be made to negotiate a connection.
- ikelifetime – specifies how long the keying channel of a connection should last before being renegotiated.
- lifetime – specifies how long a particular instance of a connection should last, from successful negotiation to expiry.
- dpddelay – declares the time interval with which R_U_THERE messages/INFORMATIONAL exchanges are sent to the peer.
- dpdtimeout – used to declare the timeout interval, after which all connections to a peer are deleted in case of inactivity.
- dpdaction – specifies how to use the Dead Peer Detection(DPD) protocol to manage the connection.
You can find a description of all configuration parameters for the strongSwan IPsec subsystem by reading the ipsec.conf man page.
# man ipsec.conf
Step 4: Configuring PSK for Peer-to-Peer Authentication
10. Next, you need to generate a strong PSK to be used by the peers for authentication as follows.
# head -c 24 /dev/urandom | base64

11. Add the PSK in the /etc/strongswan/ipsec.conf file on both security gateways.
# vi /etc/strongswan/ipsec.secrets
Enter the following line in the file.
#Site 1 Gateway
192.168.56.7  192.168.56.6 : PSK "0GE0dIEA0IOSYS2o22wYdicj/lN4WoCL"

#Site 1 Gateway
192.168.56.6  192.168.56.7 : PSK "0GE0dIEA0IOSYS2o22wYdicj/lN4WoCL"
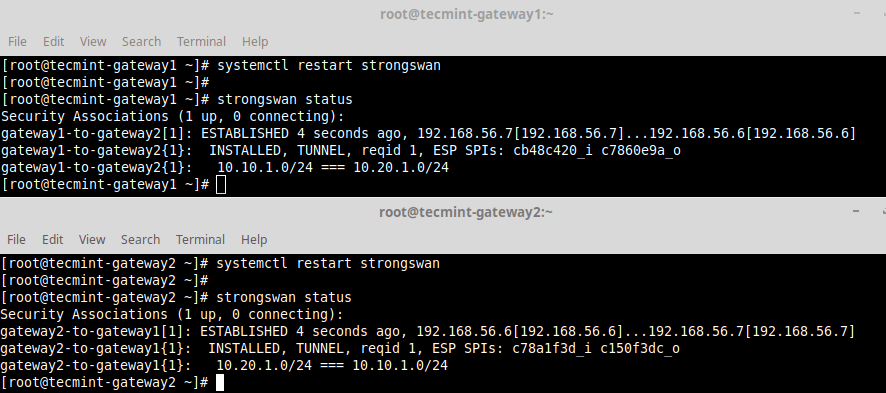
12. Then start the strongsan service and check the status of connections.
# systemctl restart strongswan
# strongswan status
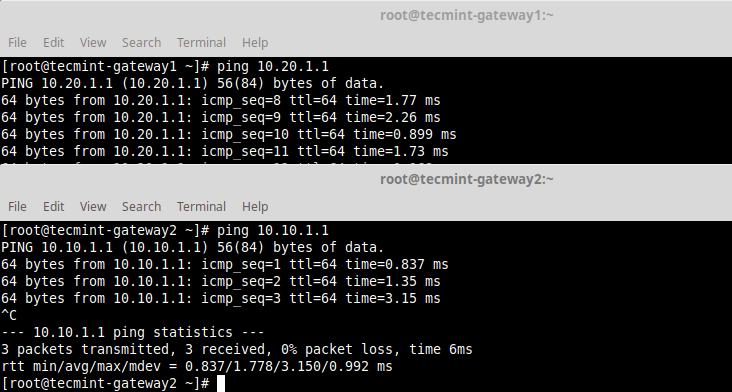
13. Test if you can access the private sub-nets from either security gateways by running a ping command.
# ping 10.20.1.1
# ping 10.10.1.1
14. Last but not least, to learn more strongswan commands to manually bring up/down connections and more, see the strongswan help page.
# strongswan --help
That’s all for now! To share your thoughts with us or ask questions, reach us via the feedback form below. And to learn more about the new swanctl utility and the new more flexible configuration structure, see the strongSwan User Documentation.


I am trying to create a PSK tunnel between AIX and Linux. I tried activating the tunnel from Linux, but it is not coming up.
Any help, please?
/etc/strongswan/ipsec.conf:
config setup charondebug="all" uniqueids=no strictcrlpolicy=no conn tun1 type=transport auto=add keyexchange=ikev2 authby=secret left=70.70.70.20 right=70.70.70.10 ike=aes256-sha1-modp1024 esp=aes256-sha1 pfs=no/etc/strongswan/ipsec.secrets:
@Raji,
It looks like the issue is that StrongSwan cannot find the ‘
tun1‘ configuration. Double-check youripsec.conffile for any syntax errors or misconfigurations.Ensure that the configuration file is saved correctly and try reloading the StrongSwan configuration with:
Then attempt to bring up the tunnel again:
If it still doesn’t work, consider checking the logs using
journalctl -xefor more detailed error information, which can help troubleshoot the problem further.I have already established an IPIP6 tunnel between two endpoints, where IPv4 packets are encapsulated inside the IPv6 tunnel.
Can this method help me secure and authenticate my tunnel ??
Or it is totally different method?
No firewall ports have to be opened?
So we don’t need to open ports with firewall-cmd?
@Christophe,
I think we have disabled firewall, but you can open port if you an have active firewall.
Hello,
I have followed the same instruction my VPN tunnel is up but not pinging to each other. Any clue where I did something wrong or miss any configuration.
Hi Guys,
Thanks for the step by step configuration.
I’ve one issue, I have a site 2 site VPN (strongswan–&–Cisco ASA), after a period of ideal time the VPN got disconnected, and to bring it back I need to restart strongswan.
is there is any way to make the VPN always up?
@Naji
There should be something wrong with your configuration, causing the timeout. If well configured, the VPN should always be up. Try to check the logs for any relevant error messages.
Hi, I have followed the complete way you have shared here. But still, I stuck on connecting mode. Can you help me with this?
Site 1 Gateway
Public IP: 72.21.25.196
Private IP: 192.168.0.101
Private Subnet: 10.10.1.0/24
Site 2 Gateway
Public IP: 149.20.188.62
Private IP: 10.0.2.15
Private Subnet: 10.20.1.0/24
config setup
# strictcrlpolicy=yes
# uniqueids = no
charondebug=”all”
uniqueids=yes
# Add connections here.
conn ateway1-to-gateway2
type=tunnel
auto=start
keyexchange=ikev2
authby=secret
left=72.21.25.196
leftsubnet=192.168.0.101/24
right=149.20.188.62
rightsubnet=10.0.2.15/24
ike=aes256-sha1-modp1024!
esp=aes256-sha1!
aggressive=no
keyingtries=%forever
ikelifetime=86400s
lifetime=3600s
dpddelay=30s
dpdtimeout=120s
dpdaction=restart
config setup
# strictcrlpolicy=yes
# uniqueids = no
charondebug=”all”
uniqueids=yes
# Add connections here.
conn 2gateway-to-gateway1
type=tunnel
auto=start
keyexchange=ikev2
authby=secret
left=149.20.188.62
leftsubnet=10.0.2.15/24
right=72.21.25.196
rightsubnet=192.168.0.101/24
ike=aes256-sha1-modp1024!
esp=aes256-sha1!
aggressive=no
keyingtries=%forever
ikelifetime=86400s
lifetime=3600s
dpddelay=30s
dpdtimeout=120s
dpdaction=restart
Let me know if anything is wrong here. It will be a great help for me.
Hello, I think in step 12 you must have write
and the phrase shared, it could be any phrase
@Dextre
True, you can create a PSK of your own: https://www.tecmint.com/generate-pre-shared-key-in-linux/.