iSCSI is a block level Protocol for sharing RAW Storage Devices over TCP/IP Networks, Sharing and accessing Storage over iSCSI, can be used with existing IP and Ethernet networks such as NICs, Switched, Routers etc. iSCSI target is a remote hard disk presented from an remote iSCSI server (or) target.
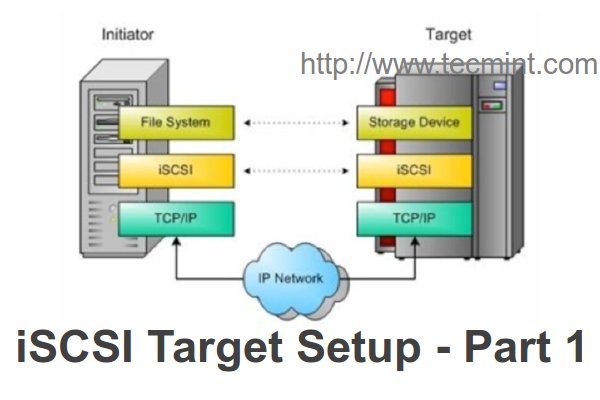
We don’t need a high resource for stable connectivity and performance in Client side’s. iSCSI Server called as Target, this share’s the storage from server. iSCSI Client’s called as Initiator, this will access the storage which shared from Target Server. There are iSCSI adapter’s available in market for Large Storage services such as SAN Storage’s.
Why we need a iSCSI adapter for Large storage Area?
Ethernet adapters (NIC) are designed to transfer packetized file level data among systems, servers and storage devices like NAS storage’s, they are not capable for transferring block level data over Internet.
Features of iSCSI Target
- Possible to run several iSCSI targets on a single machine.
- A single machine making multiple iscsi target available on the iSCSI SAN
- The target is the Storage and makes it available for initiator (Client) over the network
- These Storage’s are Pooled together to make available to the network is iSCSI LUNs (Logical Unit Number).
- iSCSI supports multiple connections within the same session
- iSCSI initiator discover the targets in network then authenticating and login with LUNs, to get the remote storage locally.
- We can Install any Operating systems in those locally mounted LUNs as what we used to install in our Base systems.
Why the need of iSCSI?
In Virtualization we need storage with high redundancy, stability, iSCSI provides those all in low cost. Creating a SAN Storage in low price while comparing to Fiber Channel SANs, We can use the standard equipment’s for building a SAN using existing hardware such as NIC, Ethernet Switched etc..
Let start to get install and configure the centralized Secure Storage using iSCSI Target. For this guide, I’ve used following setups.
- We need separate 1 systems to Setup the iSCSI Target Server and Initiator (Client).
- Multiple numbers of Hard disk can be added in large storage environment, But we here using only 1 additional drive except Base installation disk.
- Here we using only 2 drives, One for Base server installation, Other one for Storage (LUNs) which we going to create in PART-II of this series.
Master Server Setup
- Operating System – CentOS release 6.5 (Final)
- iSCSI Target IP – 192.168.0.200
- Ports Used : TCP 860, 3260
- Configuration file : /etc/tgt/targets.conf
This series will be titled Preparation for the setting up Centralized Secure Storage using iSCSI through Parts 1-3 and covers the following topics.
Installing iSCSI Target
Open terminal and use yum command to search for the package name which need to get install for iscsi target.
# yum search iscsi
Sample Output
========================== N/S matched: iscsi =======================
iscsi-initiator-utils.x86_64 : iSCSI daemon and utility programs
iscsi-initiator-utils-devel.x86_64 : Development files for iscsi-initiator-utils
lsscsi.x86_64 : List SCSI devices (or hosts) and associated information
scsi-target-utils.x86_64 : The SCSI target daemon and utility programs
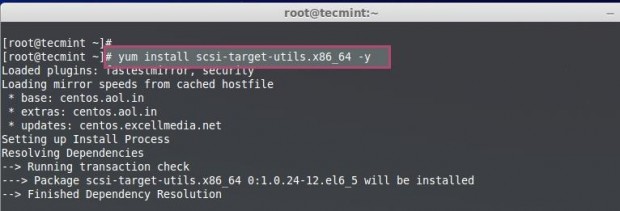
We got the search result as above, choose the Target package and install to play around.
# yum install scsi-target-utils -y
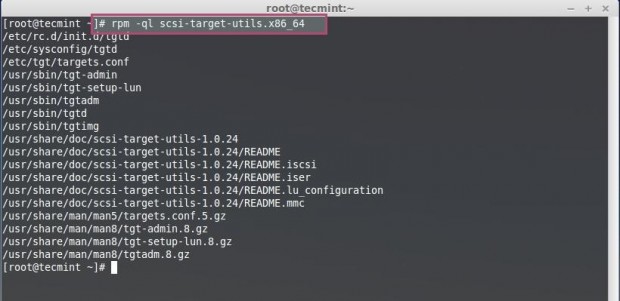
List the installed package to know the default config, service, and man page location.
# rpm -ql scsi-target-utils.x86_64
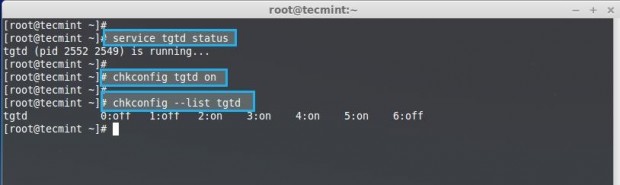
Let’s start the iSCSI Service, and check the status of Service up and running, iSCSI service named as tgtd.
# /etc/init.d/tgtd start
# /etc/init.d/tgtd status

Now we need to configure it to start Automatically while system start-up.
# chkconfig tgtd on
Next, verify that the run level configured correctly for the tgtd service.
# chkconfig --list tgtd
Let’s use tgtadm to list what targets and LUNS we currently got configured in our Server.
# tgtadm --mode target --op show
The tgtd installed up and running, but there is no Output from the above command because we have not yet defined the LUNs in Target Server. For manual page, Run ‘man‘ command.
# man tgtadm

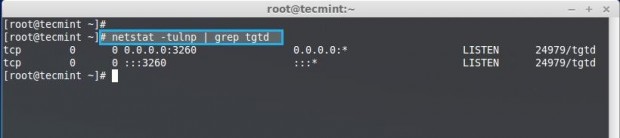
Finally we need to add iptables rules for iSCSI if there is iptables deployed in your target Server. First, find the Port number of iscsi target using following netstat command, The target always listens on TCP port 3260.
# netstat -tulnp | grep tgtd
Next add the following rules to allow iptables to Broadcast the iSCSI target discovery.
# iptables -A INPUT -i eth0 -p tcp --dport 860 -m state --state NEW,ESTABLISHED -j ACCEPT
# iptables -A INPUT -i eth0 -p tcp --dport 3260 -m state --state NEW,ESTABLISHED -j ACCEPT
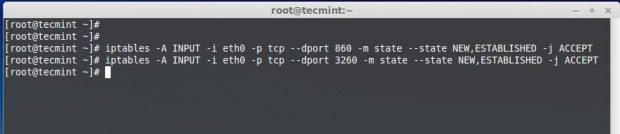
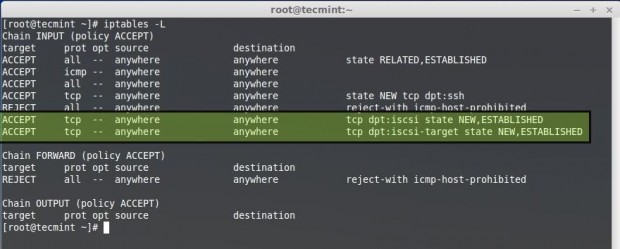
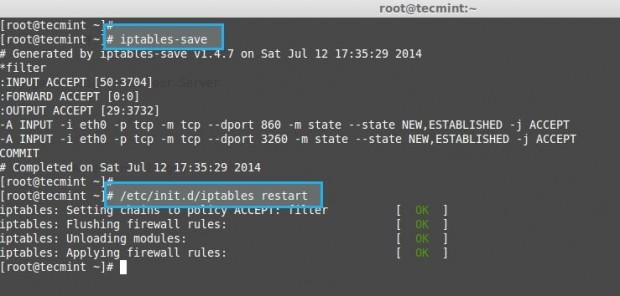
Note: Rule may vary according to your Default CHAIN Policy. Then save the Iptables and restart the iptables.
# iptables-save
# /etc/init.d/iptables restart
Here we have deployed a target server to share LUNs to any initiator which authenticating with target over TCP/IP, This suitable for small to large scale production environments too.
In my next upcoming articles, I will show you how to Create LUN’s using LVM in Target Server and how to share LUN’s on Client machines, till then stay tuned to TecMint for more such updates and don’t forget to give valuable comments.


The firewall rules mentioned have no effect in your setup as you have a REJECT all just above. Maybe
# iptables -I INPUT …
Is a better choice.
Babin,
scsi-target-utils does not seem to be working with CENTOS 7.0. 7.0 has targetcli, not tgtadm. Is there a way to install tgtadm on Centos 7.0?
Thanks,
Anil
@Anil,
I think you can install with yum as suggested..
Install pacakge using
# yum install targetcli -y
Use admin console command
# targetcli
Enable the service using system control
# systemctl enable target
I tried to follow the instructions, but am getting an error when I try to add a lun to a target:
[root@centos66 ~]# tgtadm –lld iscsi –mode target –op new –tid 1 –targetname iqn.2015-01.com.foobar:target01
[root@centos66 ~]# tgtadm –lld iscsi –mode logicalunit –op new –tid 1 –lun 1 -b /dev/iscsi_lv/lun0_lv
tgtadm: invalid request
Someone suggested I run the following command to see if iscsi target support is in my kernel, and it appears as it’s not.
grep CONFIG_ISCSI_TARGET /boot/config-`uname -r`
Do you know how you got the iscsi support in the kernel, or how to add it?
Im running CentOS 6.6
nice but need more precise
@ gaurav, Saying the truth i’am zero in scripting :D
thanku for the post sir. i would like to know how can we implement all these steps through a script (eg. python javascipt etc).
Hello..
It’s a great article , waiting for second part..
Thanks,
@ jiten Chadva, here you can find the 2nd and 3rd part.
Part – II
https://www.tecmint.com/create-luns-using-lvm-in-iscsi-target/
Part – III
https://www.tecmint.com/iscsi-initiator-client-setup/
@Tarunika Shrivastava Thanks for your precious comment, Will update soon with FC and Multipathing too.
Hi Babin,
I have read all articles of this series, Very well written.
Thank you so much.
Expecting articles for Fiber Channel setups and multipathing with it.
really awesome,
waiting for next part.
Thanks for your Valuable feedback, Follow us to get updated for next parts.
Thanks Dear, 2nd and 3rd parts will be ahead soon..
hi,
it a great articlet , waiting for second part..
Thanks,
@Medhhansh, here you can find the 2nd and 3rd part.
Part – II
https://www.tecmint.com/create-luns-using-lvm-in-iscsi-target/
Part – III
https://www.tecmint.com/iscsi-initiator-client-setup/