The Linux Foundation launched the LFCS (Linux Foundation Certified Sysadmin) certification, a shiny chance for system administrators everywhere to demonstrate, through a performance-based exam, that they are capable of performing overall operational support on Linux systems: system support, first-level diagnosing and monitoring, plus issue escalation, when required, to other support teams.
The series will be titled Preparation for the LFCS (Linux Foundation Certified Sysadmin) Parts 1 through 33 and cover the following topics:
This post is Part 6 of a 33-tutorial series, here in this part, we will explain how to assemble partitions as RAID devices and create & manage system backups, that are required for the LFCS certification exam.
Understanding RAID in Linux
The technology known as Redundant Array of Independent Disks (RAID) is a storage solution that combines multiple hard disks into a single logical unit to provide redundancy of data and/or improve performance in read / write operations to disk.
However, the actual fault tolerance and disk I/O performance lean on how the hard disks are set up to form the disk array. Depending on the available devices and the fault tolerance/performance needs, different RAID levels are defined.
You can refer to the following RAID series article for know more detailed explanation of each RAID level.
Install mdadm in Linux
Our tool of choice for creating, assembling, managing, and monitoring our software RAIDs is called mdadm (short for multiple disks admin).
$ sudo apt install mdadm         [On Debian, Ubuntu and Mint]
$ sudo yum install mdadm         [On RHEL/CentOS/Fedora and Rocky/AlmaLinux]
$ sudo zypper install mdadm      [On OpenSUSE]
Assembling Partitions as RAID Devices
The process of assembling existing partitions as RAID devices consists of the following steps.
1. Create a New Array using mdadm
If one of the partitions has been formatted previously or has been a part of another RAID array previously, you will be prompted to confirm the creation of the new array.
Assuming you have taken the necessary precautions to avoid losing important data that may have resided in them, you can safely type y and press Enter.
# mdadm --create --verbose /dev/md0 --level=stripe --raid-devices=2 /dev/sdb1 /dev/sdc1

2. Check Array Creation Status
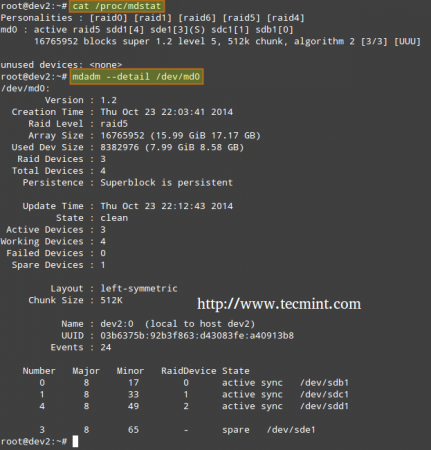
In order to check the array creation status, you will use the following commands – regardless of the RAID type. These are just as valid as when we are creating a RAID0 (as shown above), or when you are in the process of setting up a RAID5, as shown in the image below.
# cat /proc/mdstat
or
# mdadm --detail /dev/md0	[More detailed summary]
3. Format RAID Device
Format the device with a filesystem as per your needs/requirements, as explained in Part 4 of this series.
4. Monitor RAID Array Service
Instruct the monitoring service to “keep an eye” on the array. Add the output of mdadm --detail --scan to /etc/mdadm/mdadm.conf (Debian and derivatives) or /etc/mdadm.conf (CentOS / openSUSE), like so.
# mdadm --detail --scan

# mdadm --assemble --scan [Assemble the array]
To ensure the service starts on system boot, run the following commands as root.
# systemctl start mdmonitor
# systemctl enable mdmonitor
5. Check RAID Disk Failure
In RAID levels that support redundancy, replace failed drives when needed. When a device in the disk array becomes faulty, a rebuild automatically starts only if there was a spare device added when we first created the array.

Otherwise, we need to manually attach an extra physical drive to our system and run it.
# mdadm /dev/md0 --add /dev/sdX1
Where /dev/md0 is the array that experienced the issue and /dev/sdX1 is the new device.
6. Disassemble a Working Array
You may have to do this if you need to create a new array using the devices – (Optional Step).
# mdadm --stop /dev/md0 		#  Stop the array
# mdadm --remove /dev/md0 		# Remove the RAID device
# mdadm --zero-superblock /dev/sdX1 	# Overwrite the existing md superblock with zeroes
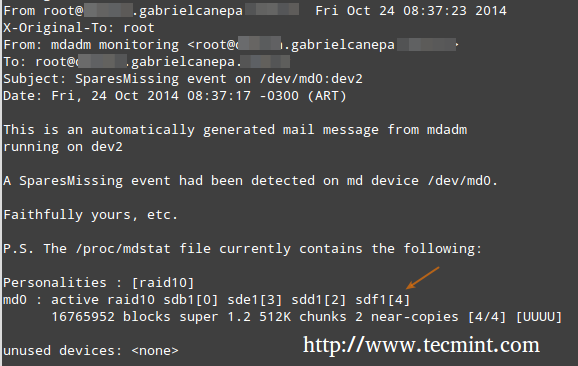
7. Create Mail Alerts
You can configure a valid email address or system account to send alerts to (make sure you have this line in mdadm.conf). – (Optional Step)
MAILADDR root
In this case, all alerts that the RAID monitoring daemon collects will be sent to the local root account’s mailbox. One of such alerts looks like the following.
Note: This event is related to the example in STEP 5, where a device was marked as faulty and the spare device was automatically built into the array by mdadm. Thus, we “ran out” of healthy spare devices and we got the alert.
Understanding RAID Levels in Linux
Here’s a brief overview of common RAID levels:
RAID 0
The total array size is n times the size of the smallest partition, where n is the number of independent disks in the array (you will need at least two drives). Run the following command to assemble a RAID 0 array using partitions /dev/sdb1 and /dev/sdc1.
# mdadm --create --verbose /dev/md0 --level=stripe --raid-devices=2 /dev/sdb1 /dev/sdc1
Common Uses: Setups that support real-time applications where performance is more important than fault tolerance.
RAID 1 (aka Mirroring)
The total array size equals the size of the smallest partition (you will need at least two drives). Run the following command to assemble a RAID 1 array using partitions /dev/sdb1 and /dev/sdc1.
# mdadm --create --verbose /dev/md0 --level=1 --raid-devices=2 /dev/sdb1 /dev/sdc1
Common Uses: Installation of the operating system or important subdirectories, such as /home.
RAID 5 (aka drives with Parity)
The total array size will be (n – 1) times the size of the smallest partition. The “lost” space in (n-1) is used for parity (redundancy) calculation (you will need at least three drives).
Note that you can specify a spare device (/dev/sde1 in this case) to replace a faulty part when an issue occurs. Run the following command to assemble a RAID 5 array using partitions /dev/sdb1, /dev/sdc1, /dev/sdd1, and /dev/sde1 as spare.
# mdadm --create --verbose /dev/md0 --level=5 --raid-devices=3 /dev/sdb1 /dev/sdc1 /dev/sdd1 --spare-devices=1 /dev/sde1
Common uses: Web and file servers.
RAID 6 (aka Drives with Double Parity
The total array size will be (n*s)-2*s, where n is the number of independent disks in the array and s is the size of the smallest disk. Note that you can specify a spare device (/dev/sdf1 in this case) to replace a faulty part when an issue occurs.
Run the following command to assemble a RAID 6 array using partitions /dev/sdb1, /dev/sdc1, /dev/sdd1, /dev/sde1, and /dev/sdf1 as spare.
# mdadm --create --verbose /dev/md0 --level=6 --raid-devices=4 /dev/sdb1 /dev/sdc1 /dev/sdd1 /dev/sde --spare-devices=1 /dev/sdf1
Common Uses: File and backup servers with large capacity and high availability requirements.
RAID 1+0 (aka Stripe of Mirrors)
The total array size is computed based on the formulas for RAID 0 and RAID 1 since RAID 1+0 is a combination of both. First, calculate the size of each mirror and then the size of the stripe.
Note that you can specify a spare device (/dev/sdf1 in this case) to replace a faulty part when an issue occurs. Run the following command to assemble a RAID 1+0 array using partitions /dev/sdb1, /dev/sdc1, /dev/sdd1, /dev/sde1, and /dev/sdf1 as spare.
# mdadm --create --verbose /dev/md0 --level=10 --raid-devices=4 /dev/sd[b-e]1 --spare-devices=1 /dev/sdf1
Common Uses: Database and application servers that require fast I/O operations.
Creating and Managing System Backups in Linux
It never hurts to remember that RAID with all its bounties IS NOT A REPLACEMENT FOR BACKUPS! Write it 1000 times on the chalkboard if you need to, but make sure you keep that idea in mind at all times.
Before we begin, we must note that there is no one-size-fits-all solution for system backups, but here are some things that you need to take into account while planning a backup strategy.
- What do you use your system for? (Desktop or server? If the latter case applies, what are the most critical services – whose configuration would be a real pain to lose?)
- How often do you need to take backups of your system?
- What is the data (e.g. files/directories/database dumps) that you want to backup? You may also want to consider if you really need to backup huge files (such as audio or video files).
- Where (meaning physical place and media) will those backups be stored?
1. Backup Drives Using dd Command
Backup entire drives with the dd command. You can either back up an entire hard disk or a partition by creating an exact image at any point in time. Note that this works best when the device is offline, meaning it’s not mounted and there are no processes accessing it for I/O operations.
The downside of this backup approach is that the image will have the same size as the disk or partition, even when the actual data occupies a small percentage of it.
For example, if you want to image a partition of 20 GB that is only 10% full, the image file will still be 20 GB in size. In other words, it’s not only the actual data that gets backed up, but the entire partition itself. You may consider using this method if you need exact backups of your devices.
Creating a Partition Image
# dd if=/dev/sda of=/system_images/sda.img
OR
--------------------- Alternatively, you can compress the image file ---------------------
# dd if=/dev/sda | gzip -c > /system_images/sda.img.gz
Restoring a Partition Image
# dd if=/system_images/sda.img of=/dev/sda
OR
# gzip -dc /system_images/sda.img.gz | dd of=/dev/sda
2. Backup Files Using tar Command
Backup certain files / directories with tar command – already covered in Part 3 of this series. You may consider using this method if you need to keep copies of specific files and directories (configuration files, users’ home directories, and so on).
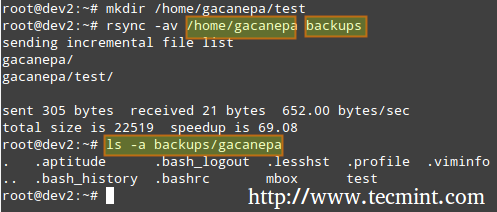
2. Backup and Sync Files Using rsync Command
Synchronize files with the rsync command, which is a versatile remote (and local) file-copying tool. If you need to backup and synchronize your files to/from network drives, rsync is a go.
Whether you’re synchronizing two local directories or local < --- > remote directories mounted on the local filesystem, the basic syntax is the same.
Synchronizing Two Local Directories
# rsync -av source_directory destination directory
Where, -a recurse into subdirectories (if they exist), preserve symbolic links, timestamps, permissions, and original owner / group and -v verbose.
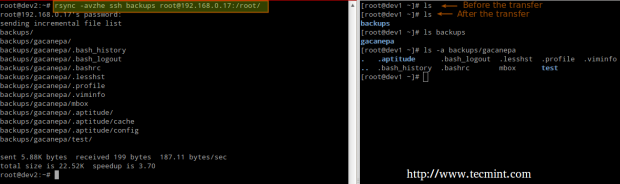
In addition, if you want to increase the security of the data transfer over the wire, you can use ssh over rsync.
Synchronizing Local → Remote Directories Over SSH
# rsync -avzhe ssh backups root@remote_host:/remote_directory/
This example will synchronize the backup directory on the local host with the contents of /root/remote_directory on the remote host.
Where the -h option shows file sizes in human-readable format, and the -e flag is used to indicate an SSH connection.
Synchronizing Remote → Local Directories Over SSH
In this case, switch the source and destination directories from the previous example.
# rsync -avzhe ssh root@remote_host:/remote_directory/ backups
Please note that these are only 3 examples (most frequent cases you’re likely to run into) of the use of rsync. For more examples and usages of rsync commands can be found at the following article.
Summary
As a sysadmin, you need to ensure that your systems perform as well as possible. If you’re well prepared, and if the integrity of your data is well supported by storage technology such as RAID and regular system backups, you’ll be safe.
The LFCS eBook is available now for purchase. Order your copy today and start your journey to becoming a certified Linux system administrator!
| Product Name | Price | Buy |
|---|---|---|
| The Linux Foundation’s LFCS Certification Preparation Guide | $19.99 | [Buy Now] |
Last, but not least, please consider buying your exam voucher using the following links to earn us a small commission, which will help us keep this book updated.
If you have questions, comments, or further ideas on how this article can be improved, feel free to speak out below. In addition, please consider sharing this series through your social network profiles.


Just a minute tidbit, as of March 1st, 2015, The Linux Foundation has replaced RAID with LVM in the LFCS Domains / Compentencies, so it would be fantastic if this article could be rewritten or replaced to reflect the slight change in test objectives. Thanks for your contributions, @Gabriel!
Barry thank you for you comment!!!
@Bekzot,
Thanks for bringing that to our attention. That is indeed a typo – I will notify the owner of the site to correct it ASAP.
FYI, there is another typo here:
# mdadm –create –verbose /.dev/md0 –level=5 –raid-devices=3 /dev/sdb1 /dev/sdc1 /dev/sdd1 –spare-devices=1 /dev/sde1
(There should be no dot between the forward slash and the word dev – after the verbose directive)
@Gabriel,
corrected the typo in the write-up..
Thank you.
I think here is a typo below:
Restoring the backup from the image file
# dd if=/system_images/sda.img of=/dev/sdc
Should it be /dev/sda? or you intentionally restoring the data to /dev/sdc?
@Bekzot,
Thanks for pointing out, yes that was a typo and we’ve corrected….