Have you ever encountered situations where one application dominated your network bandwidth? If you have ever been in a situation where one application ate all your traffic, then you will value the role of the trickle bandwidth shaper application.
Whether you are a system admin or just a Linux user, you need to learn how to control the upload and download speeds for applications to make sure that your network bandwidth is not burned by a single application.
What is Trickle?
Trickle is a network bandwidth shaper tool that allows us to manage the upload and download speeds of applications in order to prevent any single one of them to hog all (or most) of the available bandwidth.
In a few words, trickle lets you control the network traffic rate on a per-application basis, as opposed to per-user control, which is the classic example of bandwidth shaping in a client-server environment, and is probably the setup we are more familiar with.
How Trickle Works?
In addition, a trickle can help us to define priorities on a per-application basis so that when overall limits have been set for the entire system, priority apps will still get more bandwidth automatically.
To accomplish this task, the trickle sets traffic limits to the way in which data is sent to and received from, sockets using TCP connections. We must note that other than the data transfer rates, trickle does not modify in any way the behavior of the process it is shaping at any given moment.
What Can’t Trickle Do?
The only limitation, so to speak, is that trickle will not work with statically linked applications or binaries with the SUID or SGID bits set since it uses dynamic linking and loading to place itself between the shaped process and its associated network socket. Trickle then acts as a proxy between these two software components.
Since trickle does not require superuser privileges in order to run, users can set their own traffic limits. Since this may not be desirable, we will explore how to set overall limits that system users cannot exceed. In other words, users will still be able to manage their traffic rates, but always within the boundaries set by the system administrator.
Testing Environment
In this article, we will explain how to limit the network bandwidth used by applications in a Linux server with a trickle.
To generate the necessary traffic, we will use ncftpput and ncftpget (both tools are available by installing ncftp) on the client (CentOS server – dev1: 192.168.0.17), and vsftpd on the server (Debian – dev2: 192.168.0.15) for demonstration purposes.
The same instructions also work on RHEL-based and Debian-based distributions such as Ubuntu and Linux Mint.
How to Install ncftp and vsftpd in Linux
1. For RedHat-based distributions, you need to enable the EPEL repository, which is a repository of high-quality free and open-source software maintained by the Fedora project.
Install EPEL on RHEL 9:
sudo subscription-manager repos --enable codeready-builder-for-rhel-9-$(arch)-rpms
sudo dnf install https://dl.fedoraproject.org/pub/epel/epel-release-latest-9.noarch.rpm
Install EPEL on CentOS 9, AlmaLinux 9, Rocky Linux 9:
sudo dnf config-manager --set-enabled crb
sudo dnf install epel-release
Install EPEL on RHEL 8:
sudo subscription-manager repos --enable codeready-builder-for-rhel-8-$(arch)-rpms
sudo dnf install https://dl.fedoraproject.org/pub/epel/epel-release-latest-8.noarch.rpm
Install EPEL on CentOS 8, AlmaLinux 8, Rocky Linux 8:
sudo dnf config-manager --set-enabled powertools
sudo dnf install epel-release
2. Next, install ncftp as follows.
sudo dnf install ncftp         [On RHEL/CentOS/Fedora and Rocky/AlmaLinux]
sudo apt install ncftp         [On Debian, Ubuntu and Mint]
3. Set up an FTP server in a separate server. Please note that although FTP is inherently insecure, it is still widely used in cases when security in uploading or downloading files is not needed.
We are using it in this article to illustrate the bounties of trickle and because it shows the transfer rates in stdout on the client, and we will leave the discussion of whether it should or should not be used for another date and time.
sudo dnf install vsftpd         [On RHEL/CentOS/Fedora and Rocky/AlmaLinux]
sudo apt install vsftpd         [On Debian, Ubuntu and Mint]
Now, edit the /etc/vsftpd/vsftpd.conf file on the FTP server as follows:
$ sudo nano /etc/vsftpd/vsftpd.conf
OR
$ sudo nano /etc/vsftpd.conf
Make the following changes:
anonymous_enable=NO
local_enable=YES
chroot_local_user=YES
allow_writeable_chroot=YES
After that, make sure to start vsftpd for your current session and enable it for automatic start on future boots:
sudo systemctl start vsftpd
sudo systemctl enable vsftpd
sudo systemctl status vsftpd
4. If you choose to set up the FTP server in a CentOS/RHEL droplet with SSH keys for remote access, you will need a password-protected user account with the appropriate directory and file permissions for uploading and downloading the desired content OUTSIDE root’s home directory.
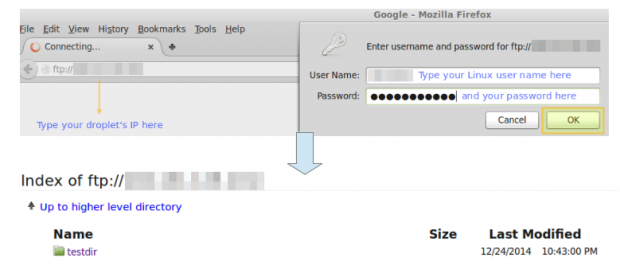
You can then browse to your home directory by entering the following URL in your browser. A login window will pop up prompting you for a valid user account and password on the FTP server.
ftp://192.168.0.15
If the authentication succeeds, you will see the contents of your home directory. Later in this tutorial, you will be able to refresh that page to display the files that have been uploaded during previous steps.
How to Install Trickle in Linux
Now install trickle via yum or apt.
To ensure a successful installation, it is considered good practice to make sure the currently installed packages are up-to-date (using yum update) before installing the tool itself.
sudo yum -y update && sudo yum  install trickle  [On RedHat based systems]
sudo apt -y update && sudo apt install trickle 	 [On Debian based systems]
Verify whether the trickle will work with the desired binary. As we explained earlier, the trickle will only work with binaries using dynamic or shared libraries.
To verify whether we can use this tool with a certain application, we can use the well-known ldd utility, where ldd stands for list dynamic dependencies.
Specifically, we will look for the presence of glibc (the GNU C library) in the list of dynamic dependencies of any given program because it is precisely that library that defines the system calls involved in communication through sockets.
Run the following command against a given binary to see if trickle can be used to shape its bandwidth:
sudo ldd $(which [binary]) | grep libc.so
For example,
sudo ldd $(which ncftp) | grep libc.so
whose output is:
sudo libc.so.6 => /lib64/libc.so.6 (0x00007efff2e6c000)
The string between brackets in the output may change from system to system and even between subsequent runs of the same command since it represents the load address of the library in physical memory.
If the above command does not return any results, it means that the binary it was run against does not use libc, and thus trickle cannot be used as bandwidth shaper in that case.
Learn How to Use Trickle in Linux
The most basic usage of trickle is in standalone mode. Using this approach, the trickle is used to explicitly define the download and upload speeds of a given application. As we explained earlier, for the sake of brevity, we will use the same application for download and upload tests.
Running Trickle in Standalone Mode
We will compare the download and upload speeds with and without using trickle. The -d option indicates the download speed in KB/s, while the -u flag tells trickle to limit the upload speed by the same unit. In addition, we will use the -s flag, which specifies that trickle should run in standalone mode.
The basic syntax to run trickle in standalone mode is as follows:
sudo trickle -s -d [download rate in KB/s] -u [upload rate in KB/s]
In order to perform the following examples on your own, make sure to have trickle and ncftp installed on the client machine (192.168.0.17 in my case).
Example 1: Uploading a 2.8MB File With and Without Trickle
We are using the freely distributable Linux Fundamentals PDF file (available from here) for the following tests.
You can initially download this file to your current working directory with the following wget command:
wget http://linux-training.be/files/books/LinuxFun.pdf
The syntax to upload a file to our FTP server without trickle is as follows:
sudo ncftpput -u username -p password 192.168.0.15 /remote_directory local-filename
Where /remote_directory is the path of the upload directory relative to the username’s home, and local-filename is a file in your current working directory.
Specifically, without trickle, we get a peak upload speed of 52.02 MB/s (please note that this is not the real average upload speed, but an instant starting peak), and the file gets uploaded almost instantly:
sudo ncftpput -u username -p password 192.168.0.15 /testdir LinuxFun.pdf
Output:
LinuxFun.pdf: 2.79 MB 52.02 MB/s
With trickle, we will limit the upload transfer rate to 5 KB/s. Before uploading the file for the second time, we need to delete it from the destination directory.
Otherwise, ncftp will inform us that the file at the destination directory is the same that we are trying to upload, and will not perform the transfer:
rm /absolute/path/to/destination/directory/LinuxFun.pdf
Then:
trickle -s -u 5 ncftpput -u username -p password 111.111.111.111 /testdir LinuxFun.pdf
Output:
LinuxFun.pdf: 2.79 MB 4.94 kB/s
In the example above, we can see that the average upload speed dropped to ~5 KB/s.
Example 2: Downloading the Same 2.8MB File With and Without Trickle
First, remember to delete the PDF from the original source directory:
rm /absolute/path/to/source/directory/LinuxFun.pdf
Please note that the following cases will download the remote file to the current directory in the client machine. This fact is indicated by the period (‘.‘) that appears after the IP address of the FTP server.
Without trickle:
ncftpget -u username -p password 111.111.111.111 . /testdir/LinuxFun.pdf
Output:
LinuxFun.pdf: 2.79 MB 260.53 MB/s
With trickle, limiting the download speed at 20 KB/s:
trickle -s -d 30 ncftpget -u username -p password 111.111.111.111 . /testdir/LinuxFun.pdf
Output:
LinuxFun.pdf: 2.79 MB 17.76 kB/s
Running Trickle in Supervised [unmanaged] Mode
Trickle can also run in unmanaged mode, following a series of parameters defined in /etc/trickled.conf. This file defines how trickled (the daemon) behaves and manages trickle.
In addition, if we want to set global settings to be used, overall, by all applications, we will need to use the trickled command. This command runs the daemon and allows us to define download and upload limits that will be shared by all the applications run through trickle without us needing to specify limits each time.
For example, running:
trickled -d 50 -u 10
This will cause the download and upload speeds of any application run through trickle to be limited to 30 KB/s and 10 KB/s, respectively.
Please note that you can check at any time whether trickled is running and with what arguments:
ps -ef | grep trickled | grep -v grep
Output:
root 16475 1 0 Dec24 ? 00:00:04 trickled -d 50 -u 10
Example 3: Uploading a 19MB MP4 File to FTP Server Using Trickle
In this example we will use the freely-distributable “He is the gift” video, available for download from this link.
We will initially download this file to your current working directory with the following command:
wget http://media2.ldscdn.org/assets/missionary/our-people-2014/2014-00-1460-he-is-the-gift-360p-eng.mp4
First off, we will start the trickled daemon with the command listed above:
trickled -d 30 -u 10
Without trickle:
ncftpput -u username -p password 192.168.0.15 /testdir 2014-00-1460-he-is-the-gift-360p-eng.mp4
Output:
2014-00-1460-he-is-the-gift-360p-eng.mp4: 18.53 MB 36.31 MB/s
With trickle:
trickle ncftpput -u username -p password 192.168.0.15 /testdir 2014-00-1460-he-is-the-gift-360p-eng.mp4
Output:
2014-00-1460-he-is-the-gift-360p-eng.mp4: 18.53 MB 9.51 kB/s
As we can see in the output above, the upload transfer rate dropped to ~10 KB/s.
Example 4: Downloading the Same Video With Trickle
As in Example 2, we will be downloading the file to the current working directory.
Without trickle:
ncftpget -u username -p password 192.168.0.15 . /testdir/2014-00-1460-he-is-the-gift-360p-eng.mp4
Output:
2014-00-1460-he-is-the-gift-360p-eng.mp4: 18.53 MB 108.34 MB/s
With trickle:
trickle ncftpget -u username -p password 111.111.111.111 . /testdir/2014-00-1460-he-is-the-gift-360p-eng.mp4
Output:
2014-00-1460-he-is-the-gift-360p-eng.mp4: 18.53 MB 29.28 kB/s
Which is in accordance with the download limit set earlier (30 KB/s).
Note: That once the daemon has been started, there is no need to set individual limits for each application that uses trickle.
As we mentioned earlier, one can further customize trickle’s bandwidth shaping through trickled.conf. A typical section in this file consists of the following:
[service]
Priority = <value>
Time-Smoothing = <value>
Length-Smoothing = <value>
Where,
- [service] indicates the name of the application whose bandwidth usage we intend to shape.
- Priority allows us to specify a service to have a higher priority relative to another, thus not allowing a single application to hog all the bandwidth that the daemon is managing. The lower the number, the more bandwidth that is assigned to [service].
- Time-Smoothing [in seconds]: defines with what time intervals trickled will try to let the application transfer and/or receive data. Smaller values (something between the range of 0.1 – 1s) are ideal for interactive applications and will result in a more continuous (smooth) session while slightly larger values (1 – 10 s) are better for applications that need bulk transfer. If no value is specified, the default (5 s) is used.
- Length-Smoothing [in KB]: the idea is the same as in Time-Smoothing, but based on the length of an I/O operation. If no value is specified, the default (10 KB) is used.
Changing the smoothing values will translate into the application specified by [service] using transfer rates within an interval instead of a fixed value. Unfortunately, there is no formula to calculate the lower and upper limits of this interval as it mainly depends of each specific case scenario.
The following is a trickled.conf sample file in the CentOS 7 client (192.168.0.17):
[ssh]
Priority = 1
Time-Smoothing = 0.1
Length-Smoothing = 2

[ftp]
Priority = 2
Time-Smoothing = 1
Length-Smoothing = 3
Using this setup, trickled will prioritize SSH connections over FTP transfers. Note that an interactive process, such as SSH, uses smaller time-smoothing values, whereas a service that performs bulk data transfers (FTP) uses a greater value.
The smoothing values are responsible for the download and upload speeds in our previous example not matching the exact value specified by the trickled daemon but moving in an interval close to it.
[ You might also like: How to Secure and Harden OpenSSH Server ]
Conclusion
In this article, we have explored how to limit the bandwidth used by applications using trickle on Fedora-based distributions and Debian / derivatives. Other possible use cases include, but are not limited to:
- Limiting the download speed via a system utility such as wget, or a torrent client, for example.
- Limiting the speed at which your system can be updated via `yum` (or `aptitude`, if you’re in a Debian-based system), the package management system.
- If your server happens to be behind a proxy or firewall (or is the proxy or firewall itself), you can use trickle to set limits on both the download and upload or communication speed with the clients or the outside.
Questions and comments are most welcome. Feel free to use the form below to send them our way.


can i use this in cpanel server to throttled a specific user ?
@Abu,
Yes you can, just follow the instructions as shown in this article and setup bandwidth throttling per user.
Hi,
How to limite bandwidth only when needed.
Ex: I want use app1 to download on a system with total bandwidth of 800 ko/s
# trickle -d 600 foo_app1
To let 200 ko/s to other apps.
How call ‘trickle’ to tell it to use all Bandwidth when other app are finish to use bandwidth remaining ?
I haven’t see no options in man page.
Perhaps another app do that?
Thanks
Hi,
How can i change the transfer rate if ftp? please reply to my mail id.
Sandip Singh
If any user figures out how to run your app without trickle your bandwidth management no longer works. You need method that are part of the kernel for proper bandwidth management.
@cybernard,
Would you be as kind as to share a specific example of how an user would be able to do that? Please notice that we covered this possibility near the bottom of the article. If you make an experiment and are able to fool trickle, please report back with the specifics so we can edit the article accordingly. Thank you!
This is very interesting but a bit redundant. Cgroups (control groups) is built into the kernel and provides awesome control over an application’s usage of not only network but mem, CPU, disk I/o and more. This is taken to the next level by containers and docker which provide better tooling and automation to make more easily use cgroups and other plumbing built into the os.
I highly recommend spending your time learning docker and the other container tooling as this is the future for better designed apps and this skill set is in VERY high demand right now.
@Terry,
Thanks for taking the time to share such a well-supported and informative comment. You are SO right about docker. The reason why we published this article is because it outlines the basics of network bandwidth shaping. We will consider writing and publishing a docker series in the near future once we’re done with the RHCSA and RHCE series.
Hello
Trickled can work along side Default TC-HTB-QoS class rules ?
@Chetan,
I must admit that I don’t know. Feel free to give it a try and post back your findings. We will all appreciate that.
You can use force_bind to set a mark per application, and then you can use HTB to do the matching.
Check http://kernel.embedromix.ro/us/ – see examples 13 and 14.
Thanks for sharing your thoughts on bandwidth
limit in linux. Regards
@logbook,
Thank you for taking the time to comment on this article. Feel free to share it through your social network profiles.
Will it control smtp or postfix ?
Yes it can because smtp and postfix works TCP. So, it should work
Can i used trickle in server / router so i can control download rate for all my client ?
@Edward,
Unfortunately, trickle was not intended to work in a client-server architecture. In other words, it will only shape traffic on the host where it is installed.