RAID is Redundant Array of Inexpensive disks, used for high availability and reliability in large scale environments, where data need to be protected than normal use. Raid is just a collection of disks in a pool to become a logical volume and contains an array. A combine drivers makes an array or called as set of (group).
RAID can be created, if there are minimum 2 number of disk connected to a raid controller and make a logical volume or more drives can be added in an array according to defined RAID Levels. Software Raid are available without using Physical hardware those are called as software raid. Software Raid will be named as Poor man raid.
Main concept of using RAID is to save data from Single point of failure, means if we using a single disk to store the data and if it’s failed, then there is no chance of getting our data back, to stop the data loss we need a fault tolerance method. So, that we can use some collection of disk to form a RAID set.
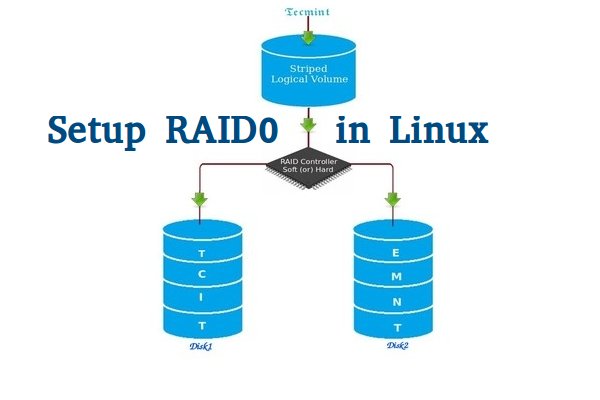
What is Stripe in RAID 0?
Stripe is striping data across multiple disk at the same time by dividing the contents. Assume we have two disks and if we save content to logical volume it will be saved under both two physical disks by dividing the content. For better performance RAID 0 will be used, but we can’t get the data if one of the drive fails. So, it isn’t a good practice to use RAID 0. The only solution is to install operating system with RAID0 applied logical volumes to safe your important files.
- RAID 0 has High Performance.
- Zero Capacity Loss in RAID 0. No Space will be wasted.
- Zero Fault Tolerance ( Can’t get back the data if any one of disk fails).
- Write and Reading will be Excellent.
Requirements
Minimum number of disks are allowed to create RAID 0 is 2, but you can add more disk but the order should be twice as 2, 4, 6, 8. If you have a Physical RAID card with enough ports, you can add more disks.
Here we are not using a Hardware raid, this setup depends only on Software RAID. If we have a physical hardware raid card we can access it from it’s utility UI. Some motherboard by default in-build with RAID feature, there UI can be accessed using Ctrl+I keys.
If you’re new to RAID setups, please read our earlier article, where we’ve covered some basic introduction of about RAID.
My Server Setup
Operating System :	CentOS 6.5 Final
IP Address	 :	192.168.0.225
Two Disks	 :	20 GB each
This article is Part 2 of a 9-tutorial RAID series, here in this part, we are going to see how we can create and setup Software RAID0 or striping in Linux systems or servers using two 20GB disks named sdb and sdc.
Step 1: Updating System and Installing mdadm for Managing RAID
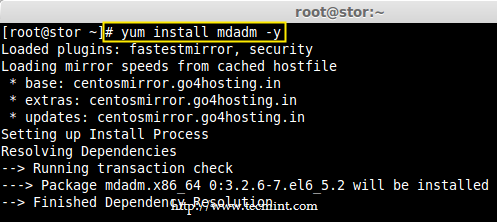
1. Before setting up RAID0 in Linux, let’s do a system update and then install ‘mdadm‘ package. The mdadm is a small program, which will allow us to configure and manage RAID devices in Linux.
# yum clean all && yum update
# yum install mdadm -y
Step 2: Verify Attached Two 20GB Drives
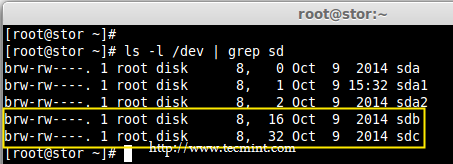
2. Before creating RAID 0, make sure to verify that the attached two hard drives are detected or not, using the following command.
# ls -l /dev | grep sd
3. Once the new hard drives detected, it’s time to check whether the attached drives are already using any existing raid with the help of following ‘mdadm’ command.
# mdadm --examine /dev/sd[b-c]
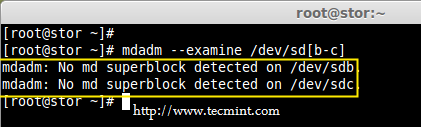
In the above output, we come to know that none of the RAID have been applied to these two sdb and sdc drives.
Step 3: Creating Partitions for RAID
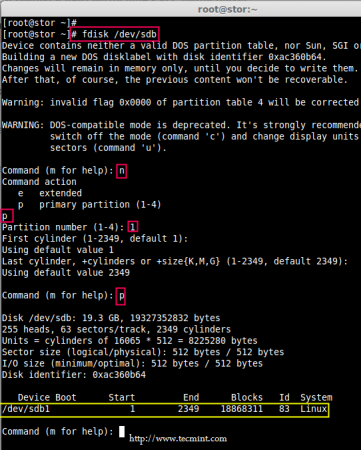
4. Now create sdb and sdc partitions for raid, with the help of following fdisk command. Here, I will show how to create partition on sdb drive.
# fdisk /dev/sdb
Follow below instructions for creating partitions.
- Press ‘n‘ for creating new partition.
- Then choose ‘P‘ for Primary partition.
- Next select the partition number as 1.
- Give the default value by just pressing two times Enter key.
- Next press ‘P‘ to print the defined partition.
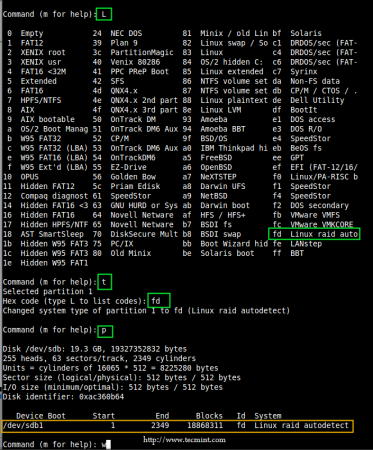
Follow below instructions for creating Linux raid auto on partitions.
- Press ‘L‘ to list all available types.
- Type ‘t‘to choose the partitions.
- Choose ‘fd‘ for Linux raid auto and press Enter to apply.
- Then again use ‘P‘ to print the changes what we have made.
- Use ‘w‘ to write the changes.
Note: Please follow same above instructions to create partition on sdc drive now.
5. After creating partitions, verify both the drivers are correctly defined for RAID using following command.
# mdadm --examine /dev/sd[b-c]
# mdadm --examine /dev/sd[b-c]1

Step 4: Creating RAID md Devices
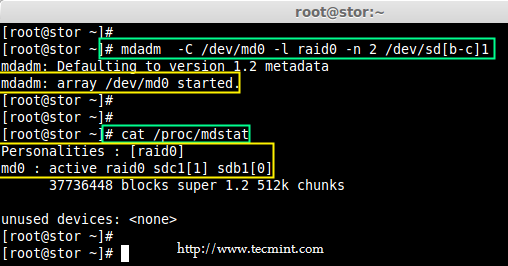
6. Now create md device (i.e. /dev/md0) and apply raid level using below command.
# mdadm -C /dev/md0 -l raid0 -n 2 /dev/sd[b-c]1
# mdadm --create /dev/md0 --level=stripe --raid-devices=2 /dev/sd[b-c]1
- -C – create
- -l – level
- -n – No of raid-devices
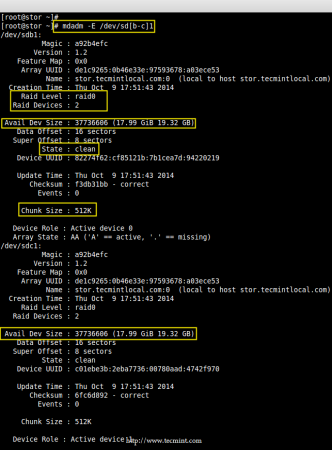
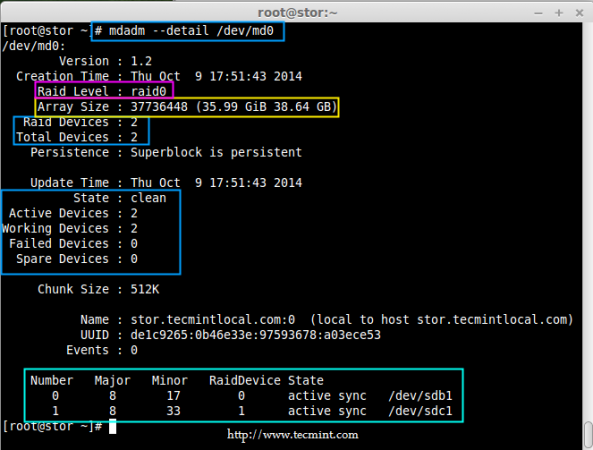
7. Once md device has been created, now verify the status of RAID Level, Devices and Array used, with the help of following series of commands as shown.
# cat /proc/mdstat
# mdadm -E /dev/sd[b-c]1
# mdadm --detail /dev/md0
Step 5: Assiging RAID Devices to Filesystem
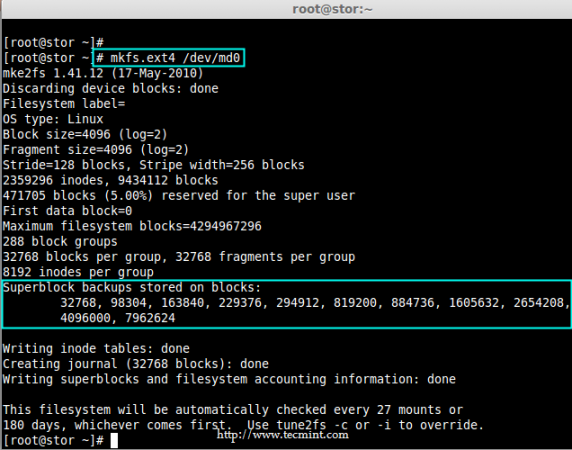
8. Create a ext4 filesystem for a RAID device /dev/md0 and mount it under /dev/raid0.
# mkfs.ext4 /dev/md0
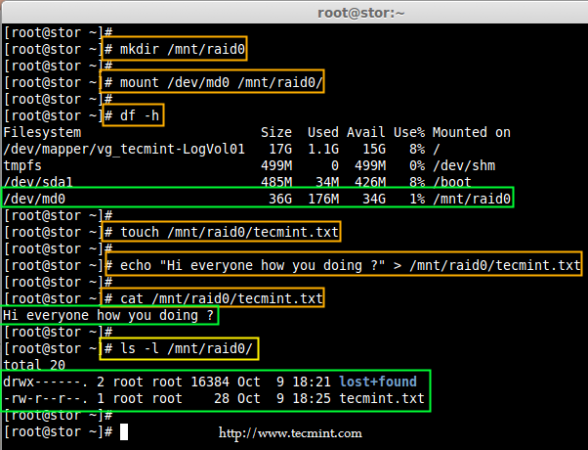
9. Once ext4 filesystem has been created for Raid device, now create a mount point directory (i.e. /mnt/raid0) and mount the device /dev/md0 under it.
# mkdir /mnt/raid0
# mount /dev/md0 /mnt/raid0/
10. Next, verify that the device /dev/md0 is mounted under /mnt/raid0 directory using df command.
# df -h
11. Next, create a file called ‘tecmint.txt‘ under the mount point /mnt/raid0, add some content to the created file and view the content of a file and directory.
# touch /mnt/raid0/tecmint.txt
# echo "Hi everyone how you doing ?" > /mnt/raid0/tecmint.txt
# cat /mnt/raid0/tecmint.txt
# ls -l /mnt/raid0/
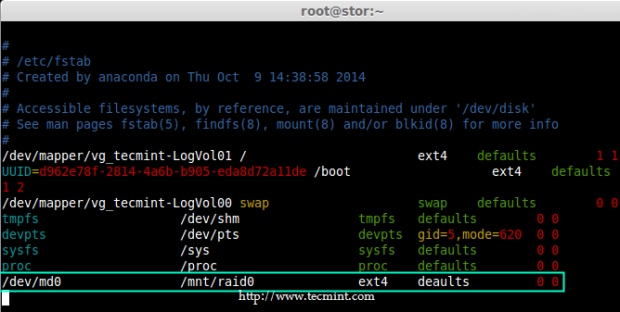
12. Once you’ve verified mount points, it’s time to create an fstab entry in /etc/fstab file.
# vim /etc/fstab
Add the following entry as described. May vary according to your mount location and filesystem you using.
/dev/md0 /mnt/raid0 ext4 defaults 0 0
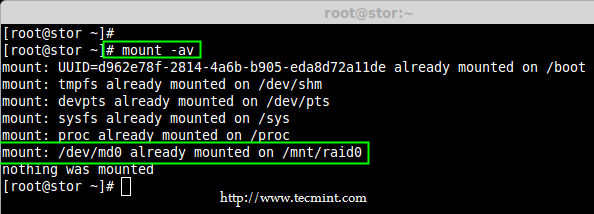
13. Run mount ‘-a‘ to check if there is any error in fstab entry.
# mount -av
Step 6: Saving RAID Configurations
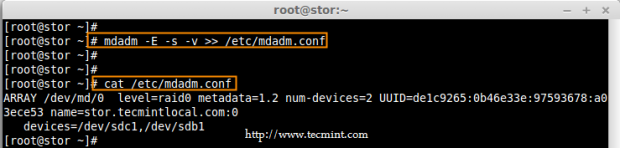
14. Finally, save the raid configuration to one of the file to keep the configurations for future use. Again we use ‘mdadm’ command with ‘-s‘ (scan) and ‘-v‘ (verbose) options as shown.
# mdadm -E -s -v >> /etc/mdadm.conf
# mdadm --detail --scan --verbose >> /etc/mdadm.conf
# cat /etc/mdadm.conf
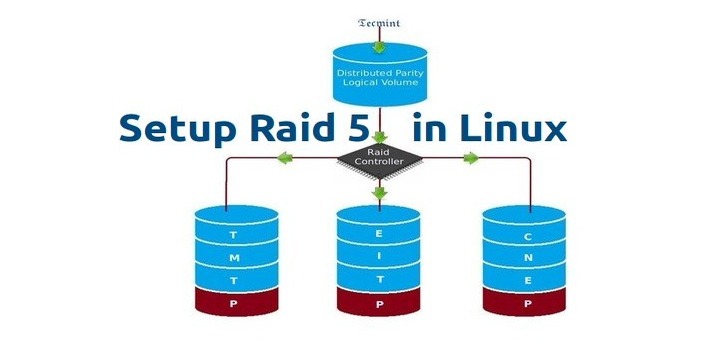
That’s it, we have seen here, how to configure RAID0 striping with raid levels by using two hard disks. In next article, we will see how to setup RAID5.

So, when messing around with this, how does one undo the changes made? It did not work, but not I can’t stop it.
mdadm: Cannot get exclusive access to /dev/md0:Perhaps a running process, mounted filesystem, or active volume group?
Thoughts?
In step 6 you also need to add “
update-initramfs -u” if you are running a Debian install. otherwise, the steps are the same. if you don’t run that command, you will boot into emergency mode.Thanks for the guide!
I am having trouble with setting up my RAID 0 Array following this guide and everything goes as expected until I look at the available space when I am done. I am only seeing half of my drive capacity. I am running Plex Media Server on Centos7.
The way I initially set this up was I use a 120gb SSD for the OS, I use a second 120gb SSD for transcoding video. I initially set this server up with Software RAID 5 using 12 old 500gb hard drives, after having at least 2 drives fail, I ripped them all out and purchased 2 new 4TB WD drives.
With some help, we cleared out the software raid info and got the server ready for the 2 new drives. I ran through this guide step by step and at the end, I see 4TB of available space. Any ideas on what I am doing wrong?
I am a Linux newbie and I have never used Linux professionally.
I have have been using Linux only on my home PC and via virtualbox labs, but I must admin that through this website I can see the light at the end of the tunnel and I am feeling more confident to accept a Linux sysadmin job now.
As for Babin you are the main man and I would like you to do a session covering how to get the following right on a virtualbox lab, confirgure DNS, DHCP and VPN for both CentOS and Ubuntu
Thank you all for such an amazing job.
Hi Babin,
We are facing serious issue with RAID-0, we have created RAID-0 using your article in our Production environment. Now the scenario is our RAID-0 disks
/mount point got 100% utilized and we want to extend the same RAID-0 volume.I have tried to extend the existing RAID-0 array by adding new disk to server. And uses your article Grow Raid Array in Linux to extend the RAID array, but it got failed and it converted existing RAID-0 to RAID-4 and gone in to inactive state.
Also one of the existing disk got out of RAID-0 array and giving error “mdadm: /dev/md0 is not an active md array – aborting“.
I do have error screenshot file. Please let me know on which email ID I should send to you.
Important : Please help to learn us, how to extend existing RAID-0 array in Linux.
Hi Manoj, I am having the same scenario. I have created a raid 0 setup with 2 disks of 50 GB, now disk has been utilized to 100%. Can you please help which document to follow to add new disks in raid array so that my data will be intact
Is it possible to monitor RAID0 failover events. I set-up RAID 0 on a test environment with 2 disks of 1 GB each. Then i removed one of the disk of the disk on a running system. But still I am able to work properly on my RAID 0 filesystem of 2 GB i.e. I am able to create a new file of 2GB.
Although I have monitor mode setup via mdadm but i believe thats not gonna work as the man page suggests “Monitor one or more md devices and act on any state changes. This is only meaningful for RAID1, 4, 5, 6, 10 or multipath arrays, as only these have interesting state. RAID0 or Linear never have missing, spare, or failed drives, so there is nothing to monitor.”
So id there there any other way by which whenever a RAID0 disk fails we can get an alert of corruption message while doing anything on filesystem.
Thanks in advance…..Waiting for your reply..
@Amit,
Yes, we can setup an email alert as below. This will trigger the email when an error or failure in array md0.
# mdadm –monitor –daemonise –mail=root@localhost –delay=1800 /dev/md0
Thanks & Regards,
Babin Lonston
Thanks Bobin. This does not seems to be working. However when i am trying to send a test mail using :
/sbin/mdadm –monitor –scan –test
then i am getting an e-mail in my mail box.
Regards,
Amit
Thanks for this
Thanks for this. I stumbled through countless write ups and reference material before reaching your article. I was able to spin up my secondary RAID 0 caching array easily while following your guide.
Hello,
Please correct the spelling of word ” defaults” not “deaults” in the entry of fstab file
Thanks
@Mohamed,
Thanks for pointing out that error, we’ve corrected in the writeup..
I was able to follow up to step 6. There wasn’t any /etc/mdadm.conf file so I created one, but I couldn’t save the config.
Here is the script
[vagrant@localhost ~]$ sudo mdadm -E -s -v >> /etc/mdadm.conf
-bash: /etc/mdadm.conf: Permission denied
Please advice on how I can troubleshoot.
Thanks a lot :)
@June,
Use root user to create mdadm.conf file..
vagrant user not in sudo (wheel) group, use root user to perform every steps. mdadm.conf will not be there we have to create one to save the config.
Hello, I am getting an error message at Step 4:
[root@localhost fs1]# mdadm -C /dev/md0 -l raid0 -n 2 /dev/sd[b-c]1
mdadm: cannot open /dev/sdb1: Device or resource busy
How can I fix this?
Regards, Mark
[root@localhost fs1]# mdadm -C /dev/md0 -l raid0 -n 2 /dev/sd[b-c]1
mdadm: cannot open /dev/sdb1: Device or resource busy
Please try to stop the RAID set md0
Then reset the superblock for sdb1
Remove the partition and recreate it.
Please go through other RAID topics you will find the solution which i have provided in comments.
[root@raghu@example ~]# more /etc/fstab
#
# /etc/fstab
# Created by anaconda on Sat Sep 20 14:54:34 2014
#
# Accessible filesystems, by reference, are maintained under ‘/dev/disk’
# See man pages fstab(5), findfs(8), mount(8) and/or blkid(8) for more info
#
UUID=afe2e861-fd68-46bd-a8ef-44da85166195 / ext4 defaults 1 1
UUID=721422a7-a533-4cff-93fc-bc0249e95f96 /boot ext4 defaults 1 2
UUID=41677dce-cc0e-4f0c-b924-f76b2bb753a6 swap swap defaults 0 0
tmpfs /dev/shm tmpfs defaults 0 0
devpts /dev/pts devpts gid=5,mode=620 0 0
sysfs /sys sysfs defaults 0 0
proc /proc proc defaults 0 0
/dev/md0 /mnt/raid0 ext4 deaults 0 0
/dev/mapper/vg_tec-lv_tec /mnt/lv_tec ext4 deaults 0 0
Hi Babin Lonston,
have followed your steps in my Vm , works good, But after i reboot my Vm everything is gone (Including Raid also ) !!!
Fstab entry also i did .
[root@raghu@example ~]# more /etc/fstab
#
# /etc/fstab
# Created by anaconda on Sat Sep 20 14:54:34 2014
#
# Accessible filesystems, by reference, are maintained under ‘/dev/disk’
# See man pages fstab(5), findfs(8), mount(8) and/or blkid(8) for more info
#
UUID=afe2e861-fd68-46bd-a8ef-44da85166195 / ext4 defaults 1 1
UUID=721422a7-a533-4cff-93fc-bc0249e95f96 /boot ext4 defaults 1 2
UUID=41677dce-cc0e-4f0c-b924-f76b2bb753a6 swap swap defaults 0 0
tmpfs /dev/shm tmpfs defaults 0 0
devpts /dev/pts devpts gid=5,mode=620 0 0
sysfs /sys sysfs defaults 0 0
proc /proc proc defaults 0 0
/dev/md0 /mnt/raid0 ext4 deaults 0 0
/dev/mapper/vg_tec-lv_tec /mnt/lv_tec ext4 deaults 0 0
[root@raghu@example ~]# mount -a
mount: special device /dev/md0 does not exist
mount: special device /dev/mapper/vg_tec-lv_tec does not exist
EXPECTING YOUR SUGGESTION !!!!!!!
Thanks
Raghu S
@Raghu adding fstab entry is not enough, you need to save the raid configuration using below command.
mdadm -E -s -v >> /etc/mdadm.conf
Pretty sure you have not done the below steps so only you have lost the RAID after a restart.
I did it but just after i restart the system everything i did just vanished, in the first step of booting the “os” i get this message “Wait for mounting press S for skip mounting….”
Hello, I’m stuck at Step 4 with the following error: “cannot open /dev/sdb1: Device or resource busy”
Any thoughts on how to continue?
Regards, Mark
@Mark Miller
What does cat /proc/mdstat gives ?
Assume you have already tried creating raid in this disk before.
Alright first you need to make the disk super block size to zero.
Stop the RAID using
# mdadm –stop /dev/md0
Then reset the super-block size using below command
# sudo mdadm –zero-superblock /dev/sda1
Then remove the partition and recreate and follow the raid creation steps it will work.
Thanks!
@Mark Miller
Assume you have already tried raid setup in this disk.
Check using # cat /proc/mdstat
Then stop the RAID using
# mdadm –manage /dev/md0 –stop
Then reset the superblock for sda disk
# mdadm –zero-superblock /dev/sda
Remove the partitions using fdisk
Then try to create your RAID let me know how it went through..
@Priya Dividing and Writing data’s across multiple disk was defined by default Programming no idea were it was defined. RAID 0 was defined as striping. May be kernel Order’s to do RAID 0 to do the striping.
HI Babin,
I want to clarify one doubt. When you said that while striping on 2 disk – disk0 and disk1 for RAID-0 The data “TECDH”in which T will be saved in disk0 and E will be saved in disk1 how it knows it should be saved alternatively, somewhere any program or any code that instruct this RAID setup to save the data in this way?
Thanks in advance.
Great work bro..appreciate it..
excellent work………..
@Khoi D. Dinh Most welcome, thanks for your feedback
@ Omipenuin
I’am pretty sure you have not saved the RAID configuration, So what after a restart you can’t see the disks.
After creating a RAID set first you have to save the RAID configuration by using below command.
# mdadm –detail –scan –verbose >> /etc/mdadm.conf
After that just Restart and check for the raid device under
# ls -l /dev/md0
It want to list the md0 while we list. Now on-wards follow the below steps. After this Don’t create the file-system in md0 and don’t plan to mount it, cos you need LVM right.
Then start to create the LVM by creating a Pv
# pvcreate /dev/md0
Then create a VG
# vgcreate vg_tec /dev/md0
Then create the LV for 500MB (just i’am using for demonstration, use your required size here)
# lvcreate -n lv_tec -L 500M vg_tec
Just list the lv using devices if so we can see which device holds the LVM
# lvs -o+devices
Then Make the file-system
# mkfs.ext4 /dev/vg_tec/lv_tec
Mount the file-system now
# mkdir -p /mnt/lv_tec
# mount /dev/vg_tec/lv_tec /mnt/lv_tec/
# mount -av
Then add the fstab entry
# vim /etc/fstab
Then restart the system
# init 6
After restart just check the mount point now
# df -h
or check the devices
# lvs -o+devices
Still you can’t find the LVM let me know.
Thanks Babin I will do it soon.Will update you about success or failure.
And again thanks for teaching us in-depth about Software RAID you really spent so much time on this and we are thankful for that.
@Babin. I started to implement all the tuts you taught. Today I worked on this Part2 Implementing RAID0. After creating RAID0 and saving the conf of RAID i implemented LVM on RAID0 .
And damn it worked. Issue before was just like you said previously i never saved the raid settings previously but now i saved the settings and after restarted system both raid and lvm are available.
Simply great tutorial. THANKS
@Omipenuin Happy to hear from you!
Thank you.
Babin when you make a tut for RAID 1 also make LVM on it.
I tried many times to make LVM work on Software Raid 1 initially it works but when I restart then boom no lvm. LVM gone like never happened