In Unix/Linux systems, the root user account is the super user account, and it can therefore be used to do anything and everything achievable on the system.
However, this can be very dangerous in so many ways – one could be that the root user might enter a wrong command and break the whole system or an attacker could get access to a root user account and take control of the whole system and who knows what he/she can do.
Based upon this background, in Ubuntu and Ubuntu derivatives, the root user account is locked by default, regular users (system administrators or not) can only gain superuser privileges by using the sudo command.
And one of the worst things that can happen to a Ubuntu System admin is losing privileges to use the sudo command, a situation commonly referred to as “broken sudo”. This can be absolutely devastating.
A broken sudo may be caused by any of the following:
- A user should not have been removed from the sudo or admin group.
- The /etc/sudoers file was altered to prevent users in the sudo or admin group from elevating their privileges to that of root using the sudo command.
- The permission on the /etc/sudoers file is not set to 0440.
In order to perform crucial tasks on your system such as viewing or altering important system files, or updating the system, you need the sudo command to gain superuser privileges. What if you are denied usage of sudo due to one or more of the reasons we mentioned above.
Below is an image showing a case in which the default system user is being prevented from running the sudo command:
tecmint@TecMint ~ $ sudo visudo
[ sudo ] password for aaronkilik:
aaronkilik is not in the sudoers file.   This incident will be reported.

tecmint@TecMint ~ $ sudo apt install vim
[ sudo ] password for aaronkilik:
aaronkilik is not in the sudoers file.   This incident will be reported.
How To Fix Broken sudo Command in Ubuntu
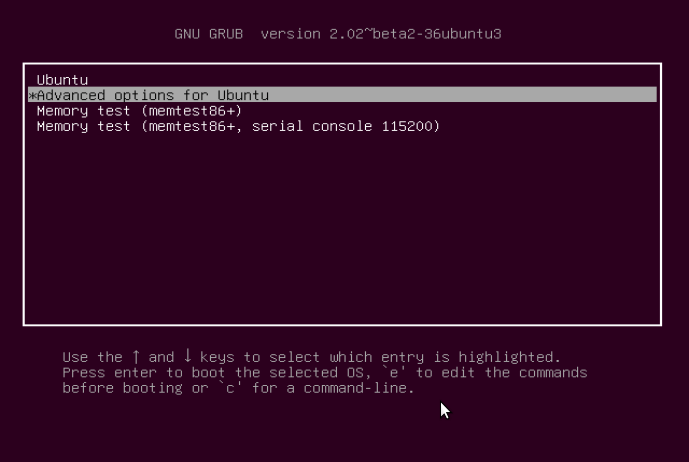
If you happen to be running only Ubuntu on your machine, after powering it, press the Shift key for a few seconds to get the Grub boot menu. On the other hand, if you are running a dual-boot (Ubuntu alongside Windows or Mac OS X), then you should see the Grub boot menu by default.
Using the Down Arrow, select “Advanced options for Ubuntu” and press Enter.
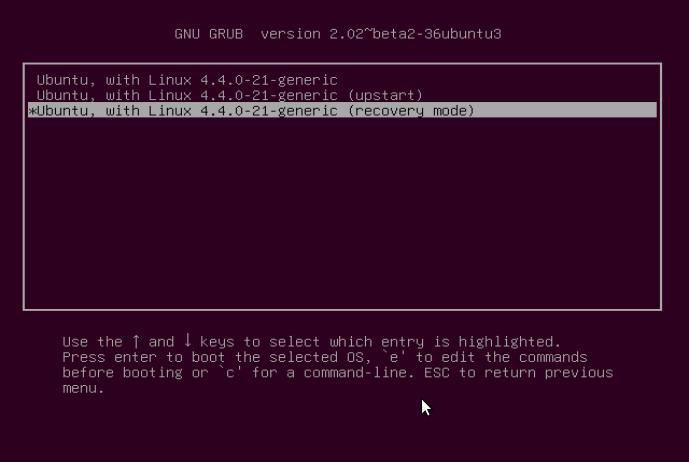
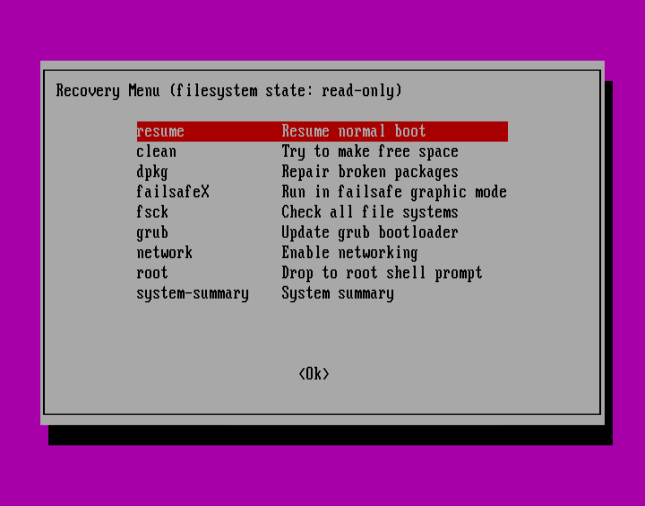
You will be at the interface below, select the kernel with the “recovery mode” option as below and press Enter to advance to the “Recovery menu”.
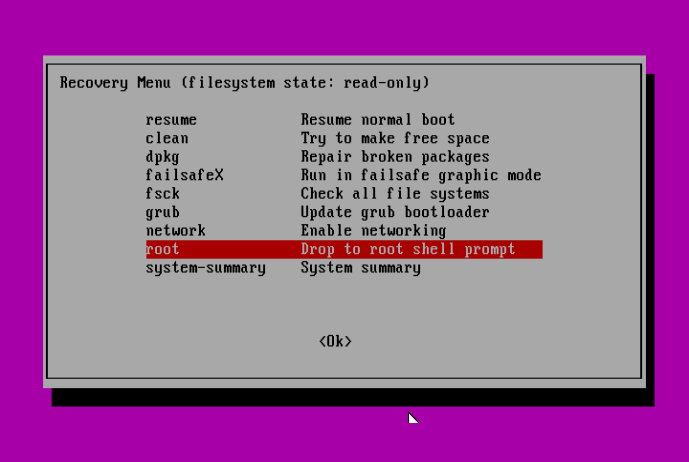
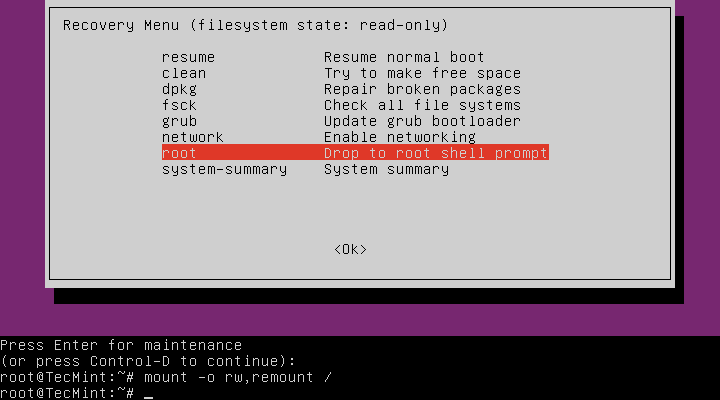
Below is the “Recovery menu”, indicating that the root filesystem is mounted as read-only. Move over to the line “root Drop to root shell prompt”, then hit Enter.
Next, press Enter for maintenance:
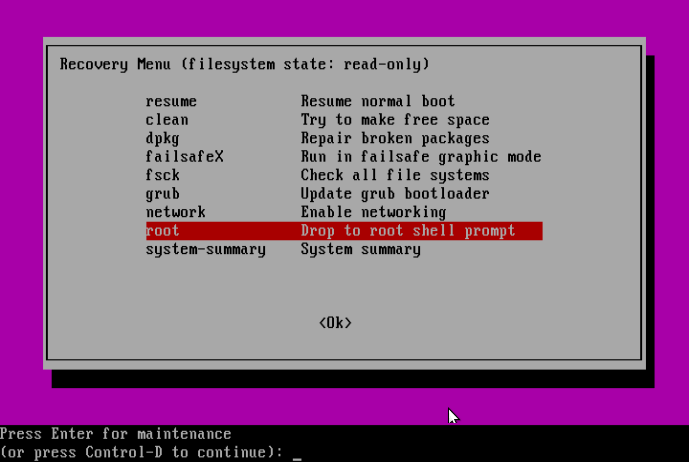
At this point, you should be at the root shell prompt. As we had seen before, the filesystem is mounted as read-only, therefore, to make changes to the system we need to remount is as read/write by running the command below:
# mount -o rw,remount /
Solving Case #1 – Add User to sudo or admin Group
Assuming that a user has been removed from the sudo group, to add the user back to the sudo group issue the command below:
# adduser username sudo

Or else, under the condition that a user has been removed from the admin group, run the following command:
# adduser username admin
Solving Case #2 – Granting sudo Privileges to Users
On the assumption that the /etc/sudoers file was altered to prevent users in the sudo or admin group from elevating their privileges to that of a super user, then make a backup of the sudoers files as follows:
# cp /etc/sudoers /etc/sudoers.orginal
Subsequently, open the sudoers file.
# visudo
and add the content below:
#
# This file MUST be edited with the 'visudo' command as root.
#
# Please consider adding local content in /etc/sudoers.d/ instead of
# directly modifying this file.
#
# See the man page for details on how to write a sudoers file.
#
Defaults        env_reset
Defaults        mail_badpass
Defaults        secure_path="/usr/local/sbin:/usr/local/bin:/usr/sbi$

# Host alias specification

# User alias specification

# Cmnd alias specification

# User privilege specification
root    ALL=(ALL:ALL) ALL

# Members of the admin group may gain root privileges
%admin ALL=(ALL) ALL

# Allow members of group sudo to execute any command
%sudo   ALL=(ALL:ALL) ALL

# See sudoers(5) for more information on "#include" directives:

#includedir /etc/sudoers.d
Solving Case #3 – Setting Correct Permission on sudoers File
Supposing that the permission on the /etc/sudoers file is not set to 0440, then run the following command to make it right:
# chmod 0440 /etc/sudoers
Last but not least, after running all the necessary commands, type the exit command to go back to the “Recovery menu”:
# exit
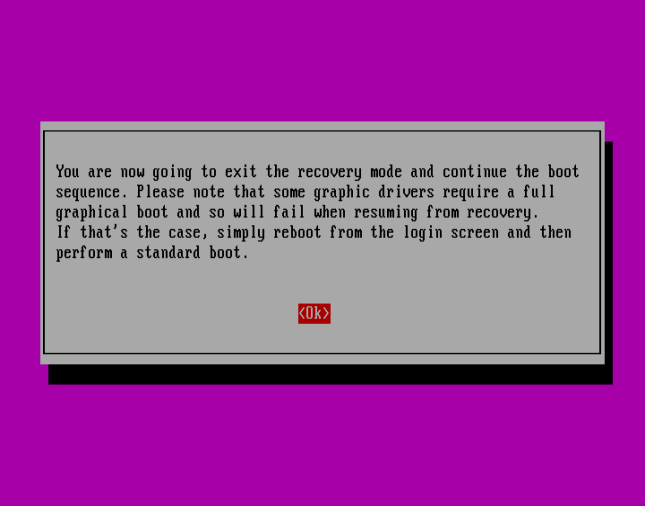
Use the Right Arrow to select <Ok> and hit Enter:
Press <Ok> to continue with normal boot sequence:
Summary
This method should work just fine especially when it is an administrative user account involved, where there is no other option but to use the recovery mode.
However, if it fails to work for you, try to get back to us by expressing your experience via the feedback section below. You can also offer any suggestions or other possible ways to solve the issue at hand or improve this guide altogether.


Thanks. It works!!!
Thank you, Aaron! It worked.
At the point of the root, when prompted by you to hit enter for the maintenance, instead of allowing me to run the command “#mount -0 rw,remount /” it instead when I hit enter says Login incorrect then prompts again give root password for maintenance or press control d to continue and will not let me ensue.
Hope to hear back soon.
Just go back to the terminal and type ‘su‘ which should take you to root.
Type this:
Should solve it
Using virtual box, running ubuntu and having the issue of username not in the sudoers file, tried following your steps in accessing GRUB, but not working.
Tried using the shift key repeatedly, but could not access it in order for me to walk down the process and add my username to the sudoers list.
@Olefoto,
Switch to the root account, and then add the user to the wheel or sudo group as shown.
I have the same problem and tried this solution but, when I typed
(su -i ), it says invalid option.It’s working
Thank you very much for such useful information…
I will buy a coffee if you can give a solution.
I’m getting that message, but I can’t execute any command starting with “sudo”, can’t install vim, can’t copy sudoers. nothing
Where was this incident actually reported.
I’ve always wondered that as well :) Maybe Linux gets an email every time.
Thank you so much!
Thank you. it’s working. :)
This work, thanks you
Hello,
Thank you very much, it was helpful! But I can’t set the permission of /etc/sudoers file 0440.
After :
The permission of /etc/sudoers file is still set on 755 as you can see it below.
But thanks again it was a pleasure to recover root permissions.
Thank you for the help.
Cheers
Thanks a lot you saved my time :)
Thank you so much! This saved me.
You saved my life. Thank you!
@Ibrahim
Thanks for the useful feedback.
Does this works in debian buster?
Thank you for this excellent document. Works great on Ubuntu 20.04
I got as far as the remounting and it said:
Mount: /: Special device remount does not exist.
Is there a way to solve this? As I can’t continue without this.
Thank you!
Thanks very much for your help. I followed the steps you outlined and it worked.
Thank you :)
Thank you!
@Piobaireachd
Welcome, thanks for the feedback.
thank you, my friend, helped a lot.
@Fernando
Great! Thanks for the feedback.
After trying 1 Step.
Add user Username Sudo – I only get
Gpasswd:cannot lock/etc/group;try again laterAdduser : `/usr/bin/gpasswd -a username Sufi ' returned error code 1. Exiting
@Manjeet
Did you replace username with your actual username?
Thanks a lot!
It helped me to fix the problem.
@Luis
Wonderful! Thanks for getting back to us.
Thanks you! I did adduser sudo after recovery mode. It works like a charm!
@Sam
Great! Thanks for the feedback.
Helped a lot, issue fixed, in my case, that was Case #1, Ubuntu 16.04.
thanks mate!
Great work dude, this article helped me to fix the sudoers issue..
@Dax
Okay, great! Thanks for the feedback.
Simply create root user As:
Then type root password and login into root user As:
Then type root password:
This will add your username into sudoers file
ok. But I typed similar in black arch Linux it shows
[root user~/home/root user] #is it correct?
much thanks cz it worked for me
I was not able to gain administration level.
Ubuntu dual boot , 18.04.
My error 28 no space left on disk keeps looping me out.
Thanks alot man.♥️
It doesn’t work for me. Even entering the root mode I keep getting that file system is read-only or that username is already member of sudo group and root group. However I don’t have any admin group
@Lalande
Then mount the system in read/write mode. If you have a RHEL-based system such as CentOS, use the wheel group instead of the sudo group.
On some systems use esc to enter grub
@Hayk
Great, many thanks for sharing.
I am running an CentOS i386 in my system, When i try to log in as root in terminal as sudo su.
I got the following error, any solution for this?
Pulse is not in the sudoers file. this incident will be reported…..
@K.Praveena
Add Pulse under user specification with the syntax (pulse ALL=(ALL) ALL) in the sudoers file, you can open this file as described above.
Relatively new Ubuntu user (6-7 months) and experienced this situation this morning (24/02/18). Found some data online to correct. Your write up is by far the clearest of all I came across. You made it very easy to follow. Thanks for your time and effort to give us “Noob” users such clear and concise info.
Gord K
@Gord
Thanks for the kind words of appreciation and encouragement. We always aim at giving clear and easy to follow instructions in our Linux guides, tutorials and how tos.
It worked :)
Thank You :)
@Bilal
Good to know, thanks for the feedback and always following us.
Thank you so much! This helped a lot
@Srinivas
Welcome, that’s cool and hope you enjoyed it. Many thanks for following us.
Thanks a ton!!! Had a very tough doing this. This helped
@Chaitanya
Welcome and thanks for the feedback.
Thank you for keeping to provide us, users of Ubuntu OS, with important tips on how to overcome common and daily situations we may face.
@Martins
Welcome, thanks a lot for always following us and the kind words of appreciation.
Sorry I want to said passwd instead of pwd
There is a lot more to said about this. What about if at recovery time, root have been setup with a different password from defaults? The system ask for password, there is only one way to proceed, mount / with a live CD or USB drive and mount then chroot to / and use pwd command to do what you want. Hope this help/improve.
@v
In recovery mode, you will always get a passwordless root shell, and have absolute control over the system to perform required changes in the system hence the name “recovery mode”.
Try to go through this Ubuntu documentation about lost password, it covers the same thing here but focuses on resetting a password other than fixing broken sudo in recovery mode: https://help.ubuntu.com/community/LostPassword. You will get a full root access in recovery mode, whether root password was set to something different or not on Ubuntu.
Lastly, thanks for sharing your useful thoughts on the subject matter.