Even in a time when significant Internet speeds are available throughout the globe, every effort to optimize website load times is welcome with open arms.
In this article we will discuss a method to increase transfer speeds by reducing the file sizes through compression. This approach brings an extra benefit in that it also reduces the amount of bandwidth used in the process, and makes it cheaper for the website owner who pays for it.
To accomplish the goal stated in the above paragraph, we will use Nginx and its built-in gzip module in this article. As the official documentation states, this module is a filter that compresses responses using the well-known gzip compression method. This ensures that the size of the transmitted data will be compressed by half or even more.
Suggested Read: The Ultimate Guide to Secure, Harden and Boost Performance of Nginx Websites
By the time you reach the bottom of this post, you will have yet another reason to consider using Nginx to serve your websites and applications.
Installing Nginx Web Server
Nginx is available for all major modern distributions. Although we will use a CentOS 7 virtual machine (IP 192.168.0.29) for this article.
The instructions provided below will work with little (if any) modifications in other distributions as well. It is assumed that your VM is a fresh install; otherwise, you will have to make sure that there are not any other web servers (such as Apache) running on your machine.
To install Nginx along with its required dependencies, use the following command:
----------- On CentOS/RHEL 7 and Fedora 22-24 -----------
# yum update && yum install nginx

----------- On Debian and Ubuntu Distributions -----------
# apt update && apt install nginx
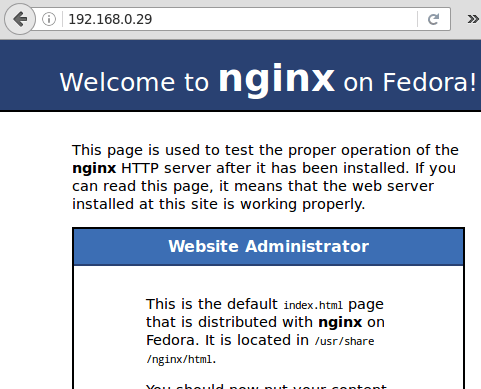
To verify that the installation has completed successfully and that Nginx can serve files, start the web server:
# systemctl start nginx
# systemctl enable nginx
and then open a web browser and go to http://192.168.0.29 (don’t forget to replace 192.168.0.29 with the IP address or hostname of your server). You should see the Welcome page:
We must keep in mind that some file types can be compressed better than others. Plain text files (such as HTML, CSS, and JavaScript files) compress very well while others (.iso files, tarballs, and images, to name a few) do not, as they are already compressed by nature.
Thus, it is to be expected that the combination of Nginx and gzip will allow us to increase the transfer speeds of the former, while the latter may show little or no improvement at all.
It is also important to keep in mind that when the gzip module is enabled, HTML files are ALWAYS compressed, but other file types commonly found in websites and applications (namely, CSS and JavaScript) aren’t.
Testing Nginx Website Speeds WITHOUT the gzip Module
To begin, let’s download a complete Bootstrap template, a great combination of HTML, CSS, and JavaScript files.
After downloading the compressed file, we will unzip it to the root directory of our server block (remember that this is the Nginx equivalent of the DocumentRoot directive in an Apache virtual host declaration):
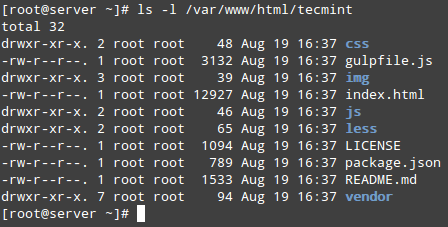
# cd /var/www/html
# wget https://github.com/BlackrockDigital/startbootstrap-creative/archive/gh-pages.zip
# unzip -a gh-pages.zip
# mv startbootstrap-creative-gh-pages tecmint
You should have the following directory structure inside /var/www/html/tecmint:
# ls -l /var/www/html/tecmint
Now go to http://192.168.0.29/tecmint and make sure the page loads correctly. Most modern browser include a set of developer tools. In Firefox, you can open it via the Tools → Web Developer menu.
We are particularly interested in the Network submenu, which will allow us to monitor all network requests going on between our computer and the local network and the Internet.
Suggested Read: Install Mod_Pagespeed to Speed Up Nginx Performance Upto 10x
A shortcut to opening the Network menu in the developer tools is Ctrl + Shift + Q. Press that key combination or use the menu bar to open it.
Since we are interested in examining the transfer of HTML, CSS, and JavaScript files, click on the buttons in the bottom and refresh the page. In the main screen you will see the detail of the transfer of all the HTML, CSS, and JavaScript files:
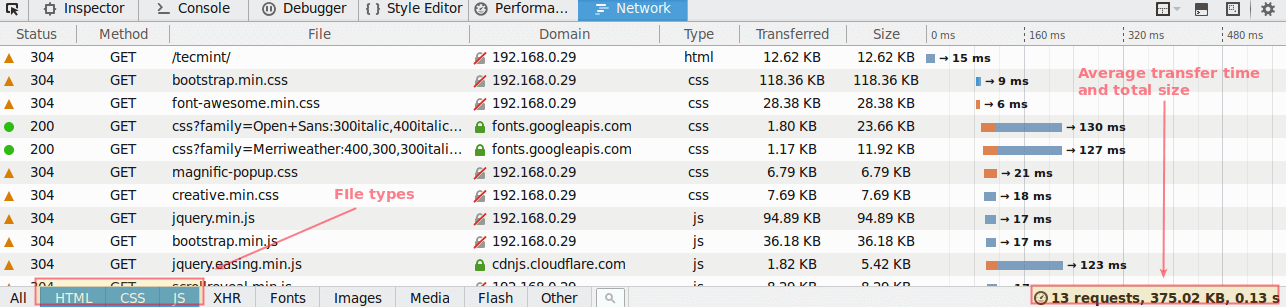
To the right of the Size column (which shows the individual file sizes) you’ll see the individual transfer timings. You can also double click on any given file to see more details in the Timings tab.
Make sure you take notes of the timings shown in the above image so that you can compare them with the same transfer once we have enabled the gzip module.
Enabling and Configuring the gzip Module in Nginx
To enable and configure the gzip module, open /etc/nginx/nginx.conf, locate the main server block as shown in the below image, and add or modify the following lines (don’t forget the semicolon at the end or Nginx will return an error message while restarting later!)
root     	/var/www/html;
gzip on;
gzip_types text/plain image/jpeg image/png text/css text/javascript;

The gzip directive turns on or off the gzip module, whereas gzip_types is used to list all the MIME types the module should handle.
To learn more about MIME types and view the available types, go to Basics_of_HTTP_MIME_types.
Testing Nginx Website Speeds With Gzip Compression Module
Once we have completed the above steps, let’s restart Nginx and reload the page by pressing Ctrl + F5 (again, this works in Firefox, so if you’re using a different browser consult first the corresponding documentation) to override the cache and let’s observe the transfer times:
# systemctl restart nginx
The network requests tab shows some significant improvements. Compare the timings to see for yourself, keeping in mind that it’s the transfers between our computer and 192.168.0.29 (transfers between Google servers and CDNs are beyond our grasp):
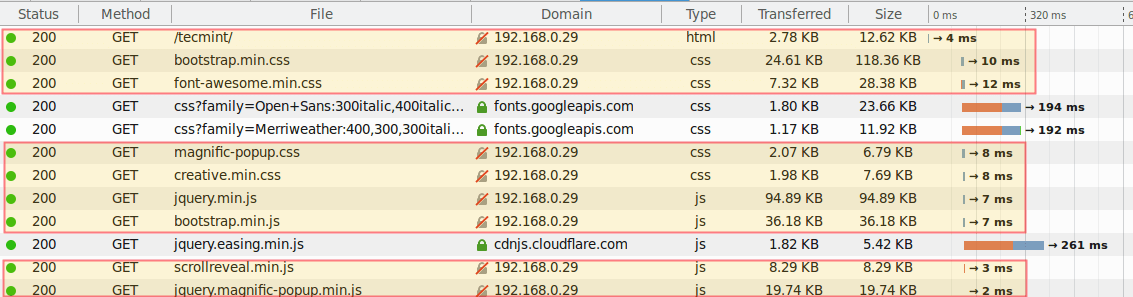
For example, let’s consider the following file transfer examples before / after enabling gzip. Timings are given in milliseconds:
index.html(represented by/tecmint/at the top of the list): 15 / 4Creative.min.css: 18 / 8jquery.min.js: 17 / 7
Doesn’t this make you love Nginx even more? As far as I’m concerned, it does!
Suggested Read: 5 Tips to Boost the Performance of Your Apache Web Server
Summary
In this article we have demonstrated that you can use the Nginx gzip module to speed up file transfers. The official documentation for gzip module lists other configuration directives that you may want to take a look at.
Additionally, the Mozilla Developer Network website has an entry about the Network Monitor that explains how to use this tool to understand what’s going on behind the scenes in a network request.
As always, feel free to use the comment form below if you have any questions about this article. We are always looking forward to hearing from you!


cd to post above : is my firewall blocking ports?
I installed Nginx and in console got this listing :
root@aleksander-Aspire-7750G:/home/aleksander# nginx
nginx: [emerg] bind() to 0.0.0.0:80 failed (98: Address already in use)
nginx: [emerg] bind() to [::]:80 failed (98: Address already in use)
nginx: [emerg] bind() to 0.0.0.0:80 failed (98: Address already in use)
nginx: [emerg] bind() to [::]:80 failed (98: Address already in use)
nginx: [emerg] bind() to 0.0.0.0:80 failed (98: Address already in use)
nginx: [emerg] bind() to [::]:80 failed (98: Address already in use)
nginx: [emerg] bind() to 0.0.0.0:80 failed (98: Address already in use)
nginx: [emerg] bind() to [::]:80 failed (98: Address already in use)
nginx: [emerg] bind() to 0.0.0.0:80 failed (98: Address already in use)
nginx: [emerg] bind() to [::]:80 failed (98: Address already in use)
nginx: [emerg] still could not bind()
Does anyone know how to fix it? or probably I did something wrong.
Aleksander,
The message is saying that nginx can’t be bound to port 80 because it is already in use. My guess is that Apache must be installed and running on the same machine. Because I thought that was going to be the case with some readers, I specifically stated “It is assumed that your VM is a fresh install; otherwise, you will have to make sure that there are not any other web servers (such as Apache) running on your machine.“. Stop Apache and try again, then let us know if you need further help.