Gitlab is an open-source, powerful, robust, scalable, secure, as well as efficient software development and collaboration platform for all stages of the DevOps lifecycle.
It allows you to plan your development process; code, and verify; package software, and release it with an in-built continuous delivery feature; automate configurations management, and monitor software performance.
It has features such as an issue tracker, moving of issues between projects, time tracking, very powerful branching tools, file locking, merge requests, custom notifications, project roadmaps, burndown charts for project and group milestones, and so much more.
Gitlab is one of the best alternatives to Github for hosting your open-source projects, which you will find out there.
In this article, we will explain how to install and configure GitLab (Git-repository manager) on RHEL-based and Debian-based distributions.
Step 1: Install and Configure Required Dependencies
1. First, start by installing the following necessary dependencies using the yum or apt package manager as shown.
sudo yum install curl policycoreutils-python-utils [On RHEL-based]
sudo apt install curl policycoreutils-python-utils [On Debian-based]
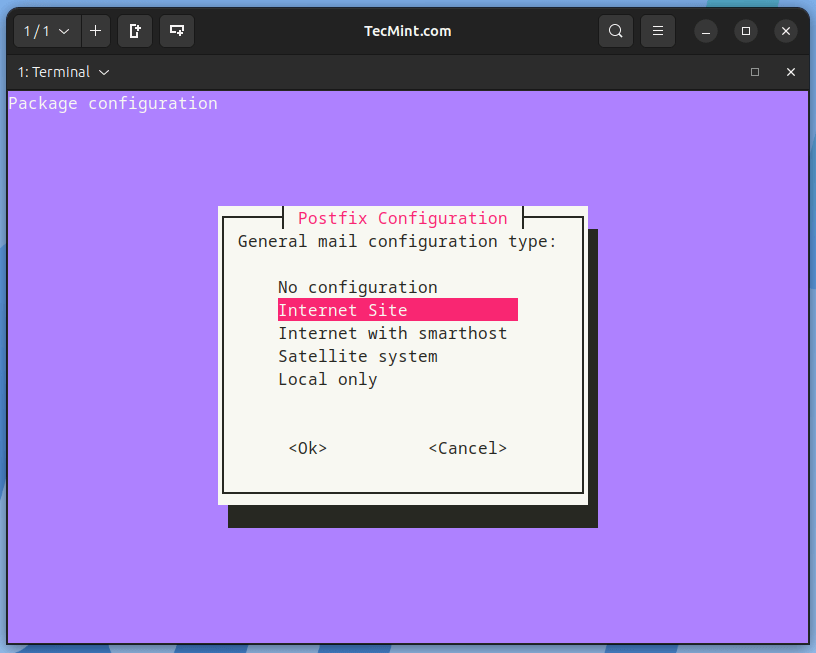
2. Next, install the Postfix service to send notification emails, and enable it to start at system boot, then check if it is up and running using the following commands.
sudo yum install postfix    [On RHEL-based]
sudo apt install postfix    [On Debian-based]

sudo systemctl start postfix
sudo systemctl enable postfix
sudo systemctl status postfix
During Postfix installation a configuration window may appear. Select ‘Internet Site‘ and use your server’s external DNS for ‘mail name‘ and press enter. If extra screens appear, continue to press enter to accept the defaults.
Step 2: Add GitLab Repository and Install Package
3. Now add the GitLab package repository to your system by running the following script.
On RHEL-based systems:
curl https://packages.gitlab.com/install/repositories/gitlab/gitlab-ce/script.rpm.sh | sudo bash
On Debian-based systems:
curl https://packages.gitlab.com/install/repositories/gitlab/gitlab-ee/script.deb.sh | sudo bash
4. Next, install the GitLab Community Edition package using the following command and make sure to change ‘https://gitlab.tecmint.com‘ to the URL at which you want to access your GitLab instance from a web browser.
On RHEL-based systems:
sudo EXTERNAL_URL="https://gitlab.tecmint.com" yum install -y gitlab-ce
On Debian-based systems:
sudo EXTERNAL_URL="https://gitlab.tecmint.com" apt install -y gitlab-ee
Note: If you want to change your main URL, you can configure it in the GitLab main configuration file /etc/gitlab/gitlab.rb in the external_url section. Once changed, don’t forget to reconfigure gitlab to apply the recent changes in the configuration file using the following command.
sudo gitlab-ctl reconfigure
5. If you have a system firewall enabled, you need to open ports 80 (HTTP) and 443 (HTTPS) to allow connections in the system firewall.
On RHEL-based systems:
sudo firewall-cmd --permanent --add-service=80/tcp
sudo firewall-cmd --permanent --add-service=443/tcp
sudo# systemctl reload firewalld
On Debian-based systems:
sudo ufw allow http
sudo ufw allow https
sydo ufw reload
Step 3: Perform Initial Gitlab Setup
6. Now, open a web browser and access your gitlab instance using the following URL you set during installation.
https://gitlab.tecmint.com
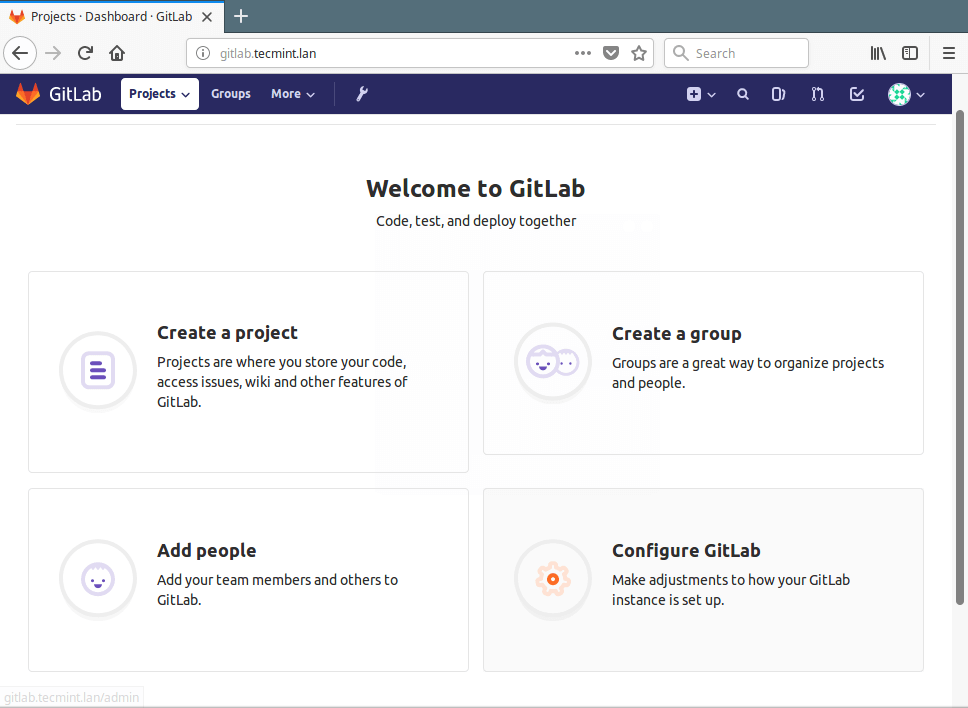
7. On your first visit, you’ll be redirected to a password reset screen, create a new password for your new admin account and click “Change your password”. Once you set it, it will be redirected back to the login screen, and log in with the username root and the password you set.

8. After a successful login, it should take you to the admin user account as shown in the screenshot. From, here, you can create an object, create a group, add people, or configure your gitlab instance as you wish. You can also edit your user profile, configure your email, add SSH keys to your gitlab instance, and more.
For more information, go to Gitlab About Page: https://about.gitlab.com/
That’s all for now! In this article, we have explained how to install and configure a Gitlab (Git-repository manager) on RHEL-based and Debian-based Linux distributions. If you have any questions or thoughts to add to this guide, use the comment form below to reach us.


Hi,
How to enable https eg:
https://gitlab.tecmint.comin Gitlab?@Dileep,
Use certbot to enable free HTTPS on-site as explained here – https://docs.gitlab.com/omnibus/settings/ssl/
After the new installation of GitLab 14.9, add member Tab not visible in project->repository-> setting.
Hi! Thank you for this awesome tutorial. I stumbled upon an issue – after installing GitLab runs on domain.com not on gitlab.domain.com, even though I’ve specified EXTERNAL_URL to be gitlab.domain.com.
Do I need to set up DNS to redirect gitlab.domain.com to some IP address? Do I need to get an additional public IP address to handle that subdomain? I’m new to this and might be doing something stupid
Does someone manage to install in CenOS 8? I couldn’t find a way to get this working in CentOS 8.
policycoreutils-python isn’t included in any of the default repos, what repo was added to enable this?
@David,
Try to install the EPEL repository and see the package policycoreutils-python available.
Hi, I have a development server running Redhat 7 I have Apache, PHP and MariaDB installed and working I am currently using port 443 for testing. Because this is a development server it is not accessible to the public it is only used to write new code on and test.
But I need GIT so I can utilize version control. So I wanted to install GITLABS on this server instead of standing up a new server for this. Because I am not accessing this from External location . can you tell me how can I access locally instead of this command:
any help would be Appreciated
Dave
@David,
Setup a local domain and install the GitLab Community Edition package on that local URL. Just see if it works..
@David
You can add your local domain in the /etc/hosts file like this (replace 192.168.56.100 and gitlab.mylocaldomain.lan with your dev server’s IP address and local domain respectively):
Save the file and close it. Then run the installation command like this:
After installation, you can use the following URL in the browser (check the image in the screenshot in the article):
In my case, I’m having some issues with SELinux. I was running
gitlab-ctlreconfigure and I’m getting below error. Can you please help.There was an error running gitlab-ctl reconfigure:
execute[semodule -i /opt/gitlab/embedded/selinux/rhel/7/gitlab-7.2.0-ssh-keygen.pp] (gitlab::selinux line 20) had an error: Mixlib::ShellOut::ShellCommandFailed: Expected process to exit with [0], but received '1'---- Begin output of semodule -i /opt/gitlab/embedded/selinux/rhel/7/gitlab-7.2.0-ssh-keygen.pp ----
STDOUT:
STDERR: Failed to resolve typeattributeset statement at /etc/selinux/targeted/tmp/modules/400/gitlab-7.2.0-ssh-keygen/cil:1
semodule: Failed!
---- End output of semodule -i /opt/gitlab/embedded/selinux/rhel/7/gitlab-7.2.0-ssh-keygen.pp ----
Ran semodule -i /opt/gitlab/embedded/selinux/rhel/7/gitlab-7.2.0-ssh-keygen.pp returned 1
In my case, Apache is using port 80 and port 443. Where are gitlab pages stored so that I can point Apache to there?
Can we integrate LDAP with Gitlab for Auth process?
@Saurabh
It should be possible.
Can we configure gitlab high availability using DRBD ?
@Daniel
Ooops, many thanks for the heads up. We will correct this in the article.
Still an issue in the article
@Jimmy
We’ll correct it! Thanks for the useful feedback.
Please share the guide on how to configure email setup (postfix) for gitlab ce on centos7.
Thanks alot.
Here should be yum install -y gitlab-ce and not ee.
@Shai,
Thanks for pointing out that typo, corrected in the article.