In this guide, we’ll explain how to install and configure VNC Remote Access in CentOS 7/8 and RHEL 9/8/7 desktop edition via the tigervnc-server program to access remote desktop machines.
VNC (Virtual Network Computing) is a server-client protocol that allows user accounts to remotely connect and control a distant system by using the resources provided by the Graphical User Interface.
Unlike other VNC servers available which connect directly to the runtime desktop, such as VNC X or Vino, tigervnc-vncserver uses a different mechanism that configures a standalone virtual desktop for each user.
Requirements
- Installation of CentOS 8 with Screenshots
- CentOS 7 Installation Procedure
- How to Install RHEL 9 for Free
- How to Install RHEL 8 for Free
- RHEL 7 Installation Procedure
Step 1: Install and Configure VNC on CentOS
1. Tigervnc-server is a program that executes an Xvnc server and starts parallel sessions of Gnome or other desktop environments on the VNC desktop.
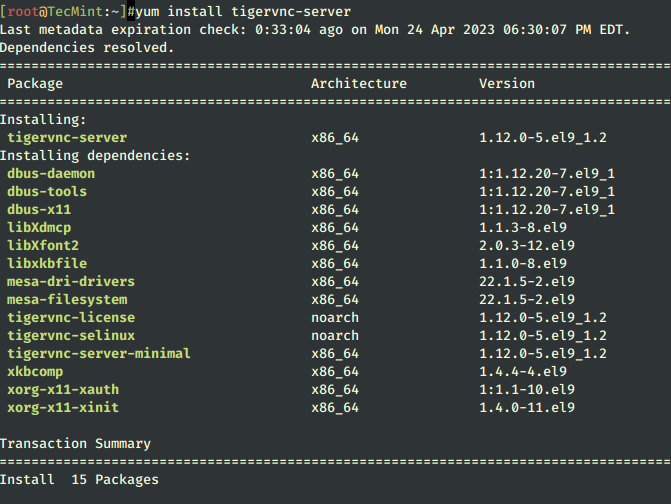
A started VNC user session can be accessed by the same user from multiple VNC clients. In order to install the TigerVNC server in CentOS/RHEL, open a terminal session and issue the following yum command with root privileges.
$ sudo yum install tigervnc-server
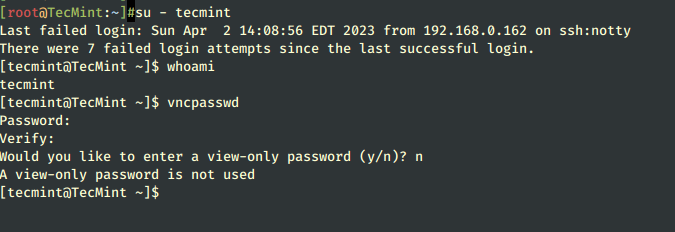
2. After, you’ve installed the program, log in with the user you want to run the VNC program and issue the below command in the terminal in order to configure a password for the VNC server.
Be aware that the password must be at least six characters long.
$ su - your_user
$ vncpasswd
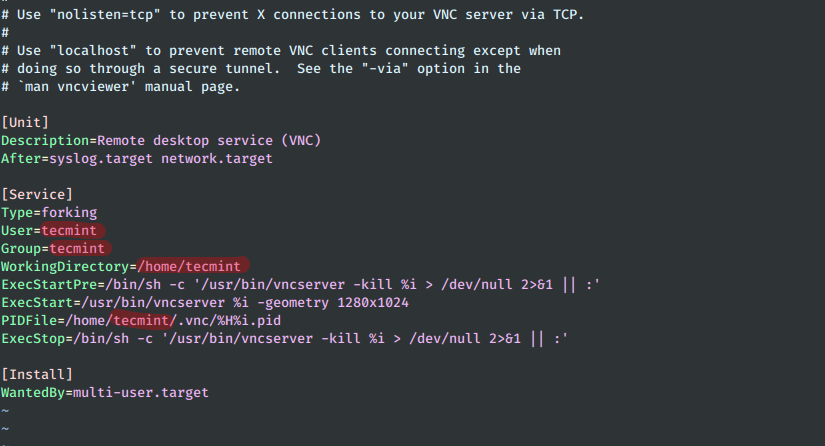
3. Next, add a VNC service configuration file for your user via a daemon configuration file placed in the systemd directory tree. In order to copy the VNC template file you need to run the following cp command with root privileges.
If your user is not granted sudo privileges, either switch directly to the root account or run the command from an account with root privileges.
# cp /lib/systemd/system/[email protected] /etc/systemd/system/vncserver@:1.service
4. In the next step edit the copied VNC template configuration file from /etc/systemd/system/ directory and replace the following values to reflect your user as shown in the below sample.
The value of 1 after @ sign represents the display number (port 5900+display). Also, for each started VNC server, port 5900 will be incremented by 1.
# vi /etc/systemd/system/vncserver@\:1.service
Add the following lines to file vncserver@:1.service.
[Unit]
Description=Remote desktop service (VNC)
After=syslog.target network.target

[Service]
Type=forking
User=tecmint
Group=tecmint
WorkingDirectory=/home/tecmint
ExecStartPre=/bin/sh -c '/usr/bin/vncserver -kill %i > /dev/null 2>&1 || :'
ExecStart=/usr/bin/vncserver %i -geometry 1280x1024
PIDFile=/home/tecmint/.vnc/%H%i.pid
ExecStop=/bin/sh -c '/usr/bin/vncserver -kill %i > /dev/null 2>&1 || :'

[Install]
WantedBy=multi-user.target
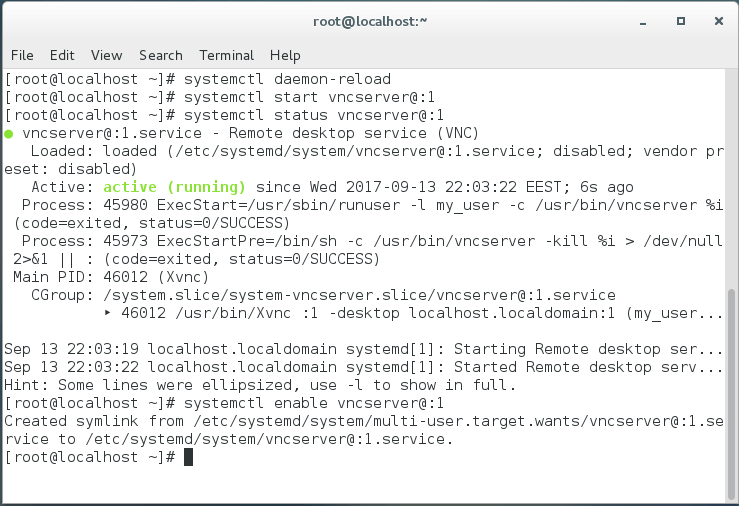
5. After you’ve made the proper changes to the VNC service file, reload the systemd system initialization program to pick up the new vnc configuration file and start the TigerVNC server.
Also, check the VNC service status and enable the VNC daemon system-wide by issuing the below commands.
# systemctl daemon-reload
# systemctl start vncserver@:1
# systemctl status vncserver@:1
# systemctl enable vncserver@:1
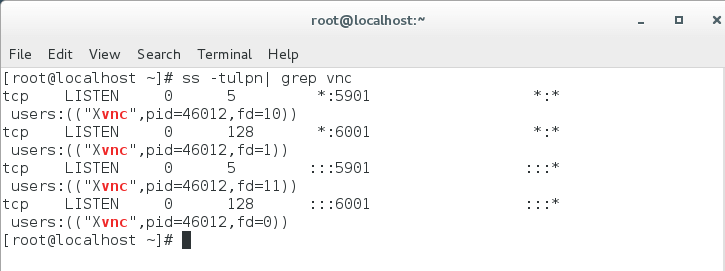
6. To list the opened ports in the listening state owned by the VNC server, run the ss command, which is used to display network sockets. Because you’ve only started one instance of the VNC server, the first open port is 5901/TCP.
Again, the ss command must be executed with root privileges. In case you start other VNC instances in parallel for different users, the port value will be 5902 for the second, 5903 for the third, and so on. The ports 6000+ are used for allowing the X applications to connect to the VNC server.
# ss -tulpn| grep vnc
7. In order to allow external VNC clients to connect to the VNC server, you need to make sure the proper VNC open ports are allowed to pass through your firewall.
In case just one instance of the VNC server is started, you only need to open the first allocated VNC port: 5901/TCP by issuing the below commands to apply the firewall configuration at runtime.
# firewall-cmd --add-port=5901/tcp
# firewall-cmd --add-port=5901/tcp --permanent
Step 2: Connecting to CentOS Desktop via VNC Client
8. Being a platform-independent protocol, remote Graphical User Interface VNC connections can be performed from almost any operating system with a GUI and a specialized VNC client.
A popular VNC client used in Microsoft-based operating systems, fully compatible with Linux TigerVNC server, is the RealVNC VNC Viewer.
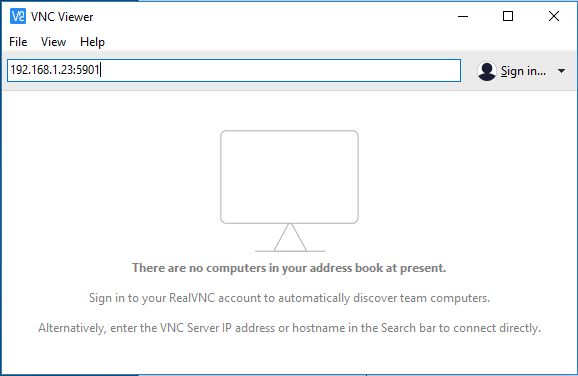
In order to remotely connect to CentOS Desktop from a Microsoft OS via VNC protocol, open the VNC Viewer program, add the IP address and port number of the CentOS VNC server, and hit the [enter] key.
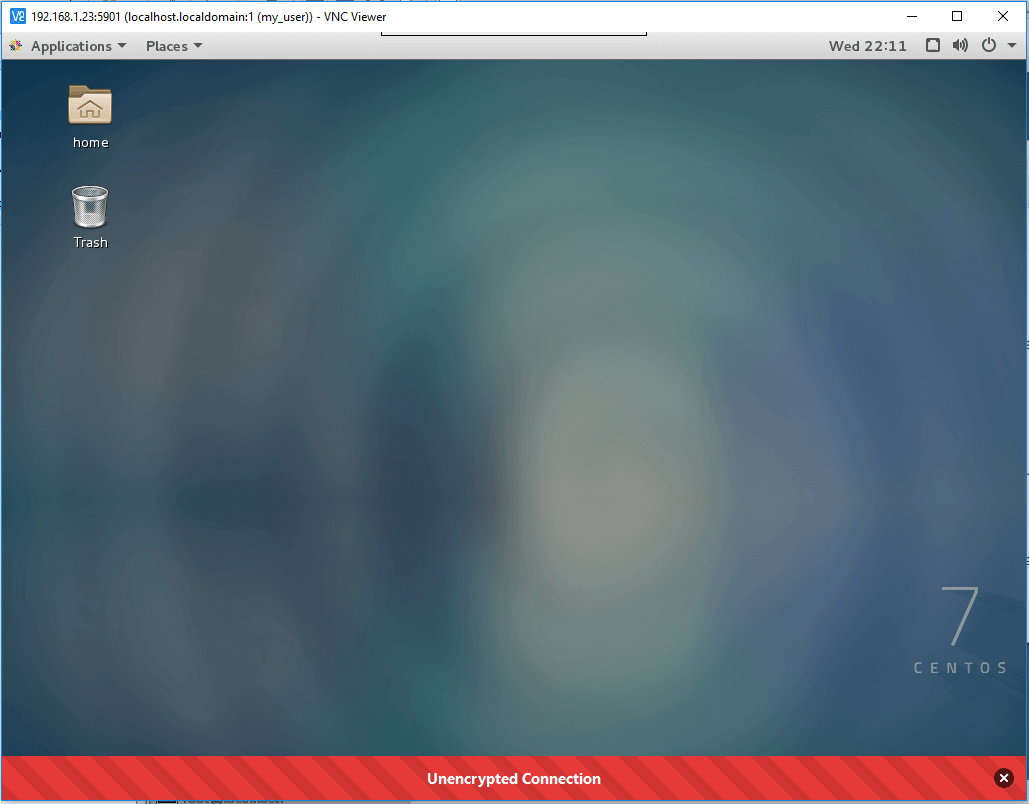
After the VNC connection has been established a warning saying that the connection is not encrypted should be displayed on your screen as illustrated in the below screenshots.
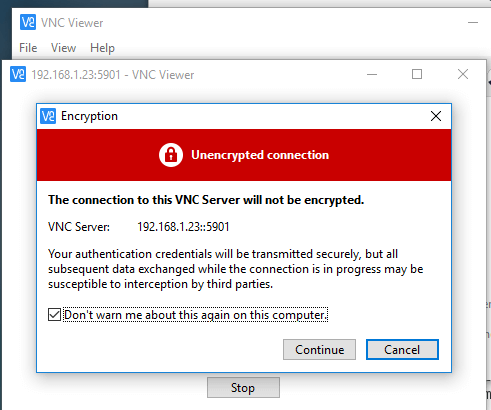
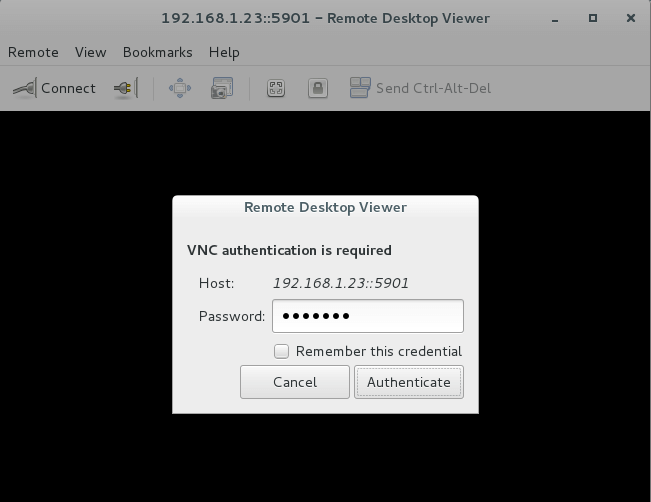
9. In order to bypass the warning, hit on the Continue button, add the password setup for the VNC server at point 2 and you should be remotely connected to CentOS Desktop with the user configured to run the VNC server instance.
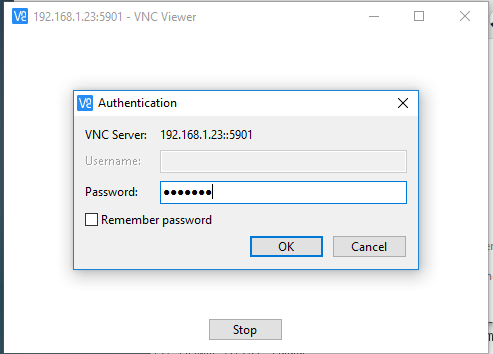
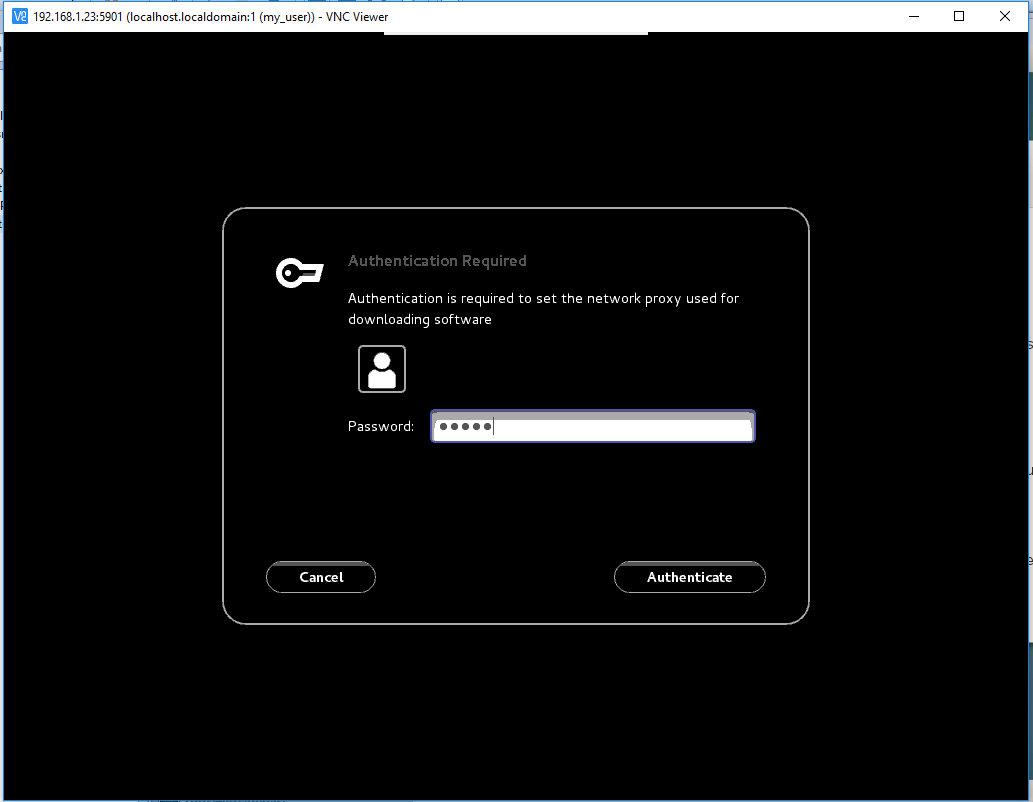
10. In case a new Authentication message appears on your screen and your user has no root privileges, just hit the Cancel button to continue to CentOS Desktop, as shown in the below screenshot.
Be aware that the established VNC communication between the server and client and any data exchanged (except the password) run over an unencrypted channel. In order to encrypt and secure the VPN data transfer, first you need to set up a secure SSH tunnel and run any subsequent VPN traffic over the SSH tunnel.
11. In order to remotely connect to CentOS Desktop via VNC protocol from other CentOS Desktops, first make sure that the vinagre package is installed on your system by issuing the below command.
$ sudo yum install vinagre
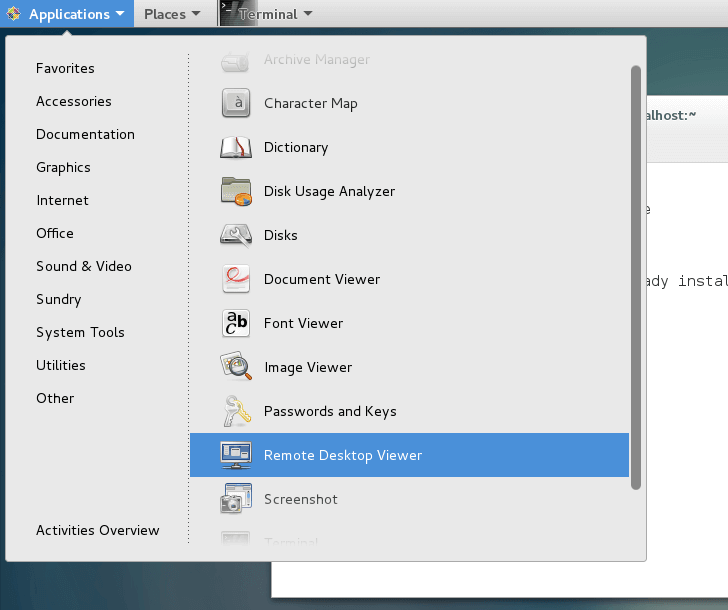
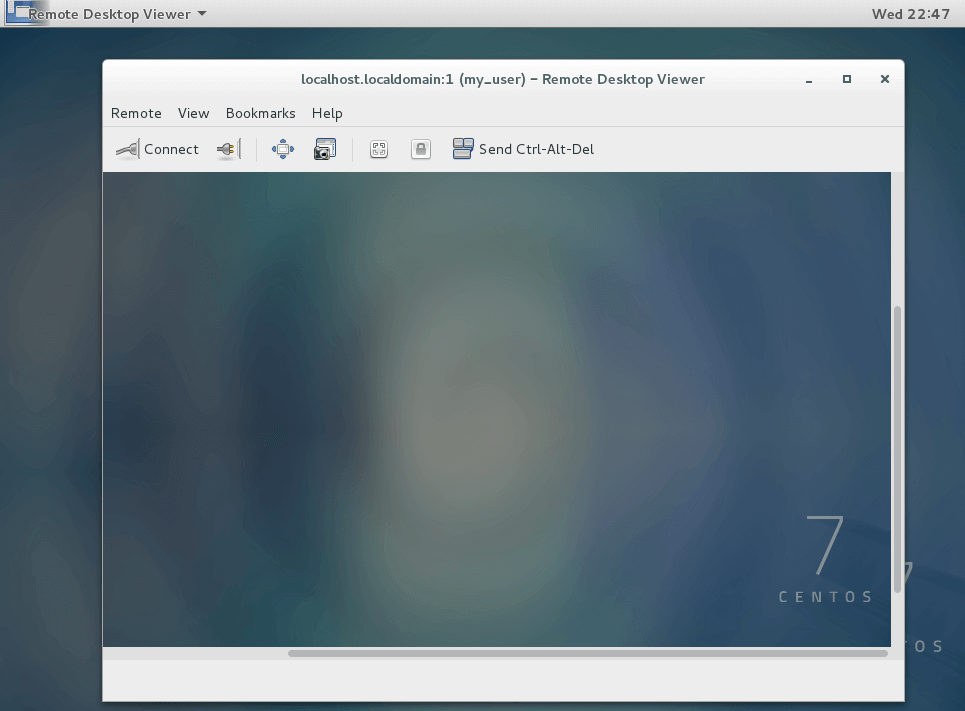
12. To open vinagre utility, go to Applications -> Utilities -> Remote Desktop Viewer as shown in the below screenshot.
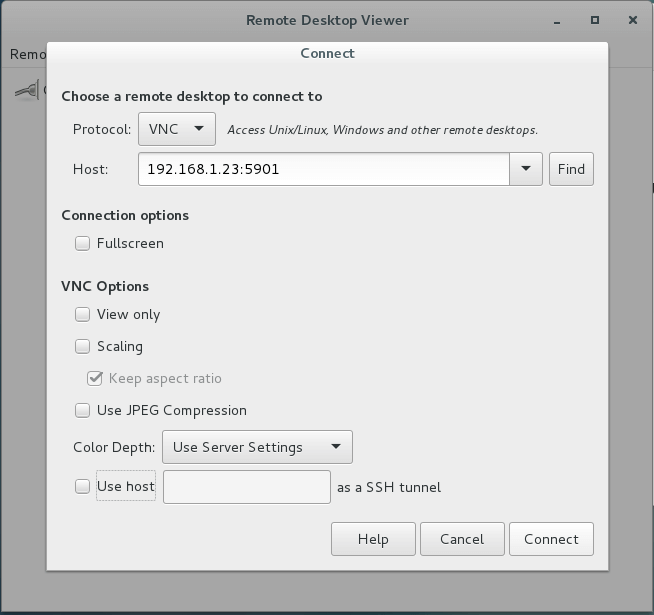
13. To remotely connect to a CentOS Desktop, hit on Connect button, select VNC protocol from the list and add the IP address and port (5900+display number) of the remote VNC server. Also, supply the password setup for the VNC user as illustrated in the following screenshots.
14. Another popular VNC client for Linux-based platforms is Remmina, a remote desktop client that is especially used in Debian-based distributions that run the GNOME desktop environment.
To install the Remmina Remote Desktop client in Debian-based distros issue the following command.
$ sudo apt-get install remmina
Step 3: Configure Multiple VNC Sessions on CentOS
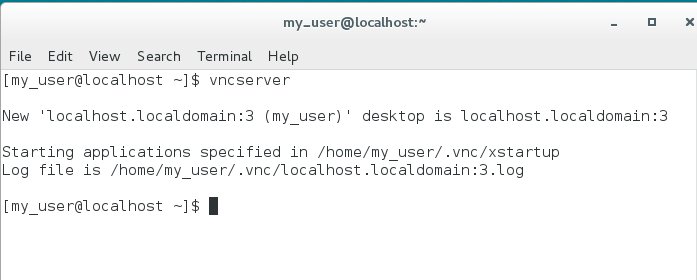
15. In case you need to run a new parallel VNC session under the same user, open a Terminal console, log in with the user you want to start the new VNC session, and execute the below command.
When you first start the server you will be asked to supply a new password for this session. However, be aware that this session runs with your logged-in user permissions and independently from the started systemd VNC server session.
$ vncserver
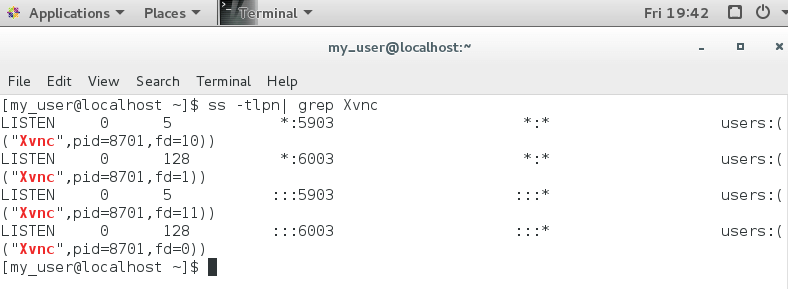
16. The new VNC sessions will open the next available VNC-based ports (5900+3 display in this example). To display the opened ports, execute the ss command without root privileges as illustrated in the below excerpt. It will list only the started VNC sessions owed by your user.
$ ss -tlpn| grep Xvnc
17. Now, remotely connect to CentOS Desktop using this new VNC session, and supply the IP:port combination (192.168.1.23:5903) in the VNC client as illustrated in the below image.

In order to stop the VNC server instances started with these logged-in user permissions, issue the following command without any root privileges. This command will destroy all started VNC instances owned only by the user who stated them.
$ su - your_user
$ killall Xvnc
That’s all! You can now access your CentOS system and perform administrative tasks by using the graphical user interface provided by the operating system.


Hi,
But should I add a VNC service configuration file for any other user? thanks Phil.
Thanks for this!
I have changed the /etc/systemd/system/vncserver@\:1.service specifying the user, group and workdir, and also removed the runuser so now systemd cares of it and there is no PID file not owned by root error.
Here it is:
I have VNC up and running on CentOS 7 but I can’t seem to change the existing VNC password. When I use the command vncpasswd to change the password I still need to use the old password to connect using VNCVIEWER on my win10 laptop to connect on Centos7 pc.
I execute the command sudo yum install tiger-vnc server, as listed at the top of this column, it goes out to a bad destination to find the file. I can manually type in the destination
http://mirror.keystealth.org/centos/7/os/x86_64/Packages/tigervnc-server-1.8.0-21.el7.x86_64.rpmand get to the file, even download the file to the PC and execute it.I try to install the program (the other option when downloading) and I get a file not supported error. I have been at this for three days now and I’m about to throw the PC out the window. I need access to this server from a remote location.
Hello,
I am facing a problem when I have finished with these steps and connect to the vnc server, blue screen appears to me, and this error on the log file:
Can any one help me to solve this problem?
Works fine! But I had to comment out the PIDFile line, due to an error related to the PID file not owned by root.
systemctl status vncserver@:1.service● vncserver@:1.service – Remote desktop service (VNC)
Loaded: loaded (/etc/systemd/system/vncserver@:1.service; bad; vendor preset: disabled)
Active: failed (Result: resources) since Tue 2019-12-10 12:04:56 IST; 6min ago
Process: 1540 ExecStart=/usr/sbin/runuser -l root -c /usr/bin/vncserver %i (code=exited, status=0/SUCCESS)
Process: 1537 ExecStartPre=/bin/sh -c /usr/bin/vncserver -kill %i > /dev/null 2>&1 || : (code=exited, status=0/SUCCESS)
Dec 10 12:04:53 207-182-149-234.xlhdns.com systemd[1]: Starting Remote desktop service (VNC)…
Dec 10 12:04:56 207-182-149-234.xlhdns.com systemd[1]: PID file /home/root/.vnc/207-182-149-234.xlhdns.com:1.pid not readable (yet?) after start.
Dec 10 12:04:56 207-182-149-234.xlhdns.com systemd[1]: Failed to start Remote desktop service (VNC).
Dec 10 12:04:56 207-182-149-234.xlhdns.com systemd[1]: Unit vncserver@:1.service entered failed state.
Dec 10 12:04:56 207-182-149-234.xlhdns.com systemd[1]: vncserver@:1.service failed.
Thanks for these instructions. This worked fine for me, I’m using Tiger VNC to connect, no problems. I didn’t bother with the tunnel, maybe try that later on.
Only one port functions. I am struggling with VNC connections for ports other than 5901. I introduced new hardware and I cannot determine which one is causing the problem. I believe it is my firewall but it would be my ATT router/modem talking to the firewall.
I have been using the VNC server on Linux and Real VNC on remote Windows for 15 years and it has always worked beautifully. But something has gone wrong. Since my most recent
yum updateon my Centos 7.2 there is a problem.Whenever a graphical window inside the Remote Desktop is closed by me or the program that invoked it, Xvnc on Linux throws a segmentation fault 0x38 and Xvnc crashes. Apparently it is dereferencing a null pointer or some such. So those of you who follow these very finely written installation instructions may be in for a disappointment.
Not everyone use (or can use) “yum” to install VNC or any other application !
Can you indicate the mandatory RPMs individually so that one can install VNC manually ?
Thanks
Hey Matei. Thanks so much. This was very detailed and clear to follow. It was working great and then after a reboot, I’m getting “Unable connect to socket: Connection refused (10061)”. Been googling around for a bit and can’t seem to find a solution for this. Reloaded systemctl, stopped it, disabled/enabled it, etc. and still getting no connection. Any thoughts on this?
I’m getting a large solid blue background, but no icons or menus.
I can open the window, but can’t do anything inside of it, because none of the expected buttons, icons, task bars are visible.
This configuration is not working, invalid argument in Unit and I don’t know what is the problem.
How can you set this up so that it works on boot up? It seems it only works after you have made it past the login screen. So if I were remote, rebooting the machine then locks me out as I am not physically there to enter the user credentials into the Desktop login screen. Does that make sense?
Thank you very much! These were the best instructions I’ve found for setting up tigervnc-server on CentOS 7.x. It worked perfectly. Previous instructions I’ve found always leave out something, and even though I’ve gotten it to work, when I start the service I always get some errors. I didn’t get any errors at all following these instructions.
I do agree with @Todor Petkov, that one should run the service through SSH tunnel. Perhaps Tecmint can post a revision to these with the option to run VNC via SSH.
VNC Viewer is not able to display graphical window properly seems pixel – resolution issue, please help me
FYI: https://imgur.com/a/F0MS2
Since VNC is not secured by default, I suggest making the server listen only on lo device and connecting to it via ssh tunnel.