CentOS Web Panel (CWP) is a free web hosting control panel that offers easy managemet of multiple servers (both Dedicated and VPS) without the need to access server through SSH for every small task that you need to complete. It is a feature rich control panel, which comes with a high number of options and features for quick server management.
CentOS Web Panel Features
Here are some of the most beneficial features and services offered by CentOS Web Panel.
- Apache Web Server ( Mod Security + Automatic updated rules optional).
- PHP 5.6 (suPHP, SuExec + PHP version switcher).
- MySQL/MariaDB + phpMyAdmin.
- Email – Postfix and Dovecot, mailboxes, RoundCube web interface ((Antivirus, Spamassassin optional).
- CSF (Config Server Firewall).
- Backups ( this feature is optional).
- Easy user management interface.
- Setups Server for Web Hosting with WordPres.
- FreeDNS Server.
- Live Monitoring.
- File System Lock (means, no more website hacking due to locking of files from changes).
- Server configuration AutoFixer.
- cPanel Account Migration.
- TeamSpeak 3 Manager (Voice) and Shoutcast Manager (video streaming).
Thare are lots more features offered by CWP, that you can check out here.
The latest version of CWP is 0.9.8.651 and was released on 21st April 2018, which includes few bug fixes regarding loading time improvements.
CentOS Web Panel Demo
New Root Admin Panel Login:
Non SSL Login: http://demo1.centos-webpanel.com:2030
SSL Login: https://79.137.25.230:2031
Username: root
Password: admin123

New End user Panel Login:
Non SSL Login: http://demo1.centos-webpanel.com:2082
SSL Login: https://79.137.25.230:2083
Username: testacc
Password: admin123
Requirements of CentOS Web Panel Installer:
To avoid getting any problems, please make sure to read all of the following important instructions thoroughly prior to the CWP installation process.
- Only install CWP on a freshly installed CentOS 7 server without any configuration changes.
- Minimum RAM requirement for 32-bit 512MB and 64-bit 1GB with 10GB of free space.
- Only static IP addresses are currently supported, no support for dynamic, sticky, or internal IP addresses.
- There isn’t any uninstaller for removing CWP after installation, you must reload the OS to remove it.
For the better performances we suggest you to order a Linode VPS with minimal CentOS 7 install.
Install CentOS Web Panel (CWP) on CentOS 7
For the purpose of this article, I will be installing CWP (CentOS Web Panel) on a local CentOS 7 server with a static IP address 192.168.0.104 and hostname cwp.tecmint.com.
Setup Hostname
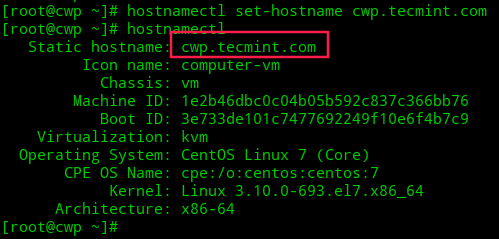
1. To start the CWP installation, login into your server as root and make sure to set the correct hostname.
Important: The hostname and domain name must be different on your server (for example, if domain.com is your domain on your server, then use hostname.domain.com as your fully qualified hostname).
# hostnamectl set-hostname cwp.tecmint.com
# hostnamectl
Setup Server IP Addresses
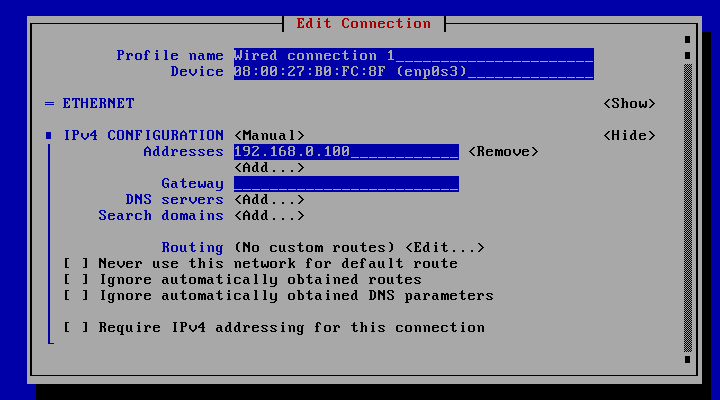
2. To setup network, we will use nmtui (NetworkManager Text User Interface) utility, which offers a graphical user interface to configure networking by controlling Network Manager.
# yum install NetworkManager-tui
# nmtui
Installing CentOS Web Panel
3. After setting hostname and static IP address, now you need update your server to the latest version and install wget utility to fetch and install the CWP installation script.
# yum -y update
# yum -y install wget
# cd /usr/local/src
# wget http://centos-webpanel.com/cwp-el7-latest
# sh cwp-el7-latest
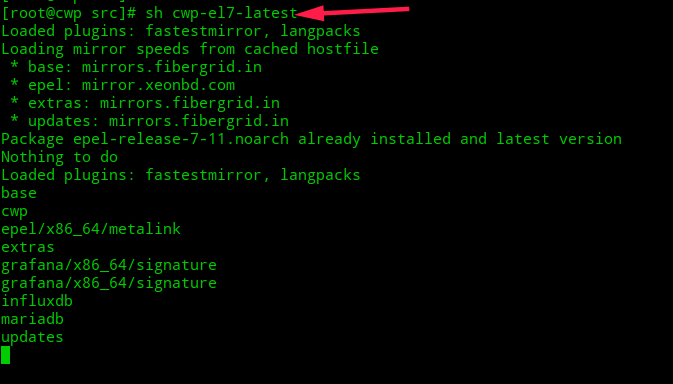
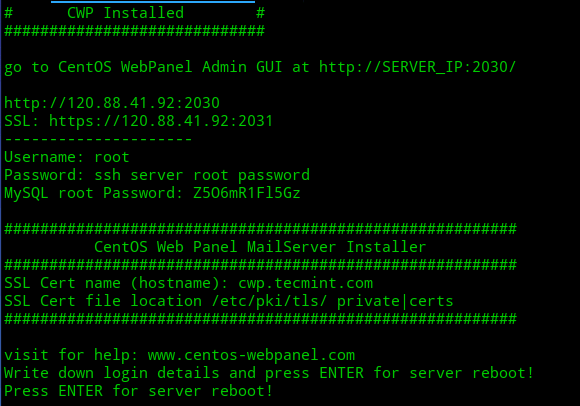
Please be patient as the installation progress can take between 10 and 20 minutes to complete. Once the install has finished you should see a screen saying “CWP” installed and list of credentials required to access the panel. Make sure to copy or write down the information and keep it safe:
Once ready, press “ENTER” for server reboot. If the system does not reboot automatically simply type “reboot” to reboot the server.
# reboot
CentOS Web Panel Configuration
4. After server reboot, login into server as root, once login you will see different welcome screen with information about the logged users and the current disk space usage.
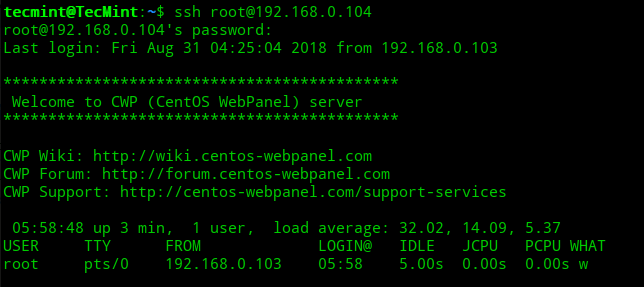
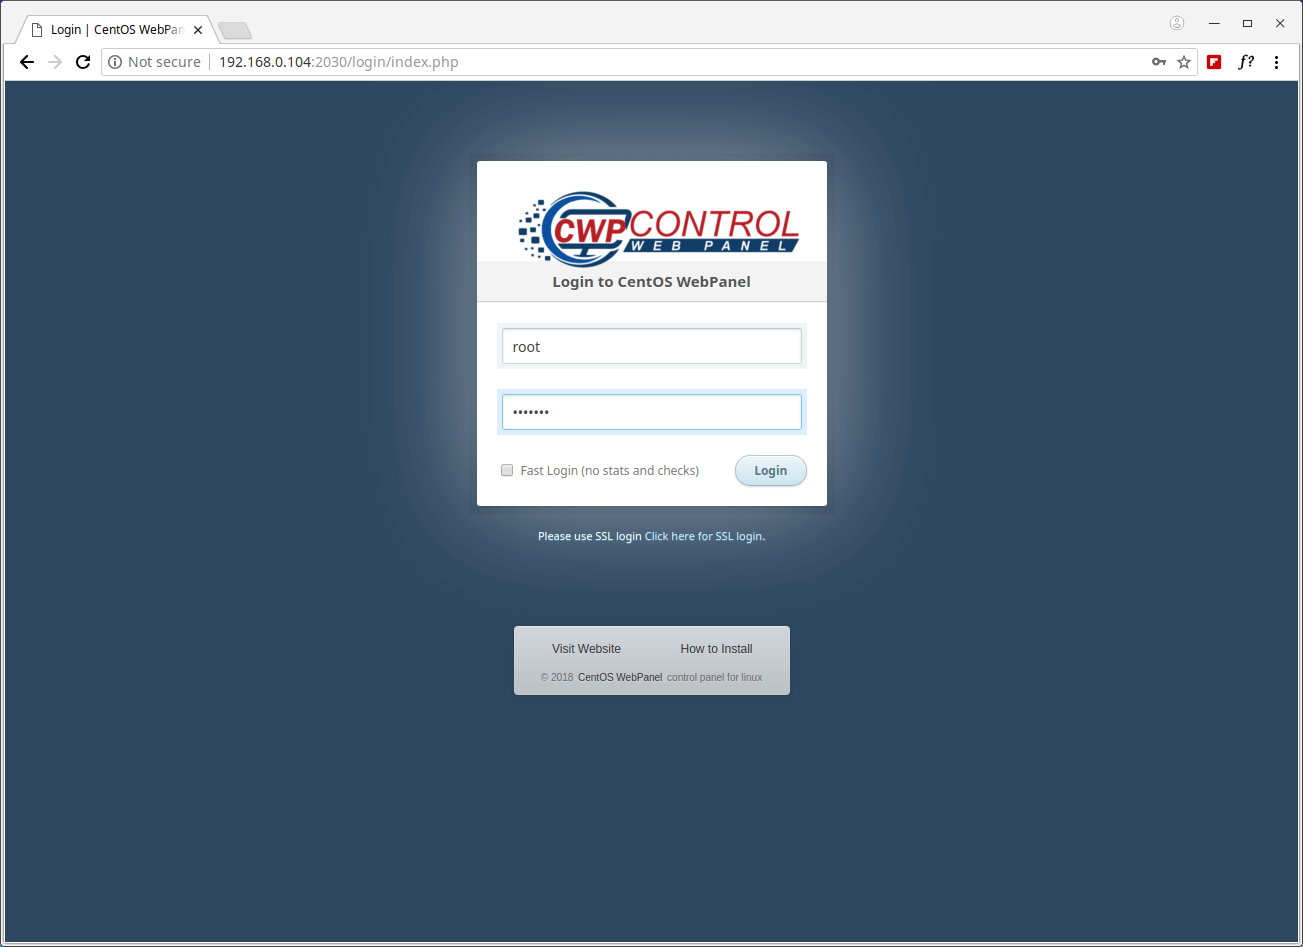
Now log in to your CentOS Web Panel server using the link provided by the installer on your server.
CentOS WebPanel Admin GUI: http://SERVER-IP:2030/
Username: root
Password: your root password

For additional configuration instruction, please check out wiki/documentation site.
In this article, we’ve explained how to install CentOS Web Panel on CentOS 7. If you have any questions or comments, please do not hesitate to submit them in the comment section below.


What is meant by “clean install” of CentOS? Will it cause a problem if I’ve already set up some things such as adding users, https.conf settings, and upgrading to PHP 7?
@Benjamin,
Clean install means fresh installation of CentOS…
Thanks, but that didn’t answer the most important part of my question.
@Benjamin,
No, you can’t set up any other services on the system, it should be clean fresh install OS.
Those command working perfectly. Thanks for share
Hahaha, This works till this.
What about establishing a domain internally.
CWP Does not work on the internal local network?
Useless to install than.
Server CWPro is very slow is a horrible Panel 6 months of experience. Do you want a panel hosting of Nightmares go to CWPanel.
Support is horrible The forum is only 1 or 2 users to answer. Nothing good exists in that company if it is well to call Company.
please give the floor to anyone to go through the problems that I went through…
So far I like this web panel, I try pro license for web server software option and wishing it can be developed for clustering but with the affordable price for the license.
For hosting billing software I use AWBS and no problem connecting with the API
So it is the best alternative and cheap even free web panel software we can try as a web hosting provider or web admin
Does it support on CentOS 8 ?
@Asau,
Not yet supported…
Hello, How can I install SSL on my IP like if my IP is 1.1.1.1 and if i type 1.1.1.1:2031 then it will give warning every time and issue is not once it is nearly every time after nearly all fix. even, i have tried cwp guide which provide solution with .htaccess fix. but it has not been fixed. hoping for your quick reply
How can I find out whether it’s CWP 6 or CWP 7?
How can I find out via SSH which distro/version of CWP is installed on a CENTOS server, e.g. whether it’s CWP6 or CWP7?
This is not open source, a spy software: cwp
Newbie question: How do I connect and manage various serves with one cwp. Do I have to install cwp on each server to manage that server. Or can I manage various servers using single cwp instance. If yes then how. I did not find the information to manage ssh for 3 different serves via single cwp.
Hello to you all,
A new and advanced version of centos webpanel has been officially released. Well the name is now control webpanel.
The new version has a completely rebuilt webserver, a new user interface, a new file manager and so many other thing…
This looked interesting and I tried it out. seems like it would be very useful. I went over their install script. Found out that they completely disable SELinux.
is this kind of nagios ? or other monitoring tools ?
@Prashant,
No its not a monitoring tool like Nagios, but a server a management control panel to manage all your services from the web browser.