MySQL is an open-source free relational database management system (RDBMS) released under GNU (General Public License). It is used to run multiple databases on any single server by providing multi-user access to each created database.
This article will walk through you the process of installing and updating the latest MySQL 8.0 version on RHEL/CentOS 8/7/6/ and Fedora using MySQL Yum repository via YUM utility.
Step 1: Adding the MySQL Yum Repository
1. We will use the official MySQL Yum software repository, which will provide RPM packages for installing the latest version of MySQL server, client, MySQL Utilities, MySQL Workbench, Connector/ODBC, and Connector/Python for the RHEL/CentOS 8/7/6/ and Fedora 30-35.
Important: These instructions only work on a fresh installation of MySQL on the server, if there is already a MySQL installed using a third-party-distributed RPM package, then I recommend you to upgrade or replace the installed MySQL package using the MySQL Yum Repository”.
Before Upgrading or Replacing an old MySQL package, don’t forget to take all important database backup and configuration files using our Backup MySQL Databases guide.
2. Now download and add the following MySQL Yum repository to your respective Linux distribution system’s repository list to install the latest version of MySQL (i.e. 8.0 released on 27 July 2018).
--------------- On RHEL/CentOS 8 ---------------
# wget https://repo.mysql.com/mysql80-community-release-el8-1.noarch.rpm
--------------- On RHEL/CentOS 7 ---------------
# wget https://repo.mysql.com/mysql80-community-release-el7-1.noarch.rpm
--------------- On RHEL/CentOS 6 ---------------
# wget https://dev.mysql.com/get/mysql80-community-release-el6-1.noarch.rpm
--------------- On Fedora 35 ---------------
# wget https://dev.mysql.com/get/mysql80-community-release-fc35-1.noarch.rpm
--------------- On Fedora 34 ---------------
# wget https://dev.mysql.com/get/mysql80-community-release-fc34-1.noarch.rpm
--------------- On Fedora 33 ---------------
# wget https://dev.mysql.com/get/mysql80-community-release-fc33-1.noarch.rpm
3. After downloading the package for your Linux platform, now install the downloaded package with the following command.
--------------- On RHEL/CentOS 8 ---------------
# yum localinstall mysql80-community-release-el8-1.noarch.rpm
--------------- On RHEL/CentOS 7 ---------------
# yum localinstall mysql80-community-release-el7-1.noarch.rpm
--------------- On RHEL/CentOS 6 ---------------
# yum localinstall mysql80-community-release-el6-1.noarch.rpm
--------------- On Fedora 35 ---------------
# dnf localinstall mysql80-community-release-fc35-1.noarch.rpm
--------------- On Fedora 34 ---------------
# dnf localinstall mysql80-community-release-fc34-1.noarch.rpm
--------------- On Fedora 33 ---------------
# yum localinstall mysql80-community-release-fc33-1.noarch.rpm
The above installation command adds the MySQL Yum repository to the system’s repository list and downloads the GnuPG key to verify the integrity of the packages.
4. You can verify that the MySQL Yum repository has been added successfully by using the following command.
# yum repolist enabled | grep "mysql.*-community.*"
# dnf repolist enabled | grep "mysql.*-community.*"      [On Fedora versions]

Step 2: Installing Latest MySQL Version
5. Install the latest version of MySQL (currently 8.0) using the following command.
# yum install mysql-community-server
# dnf install mysql-community-server      [On Fedora versions]
The above command installs all the needed packages for MySQL server mysql-community-server, mysql-community-client, mysql-community-common and mysql-community-libs.
Step 3: Installing Different MySQL Release Versions
6. You can also install different MySQL versions using different sub-repositories of MySQL Community Server. The sub-repository for the recent MySQL series (currently MySQL 8.0) is activated by default, and the sub-repositories for all other versions (for example, the MySQL 5.x series) are deactivated by default.
To install a specific version from a specific sub-repository, you can use --enable or --disable options using yum-config-manager or dnf config-manager as shown:
# yum-config-manager --disable mysql57-community
# yum-config-manager --enable mysql56-community
------------------ Fedora Versions ------------------
# dnf config-manager --disable mysql57-community
# dnf config-manager --enable mysql56-community
Step 4: Starting the MySQL Server
7. After successful installation of MySQL, it’s time to start and enable the MySQL server with the following commands:
# service mysqld start
# systemctl enable mysqld.service
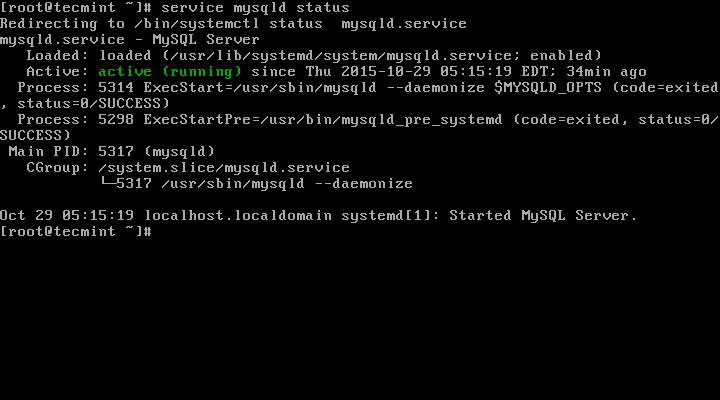
You can verify the status of the MySQL server with the help of the following command.
# systemctl status mysqld.service
OR
# service mysqld status
This is the sample output of running MySQL under my CentOS 7 box.
Redirecting to /bin/systemctl status  mysqld.service
mysqld.service - MySQL Server
   Loaded: loaded (/usr/lib/systemd/system/mysqld.service; enabled)
   Active: active (running) since Thu 2015-10-29 05:15:19 EDT; 4min 5s ago
  Process: 5314 ExecStart=/usr/sbin/mysqld --daemonize $MYSQLD_OPTS (code=exited, status=0/SUCCESS)
  Process: 5298 ExecStartPre=/usr/bin/mysqld_pre_systemd (code=exited, status=0/SUCCESS)
 Main PID: 5317 (mysqld)
   CGroup: /system.slice/mysqld.service
           └─5317 /usr/sbin/mysqld --daemonize

Oct 29 05:15:19 localhost.localdomain systemd[1]: Started MySQL Server.
8. Now finally verify the installed MySQL version using the following command.
# mysql --version

mysql  Ver 8.0.27 for Linux on x86_64 (MySQL Community Server - GPL)

Step 5: Securing the MySQL Installation
9. The command mysql_secure_installation allows you to secure your MySQL installation by performing important settings like setting the root password, removing anonymous users, removing root login, and so on.
Note: MySQL version 8.0 or higher generates a temporary random password in /var/log/mysqld.log after installation.
Use the below command to see the password before running MySQL secure command.
# grep 'temporary password' /var/log/mysqld.log
Once you know the password you can now run the following command to secure your MySQL installation.
# mysql_secure_installation
Note: Enter new Root password means your temporary password from a file /var/log/mysqld.log.
Now follow the onscreen instructions carefully, for reference see the output of the above command below.
Sample Output
Securing the MySQL server deployment.

Enter password for user root: Enter New Root Password

VALIDATE PASSWORD PLUGIN can be used to test passwords
and improve security. It checks the strength of password
and allows the users to set only those passwords which are
secure enough. Would you like to setup VALIDATE PASSWORD plugin?

Press y|Y for Yes, any other key for No: y

There are three levels of password validation policy:

LOW    Length >= 8
MEDIUM Length >= 8, numeric, mixed case, and special characters
STRONG Length >= 8, numeric, mixed case, special characters and dictionary                  file

Please enter 0 = LOW, 1 = MEDIUM and 2 = STRONG: 2
Using existing password for root.

Estimated strength of the password: 50
Change the password for root ? ((Press y|Y for Yes, any other key for No) : y

New password: Set New MySQL Password

Re-enter new password: Re-enter New MySQL Password

Estimated strength of the password: 100
Do you wish to continue with the password provided?(Press y|Y for Yes, any other key for No) : y
By default, a MySQL installation has an anonymous user,
allowing anyone to log into MySQL without having to have
a user account created for them. This is intended only for
testing, and to make the installation go a bit smoother.
You should remove them before moving into a production
environment.

Remove anonymous users? (Press y|Y for Yes, any other key for No) : y
Success.


Normally, root should only be allowed to connect from
'localhost'. This ensures that someone cannot guess at
the root password from the network.

Disallow root login remotely? (Press y|Y for Yes, any other key for No) : y
Success.

By default, MySQL comes with a database named 'test' that
anyone can access. This is also intended only for testing,
and should be removed before moving into a production
environment.

Remove test database and access to it? (Press y|Y for Yes, any other key for No) : y
 - Dropping test database...
Success.

 - Removing privileges on test database...
Success.

Reloading the privilege tables will ensure that all changes
made so far will take effect immediately.

Reload privilege tables now? (Press y|Y for Yes, any other key for No) : y
Success.

All done!
Step 6: Connecting to MySQL Server
10. Connect to a newly installed MySQL server by providing a username and password.
# mysql -u root -p
Sample Output:
Welcome to the MySQL monitor.  Commands end with ; or \g.
Your MySQL connection id is 11
Server version: 8.0.27 MySQL Community Server - GPL

Copyright (c) 2000, 2021, Oracle and/or its affiliates.

Oracle is a registered trademark of Oracle Corporation and/or its
affiliates. Other names may be trademarks of their respective
owners.

Type 'help;' or '\h' for help. Type '\c' to clear the current input statement.

mysql>
Step 7: Updating MySQL with Yum
11. Besides fresh installation, you can also do updates for MySQL products and components with the help of the following command.
# yum update mysql-server
# dnf update mysql-server       [On Fedora versions]
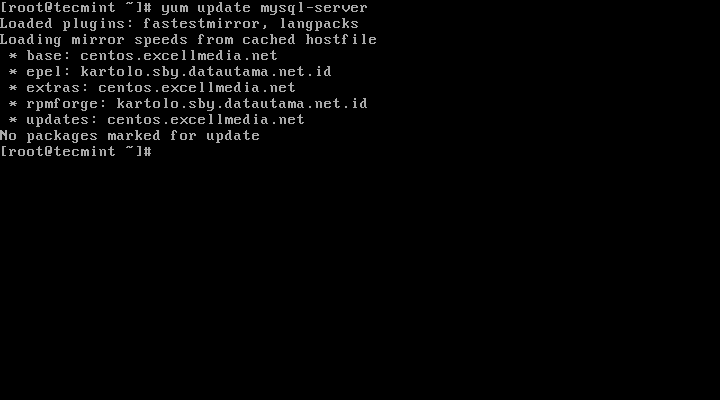
When new updates are available for MySQL, it will auto-install them, if not you will get a message saying NO packages marked for updates.
That’s it, you’ve successfully installed MySQL 8.0 on your system. If you’re having any trouble installing feel free to use our comment section for solutions.


How can I install version 8.0.17 of MySQL server on rhel 7.9?
Thank you so so much.
This explain solve my problem.
Hello,
I have problems to connect to MySQL, I am getting the following error:
@mailmed,
Please follow Step #5 – point 9 carefully, if you are installing MySQL first time, you need to get the password from the /var/log/mysqld.log file as explained in the article…
Thanks for the step by step guide.
one comment: Centos8 comes with MySQL and removal is required before installing the community edition:
we need
Thanks a lot for the great article
Hi,
very nice.
thank you for this perfect tutorial.
Thank you very much! I recently got a VPS for my projects and thought it would be the best solution for me. Turned out I had to update PHP/MySQL as there were older versions running with centos6.. Thank god there are posts like yours to help out noobs like me :)
I just have the securing part to do and I am done.
Awesome. Works like great. It helped me a lot in struggling with RHEL dependency issues. Thanks
BTW you can also mention: In order to install mysql5.7 (older versions) go to https://repo.mysql.com/ and find out for a newer version of mysql5.7 for RHEL6/7 version: i.e.,
ctrl+fand search for “mysql57-community-release-el7-” (or) “mysql57-community-release-el6-” [EL7 or EL6] and use that as wget and follow the same steps mentioned aboveAwesome, Awesome, Awesome, excellent article works like a charm without any errors..
Hi,
I am getting below while starting MySQL, please suggest
Hi,
Everything is fine, but how can i connect this database with workbench. I released port also but its not connecting.
Thanks in advance.
@Chaitanya,
What error you getting while connecting to MySQL database?
Hi Guys!!!
in “mysql_secure_installation” the following is happening…
… Failed! Error: Your password does not satisfy the current policy requirements
do not leave the message “… Failed! Error: Your password does not satisfy the current policy requirements”
some help?
@Eder,
Set the password policy level to lower, take a look at this article – https://stackoverflow.com/questions/43094726/your-password-does-not-satisfy-the-current-policy-requirements
Inadequte instructions for genuine RHEL7.5. mysql 5.7 will not start on reboot.
Hi, Can I install latest mysql on rhel 6/7 offline? My organization doesn’t permit me to use internet on my rhel server.
@Anil,
You can, but you need to download all needed RPM packages of MySQL and then install them using RPM command offline.
Kindly tell me the url to download the rpms. and can I make a local repository with all the downloaded rpms with yum and install it….
@Anil,
You will find all RPM packages at https://rpmfind.net/linux/RPM/, yes you can create a local Yum repository to install offline..
Hello,
I have a Question about to upgrading the already installed MySQL version: 5.5.56-MariaDB to the 5.7 version. I running Webmin control panel, and by the installing on my VPS server, the MySQL server was included in the installation packet.
I have an Issue with backup my system, they run in error when I try to make a whole backup, include my databases, the problem are the follow:
mysqldump: Couldn’t execute ‘show events’: Access denied for user ‘root’@’localhost’ to database ‘performance_schema’ (1044).
I have try many things to go ride of this, but nothing will works. Some people advice me to upgrade the MySQL server to the lasted version, the problem are a know bug in the earlier version.
I read your suggestions, but I m’n not sure, if I do the right thing, on a working system, with a pre installed MySQL version, with the Yum in place upgrade.
Best Regards,
Roger
@Roger,
You can upgrade to MySQL 5.7 from earlier versions, all you need to do is first take the backup of all databases and configurations if any. Then remove the already installed MySQL version from the system, and install new MySQL 5.7 as explained in this article..
Thanks for your support, Ravi!
I will try to fix this update.
Best Regards,
Roger
HELP got error on fresh install
[root@server home]# tail -f /var/log/mysqld.log
2017-11-27T16:50:21.551671Z 0 [ERROR] InnoDB: The Auto-extending innodb_system data file ‘./ibdata1’ is of a different size 640 pages (rounded down to MB) than specified in the .cnf file: initial 768 pages, max 0 (relevant if non-zero) pages!
2017-11-27T16:50:21.551689Z 0 [ERROR] InnoDB: Plugin initialization aborted with error Generic error
2017-11-27T16:50:22.153165Z 0 [ERROR] Plugin ‘InnoDB’ init function returned error.
2017-11-27T16:50:22.153194Z 0 [ERROR] Plugin ‘InnoDB’ registration as a STORAGE ENGINE failed.
2017-11-27T16:50:22.153211Z 0 [ERROR] Failed to initialize plugins.
2017-11-27T16:50:22.153221Z 0 [ERROR] Aborting
2017-11-27T16:50:22.153239Z 0 [Note] Binlog end
2017-11-27T16:50:22.153485Z 0 [Note] /usr/sbin/mysqld: Shutdown complete
Hi,
I have got an old Cenots 5 system running mysql 5.6. I need to install MySQL 5.7 as additional instance on that old Centos. Is there a way to do that please ?
@Adrian,
Yes, you can install additional MySQL by compiling from source to specific directory with different port.
Hi Ravi,
Thanks for your quick reply. Right – that option was in my mind but I thought there would be an easier way …. Anyway – thanks a lot !
I am trying to install MySQL 5.7 over RHEL v7. The sad part is, RHEL came with the pre-installed MariaDB binaries and it is not allowing to install the MySQL. Below is what I’m seeing whenever I try to install:
[root@xxxxxxx mysql_binaries]# yum repolist enabled | grep “mysql.*-community.*”
mysql-connectors-community/x86_64 MySQL Connectors Community 36
mysql-tools-community/x86_64 MySQL Tools Community 47
mysql57-community/x86_64 MySQL 5.7 Community Server 187
[root@xxxxxxx mysql_binaries]#
[root@xxxxxxx mysql_binaries]# yum install mysql-community-server
Loaded plugins: langpacks, product-id, search-disabled-repos, subscription-manager
This system is not registered to Red Hat Subscription Management. You can use subscription-manager to register.
Resolving Dependencies
–> Running transaction check
—> Package mariadb-server.x86_64 1:5.5.52-1.el7 will be obsoleted
–> Processing Dependency: mariadb-server for package: akonadi-mysql-1.9.2-4.el7.x86_64
—> Package mysql-community-server.x86_64 0:5.7.18-1.el7 will be obsoleting
–> Processing Dependency: mysql-community-common(x86-64) = 5.7.18-1.el7 for package: mysql-community-server-5.7.18-1.el7.x86_64
–> Processing Dependency: mysql-community-client(x86-64) >= 5.7.9 for package: mysql-community-server-5.7.18-1.el7.x86_64
–> Running transaction check
—> Package mariadb.x86_64 1:5.5.52-1.el7 will be obsoleted
—> Package mariadb-server.x86_64 1:5.5.52-1.el7 will be obsoleted
–> Processing Dependency: mariadb-server for package: akonadi-mysql-1.9.2-4.el7.x86_64
—> Package mysql-community-client.x86_64 0:5.7.18-1.el7 will be obsoleting
–> Processing Dependency: mysql-community-libs(x86-64) >= 5.7.9 for package: mysql-community-client-5.7.18-1.el7.x86_64
—> Package mysql-community-common.x86_64 0:5.7.18-1.el7 will be installed
–> Running transaction check
—> Package mariadb-libs.x86_64 1:5.5.52-1.el7 will be obsoleted
–> Processing Dependency: libmysqlclient.so.18()(64bit) for package: perl-DBD-MySQL-4.023-5.el7.x86_64
–> Processing Dependency: libmysqlclient.so.18()(64bit) for package: 2:postfix-2.10.1-6.el7.x86_64
–> Processing Dependency: libmysqlclient.so.18()(64bit) for package: 1:net-snmp-5.7.2-24.el7_2.1.x86_64
–> Processing Dependency: libmysqlclient.so.18()(64bit) for package: 1:qt-mysql-4.8.5-13.el7.x86_64
–> Processing Dependency: libmysqlclient.so.18(libmysqlclient_18)(64bit) for package: perl-DBD-MySQL-4.023-5.el7.x86_64
–> Processing Dependency: libmysqlclient.so.18(libmysqlclient_18)(64bit) for package: 2:postfix-2.10.1-6.el7.x86_64
–> Processing Dependency: libmysqlclient.so.18(libmysqlclient_18)(64bit) for package: 1:qt-mysql-4.8.5-13.el7.x86_64
—> Package mariadb-server.x86_64 1:5.5.52-1.el7 will be obsoleted
–> Processing Dependency: mariadb-server for package: akonadi-mysql-1.9.2-4.el7.x86_64
—> Package mysql-community-libs.x86_64 0:5.7.18-1.el7 will be obsoleting
–> Running transaction check
—> Package mariadb-server.x86_64 1:5.5.52-1.el7 will be obsoleted
–> Processing Dependency: mariadb-server for package: akonadi-mysql-1.9.2-4.el7.x86_64
—> Package mysql-community-libs-compat.x86_64 0:5.7.18-1.el7 will be obsoleting
–> Finished Dependency Resolution
Error: Package: akonadi-mysql-1.9.2-4.el7.x86_64 (@anaconda/7.1)
Requires: mariadb-server
Removing: 1:mariadb-server-5.5.52-1.el7.x86_64 (@rhel-7-server-rpms)
mariadb-server = 1:5.5.52-1.el7
Obsoleted By: mysql-community-server-5.7.18-1.el7.x86_64 (mysql57-community)
Not found
You could try using –skip-broken to work around the problem
You could try running: rpm -Va –nofiles –nodigest
[root@xxxxxxx mysql_binaries]# yum update mysql-server
Loaded plugins: langpacks, product-id, search-disabled-repos, subscription-manager
This system is not registered to Red Hat Subscription Management. You can use subscription-manager to register.
No Match for argument: mysql-server
No package mysql-server available.
No packages marked for update
[root@xxxxxxx mysql_binaries]#
How to over-write MairaDB with MySQL5.7 on RHEL 7?
resolved this issue
Thank you Man
Hi,
Are there any compatibility issues with RHEL 7.2 OS for mysql installation?
@Shankar,
No any compatibility issues, you can install MySQL without any issues on RHEL 7.2.
I followed your instructions to install Latest MySQL on my CentOS 7.2 all went well, but now how to login into MySQL server?
I followed your instructions and was able to installed MySQL 5.7 successfully on RHEL 7.2 Server. I tried to restore my backup database from MySQL 5.0.95 and got error messages:
Full database restore:
ERROR 1067 (42000) at line 18172: Invalid default value for ‘modified’
SQL restore:
ERROR 1146 (42S02) at line 72: Table ‘mysql.proc’ doesn’t exist
Are there any other steps to be done before these database restored? I heard the MySQL 5.7 is downward compatible with older version.
Thank you.
@Vincent,
This is due to sql_modes, please check your existing sql_modes using following command.
And delete the sql_mode “NO_ZERO_IN_DATE,NO_ZERO_DATE” to make it work.
This is the default sql_mode in mysql new versions.
Ravi – I modified the my.cnf file under /etc directory like the way you recommended and restart the system again.
Check to see if my.cnf is working:
Restore the backup file again and got this error:
Can you tell what cause of this problem?
@Vincent,
Try to drop that table, then take a dump of database and then try to restore it again, see if its works…For more information about this error can be found here: http://dev.mysql.com/doc/refman/5.7/en/innodb-troubleshooting-datadict.html
Thanks, Ravi! But by dropping the table I will loose all the created User accounts and Passwords. I have more than 100 user accounts with unique passwords set by users. How can I insert or import this table back on to the database?
@Vincent,
I do understand your concerns, but I really don’t have idea why such error message appearing, while restoring database, for importing table back to database, I think you should go through this article here:
https://www.tecmint.com/mysql-backup-and-restore-commands-for-database-administration/
Thanks for this. It was very helpful to me. I followed these instructions installed and secured then discovered that:
Is -9 better? I am on an enterprise RehHat Rhel6 server and not very mysql experienced.
Does not see the community editions repo sees our subscription satellite Server repo.
Maybe this will work
say no updates available does not say “available but not installed”
I had previously downloaded mysql57-community-release-el6-9.noarch.rpm from the oracle support site but was having trouble getting install steps.
Seems that is identical to what you get with:
It was download from here, browser because I had to login to Oracle support with my work support ID to get that download.
I guess I should uninstall that -7 and try the -9?
MY rhel 6 enterprise severs have
@Anne,
To install latest version of MySQL community version run the following commands.
Make sure your RHEL distribution registered to RHN subscription to install package updates, if not enable subscription here: https://www.tecmint.com/enable-redhat-subscription-reposiories-and-updates-for-rhel-7/
I am planning to upgrade Mysql 5.5 to 5.7 in my RHEL machine, I have application running on it after upgrade i can’t able to see the application connecting to application..
@Jaya,
What MySQL error you getting on the application?
No clue what is happening. It can’t find the sock and I can’t start it. I either get that error or MySQL Daemon failed to start
And I can’t find mysql.sock either
@Doug,
Find the mysql.sock location with the help of following command:
Next remove the mysql.sock and restart the service as shown:
nice documented and easily understand, thank you very much
MySQL is a prereq for RTM (IBM product) and I see in the rtm conf it is looking for the /etc/init.d/mysqld. I have the SQL started (THANK YOU for your wonderful guide) and am seeing expected results but am not sure why the /etc/init.d/mysqld is not starting.
Quite helpful
very well documented and easily understandable for beginners, thank you very much for wonderful tutorial
@Vora,
Thanks for finding this article easy and useful for beginners like you..
installed Mysql but resceived error;
[root@miet ~]# service mysqld status
mysqld (pid 327) is running…
[root@miet ~]# mysql -u root -p
Enter password:
Welcome to the MySQL monitor. Commands end with ; or \g.
Your MySQL connection id is 24
Server version: 5.7.13
Copyright (c) 2000, 2015, Oracle and/or its affiliates. All rights reserved.
Oracle is a registered trademark of Oracle Corporation and/or its
affiliates. Other names may be trademarks of their respective
owners.
Type ‘help;’ or ‘\h’ for help. Type ‘\c’ to clear the current input statement.
mysql> show databases;
ERROR 1820 (HY000): Unknown error 1820
How to solve?
@Jamali,
MySQL 5.6 added one strong feature is auto encrypted password creation when mysql first time installed on Linux box and you can find the password in mysql error log file, located at
/var/log/mysqld.log. Once you are connected to mysql using encrypted password you will get such error until unless mysql root password is reset again.mysql> SET PASSWORD = PASSWORD('new_password'); mysql> use mysql; mysql> show databases;[root@miet ~]# SET PASSWORD=PASSWORD(‘mysql’);
-bash: syntax error near unexpected token `(‘
..sorry ,i typed in prompt here is the output
mysql> set PASSWORD=PASSWORD(‘mysql’);
ERROR 1819 (HY000): Unknown error 1819
@Jamali,
I think some issue with your installation, try to re-install MySQL again…
Thanks for the tutorial , I want to install mysql workbench community on fedora 22 . Please you can make a tutorial of that ???
@Israel,
Thanks for requesting article, but it takes some time to produce article for you, why not try official documentation for installing MySQL workbench in Fedora 22?
After completing this tutorial I cannot get my mysqld to start. I am getting this [ERROR] in /var/log/mysqld.log: unknown variable ‘myisam_recover=BACKUP’
I am using centos 6.6. What do I do?
@Jeremy,
I think the issue with wrong Backtick
`placed at the beginning and end of the variable‘myisam_recover=BACKUP’, try to use following variable with correct apostrophe.That was just the error that was printed in the log file.. that wasn’t in the /etc/my.cnf…
Many thanks for the tutorial
Hi,
I am newbie to centos 7 and mysql server.
I want to setup Multiple mysql server instances in same machine with mysql 5.7.10 on centos 7.
The binary installation or Yum installation setup guide.
Can you help me with step by step guide.
Thanks in advance.
@Raja,
There isn’t any myth that newbies can’t setup complex things, everything is possible, just install first MySQL instance using yum command as shown in this guide and the second MySQL instance can be compiled and installed from source to a specific directory and use two different ports and configuration and that database path should be different. that’s it
Hi , I had setup the mysql community server 5.7.10 on centos 7 . But now i want to configure multiple mysql server instances on a centos 7 for mysqlfabric test. So can you help me step by step for running different port and multiple instances on centos 7. Thanks in advance.
Very nice article, it helps me lot. I have only one little suggestion:
Please, add comment: Alan Labastida December 15, 2015 at 11:12 pm
“MySQL v 5.7 or higher generates a temporary random password after installation and stored that in mysql error log file, located at /var/log/mysqld.log
for an installation by the MySQL Yum repository on CentOS 7.
use below command to see the password:
shell > sudo grep ‘temporary password’ /var/log/mysqld.log”
for step 5 part 9.
Something like: Enter New Root Password means your temporary password from file /var/log/mysqld.log
Thank you.
@Pavol,
Thanks for the suggestion, we’ve included the steps as suggested in this article…
Dear Ravi Saive,
Currently I am using centos 6.7 32bit, I have already mysql v 5.5. and aI want to upgrade to mysql 5.7.
do you have other article to do that?
is this article only for centos 64bit?
@Danang,
I think you can safely upgrade from MySQL 5.5 to MySQL 5.7 using instructions provided in this article, did you tried it?
“MySQL v 5.7 or higher generates a temporary random password after installation and stored that in mysql error log file, located at /var/log/mysqld.log
for an installation by the MySQL Yum repository on CentOS 7.
use below command to see the password:
shell > sudo grep ‘temporary password’ /var/log/mysqld.log”
-sameershah29 https://www.digitalocean.com/community/users/sameershah29
Went through with the install after removing MySQL 5.5 and the sevice doesn’t seem to start.
I get the follwing. Any chance you might know why ?
——————————————
[root@server ~]# yum repolist enabled | grep “mysql.*-community.*”
mysql-connectors-community/x86_64 MySQL Connectors Community 17
mysql-tools-community/x86_64 MySQL Tools Community 27
mysql57-community/x86_64 MySQL 5.7 Community Server 20
[root@server ~]# service mysqld status
Redirecting to /bin/systemctl status mysqld.service
mysqld.service – MySQL Server
Loaded: loaded (/usr/lib/systemd/system/mysqld.service; enabled)
Active: failed (Result: start-limit) since Thu 2015-11-26 01:40:29 CET; 4min 27s ago
Process: 2708 ExecStart=/usr/sbin/mysqld –daemonize $MYSQLD_OPTS (code=exited, status=1/FAILURE)
Process: 2693 ExecStartPre=/usr/bin/mysqld_pre_systemd (code=exited, status=0/SUCCESS)
Nov 26 01:40:29 server systemd[1]: mysqld.service: control proc…1
Nov 26 01:40:29 server systemd[1]: Failed to start MySQL Server.
Nov 26 01:40:29 server systemd[1]: Unit mysqld.service entered ….
Nov 26 01:40:29 server systemd[1]: mysqld.service holdoff time ….
Nov 26 01:40:29 server systemd[1]: Stopping MySQL Server…
Nov 26 01:40:29 server systemd[1]: Starting MySQL Server…
Nov 26 01:40:29 server systemd[1]: mysqld.service start request….
Nov 26 01:40:29 server systemd[1]: Failed to start MySQL Server.
Nov 26 01:40:29 server systemd[1]: Unit mysqld.service entered ….
Hint: Some lines were ellipsized, use -l to show in full.
@Yannis,
It seems you’ve not properly installed MySQL Server Community package, try to install it using following command.
And then start the MySQL service..
Mr. Ravi Saive,
Thank you very much for writing such as precise and simple-to-understand procedure for installing MySQL 5.7.9. This is a great help for me.
Thanks
Milind
@Milind,
Thanks for the kind words, and I am happy that you found this article helpful..
For people who get stck on step 5 use this command to get the temp password:
sudo grep ‘temporary password’ /var/log/mysqld.log
@Syke,
Thanks for the tip, let me give a try and see whether it gives temporary password or not..will update you
Thanks very much Syke. That has worked. I found that temporary password in mysqld.log and used it to log in for the first time.
So basically the latest version of MySQL creates a default temporary password and we are supposed to find it skimming the log file ? I got to tell you, this is one of the most ridiculous thing I saw in a long time! Sounds like Oracle wants to make it as harder as possible! No wonder people are moving towards MariaDB.
Thanks. Installed MySQL successfully. Next step – installing Adminer following the instructions at https://www.rosehosting.com/blog/install-adminer-on-a-centos-vps/. It is a database management tool for admins.
I had a problem with Step 5: Securing the MySQL Installation, When I entered New Root Password for root user: “Error: Access denied for user ‘root’@’localhost’ (using password: YES)”
@Einton,
Have you set correct root password? Please try to run MySQL secure command again and try to enter new password at first it ask and use that password for login and see.
I do not know how to set password, I do step by step like your guide, I did not see enter password step. Could you tell me that step!
@Einton,
After running mysql_secure command what you will see? did it asked you to Enter your new root password? If yes, just set here your new root password and use this password for mysql login. If you still not able to set it correctly, do send me your server details at [email protected], I will do it for your..thanks
Error: Access denied for user ‘root’@’localhost’ (using password: YES)
It showed when I entered pass for root user in step 5
Dear Mr Einton and Mr Ravi Saive!
I have just installed mysql server follow this introduction and have same problem.(I have just do step 5 and not change passwod)
Could you show me more detail for solving it.
Thanks so much
Nguyen Dang Hieu
@Nguyen,
When you ran mysql_secure_installation command at first it asks you to Enter password for user root, use this password for your MySQL…
I followed the instructions step-by-step and I am encountering the exact same problem i.e. Access denied for user ‘root’@’localhost’ (using password: YES).
The funny part is, I tried to log in mysql as root right after installation (at this point the root user does not even have password set, so should be able to log in without using password) and yet I got this error.
So basically, I can install MySQL 5.7.9 on Centos7, start the service, but can not log in at all.
Any idea what is happening ?
And as I understand, when the secure_mysql_installation asks the first password, that is supposed to be the current password (which does not even exists at this point if I am trying to secure immediately after first install), so I should be able to just press Enter key (without typing anything) and get going, right ?
Dear Mr Ravi!
I tried to change root password of mysql follow:
1. Stop mysqld service
# service mysqld stop
2. start mysql in safe mode
mysqld_safe –skip-grant-tables &
3. login to mysql , user root, passwd is blank.
4. Change password of user root
mysql> Update mysql.user set authentication_string=PASSWORD(‘new password’)
-> where user=’root’;
mysql> Update mysql.user set password_expired=’N’
-> where user=’root’;
mysql> FLUSH PRIVILEGES;
5. Restart mysql in normal mode
6 Run mysql_secure_installation command again,–> it’s ok
Above this is my experience
Thanks and best regards
Nguyen Dang Hieu
@Nguyen,
Thanks for the tip, hope it will helpful to other users, who facing similar problem, also I will update the article with correct instructions in setting up MySQL password without any errors.
Thanks so much, I’m done!!!
@Einton,
I am glad that you finally did your self…good luck for further configuration…:) keep visiting.
Hi,
thank you for your guide, please change the first link in “For RHEL/CentOS 6-5” section to:
http://dl.fedoraproject.org/pub/epel/6/x86_64/epel-release-6-8.noarch.rpm
@Behnam,
Thanks for the updated link, but the article is little old, needs to be updated with latest Rhel/CentOS 7 and Fedora 19-20..Once we will update the article will include the updated epel link…thanks again..
how to put password in mysql server? so that only root can acess it..thanks hoping for quick response..
You mean set password for MySQL server? If yes, read the following article.
Hi Mr. Ravi,
I did a benchmark on two linux servers on amazon:
Setup-1:
OS: Amazon Linux AMI 2013.03.1
MySql: 5.5.31 MySQL Community Server (GPL)
Installed mysql simply by doing: yum install mysql55
Setup-2:
OS: Centos 6.3
uname -a
Linux 2.6.32-279.2.1.el6.centos.plus.x86_64 x86_64 GNU/Linux
Mysql: default version 5.1
Upgraded to 5.5.32 MySQL Community Server (GPL) by Remi
In both setups I loaded two Mysql tables containing three int indexed fields with 55 Million records (MyIsam). And I ran a query that joins two tables and finds common rows.
In Setup-1:
First time run of the query took 200 sec.
Second time run of same query took 3 sec.
In Setup-2:
First time run of the query took 2200 sec.
Second time run of same query took 2200 sec.
Tried more than 3 times and still taking 2200 sec to run.
Note: Both setups have same hardware and Mysql settings.
Now the question is “Why the performance is poor in remi update?”
In First Setup, you’ve installed packages directly using default CentOS Base repo which is much faster, because it uses own CentOS servers to download. In Second Setup scenario, you using third party repository called Remi which of course slow, because its fetches packages from their servers, might they not much fast as CentOS does.
Pls suggest how to install mysql on RHEL
Follow this article, to install MySQL in Red Hat.
Use:
yum –enablerepo=remi,remi-test install mysql55 mysql55-server mysql55-*
Thank you
Hi there
Thank you for the tutorial.
However I have been having issues with following your steps and I am sure there is some thing missing on my OS.
However I am trying to install it on Centos 5.8 x86_64 but this is what I get:
[root@localhost ~]# yum –enablerepo=remi list mysql mysql-server
Loaded plugins: fastestmirror, security
Loading mirror speeds from cached hostfile
* remi: remi-mirror.dedipower.com
* rpmforge: archive.cs.uu.nl
Available Packages
mysql.x86_64 5.5.28-3.el5.remi remi
mysql-server.x86_64 5.5.28-3.el5.remi remi
[root@localhost ~]# yum –enablerepo=remi install mysql mysql-server
Loaded plugins: fastestmirror, security
Loading mirror speeds from cached hostfile
* remi: remi-mirror.dedipower.com
* rpmforge: archive.cs.uu.nl
Setting up Install Process
Resolving Dependencies
–> Running transaction check
—> Package mysql.x86_64 0:5.5.28-3.el5.remi set to be updated
–> Processing Dependency: mysql-libs = 5.5.28-3.el5.remi for package: mysql
—> Package mysql-server.x86_64 0:5.5.28-3.el5.remi set to be updated
–> Processing Dependency: perl-DBI for package: mysql-server
–> Processing Dependency: perl-DBD-MySQL for package: mysql-server
–> Processing Dependency: perl(DBI) for package: mysql-server
–> Running transaction check
—> Package mysql-libs.x86_64 0:5.5.28-3.el5.remi set to be updated
—> Package mysql-server.x86_64 0:5.5.28-3.el5.remi set to be updated
–> Processing Dependency: perl-DBI for package: mysql-server
–> Processing Dependency: perl-DBD-MySQL for package: mysql-server
–> Processing Dependency: perl(DBI) for package: mysql-server
–> Finished Dependency Resolution
mysql-server-5.5.28-3.el5.remi.x86_64 from remi has depsolving problems
–> Missing Dependency: perl(DBI) is needed by package mysql-server-5.5.28-3.el5.remi.x86_64 (remi)
mysql-server-5.5.28-3.el5.remi.x86_64 from remi has depsolving problems
–> Missing Dependency: perl-DBD-MySQL is needed by package mysql-server-5.5.28-3.el5.remi.x86_64 (remi)
mysql-server-5.5.28-3.el5.remi.x86_64 from remi has depsolving problems
–> Missing Dependency: perl-DBI is needed by package mysql-server-5.5.28-3.el5.remi.x86_64 (remi)
Error: Missing Dependency: perl(DBI) is needed by package mysql-server-5.5.28-3.el5.remi.x86_64 (remi)
Error: Missing Dependency: perl-DBI is needed by package mysql-server-5.5.28-3.el5.remi.x86_64 (remi)
Error: Missing Dependency: perl-DBD-MySQL is needed by package mysql-server-5.5.28-3.el5.remi.x86_64 (remi)
You could try using –skip-broken to work around the problem
You could try running: package-cleanup –problems
package-cleanup –dupes
rpm -Va –nofiles –nodigest
<<<<<<<<<<<<<<<<<<<<<<<<<<<<<<<<<<<<<<<<<<<<<<<<<<<<<<<<
Could you please help me as I am in the middle of setting up my server but this is being a big obstacle in front of me.
Thank you.
@hammam,
The following packages having some issue, please remove them first, and then try the command again.
I hope it will work, if you still getting errors, please post here
@Ravi Saive,
I am also got the same error message. When i erase and reinstall perl-DBD-MySQL (using yum install perl-DBD-MySQL command) i got
-> yum –disablerepo=\* –enablerepo=remi install mysql mysql-server
Loaded plugins: dellsysid, fastestmirror
Loading mirror speeds from cached hostfile
* remi: remi-mirror.dedipower.com
Setting up Install Process
Resolving Dependencies
–> Running transaction check
—> Package mysql.x86_64 0:5.5.30-1.el5.remi set to be updated
–> Processing Dependency: mysql-libs = 5.5.30-1.el5.remi for package: mysql
—> Package mysql-server.x86_64 0:5.5.30-1.el5.remi set to be updated
–> Running transaction check
—> Package mysql-libs.x86_64 0:5.5.30-1.el5.remi set to be updated
–> Processing Conflict: mysql-server conflicts MySQL-server
–> Processing Conflict: mysql conflicts MySQL
–> Finished Dependency Resolution
mysql-5.5.30-1.el5.remi.x86_64 from remi has depsolving problems
–> mysql conflicts with MySQL-server-community
mysql-server-5.5.30-1.el5.remi.x86_64 from remi has depsolving problems
–> mysql-server conflicts with MySQL-server-community
Error: mysql conflicts with MySQL-server-community
Error: mysql-server conflicts with MySQL-server-community
You could try using –skip-broken to work around the problem
You could try running: package-cleanup –problems
package-cleanup –dupes
rpm -Va –nofiles –nodigest
error message..
Please remove the “MySQL-server-community” package with yum and try to run the command again. Let me know the output of the command after removing.
Is there any other way other than removal of “MySQL-server-community” package. Because i am doing migration process of MySQL from 5.0 to 5.5. Please guide me other than uninstallation
Alternatively, you can use “rpm -ev packagename” to uninstall packages. If you get dependency errors, use –nodeps option.